


Introduction#
When you want a crochet project that feels instantly giftable, a unicorn plush is one of the best choices you can make. It’s cheerful, timeless, and easy to personalize—plus it works for so many occasions: birthdays, Valentine’s Day, baby showers, nursery decor, “get well soon” surprises, or just a cozy handmade companion for your own shelf.
Explore more beginner amigurumi crochet patterns in our pattern library.
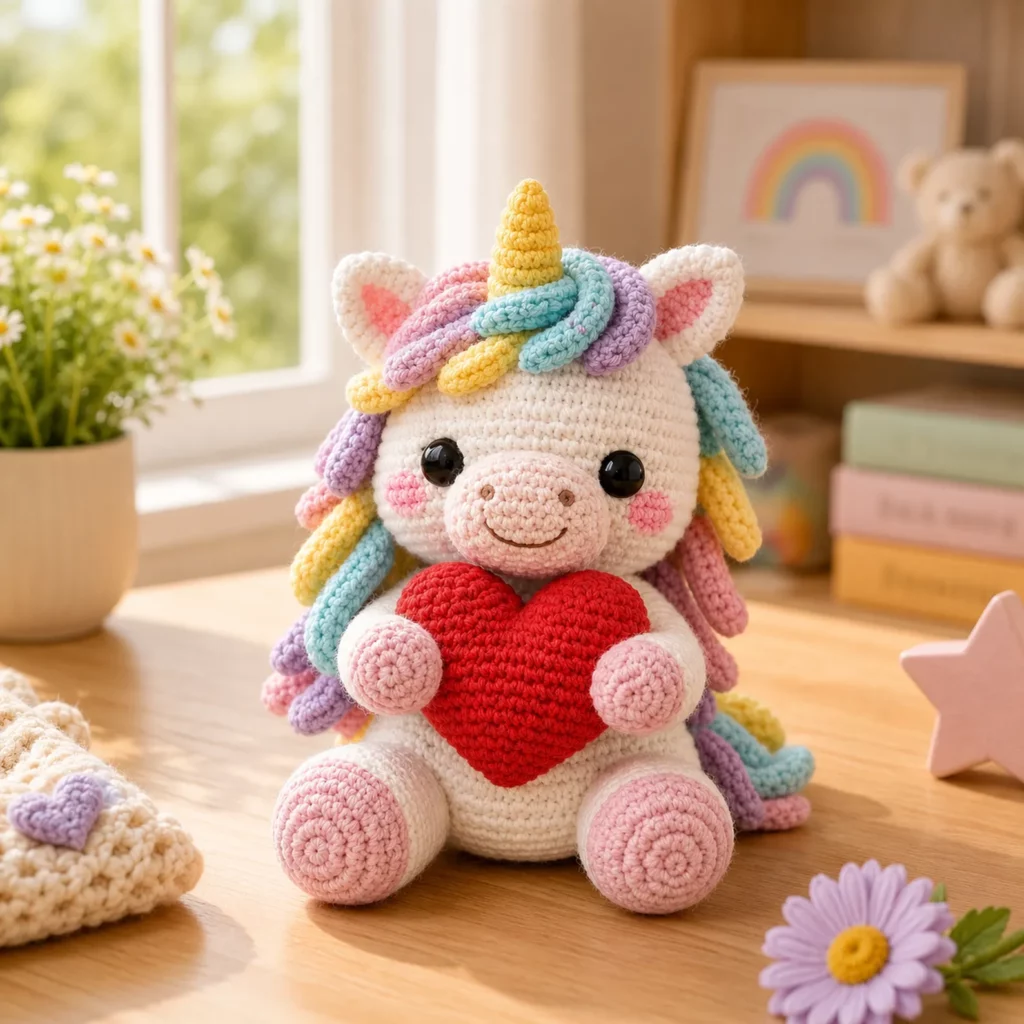
This crochet pattern creates a chubby, seated unicorn with a sweet face, pastel mane “tendrils,” a little horn, and the cutest detail of all: a bright heart that it hugs in its arms. The construction stays beginner-friendly because the body is built from simple amigurumi shapes, and the fancy-looking hair is made from easy crochet curls you can stitch on wherever you like.
Below you’ll find a complete crochet tutorial style guide, including stitch explanations, detailed steps, assembly help, and finishing tips to make your unicorn look polished and professional.
Detailed Description of the Crochet Pattern#
This unicorn amigurumi is a seated plush with rounded proportions and a soft, minimal face. The overall look is smooth single crochet for the body, with textured add-ons for personality.
You’ll crochet:
Head and body: worked as one piece or as two pieces (both methods included) for a smooth, rounded silhouette
Muzzle: a small oval “snout” piece sewn to the front of the head to give the unicorn a gentle, baby-like face
Ears: small ears with optional inner-ear contrast
Horn: a short cone that sits centered on top
Mane: multiple pastel spiral curls attached around the crown and sides of the head
Arms and legs: small rounded limbs positioned for a seated pose
Heart: a plush heart that sits between the arms, making the unicorn look like it’s hugging it
Optional cheeks: blush or embroidered cheek accents for extra sweetness
The pattern is easy to scale by changing yarn weight and hook size. The same stitch counts can produce a small desk unicorn in DK yarn or a larger plush in worsted yarn.
Skill Level Explanation#
Skill Level: Confident Beginner
This easy crochet pattern is approachable if you know:
Magic ring (MR) or alternative circle start
Single crochet (sc)
Increase (inc) and decrease (dec)
Working in continuous rounds
Basic sewing/assembly
You’ll also practice:
Invisible decrease (recommended for a smooth finish)
Clean color changes (for pastel details)
Attaching curls evenly for a balanced mane
Simple shaping with stuffing so the face looks symmetrical
If you’ve completed one small amigurumi before, this will feel like a fun step up without being overwhelming.
Materials Needed#
Yarn
Use a smooth yarn for the body so the stitches are neat and the face looks clean.
Recommended weights:
DK (Category 3) for a smaller, delicate plush
Worsted (Category 4) for a fuller, classic plush size
Suggested colors:
Main body: white or cream
Muzzle: pale pink or beige (optional—white also works)
Horn: yellow or gold
Mane: pastel mix (pink, lavender, baby blue, pale yellow)
Hooves (optional): pale pink or matching pastel
Heart: bright red, hot pink, or any color you love
Yarn tips:
Cotton gives the crispest stitch definition and a very “heirloom” look
Acrylic is soft, squishy, and washable—great for gifts
Keep yarn weights consistent across the plush so pieces fit well
Hook
Choose a hook smaller than the yarn label suggests so stuffing won’t show.
DK: 2.75–3.5 mm
Worsted: 3.25–4.0 mm
If you see gaps, go down one hook size.
Notions
Stitch marker
Yarn needle
Scissors
Fiberfill stuffing
Safety eyes (10–14 mm depending on size) or embroidery floss for baby-safe eyes
Embroidery floss or thin yarn for mouth/nose detail
Optional: blush or pastel chalk for cheeks
Safety Note
If the unicorn is for a baby/toddler, embroider the eyes instead of using safety eyes. Sew all pieces securely and avoid glued embellishments.
Stitches & Techniques Explained#
Common Abbreviations
MR = magic ring
sc = single crochet
inc = increase (2 sc in same stitch)
dec = decrease (sc2tog)
inv dec = invisible decrease
sl st = slip stitch
ch = chain
BLO = back loop only
FLO = front loop only
( ) = repeat
[ ] = stitch count
Invisible Decrease (inv dec)
Insert hook into the front loop of the next stitch, then into the front loop of the following stitch, yarn over, pull through, yarn over and sc. This makes decreases much less noticeable on the finished plush.
Spiral Curls for Mane
A simple curl is made by chaining, then working multiple stitches into each chain. This forces the strip to coil into a spiral, creating the bouncy “tendril” look.
Clean Sewing for Amigurumi
Use long tails for sewing. Stitch through the outer loops of the pieces and take small, even stitches. Pull snugly, but not so tight that the fabric puckers.
Step-by-Step Instructions#
Finished Size
With worsted yarn and a 3.75 mm hook: approximately 8–11 inches (20–28 cm) seated, depending on stuffing and limb placement
With DK yarn and a 3.0 mm hook: approximately 6–9 inches (15–23 cm) seated
Notes Before You Start
Work in continuous rounds unless stated
Use a stitch marker in the first stitch of each round
Stuff firmly and evenly for a smooth shape
Read through the whole pattern once to plan colors for mane and heart
Color Key (Optional)
A = main body (white/cream)
B = muzzle (light pink/beige)
C = horn (yellow)
M = mane colors (pastels)
H = heart (red/pink)
P = hoof accent (optional)
Head and Body (One-Piece Method, Color A)
This method gives a seamless look.
Round 1: 6 sc in MR [6]
Round 2: inc around [12]
Round 3: (sc, inc) around [18]
Round 4: (2 sc, inc) around [24]
Round 5: (3 sc, inc) around [30]
Round 6: (4 sc, inc) around [36]
Round 7: (5 sc, inc) around [42]
Round 8: (6 sc, inc) around [48]
Rounds 9–16: sc around [48]
Place safety eyes between Rounds 12–13, about 8–9 stitches apart. For a cute look, keep them slightly low on the head.
Begin shaping down slightly (under the head):
Round 17: (6 sc, dec) around [42]
Round 18: (5 sc, dec) around [36]
Round 19: (4 sc, dec) around [30]
Build the body belly (widen again):
Round 20: (4 sc, inc) around [36]
Round 21: (5 sc, inc) around [42]
Round 22: (6 sc, inc) around [48]
Rounds 23–28: sc around [48]
Start stuffing now. Focus on rounding the head first, then the upper body.
Shape the base:
Round 29: (6 sc, dec) around [42]
Round 30: sc around [42]
Round 31: (5 sc, dec) around [36]
Round 32: sc around [36]
Round 33: (4 sc, dec) around [30]
Round 34: (3 sc, dec) around [24]
Round 35: (2 sc, dec) around [18]
Round 36: (sc, dec) around [12]
Stuff firmly, especially the base so it sits.
Round 37: dec around [6]
Fasten off and close.
Muzzle (B or A)
Round 1: 6 sc in MR [6]
Round 2: inc around [12]
Round 3: (sc, inc) around [18]
Rounds 4–5: sc around [18]
Round 6: (sc, dec) around [12]
Round 7: sc around [12]
Fasten off leaving a long tail.
Lightly stuff so it’s plush but not stretched. Sew centered below the eyes.
Embroider nostrils (optional): 2 tiny stitches on the muzzle.
Embroider a small smile: a gentle curved line below the muzzle.
Ears (Make 2)
Outer ear (A):
Round 1: 6 sc in MR [6]
Round 2: (sc, inc) around [9]
Round 3: sc around [9]
Round 4: (2 sc, inc) around [12]
Round 5: sc around [12]
Flatten and sc across the opening to close (about 6 sc). Fasten off with tail.
Optional inner ear panel (pink felt or crocheted piece, not recommended for baby gifts if using felt):
Ch 5, sc in 2nd ch from hook and across (4 sc)
Rows 2–4: sc across (4 sc)
Fasten off and sew onto ear front.
Sew ears to the head, slightly angled outward.
Horn (C)
Round 1: 4 sc in MR [4]
Round 2: (sc, inc) around [6]
Round 3: sc around [6]
Round 4: (2 sc, inc) around [8]
Round 5: sc around [8]
Round 6: (3 sc, inc) around [10]
Round 7: sc around [10]
Round 8: (4 sc, inc) around [12]
Round 9: sc around [12]
Fasten off leaving a tail.
Lightly stuff the base only. Sew centered on top of head between the ears.
Mane Curls (Make 10–18 in Pastels)
These curls create that bouncy unicorn hair look.
Curl Pattern (choose lengths):
Small curl: ch 18
Medium curl: ch 24
Long curl: ch 30
Work 2 sc into the 2nd chain from hook and in each chain across. The strip will naturally spiral into a curl. Fasten off leaving a tail.
Make a mix of curl lengths and colors for a fuller mane. Sew them around the horn and down the sides of the head. Place a few behind the ears for extra volume.
Arms (Make 2)
With A (optional change to P at the tip for “hoof”):
Round 1: 6 sc in MR [6]
Round 2: (sc, inc) around [9]
Rounds 3–7: sc around [9]
Lightly stuff the lower half. Flatten and sc across to close (about 4–5 sc). Fasten off with tail.
Legs (Make 2)
With A (optional change to P for hooves):
Round 1: 6 sc in MR [6]
Round 2: inc around [12]
Round 3: (sc, inc) around [18]
Rounds 4–7: sc around [18]
Round 8: sc BLO around [18] (creates a little edge)
Rounds 9–10: sc around [18]
Stuff firmly. Flatten and close with sc across (about 8–9 sc). Fasten off with tail.
Heart (H)
This heart is made from two “bumps” joined together, then shaped down.
Make 2 top bumps:
Round 1: 6 sc in MR [6]
Round 2: inc around [12]
Round 3: (sc, inc) around [18]
Rounds 4–5: sc around [18]
Fasten off first bump. Do not fasten off second bump.
Join bumps:
With second bump on hook, ch 2 and join to first bump with a sc.
Now work around both bumps and the chains connecting them.
Round 6: sc around all stitches, placing 2 sc into each of the ch-2 bridges (one on each side) to avoid holes. Aim for about [40–42] stitches total. Exact count can vary depending on how you join—what matters is even spacing.
Shape the heart:
Round 7: sc around
Round 8: (5 sc, dec) around
Round 9: sc around
Round 10: (4 sc, dec) around
Round 11: (3 sc, dec) around
Start stuffing firmly, shaping the point.
Round 12: (2 sc, dec) around
Round 13: (sc, dec) around
Round 14: dec around
Fasten off and close.
If your heart feels too tall, reduce one plain sc round. If it feels too flat, add one extra sc round before the shaping decreases.
Assembly
Sew muzzle to face first so you can center the expression.
Sew horn to top center of head.
Attach mane curls around horn and down both sides, balancing colors.
Sew ears slightly behind the curl line so the hair looks like it’s coming forward.
Attach legs to the lower front of the body so the unicorn sits with legs visible.
Attach arms to the front sides of the body, angled inward.
Position heart between arms, then sew the arms to the heart with a few stitches so it looks “hugged.”
Add cheeks (optional) and final embroidery details.
Common Mistakes and How to Avoid Them#
The face looks uneven
Pin the muzzle first and check from multiple angles
Place eyes before closing the head and measure spacing carefully
Embroider the smile after stuffing so it matches the final shape
Stuffing shows through stitches
Use a smaller hook
Keep tension firm
Stuff gradually and avoid overstuffing small parts like the muzzle
Mane looks messy or unbalanced
Make curls in a mix of lengths
Attach the top row first (around the horn), then fill sides
Repeat colors evenly rather than clustering one color on one side
The unicorn won’t sit nicely
Stuff the base extra firmly
Sew legs slightly forward
If needed, add a small sealed pouch of pellets or rice inside the bottom (not loose) for weight
Heart has holes at the join
Make sure you work extra stitches into the chain bridges
Use tight stitches when joining the two bumps
Weave the tail through the join area to close any small gaps
Expert Tips for Better Results#
Use invisible decreases on the head and body for the smoothest finish
Weave in ends as you go, especially on mane curls (they add up fast)
To make the heart look crisp, stuff the top bumps firmly and shape the point with your fingers before closing
For a “kawaii” look, place eyes slightly lower and wider apart, and keep the smile small
If you want the horn to stand straighter, stuff only the base lightly and stitch around the bottom edge twice when sewing it on
Variations and Customization Ideas#
Pastel Valentine unicorn: use a hot pink heart and softer pastel mane
Rainbow mane: create curls in every color and add a second row down the back of the head
Mini keychain unicorn: use DK yarn and reduce curl lengths (ch 12–18), then add a loop at the top
Sleepy unicorn: embroider closed eyes with curved lashes instead of safety eyes
Sparkly horn: use metallic yarn or add a strand of glitter thread to the horn
Different holding item: swap the heart for a small star, tiny flower, or little donut
Add a tail: make 6–10 curls and sew to the back lower body
Benefits of This Crochet Project#
This crochet pattern has a high “cute payoff” without complicated techniques
The heart accessory makes it perfect for gifting and seasonal themes
It’s easy to customize colors, mane style, and facial expression
Works well as a stash-buster for pastel yarn scraps
Builds confidence with amigurumi assembly and placement
Creates a plush that looks polished enough for markets or handmade shops
Internal Linking Suggestions#
How to Crochet a Magic Ring for Amigurumi
Invisible Decrease Tutorial (Smooth Amigurumi Shaping)
How to Place Safety Eyes for the Cutest Amigurumi Face
Beginner Guide to Stuffing Amigurumi (No Lumps!)
Easy Crochet Heart Pattern Variations
How to Make Crochet Curls and Spirals (Hair for Dolls and Animals)
Best Yarn for Amigurumi: Cotton vs Acrylic vs Plush Yarn
FAQ#
Is this unicorn crochet pattern suitable for beginners?
Yes. This is an easy crochet pattern if you’re comfortable with single crochet, increases, and decreases. The mane looks fancy, but it’s made from simple curls.
What yarn works best for this project?
A smooth DK or worsted yarn is ideal because it shows the stitches clearly and keeps the face neat. Acrylic is great for softness, and cotton is great for crisp definition.
What size safety eyes should I use?
For worsted yarn, 10–14 mm usually looks best. For DK yarn, 8–12 mm works well. If you want a more “baby-faced” look, go slightly larger.
Can I make it baby-safe?
Yes. Embroider the eyes, keep the smile embroidered, and sew all pieces firmly. Avoid hard embellishments and do not use loose weights inside unless fully sealed and securely enclosed.
How do I keep the mane from looking uneven?
Make curls in different lengths and distribute colors evenly on both sides. Attach the top curls first around the horn, then fill in the sides.
Why does my heart look lopsided?
This usually happens from uneven join stitches or stuffing. Add a couple stitches into the chain bridge areas and stuff both top bumps evenly before shaping the point.
Can I attach the heart so it’s removable?
You can tack it lightly with a few stitches or use small hidden loops and thread it in place, but for toys, sewing it on securely is safest.
Conclusion#
A unicorn that hugs a heart is the kind of crochet project that instantly feels special. The simple amigurumi shaping keeps it beginner-friendly, while the pastel mane and bold heart detail make it look like a premium, gift-ready plush. Once you make one, it’s hard not to imagine a whole herd in different colors and themes.
If you tell me your yarn weight (DK or worsted) and your hook size, I can recommend the best eye size and help you adjust the curl lengths so your unicorn’s mane looks perfectly proportional to your finished plush.


