Introduction#
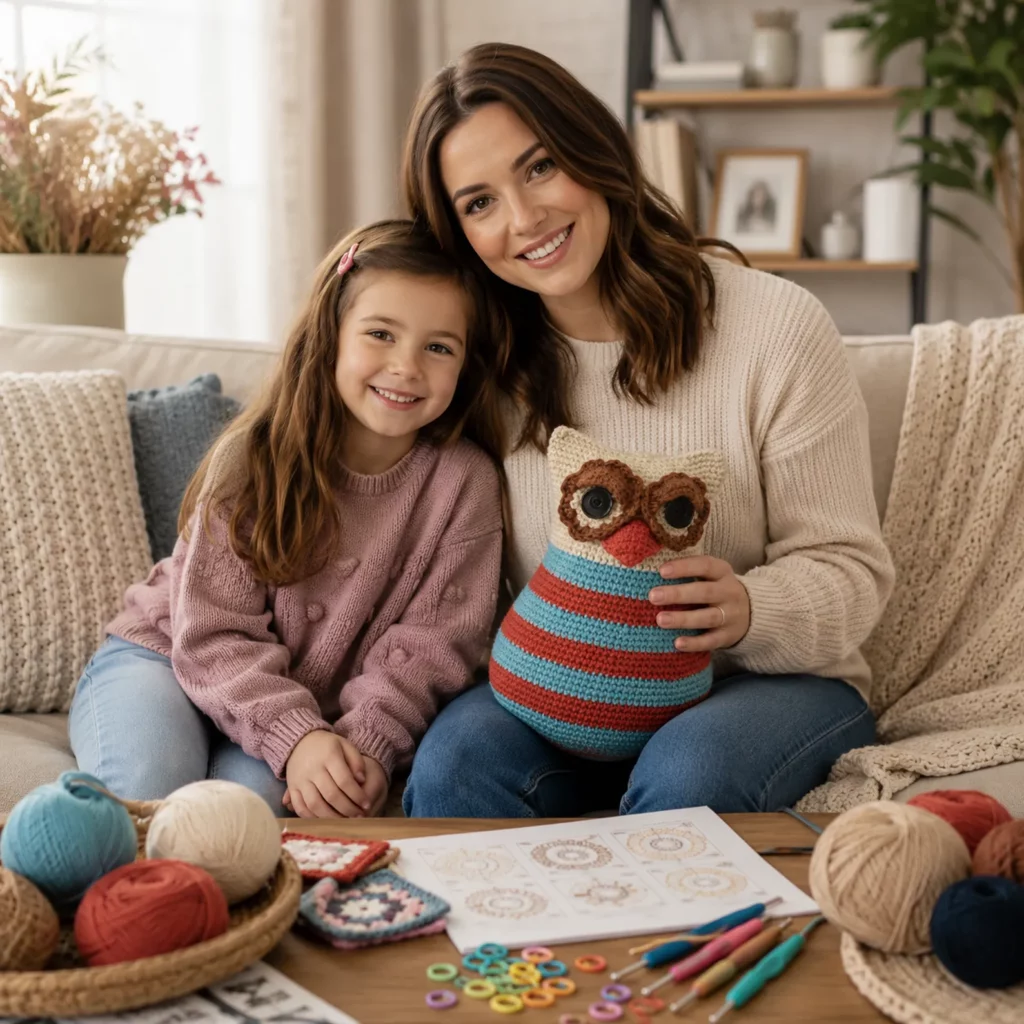
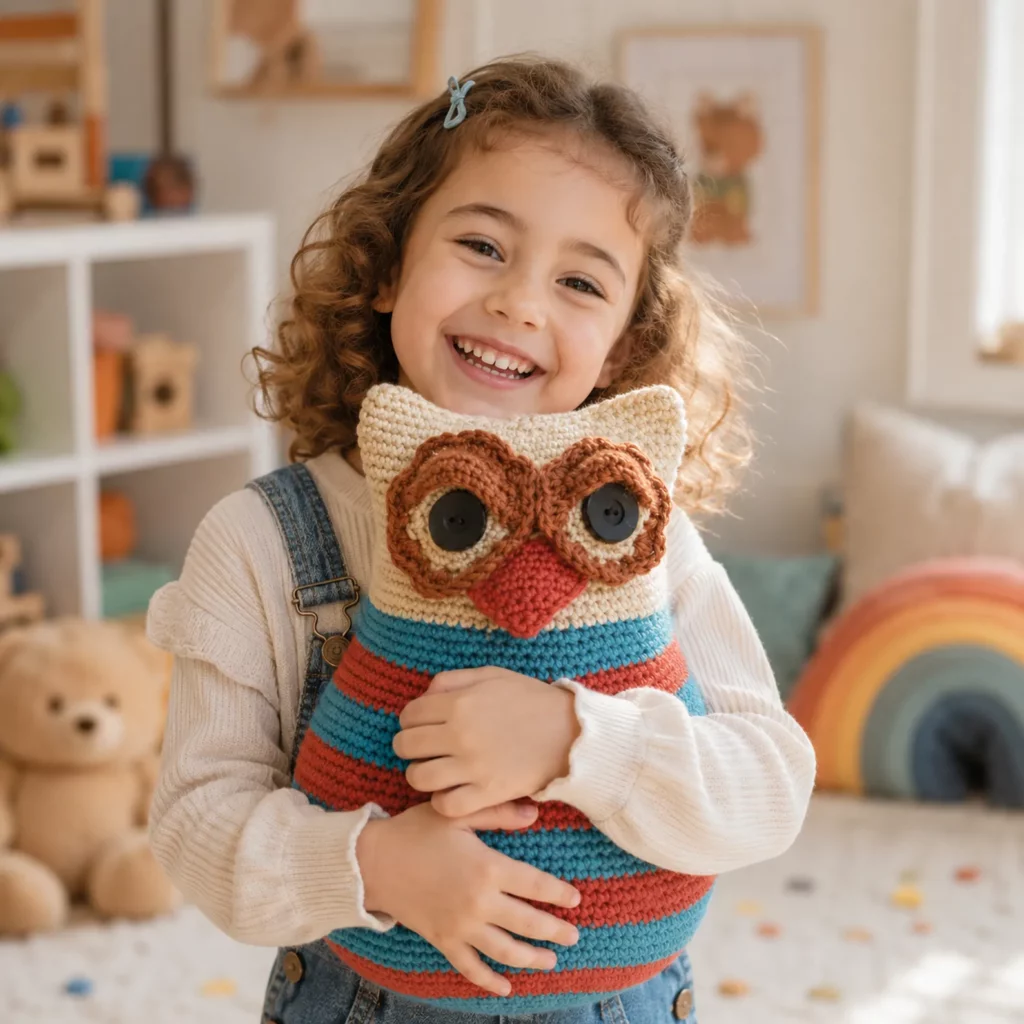
Owls have long been a favorite subject in crochet because of their expressive eyes, rounded bodies, and endless opportunities for creative color combinations. This adorable crochet owl plush combines simple shaping with charming details to create a decorative piece that is both playful and timeless.
Explore more intermediate amigurumi crochet patterns in our pattern library.
Featuring a soft striped body, oversized textured eyes, pointed ears, and a cute triangular beak, this owl instantly becomes the centerpiece of any nursery, playroom, bookshelf, or cozy reading corner. Whether displayed as home décor or gifted to a child, its friendly appearance brings warmth and personality to any space.
If you’re looking for a crochet pattern, free crochet pattern, easy crochet pattern, crochet tutorial, DIY crochet, or crochet for beginners, this owl project offers an enjoyable way to practice amigurumi techniques while creating a beautiful handmade keepsake.

Detailed Description of the Crochet Pattern#
This crochet owl features a classic rounded body worked continuously from the base upward using single crochet stitches. The smooth shaping creates a soft, plush silhouette that stands upright without complicated construction.
Alternating colorful stripes wrap around the body, giving the owl a cheerful and modern appearance. The head flows naturally from the body, while two pointed ear corners are formed during the finishing rounds to create the recognizable owl shape.
The standout feature is the oversized layered eyes. Large crocheted eye surrounds frame oversized button-style eyes, giving the owl a whimsical personality full of charm and expression. A textured triangular beak is positioned between the eyes, completing the friendly face.
The finished owl is generously stuffed to create a sturdy decorative plush that maintains its shape over time. Its simple construction makes it approachable while still offering plenty of visual appeal.
Skill Level#
This project is suitable for advanced beginners and intermediate crocheters.
Skills practiced include:
- Working in continuous rounds
- Magic ring technique
- Single crochet
- Increasing and decreasing
- Color changes
- Creating flat appliqué pieces
- Sewing crochet components together
- Stuffing and shaping amigurumi
Anyone comfortable with basic crochet stitches can successfully complete this project with patience.
Materials Needed#
Before beginning, gather the following supplies:
- Worsted weight (Category 4) yarn
- Cream yarn for the head
- Two coordinating colors for body stripes
- Brown yarn for eye surrounds
- Coral or orange yarn for the beak
- Crochet hook (3.5 mm–4.0 mm)
- Polyester fiberfill stuffing
- Yarn needle
- Stitch markers
- Scissors
- Large safety eyes or decorative buttons (for display only)
- Black embroidery thread if replacing safety eyes
Choosing the Right Yarn
Acrylic yarn is an excellent choice because it offers:
- Soft texture
- Bright color options
- Easy maintenance
- Excellent durability
- Lightweight finished toy
Cotton yarn may also be used if a firmer structure is preferred.
Stitches & Techniques Explained#
This project relies on several foundational crochet stitches.
Magic Ring
Creates a tightly closed starting point for the owl’s body.
Single Crochet (sc)
The primary stitch used throughout the project.
Increase (inc)
Two single crochet stitches worked into one stitch to expand the body.
Invisible Decrease (dec)
Produces smooth shaping while reducing stitch count.
Slip Stitch
Used for joining smaller decorative pieces.
Color Changes
Alternating yarn colors create the attractive striped body.
Sewing Components
Eyes and beak are attached after the body is completed.
Step-by-Step Instructions#
Crochet the Base
Begin with a magic ring.
Increase evenly over several rounds until reaching the desired body diameter.
Build the Body
Continue working even rounds in single crochet.
Alternate yarn colors every few rounds to create clean horizontal stripes.
Shape the Head
Switch to the cream-colored yarn.
Continue working upward while gradually decreasing to shape the upper body.
Form the Ears
Use decreases and gentle shaping during the final rounds to create two pointed ear corners.
Fasten off, leaving a long tail for closing.
Stuff Firmly
Fill the owl with polyester fiberfill.
Shape the body evenly while stuffing to maintain a balanced appearance.
Close the opening securely.
Crochet the Eyes
Create two circular eye surrounds using contrasting yarn.
Attach safety eyes before fastening the circles onto the head if making a toy suitable for older children.
For babies or toddlers, embroider the eyes instead of using plastic safety eyes or buttons.
Make the Beak
Crochet a small triangle using orange or coral yarn.
Sew it neatly between the eyes.
Final Assembly
Attach all facial features securely.
Weave in every loose yarn end.
Lightly reshape the owl with your hands for a polished finish.
Common Mistakes and How to Avoid Them#
Use stitch markers to track each round.
Stuff evenly to prevent lumps.
Count stitches frequently.
Keep color changes aligned for straight stripes.
Attach facial features symmetrically.
Avoid overstuffing the head.
Secure every sewn piece firmly.
Expert Tips for Better Results#
Choose high-contrast colors for expressive eyes.
Use invisible decreases for smoother shaping.
Stuff gradually instead of all at once.
Pin facial features before sewing permanently.
Experiment with different stripe combinations.
Add embroidered eyelashes for extra personality.
Personalize the owl with a small bow, scarf, or name tag.
Variations and Customization Ideas#
This crochet owl can easily be customized.
Popular variations include:
- Pastel nursery colors
- Woodland-inspired browns
- Rainbow stripes
- Christmas-themed owl
- Halloween owl
- Mini keychain version
- Large floor cushion owl
- Sleepy embroidered eyes
- Glasses instead of eye surrounds
- Personalized embroidered initials
Every variation creates a unique handmade keepsake.
Benefits of This Crochet Project#
This owl offers many advantages.
Benefits include:
- Beginner-friendly amigurumi project
- Quick weekend crochet project
- Excellent handmade nursery decoration
- Wonderful baby shower gift
- Great stash-busting pattern
- Easy customization
- Fun practice for shaping techniques
- Durable keepsake that lasts for years
Its timeless design makes it suitable for children and adults alike.
Internal Linking Suggestions#
Readers may also enjoy:
- Crochet Fox Amigurumi Pattern
- Easy Crochet Teddy Bear Pattern
- Beginner Amigurumi Guide
- Crochet Animal Collection
- Crochet Baby Blanket Pattern
- DIY Nursery Crochet Projects
- Crochet Bunny Pattern
- Handmade Gift Ideas for Babies
Frequently Asked Questions#
Is this owl suitable for beginners?
Yes. Confident beginners who know basic amigurumi techniques can complete this project successfully.
What yarn is recommended?
Medium-weight acrylic yarn is ideal because it creates a soft, durable plush with excellent stitch definition.
Can I make the owl larger?
Yes. Use thicker yarn and a larger crochet hook to increase the finished size.
Are safety eyes safe for babies?
No. For infants and toddlers, embroidered eyes are the safest option since small plastic parts may become a choking hazard.
Can I wash the finished owl?
Yes. Most acrylic yarns can be gently hand washed and laid flat to dry.
Is this a good gift project?
Absolutely. Crochet owls are wonderful gifts for baby showers, birthdays, nursery décor, holidays, or anyone who loves woodland-inspired handmade creations.
Conclusion#
This adorable crochet owl combines simple construction with charming personality, making it a delightful project for crocheters of many skill levels. The striped body, oversized expressive eyes, and soft rounded shape create a timeless design that looks beautiful as nursery décor, a bookshelf companion, or a treasured handmade gift.
Whether you’re exploring amigurumi for the first time or expanding your collection of crocheted animals, this DIY crochet project offers plenty of opportunities for creativity. With endless color combinations and personalized details, every finished owl becomes a unique handmade keepsake that will be enjoyed for years to come.