


Introduction#
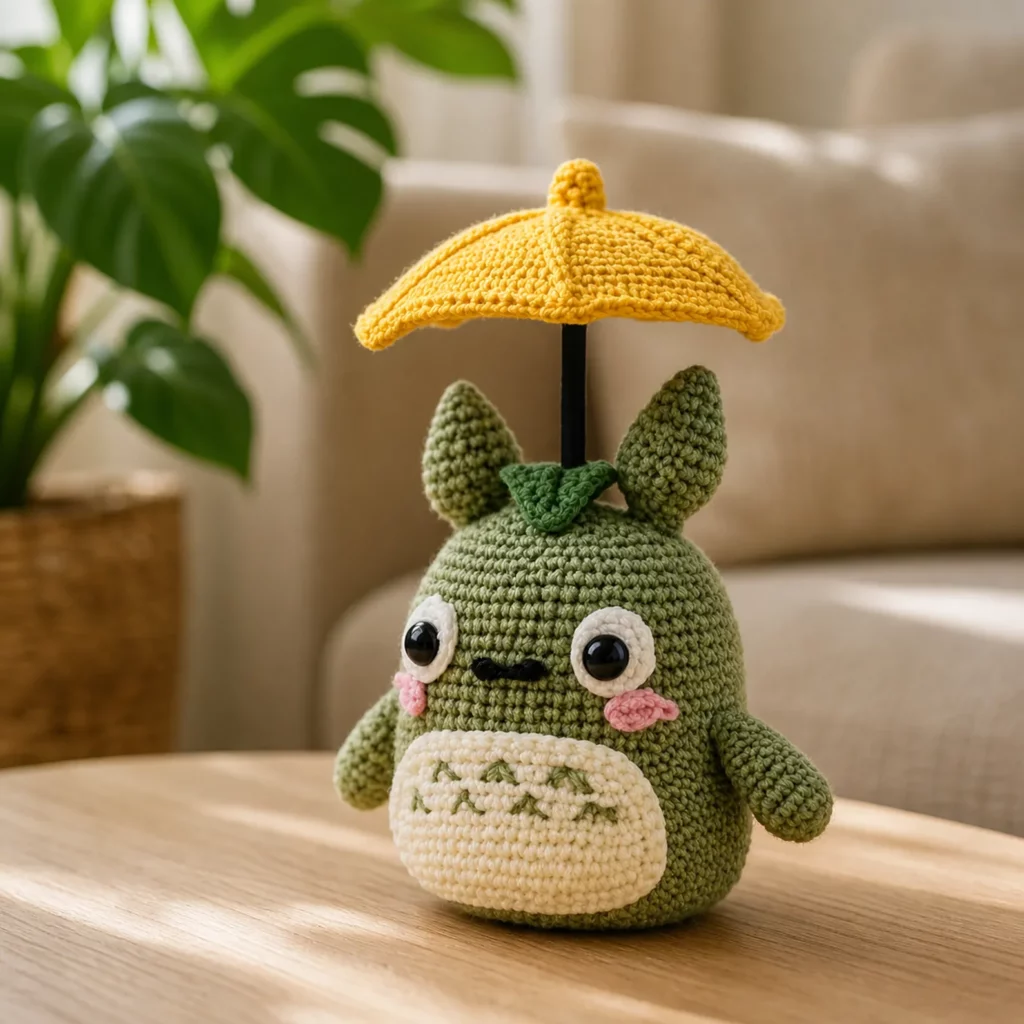
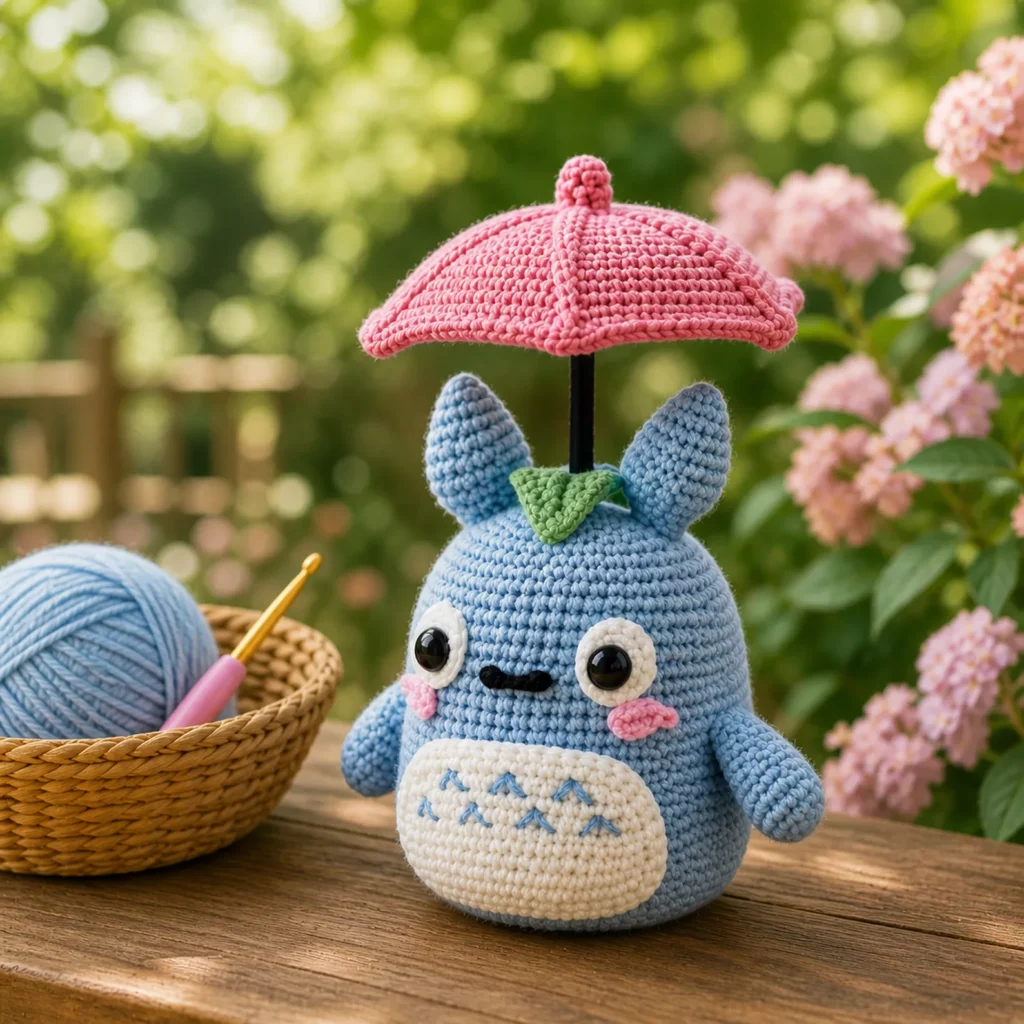
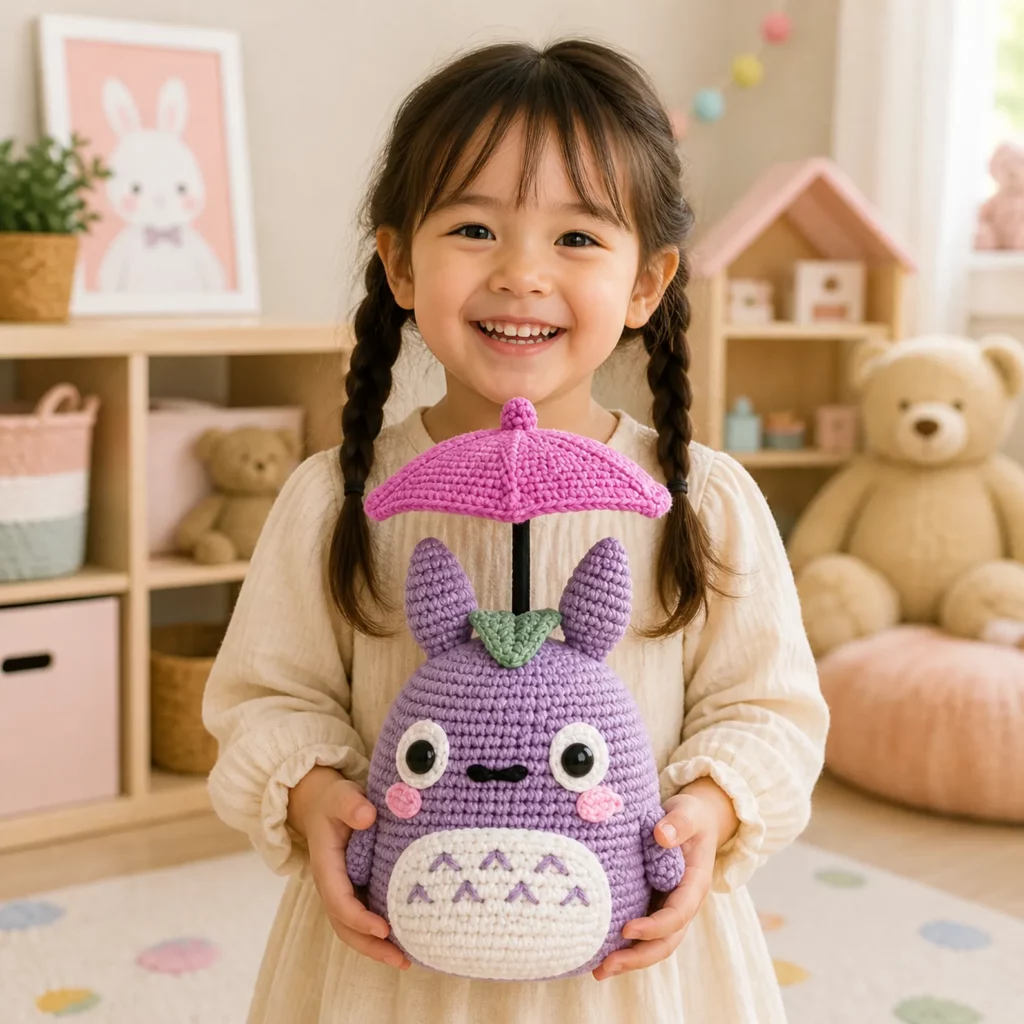
If you love amigurumi with personality, this project is pure joy. A round, squishy character plush with big eyes, tiny arms, and a little umbrella instantly feels like a collectible—something you’d display on a shelf, gift to a friend, or keep at your desk for a daily mood boost.
Explore more beginner amigurumi crochet patterns in our pattern library.
This crochet pattern walks you through making a charming umbrella buddy inspired by classic forest-creature vibes: a soft gray body, a white belly panel with simple markings, oversized eyes, rosy cheeks, and a tiny umbrella perched above. The build is beginner-friendly because it’s mostly simple shapes (sphere body, small limbs, ears, and appliqués). The umbrella looks impressive, but it’s made from easy wedges and a simple pole—no complicated engineering required.
If you’re searching for a free crochet pattern that feels special, this easy crochet pattern is a fun way to practice clean shaping and cute finishing details.
Detailed Description of the Crochet Pattern#
This amigurumi plush features:
- A round chubby body (head and body as one piece for a smooth look)
- Two upright ears (slightly pointed, symmetrical)
- Tiny arms (simple tubes)
- A white belly panel with embroidered “chevron” markings
- Oversized white eye patches with safety eyes
- Blush cheeks (small pink appliqués)
- A mini umbrella mounted above with a straight pole
What makes it look polished
- The body uses tight single crochet for a clean surface.
- Separate appliqués (belly + eye whites + cheeks) create crisp color placement.
- The umbrella is built from wedge panels so it naturally curves.
- The pole is anchored securely so the umbrella stays upright.
Finished size (approx.)
- With worsted (#4) yarn: 7–10 inches tall (depending on hook and tension)
- With DK (#3) yarn: 6–8 inches
- With plush yarn: 10–14 inches (very squishy)
Skill Level Explanation#
This is an easy-to-intermediate amigurumi project.
Beginner-friendly skills:
- single crochet in the round
- increases and decreases
- simple sewing (ears, arms, appliqués)
Intermediate skills (still very doable):
- neat placement of facial features
- building the umbrella canopy from multiple pieces
- stabilizing the umbrella pole (a simple internal support trick helps)
If you’ve made a basic ball amigurumi before, you’ll feel very comfortable with this crochet tutorial.
Materials Needed#
Yarn
Use smooth yarn for clear stitches and clean appliqués.
Suggested colors:
- Main body: medium gray
- Belly + eye whites: white/cream
- Cheeks: pink
- Leaf: green
- Umbrella: red
- Embroidery: dark gray/black
Best yarn options:
- Worsted (#4) cotton or acrylic (most accessible)
- Cotton blends (great stitch definition)
Yardage estimate:
- Gray: 150–250 yards
- White: 50–100 yards
- Small amounts of red, green, pink, black
Hook
Choose a hook that makes tight stitches:
- Worsted yarn: 2.75–3.5 mm
- DK yarn: 2.25–3.0 mm
Tip: Amigurumi fabric should feel firm—if stuffing shows, go down a hook size.
Notions
- Stitch marker
- Yarn needle
- Scissors
- Polyester fiberfill stuffing
Eyes + structure
- Safety eyes: 10–14 mm (scale to your size)
- Optional: felt circles behind eye whites (extra crisp look)
Umbrella support options (choose one):
- A wooden skewer/chopstick trimmed down
- A plastic straw
- Floral wire (wrapped and ends protected)
- Pipe cleaner (for small sizes)
Stitches & Techniques Explained#
Abbreviations (US terms)
- MR = magic ring
- sc = single crochet
- inc = increase (2 sc in one stitch)
- dec = invisible decrease
- sl st = slip stitch
- ch = chain
- st(s) = stitch(es)
- BLO = back loop only
Invisible decrease (smooth shaping)
Use invisible decrease for a cleaner body:
- Insert hook into front loop only of next st
- Insert into front loop only of following st
- Yarn over, pull through both
- Yarn over, pull through remaining loops
Appliqué sewing (clean edges)
When sewing appliqués:
- use small whip stitches
- stitch through the back loops of the appliqué edge for a neat seam
- pin first, then sew (symmetry matters)
Making a stable umbrella pole
The easiest way to keep the umbrella upright is to:
- insert a support (straw/skewer) inside the pole
- anchor the pole into the body with deep stitches
- add a small “base patch” inside the head to stop wobble (optional but effective)
Step-by-Step Instructions#
Pattern notes
- Work in continuous rounds
- Use a stitch marker in the first stitch of each round
- Stuff firmly as you go and shape with your hands
Part 1: Body (Gray)
Rnd 1: MR, 6 sc (6)
Rnd 2: inc around (12)
Rnd 3: (sc, inc) around (18)
Rnd 4: (2 sc, inc) around (24)
Rnd 5: (3 sc, inc) around (30)
Rnd 6: (4 sc, inc) around (36)
Rnd 7: (5 sc, inc) around (42)
Rnd 8: (6 sc, inc) around (48)
Rnd 9–16: sc around (48) for 8 rounds
(This creates the chubby “head-body” height.)
Start tapering slightly toward the base:
Rnd 17: (6 sc, dec) around (42)
Rnd 18: sc around (42)
Rnd 19: (5 sc, dec) around (36)
Rnd 20: sc around (36)
Rnd 21: (4 sc, dec) around (30)
Rnd 22: sc around (30)
Rnd 23: (3 sc, dec) around (24)
Stuff firmly now, especially the upper half.
Rnd 24: (2 sc, dec) around (18)
Rnd 25: (sc, dec) around (12)
Rnd 26: dec around (6)
Fasten off, close opening, weave in ends.
Part 2: Arms (Make 2, Gray)
Rnd 1: MR, 6 sc (6)
Rnd 2–5: sc around (6) for 4 rounds
Lightly stuff (or leave unstuffed), flatten and close with 3 sc through both layers.
Fasten off leaving a tail.
Attach arms to the sides around the midline of the body.
Part 3: Ears (Make 2, Gray)
Rnd 1: MR, 4 sc (4)
Rnd 2: (sc, inc) twice (6)
Rnd 3: (2 sc, inc) twice (8)
Rnd 4: (3 sc, inc) twice (10)
Rnd 5: sc around (10)
Rnd 6: (3 sc, dec) twice (8)
Rnd 7: sc around (8)
Lightly stuff the base only (optional), flatten slightly at the bottom and sew to the top of the body.
Part 4: Belly Panel (White)
Make an oval patch for the tummy.
Ch 9
Rnd 1: Starting in 2nd ch from hook: 7 sc, 3 sc in last ch.
Working other side: 6 sc, 2 sc in last ch. (18)
Rnd 2: inc, 6 sc, inc x3, 6 sc, inc x2 (24)
Rnd 3: sc, inc, 6 sc, (sc, inc) x3, 6 sc, (sc, inc) x2 (30)
Rnd 4: sc around (30)
Fasten off leaving a long tail.
Sew centered on the front.
Belly markings:
Use dark gray yarn to embroider small “V” chevrons in a row across the belly.
Part 5: Eye Whites (Make 2, White)
Rnd 1: MR, 6 sc (6)
Rnd 2: inc around (12)
Rnd 3: (sc, inc) around (18)
Fasten off leaving tail.
Sew onto face area. Insert safety eyes through the eye whites and into the body before securing backs.
Part 6: Cheeks (Make 2, Pink)
Ch 6
Row 1: sc in 2nd ch from hook and across (5)
Row 2: ch 1, sc across (5)
Fasten off.
Sew cheeks under the eyes.
Part 7: Nose + Mouth (Black/Dark Gray)
Embroider a small horizontal nose, then a short line down with a tiny smile curve (or keep it minimal with just a nose).
Part 8: Leaf (Green)
Ch 6
Row 1: sc in 2nd ch, hdc, dc, hdc, sc
Fasten off and sew between ears at the top front.
Part 9: Umbrella (Red)
The umbrella canopy can be made from 6 wedges, then joined.
Umbrella wedge (make 6)
Ch 10
Row 1: sc in 2nd ch and across (9)
Row 2: ch 1, sc across (9)
Row 3: ch 1, sc2tog, sc across to last 2 sts, sc2tog (7)
Row 4: ch 1, sc across (7)
Row 5: ch 1, sc2tog, sc across to last 2 sts, sc2tog (5)
Row 6: ch 1, sc across (5)
Row 7: ch 1, sc2tog, sc, sc2tog (3)
Row 8: ch 1, sc across (3)
Fasten off.
Join wedges side-by-side with whip stitch to form the canopy.
Add a round of sc along the bottom edge for a clean rim.
Umbrella top nub
MR, 6 sc, fasten off and sew to canopy top.
Part 10: Umbrella Pole (Black)
Ch 20–30 (depending on desired height)
Work sc back along chain to create a firm cord, or crochet a narrow tube:
- MR, 4 sc (4)
- sc around for desired length
Insert support inside (straw/skewer), fasten off.
Attach pole to umbrella canopy, then anchor pole to the top of the body between ears with deep stitches.
Common Mistakes and How to Avoid Them#
- Body looks lumpy: Stuff in small pieces and shape as you go.
- Eyes uneven: Pin eye whites first, then measure spacing before locking backs.
- Belly patch crooked: Pin in four points (top/bottom/left/right) before sewing.
- Umbrella canopy won’t curve: Make sure wedges are identical and joined evenly.
- Umbrella pole wobbles: Use an internal support (straw/skewer) and stitch pole down into the body securely.
Expert Tips for Better Results#
- Use a smaller hook: Tight stitches make the plush look professional.
- Pin everything first: Ears, eyes, cheeks—placement is what creates personality.
- Add a base weight (optional): A tiny pouch of poly pellets inside the bottom helps it sit.
- Reinforce umbrella attachment: Stitch the pole through multiple rounds, not just the surface.
- Keep embroidery minimal: Fewer stitches look cleaner at this scale.
Variations and Customization Ideas#
- Change umbrella color (yellow, teal, pastel rainbow)
- Add a tiny raincoat (simple vest shape)
- Make sleepy eyes (embroider curved lines)
- Scale up with plush yarn for a big cuddle version
- Turn it into a keychain (skip umbrella pole and add a loop)
Benefits of This Crochet Project#
- Teaches clean amigurumi shaping and neat appliqué placement
- Makes a cute collectible-style plush for decor or gifting
- Easy to customize with colors and expressions
- Umbrella adds a unique “wow” feature without being overly hard
- Great stash-buster for small amounts of yarn
Internal Linking Suggestions#
You may also like…
- Crochet Tutorial: Invisible Decrease for Amigurumi
- Crochet for Beginners: How to Place Safety Eyes Evenly
- DIY Crochet: How to Sew Appliqués Neatly
- Free Crochet Pattern: Chubby Animal Amigurumi Base Pattern
- Crochet Tutorial: How to Make a Sturdy Amigurumi Armature (Optional)
- Free Crochet Pattern Roundup: Cute Amigurumi Gifts
FAQ Section#
Is this an easy crochet pattern for beginners?
Yes—especially if you’ve done basic amigurumi before. The body is simple and the details are small. The umbrella is the “extra” piece, but it’s made from easy wedges.
What yarn is best for this amigurumi crochet pattern?
Worsted cotton or acrylic is best for stitch definition. Plush yarn works too if you want a larger, squishier version—just count carefully.
How do I make the umbrella stay upright?
Use a support inside the pole (straw, skewer, or wrapped wire) and anchor it with deep stitches into the top of the body.
Can I embroider the eyes instead of using safety eyes?
Absolutely. Embroidered eyes are baby-safe and very durable. Simple oval stitches work well.
How do I resize the plush?
Use thicker yarn and a larger hook to size up, or thinner yarn and a smaller hook to size down. You can also add an extra increase round for a bigger body.
Do I need a lining or stiffener?
Not for the plush body, but the umbrella pole benefits from an internal support to keep it straight.
Conclusion#
This umbrella amigurumi plush is the perfect blend of simple and special: a round, cuddly body, cute facial details, and an umbrella topper that makes it feel like a display-worthy collectible. This free crochet pattern is approachable for beginners, but still teaches the finishing touches that make amigurumi look polished.
If you tell me your yarn weight (DK, worsted, or plush) and the size you want (mini or standard), I can adjust the stitch counts and umbrella dimensions so your crochet pattern turns out perfectly proportioned.


