


Introduction#
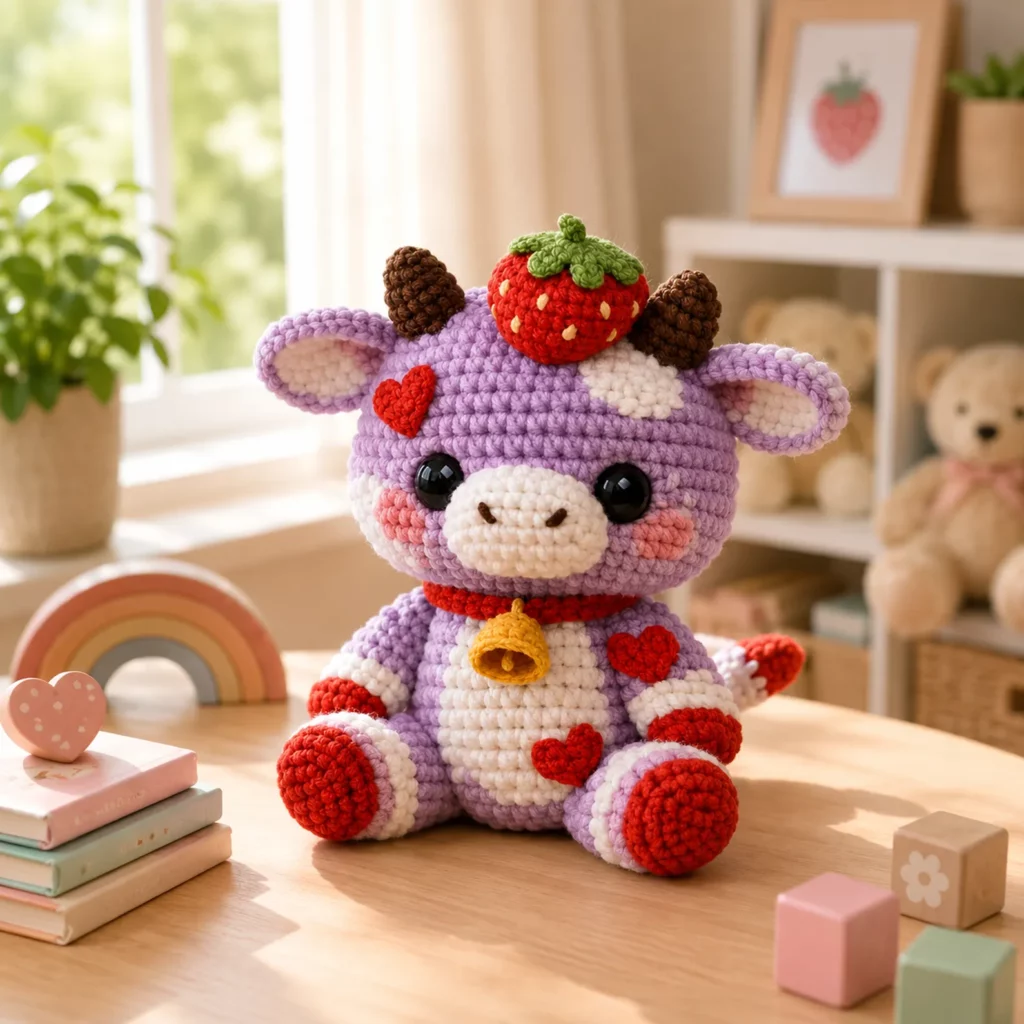
If you love amigurumi that feels extra “characterful” without being complicated, a strawberry cow is the perfect crochet project. It’s soft, round, and irresistibly cute—especially with the playful details that make it stand out: little horns, big ears, a sweet muzzle, and a strawberry sitting right on top like the cherry on a sundae. Add a tiny bell collar and heart-shaped spots, and you’ve got a plush that looks like a boutique handmade toy.
Explore more beginner amigurumi crochet patterns in our pattern library.
This crochet pattern is written to be beginner-friendly while still giving you that polished, gift-worthy finish. The shaping is classic amigurumi (single crochet in continuous rounds with increases and decreases), and the “fancy” look comes from simple appliqués and smart placement. You can make it in traditional pink-and-cream (as shown), or switch to red-and-cream for a more classic strawberry theme, or even pastel colors for a nursery vibe.
In this crochet tutorial, you’ll learn how to build a seated cow body, crochet a clean muzzle, make sturdy ears and horns, add a strawberry topper with leafy cap, and finish with heart patches and a little bell collar. By the end, you’ll have a plush you’ll be proud to gift, display, or keep as your new desk buddy.
Detailed Description of the Crochet Pattern#
This is a seated strawberry cow amigurumi plush with rounded proportions and lots of cute surface details. The body is mainly worked in smooth single crochet, with color changes or appliqués for the white belly and heart spots.
The finished cow includes:
Head: a round sphere, slightly larger than the body for a cute “baby animal” look
Muzzle: a soft oval piece sewn to the face, with embroidered nostrils
Ears: wide, slightly pointed ears with optional inner ear panels
Horns: small cone horns in brown, set behind the strawberry topper
Body: a plump seated body with a contrasting white belly patch
Arms and legs: stubby limbs positioned so the cow sits naturally
Hooves: bright accent hooves (red) that match the strawberry theme
Tail: a short tail with a contrasting tip
Strawberry topper: a small strawberry with embroidered “seeds” and a green leaf cap
Collar and bell: a simple collar strip and a tiny crocheted bell
Heart patches: small heart appliqués attached to the head and body for extra sweetness
The overall construction is approachable: crochet each part, stuff firmly, sew together, then add surface details. If you’re new to appliqués, this project is a great way to practice because small hearts are quick and forgiving.
Skill Level Explanation#
Skill Level: Confident Beginner
You’ll do well with this easy crochet pattern if you already know:
Magic ring (MR)
Single crochet (sc)
Increase (inc) and decrease (dec)
Working in continuous rounds (spiral)
Basic sewing and weaving in ends
Newer skills you’ll practice (with lots of guidance):
Clean color changes (for belly/hoof accents, if you choose that method)
Invisible decrease (recommended for a smooth finish)
Attaching appliqués neatly (the hearts, strawberry seeds, and facial pieces)
Shaping with stuffing so the plush looks symmetrical
If you’ve made one simple amigurumi before, this is a fun “next project” that teaches you finishing skills that make toys look professional.
Materials Needed#
Yarn
Worsted weight (Category 4) yarn is ideal for a plush like this with clear stitch definition. DK weight works too for a smaller cow.
Suggested colors (adjust as you like):
Main body: light pink
Belly/muzzle patches: white or cream
Hooves and heart accents: red (or hot pink)
Horns: medium brown
Leaf cap: green
Strawberry: red (or bright strawberry red)
Seeds: yellow embroidery thread or small stitches in pale yellow yarn
Yarn tips:
Cotton gives crisp stitches and very neat appliqués
Acrylic gives extra softness and squish (great for plush toys)
Try to keep all yarns the same weight so pieces fit together nicely
Hook
Use a hook slightly smaller than the yarn label suggests to prevent gaps.
Worsted: 3.25–4.0 mm
DK: 2.75–3.5 mm
If stuffing shows through, go down 0.5 mm.
Notions
Stitch marker
Yarn needle
Scissors
Fiberfill stuffing
Safety eyes (10–14 mm depending on size) or embroidery floss for baby-safe eyes
Black or dark brown embroidery floss for mouth and nostrils
Optional: blush or pastel chalk for cheeks
Optional: a tiny jingle bell (or crochet a bell as shown)
Safety note: If this is for a baby/toddler, embroider the eyes and avoid real bells or small detachable parts. Sew everything very securely.
Stitches & Techniques Explained#
Common Abbreviations
MR = magic ring
sc = single crochet
inc = increase (2 sc in same stitch)
dec = decrease (sc2tog)
inv dec = invisible decrease
sl st = slip stitch
ch = chain
BLO = back loop only
FLO = front loop only
( ) = repeat
[ ] = stitch count
Invisible Decrease (Recommended)
Insert hook into the front loop of the next stitch, then into the front loop of the following stitch, yarn over and pull through, yarn over and sc. This keeps your decreases smooth and less “dimpled.”
Clean Color Change
When switching colors, complete the last yarn over of the final stitch in the old color with the new color. Pull through to finish the stitch, then continue in the new color.
Appliqué Sewing Tip
To attach hearts or patches neatly:
Pin the piece first
Sew from the center outward so it stays flat
Use small stitches and catch only the top loops of the body stitches so your sewing doesn’t show through as much
Step-by-Step Instructions#
Finished Size
With worsted yarn and a 3.75 mm hook: about 7–10 inches (18–25 cm) seated, depending on stuffing and limb placement.
Notes Before You Start
Work in continuous rounds unless stated
Use a stitch marker and move it each round
Stuff firmly but smoothly, adding small amounts at a time
Pin pieces before sewing for symmetry
Weave in ends securely as you go
Color Key (Optional)
A = pink body
B = white/cream belly and muzzle
C = red hooves and hearts
D = brown horns
E = green leaf cap
F = strawberry red
Head (A)
Round 1: 6 sc in MR [6]
Round 2: inc around [12]
Round 3: (sc, inc) around [18]
Round 4: (2 sc, inc) around [24]
Round 5: (3 sc, inc) around [30]
Round 6: (4 sc, inc) around [36]
Round 7: (5 sc, inc) around [42]
Round 8: (6 sc, inc) around [48]
Rounds 9–16: sc around [48]
Place safety eyes between Rounds 12–13, about 8–9 stitches apart. For a cute “kawaii” look, place them slightly lower and a little wider.
Round 17: (6 sc, dec) around [42]
Round 18: (5 sc, dec) around [36]
Round 19: (4 sc, dec) around [30]
Round 20: (3 sc, dec) around [24]
Stuff firmly and shape the head into a smooth ball.
Round 21: (2 sc, dec) around [18]
Round 22: (sc, dec) around [12]
Round 23: dec around [6]
Fasten off and close.
Muzzle (B)
Round 1: 6 sc in MR [6]
Round 2: inc around [12]
Round 3: (sc, inc) around [18]
Rounds 4–5: sc around [18]
Round 6: (sc, dec) around [12]
Round 7: sc around [12]
Fasten off leaving a long tail.
Lightly stuff so it’s plump but not stretched. Sew centered below the eyes. Embroider nostrils with brown or black floss (two small diagonal stitches). Add a small curved smile below.
Ears (Make 2)
Outer ear (A):
Round 1: 6 sc in MR [6]
Round 2: (sc, inc) around [9]
Round 3: sc around [9]
Round 4: (2 sc, inc) around [12]
Round 5: sc around [12]
Flatten and sc across to close (about 6 sc). Fasten off with tail.
Optional inner ear (B):
Make a smaller piece:
Round 1: 6 sc in MR [6]
Round 2: (sc, inc) around [9]
Round 3: sc around [9]
Fasten off and sew centered inside ear.
Attach ears to the sides of the head, slightly above eye level, angled outward.
Horns (Make 2, D)
Round 1: 4 sc in MR [4]
Round 2: sc around [4]
Round 3: (sc, inc) around [6]
Round 4: sc around [6]
Round 5: (2 sc, inc) around [8]
Round 6: sc around [8]
Fasten off leaving a tail.
Lightly stuff the base only. Sew horns on top of the head, spaced apart, behind where the strawberry will sit.
Body (A with Belly Patch B)
You can do the belly two ways: crochet it as a separate patch and sew it on (easiest), or do a color-change panel. The patch method is more beginner-friendly and looks very clean.
Body base (A):
Round 1: 6 sc in MR [6]
Round 2: inc around [12]
Round 3: (sc, inc) around [18]
Round 4: (2 sc, inc) around [24]
Round 5: (3 sc, inc) around [30]
Round 6: (4 sc, inc) around [36]
Round 7: (5 sc, inc) around [42]
Round 8: (6 sc, inc) around [48]
Rounds 9–13: sc around [48]
Shape down slightly:
Round 14: (6 sc, dec) around [42]
Round 15: sc around [42]
Round 16: (5 sc, dec) around [36]
Round 17: sc around [36]
Stuff firmly, especially at the base so it sits.
Round 18: (4 sc, dec) around [30]
Round 19: (3 sc, dec) around [24]
Round 20: (2 sc, dec) around [18]
Round 21: (sc, dec) around [12]
Round 22: dec around [6]
Fasten off and close.
Belly patch (B):
Round 1: 6 sc in MR [6]
Round 2: inc around [12]
Round 3: (sc, inc) around [18]
Round 4: (2 sc, inc) around [24]
Round 5: sc around [24]
Fasten off leaving a tail.
Sew belly patch to the front of the body, centered.
Arms (Make 2, A with Hoof Tip C)
Start with C (hoof):
Round 1: 6 sc in MR [6]
Round 2: (sc, inc) around [9]
Round 3: sc around [9]
Change to A:
Rounds 4–7: sc around [9]
Lightly stuff the lower half. Flatten and close with 4–5 sc across. Fasten off with tail.
Attach arms to the sides of the upper body, slightly forward.
Legs (Make 2, A with Hoof Base C)
Start with C:
Round 1: 6 sc in MR [6]
Round 2: inc around [12]
Round 3: (sc, inc) around [18]
Rounds 4–5: sc around [18]
Change to A:
Rounds 6–9: sc around [18]
Stuff firmly. Flatten and close with 8–9 sc across. Fasten off with tail.
Sew legs to the lower front of the body so the cow sits with hooves visible.
Tail (A with Tip C)
With C:
Round 1: 6 sc in MR [6]
Round 2: sc around [6]
Change to A:
Rounds 3–8: sc around [6]
Lightly stuff. Flatten end and stitch closed. Fasten off with tail.
Sew tail to the back of the body.
Strawberry Topper (F)
Strawberry body:
Round 1: 6 sc in MR [6]
Round 2: inc around [12]
Round 3: (sc, inc) around [18]
Round 4: (2 sc, inc) around [24]
Rounds 5–7: sc around [24]
Round 8: (2 sc, dec) around [18]
Stuff lightly.
Round 9: (sc, dec) around [12]
Round 10: dec around [6]
Fasten off and close.
Seeds:
With yellow thread or yarn, make small straight stitches scattered around the strawberry.
Leaf cap (E):
Round 1: 6 sc in MR [6]
Round 2: inc around [12]
Round 3: sc around [12]
Create leaves as you go around:
ch 3, sl st in 2nd ch, sc in next ch, sl st back into next stitch on circle repeat 5–6 times around to form leaf points
Fasten off and sew leaf cap to top of strawberry.
Sew strawberry centered on the head between the horns.
Heart Appliqués (Make 3–6, C)
Small heart (simple method):
Round 1: 6 sc in MR [6]
Round 2: inc around [12]
Now form the heart top and point by shaping:
Sl st in next st, (hdc, dc, hdc) in next st, sl st in next st
Sl st in next st, (hdc, dc, hdc) in next st, sl st in next st
Ch 1, sc 2 together over the next two stitches to create a point
Fasten off leaving a tail
If you prefer a flatter heart, you can crochet a tiny heart from chains and tall stitches instead. The key is small, puffy, and easy to sew.
Sew one heart to the head side and 1–2 hearts to the body or legs.
Collar and Bell
Collar (C):
Ch enough to fit around the neck (usually 24–30 chains depending on your yarn and stitch tightness).
Row 1: sc in 2nd ch from hook and across.
Fasten off leaving tails. Sew around the neck like a collar.
Crochet bell (yellow):
Round 1: 6 sc in MR [6]
Round 2: inc around [12]
Round 3: sc around [12]
Round 4: (sc, dec) around [8]
Fasten off, lightly stuff, sew to collar center.
You can also use a small real jingle bell, but for child-safe toys, the crocheted bell is best.
Assembly
Sew muzzle onto head and embroider nostrils and smile.
Attach ears to head sides.
Attach horns to top of head.
Sew strawberry topper centered between horns.
Sew head to body centered, go around twice for strength.
Attach legs to lower front for a seated pose.
Attach arms slightly forward.
Sew tail to back.
Sew belly patch to front.
Add heart appliqués on head and body.
Attach collar around neck and sew bell at center.
Common Mistakes and How to Avoid Them#
The face looks uneven
Pin eyes, muzzle, and heart placements before sewing
Measure eye spacing with stitch counts
Embroider nostrils after muzzle is sewn so they sit centered
Stuffing shows through
Use a smaller hook
Keep tension firm
Stuff gradually rather than forcing big chunks in at once
The cow won’t sit upright
Stuff the base extra firmly
Sew legs slightly more forward
Flatten the bottom slightly by shaping with your hands before closing
Hearts curl or lift at the edges
Use small, even stitches to sew them down
Sew from the center outward
Block the heart lightly with steam before attaching (especially if using cotton)
Strawberry topper flops
Stuff it lightly
Sew around the base edge twice
Place it slightly behind the head center so it rests between horns and doesn’t tip forward
Expert Tips for Better Results#
Use invisible decreases for a smoother head and body finish
Embroider the face after stuffing so the expression matches the final shape
For extra “sweet” expression, place eyes slightly lower and add blush
Weave ends through dense areas (like the back of the head) so tails don’t pop out later
If you want a more polished look, surface stitch a thin white highlight on each eye patch area (tiny white stitch near the top of each eye)
Variations and Customization Ideas#
Classic strawberry cow: red body with white patches and green leaf topper
Pastel strawberry cow: soft pink body, pale yellow seeds, mint leaf cap
Chocolate strawberry cow: brown body with pink hearts and red strawberry
Mini keychain version: use DK yarn and a smaller hook, reduce limb rounds by 1–2
Valentine edition: make the strawberry a heart topper instead, add more heart spots
Birthday cow: swap strawberry topper for a tiny cupcake, add sprinkles
Baby-safe cow: embroidered eyes, crocheted bell, and stitched-on details only
Benefits of This Crochet Project#
A beginner-friendly crochet pattern that teaches classic amigurumi shaping
Small appliqués and accessories create a “premium” look without complex techniques
Great stash-buster for leftover yarn in red, green, and white
Perfect as a gift for baby showers, birthdays, and Valentine’s Day
Customizable colors make it easy to create multiple unique cows
Helps build confidence with assembly, placement, and finishing details
Internal Linking Suggestions#
How to Crochet a Magic Ring for Amigurumi
Invisible Decrease Tutorial for Smooth Amigurumi
How to Stuff Amigurumi Smoothly (No Lumps)
Easy Crochet Heart Appliqué Pattern for Beginners
How to Change Colors Neatly in Crochet
Best Yarn for Amigurumi: Cotton vs Acrylic
Amigurumi Assembly Tips: Sewing Head, Arms, and Legs Evenly
FAQ#
Is this strawberry cow crochet pattern suitable for beginners?
Yes. This is an easy crochet pattern if you know single crochet, increases, and decreases. The extra details are simple add-ons and can be done one at a time.
What yarn works best for a plush like this?
Worsted weight acrylic is soft and sturdy for toys. Cotton gives the neatest stitch definition and very crisp appliqués.
What size safety eyes should I use?
For worsted yarn, 10–14 mm works well. If you want a cuter “baby cow” look, go slightly larger and place them a bit lower. For toddlers, embroider eyes instead.
Can I make it baby-safe?
Yes. Embroider eyes, skip real bells, crochet the bell instead, and sew every embellishment firmly. Avoid felt and glue for baby gifts.
How do I keep the cow sitting upright?
Stuff the base firmly, sew the legs slightly forward, and shape the bottom flatter before closing. Adding a little extra stuffing at the lower belly helps stability too.
Do I have to crochet the strawberry topper?
No. You can leave it off for a simpler cow, or replace it with a flower, bow, or tiny hat. The cow base pattern still works beautifully.
How do I make the hearts look neat and flat?
Use small stitches to sew the edges down, and sew from the center outward. If the heart curls, lightly steam-block it before attaching (especially with cotton yarn).
Conclusion#
A strawberry cow amigurumi is the perfect mix of simple construction and adorable details. The plush is built from easy shapes, but the strawberry topper, heart patches, and little bell collar make it look extra special—like a one-of-a-kind handmade character. Once you finish one, it’s incredibly tempting to make a whole “flavor collection” in different colors.
If you tell me your yarn weight (DK or worsted) and the size you want (small desk plush or bigger cuddle plush), I can adjust the stitch counts and recommend the best safety-eye size so your strawberry cow turns out perfectly proportioned.


