


Introduction#
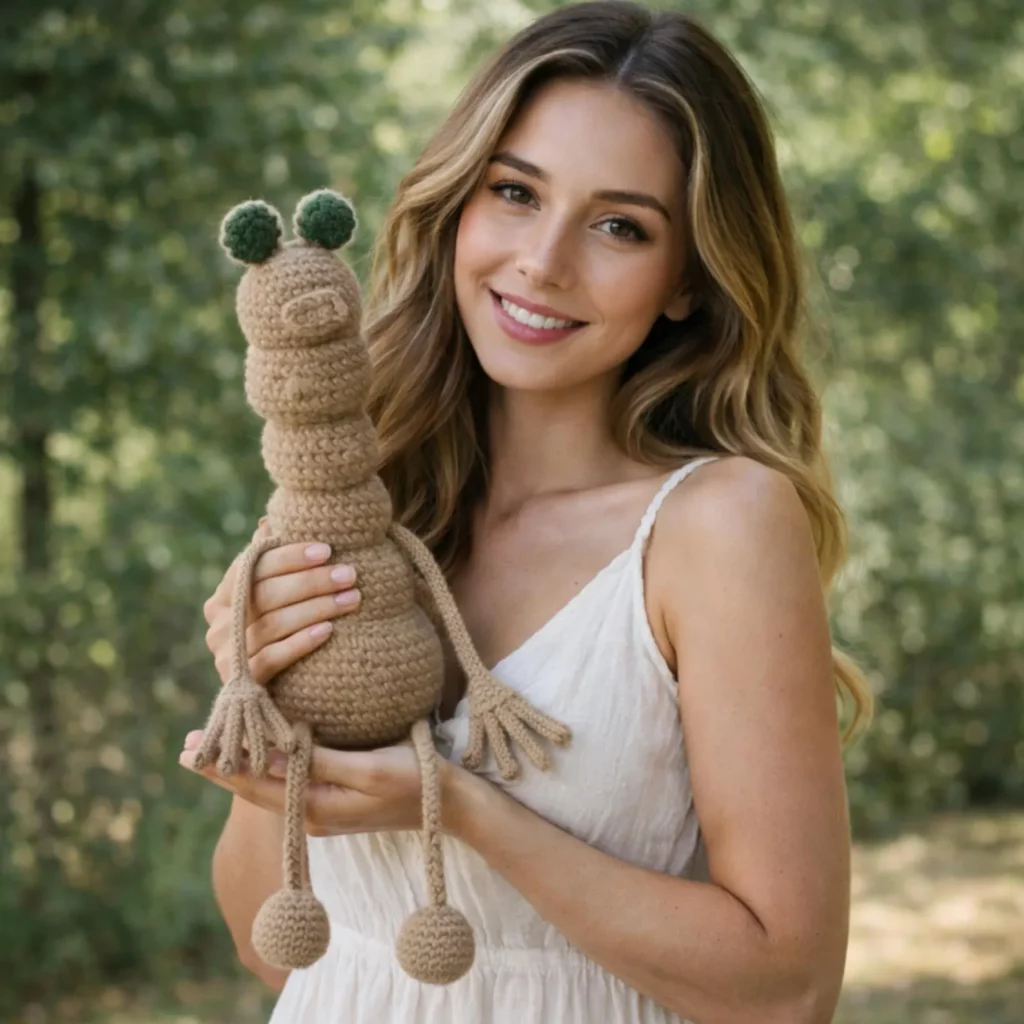
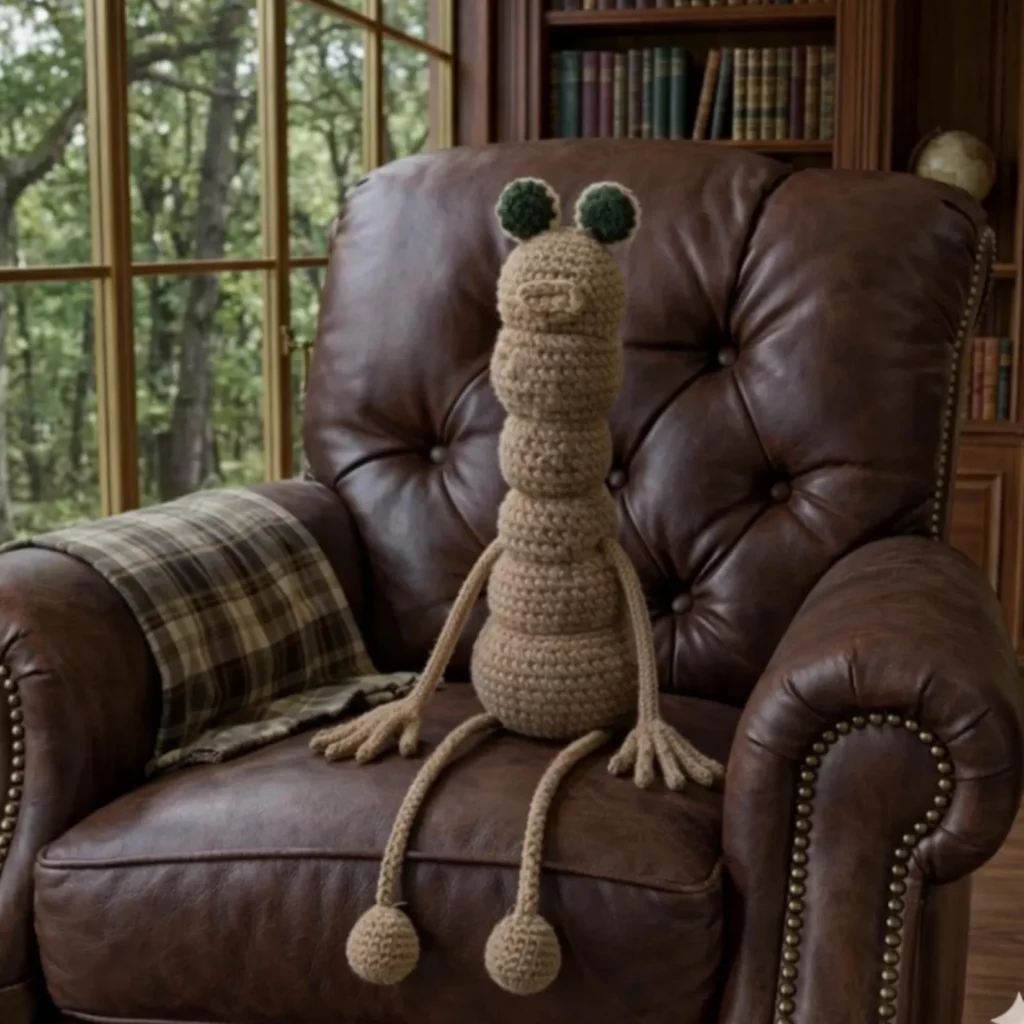
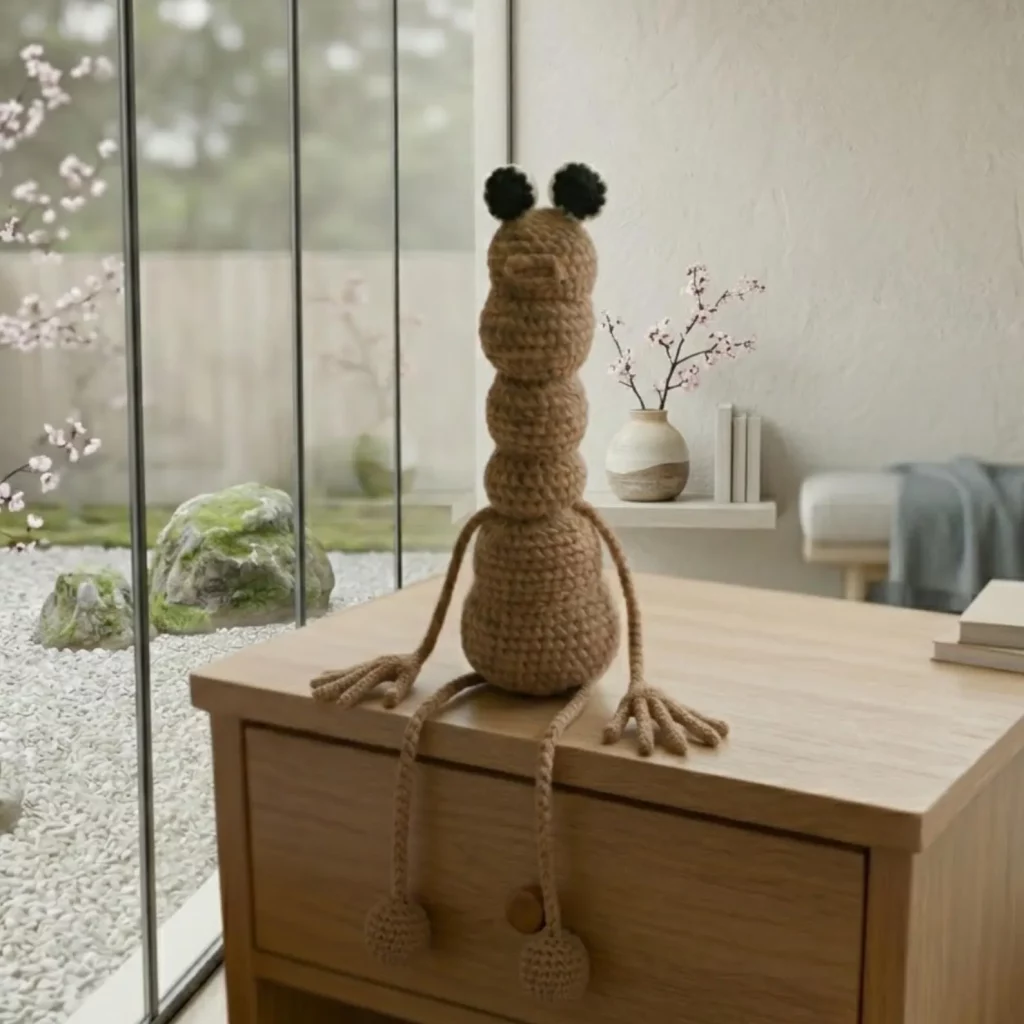
If you love amigurumi that feels a little quirky—in the best way—this long-limbed crochet creature is the perfect project. It’s tall, playful, and full of personality, with a stacked, wiggly body, long dangly arms and legs, and cute round eye “poms” on top. The finished plush looks like something you’d find in an art toy shop: simple shapes, bold silhouette, and that irresistible handmade charm.
Explore more beginner amigurumi crochet patterns in our pattern library.
This crochet pattern is also surprisingly approachable. The entire design is built from easy building blocks: small stuffed balls, tube limbs, and a simple face. Because each body segment is small, you get lots of progress quickly, and because the limbs are cords, you don’t have to wrestle with complicated shaping.
In this step-by-step crochet tutorial, you’ll learn how to make the body segments, how to connect them so the plush stands or sits nicely, and how to get those long arms and legs strong enough to hold up over time. You’ll also get variations for size, expression, and yarn types so you can make your creature look cute, spooky, minimalist, or totally silly.
Detailed Description of the Crochet Pattern#
This free crochet pattern creates a tall, stylized amigurumi creature with these signature details:
- Stacked body segments (a “beaded” look) that gives height and movement
- Small snout/muzzle bump for a gentle face profile
- Two round eyes on short stalks (simple and iconic)
- Extra-long arms and legs made from crochet cords (great for posing)
- Round hands/feet ends that look like little balls or mitts
- Minimal facial embroidery for a clean, modern expression
The texture is classic single crochet, which means the fabric is dense, durable, and beginner-friendly. You can scale the toy from small desk buddy to tall shelf sculpture just by changing yarn weight and how many segments you stack.
Skill Level Explanation#
This is an easy-to-intermediate crochet pattern.
Beginner-friendly skills you’ll use:
- Single crochet in continuous rounds
- Increases and invisible decreases
- Basic stuffing and shaping
- Sewing parts together (simple and repetitive)
Intermediate-ish elements (still very doable):
- Making long cords consistently
- Keeping the stacked segments aligned and stable
- Reinforcing joins so the limbs don’t pull out
If you’ve made any basic amigurumi before, you’ll feel comfortable here. If you’re new, this is still a great “first quirky plush” because every piece is straightforward and forgiving.
Materials Needed#
Yarn
Choose yarn that holds shape well and doesn’t split easily.
Recommended yarn:
- Worsted weight (#4) acrylic or cotton blend for sturdy structure
- DK (#3) for a smaller, more delicate creature
- Plush yarn (#6) works too, but stitch counting is harder and the toy will be very soft (less “sculptural”)
Suggested colors:
- Main body: tan, caramel, or any neutral
- Eye balls: black or dark brown
- Optional: accent color for muzzle or belly (not required)
Hook
Use a smaller hook than the label suggests to avoid gaps:
- Worsted: 3.0–3.5 mm
- DK: 2.5–3.0 mm
Notions
- Fiberfill stuffing
- Stitch marker
- Yarn needle
- Scissors
- Pins (helpful for alignment)
- Optional: poly pellets in a fabric pouch for weight
- Optional: floral wire/pipe cleaners (for posing only—use safely, not for small children)
Stitches & Techniques Explained#
Abbreviations (US terms)
- MR = magic ring
- sc = single crochet
- inc = increase (2 sc in same stitch)
- dec = invisible decrease (sc2tog through front loops)
- sl st = slip stitch
- ch = chain
- ( ) = repeat
- = stitch count
Techniques that make this plush look polished
Invisible decrease
Keeps your spheres smooth—important because the whole body is made of spheres.
Consistent stuffing
Each segment should feel similarly firm. Too soft and the creature flops; too hard and it looks lumpy.
Reinforced joining
Long limbs and stacked shapes need strong stitching. You’ll do a “double pass” join method (explained below).
Step-by-Step Instructions#
Notes:
- Work in continuous rounds unless stated.
- Use a stitch marker.
- Stuff pieces firmly but don’t overstretch stitches.
This pattern is written as a medium-tall creature. To make it taller, add more body segments.
Body Segments (make 4–6, main color)
Each segment is a small sphere. Make more for a taller plush.
R1: MR, 6 sc [6]
R2: inc x6 [12]
R3: (sc, inc) x6 [18]
R4: (2 sc, inc) x6 [24]
R5–R6: sc around [24]
R7: (2 sc, dec) x6 [18]
Stuff firmly.
R8: (sc, dec) x6 [12]
R9: dec x6 [6]
Fasten off leaving a long tail for joining.
Make 4–6 of these. One will be the “base” (bottom), one will be the “head/top,” and the others are neck/body beads.
Head Snout (optional, small bump)
This gives the face a gentle profile.
R1: MR, 6 sc [6]
R2: (sc, inc) x3 [9]
R3: sc around [9]
Lightly stuff. Fasten off with tail.
Sew centered on the front of the top segment.
Eye Stalks (make 2, main color)
These are short tubes.
R1: MR, 5 sc [5]
R2–R5: sc around [5]
Fasten off with tail.
Lightly stuff or leave unstuffed (stiffer if lightly stuffed).
Eye Balls (make 2, black)
Small spheres.
R1: MR, 6 sc [6]
R2: inc x6 [12]
R3: sc around [12]
R4: (sc, dec) x4 [8]
Stuff lightly.
R5: dec x4 [4]
Fasten off, sew closed.
Attach each eye ball to the top of an eye stalk.
Arms (make 2, main color)
These are long cords with a small “hand ball” at the end.
Hand Ball (make 2)
R1: MR, 6 sc [6]
R2: inc x6 [12]
R3: sc around [12]
R4: (sc, dec) x4 [8]
Stuff lightly.
R5: dec x4 [4]
Fasten off leaving tail.
Arm Cord
You have two easy options:
Option: Tight chain cord (fastest)
- Ch to desired length (for medium creature: 45–70 chains)
- Sl st back down the chain to thicken it slightly (makes it sturdier)
Option: Single crochet tube cord (sturdier, recommended)
R1: MR, 4 sc [4]
R2–R40+: sc around [4] until desired length
Fasten off.
Sew arm cord to the hand ball. Repeat for the second arm.
Legs (make 2, main color)
Same method as arms, but longer.
Foot Ball (make 2)
Make the same as hand balls, or slightly larger if you want a heavier base.
Leg Cord
- Chain cord: ch 60–90 (depending on how tall you want)
- Tube cord: sc around [4] for 50+ rounds
Attach leg cords to foot balls.
Assembly
This is where the creature comes to life.
Stack the body segments
Lay your segments in a line from bottom to top. Decide how tall you want it.
Strong joining method:
- Use the long tail from one segment to sew it to the next with whip stitches around the joining circle.
- After joining, weave the yarn through the center of both segments (straight up and down) and pull gently to “cinch” them together.
- Knot securely inside the next segment and weave the end away.
Repeat until all segments are stacked.
Tip: If you want a straighter posture, keep the join tight. If you want a more wiggly, bendy body, keep joins slightly looser.
Attach arms
Sew arms to the sides of the lowest or second-lowest segment (depending on the look you want). For a longer “dangly” look, attach a little higher.
Reinforce by stitching through multiple rows and making a second pass.
Attach legs
Sew legs to the bottom segment, slightly forward so the plush sits nicely. If you want it to stand, place legs wider apart and add weight inside the base.
Attach eyes
Sew the two eye stalks to the top segment. Place them slightly apart. Add extra stitches at the base so they don’t wobble.
Add simple face embroidery
With dark yarn:
- Small nose dot on the snout (optional)
- Tiny curved smile line under the snout
Keep it minimal—this style looks best with simple features.
Common Mistakes and How to Avoid Them#
- Segments look lumpy: Stuff each ball in small tufts and shape with your hands before closing.
- Creature bends too much: Tighten the join between segments and use the “cinch” method.
- Limbs pull out: Reinforce limb joins with extra stitches and a second sewing pass.
- Cords twist or stretch: Use the sc tube cord for sturdiness, or slip stitch back down chain cords.
- Eyes wobble: Stuff eye stalks lightly and stitch the base down through multiple rounds.
Expert Tips for Better Results#
- Add a small weighted pouch to the bottom segment for stability.
- Use cotton yarn if you want the creature to look more sculptural and less floppy.
- If you want poseable limbs, insert pipe cleaners inside tube cords (not recommended for young children).
- Mark “front center” with a stitch marker before attaching face and limbs.
- Weave ends deep inside segments—long plushes get handled a lot.
Variations and Customization Ideas#
- Make it taller: add more body segments.
- Make it cuter: use embroidered closed eyes and blush cheeks.
- Make it spooky: use black yarn, add a stitched mouth line, and longer eye stalks.
- Add stripes: change colors every segment for a “caterpillar” vibe.
- Add a scarf: a tiny chain scarf instantly makes it gift-ready.
- Change the hands/feet: replace balls with mitten shapes or flat feet for standing stability.
Benefits of This Crochet Project#
- Fast and satisfying because it’s built from repeating pieces
- Great stash-buster (small segments use up leftovers)
- Beginner-friendly shapes with impressive final impact
- Customizable size and personality
- Makes a fun decorative plush for shelves and desks
- Excellent blog content because it teaches multiple foundational techniques
Internal Linking Suggestions#
If you’re building a crochet blog, link this post to:
- Magic Ring Tutorial
- Invisible Decrease for Amigurumi
- How to Crochet a Cord (Chain Cord vs Tube Cord)
- How to Stuff Amigurumi Smoothly
- How to Sew Amigurumi Parts Neatly
- Easy Beginner Amigurumi Patterns
FAQ Section#
Is this a good crochet pattern for beginners?
Yes. The pieces are simple spheres and cords. The only part that needs patience is assembly and keeping it symmetrical.
What yarn works best for a tall amigurumi like this?
Worsted acrylic is easy and affordable; cotton gives the most structure. Plush yarn works but will be very soft and less upright.
How do I make it stand up instead of sitting?
Place legs wider apart, stuff the base firmly, and add a small weight pouch inside the bottom segment.
Can I make the arms and legs without crocheting tubes?
Yes. Use a chain cord and slip stitch back down for a faster method.
How do I keep the stacked segments from twisting?
Use the cinch-through-center join method and keep your joins consistent and snug.
Can I sell finished items made from this free crochet pattern?
Generally, yes for finished handmade items. If you publish it, keep your wording and photos original so your content stays unique and AdSense-friendly.
Conclusion#
This long-limbed crochet creature is the perfect project when you want something playful, modern, and a little unexpected. It’s built from easy, repeatable shapes, but the final silhouette looks like a designer plush—especially when you choose a cohesive color palette and take your time with assembly.
If you tell me what yarn weight you’re using and how tall you want the finished plush to be, I can suggest the ideal number of body segments and cord lengths so your creature comes out perfectly proportioned.


