


Introduction#
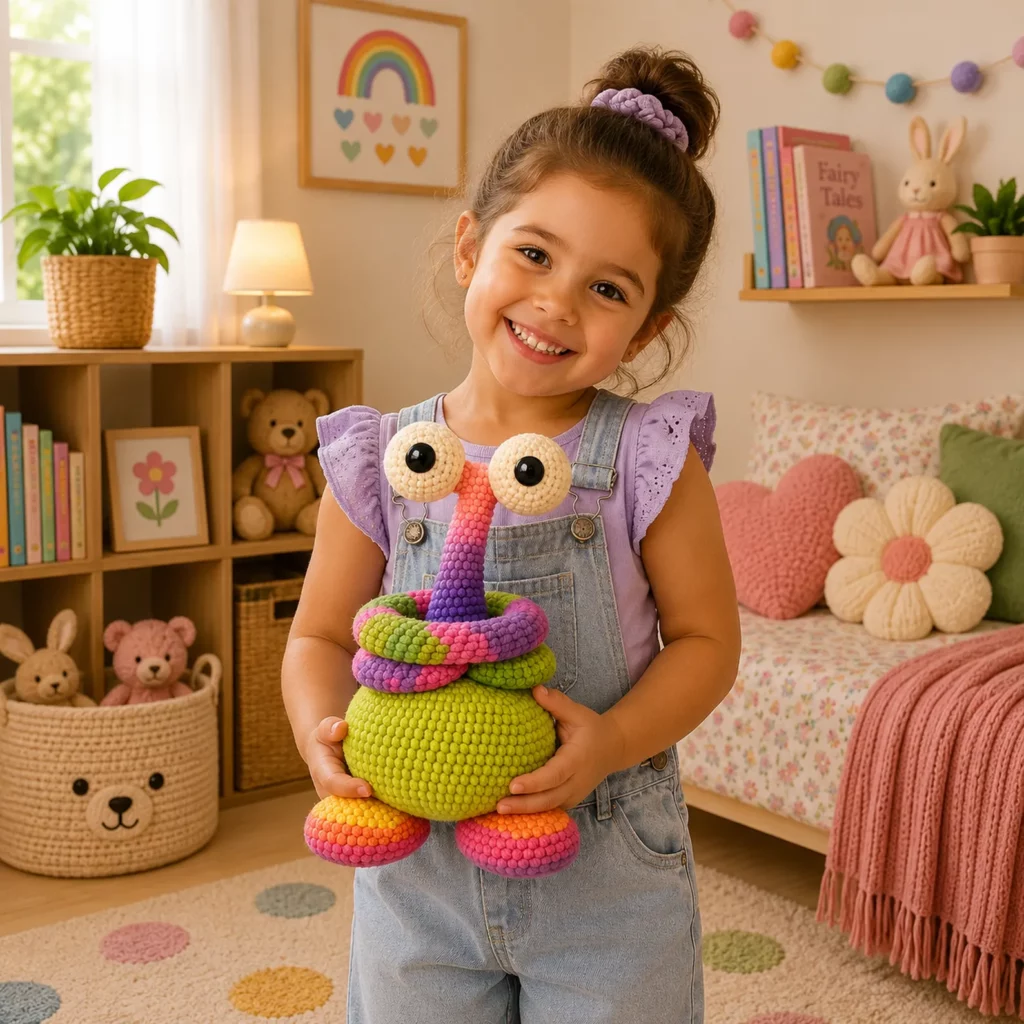
Some crochet projects are cute. Some are cozy. And then there are the projects that make you laugh the moment you set them on the table. A long-neck monster amigurumi is exactly that kind of joyful make—quirky, bright, and full of personality. It’s the perfect crochet pattern when you want a break from “serious” projects and just want to create something fun that looks amazing in photos and makes a fantastic gift.
Explore more beginner amigurumi crochet patterns in our pattern library.
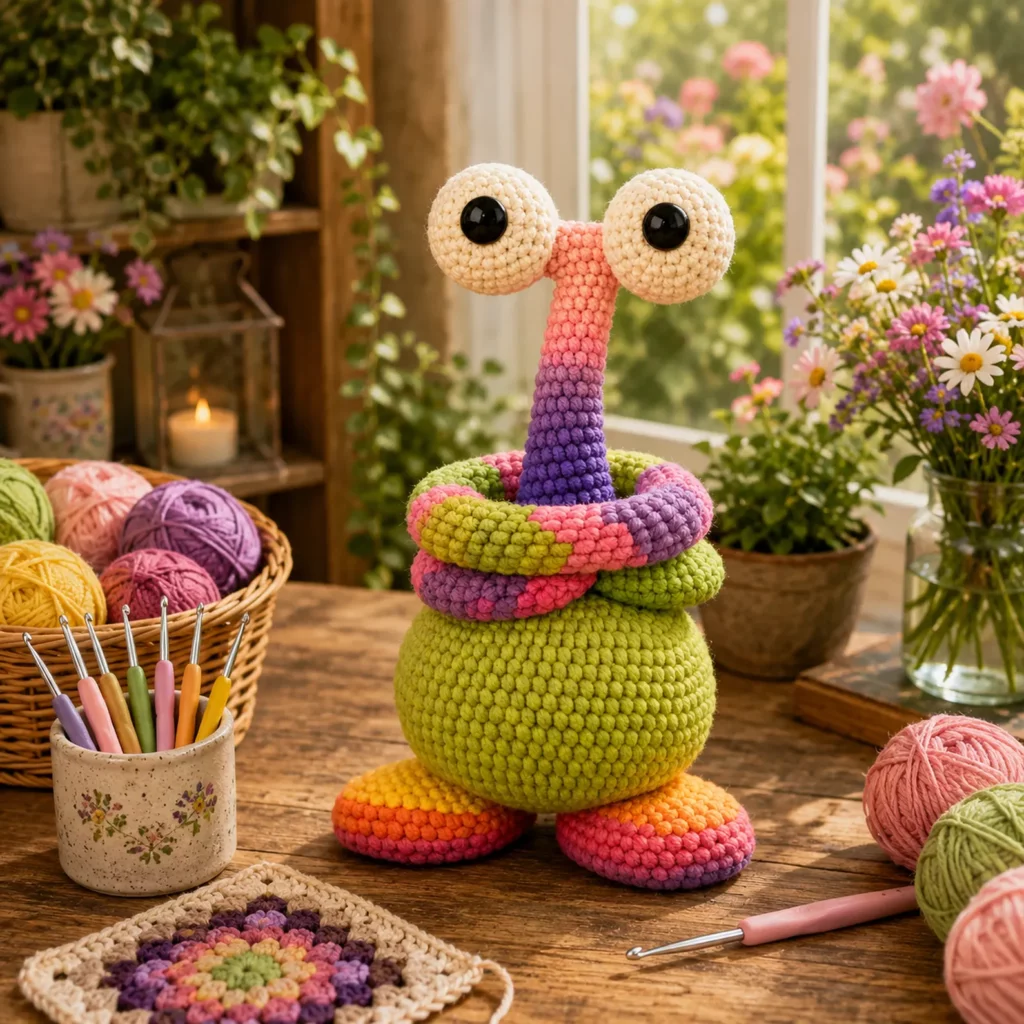
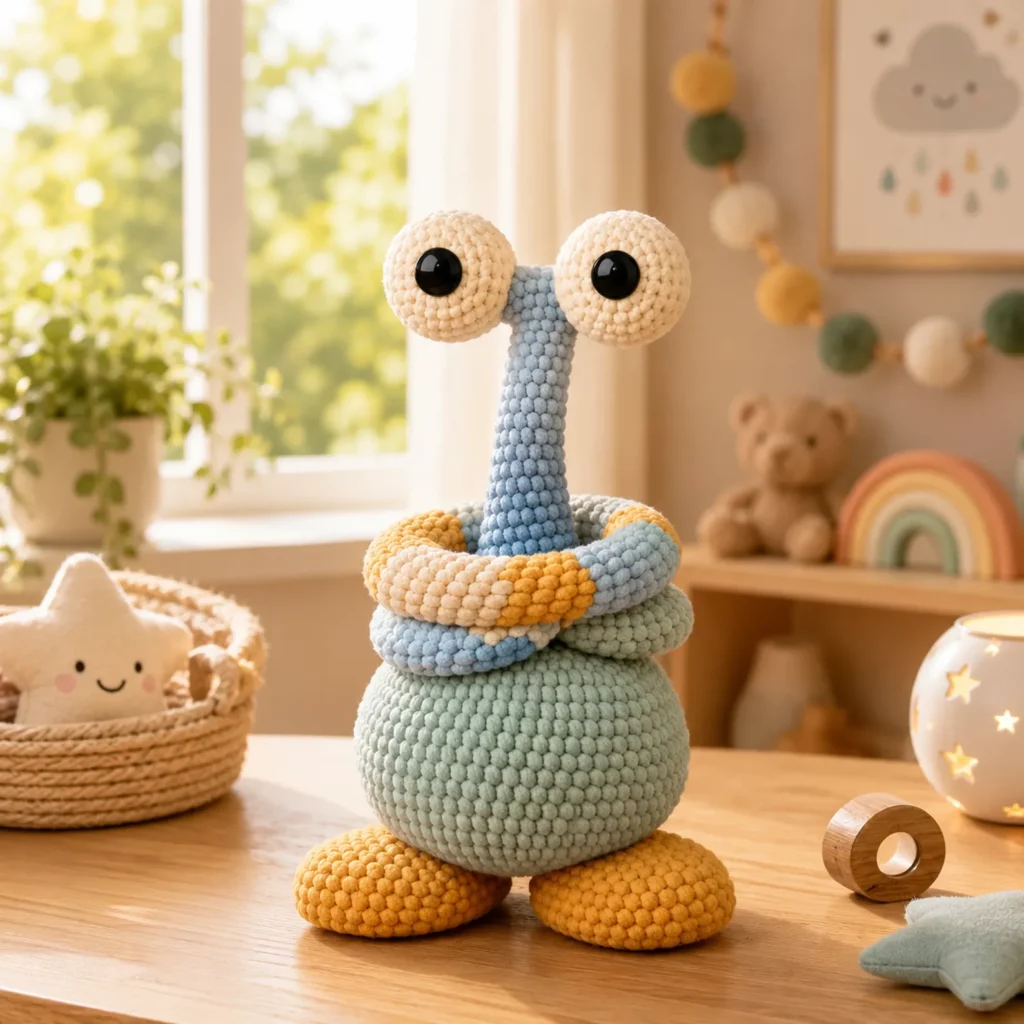
This crochet tutorial walks you through creating a chunky plush creature with a round body, oversized feet, a tall neck, and huge expressive eyes. The neck has a soft color-gradient look, and the “coiled scarf” detail around the neck adds movement and texture. The best part? The construction is actually simple: it’s mostly basic shapes made in single crochet, and you can choose how detailed you want to go.
Whether you’re using velvety plush yarn for a super squishy toy or regular worsted cotton for sharper stitch definition, this crochet pattern is easy to customize. Make it pastel, rainbow, neon, or earthy—this creature looks good in any palette.
Detailed Description of the Crochet Pattern#
This amigurumi crochet pattern creates a standing plush monster with a playful, cartoon-like style. The overall silhouette is built from these components:
A round body that feels like a plush ball
The body is a large sphere or slightly oval ball that’s stuffed firmly. This gives your monster that “squishy but structured” look and helps it stand when paired with wide feet.
Two big, flat feet for stability
The feet are oversized ovals (or flattened capsules) that act like little platforms. They’re great for balance, and they also make the monster look extra cute.
A tall neck that supports the eyes
The neck is a long tube, slightly tapered if you want a gentle “cone” shape. This is where you can add color changes to create a gradient effect.
Two eye stalks and big eyeballs
The eyes sit on either side of a short bar at the top of the neck, giving that funny wide-eyed look. The eyeballs are small spheres with safety eyes.
A coiled “scarf” detail
Around the base of the neck are several thick coils made like short tubes or rings, stitched in a stacked wrap. This adds volume and makes the design look extra unique—like the monster is wearing a chunky neck warmer.
This crochet pattern works best when you keep the fabric dense and tight so the stuffing doesn’t show. Plush yarn makes it look extra cuddly, but even basic yarn looks adorable with the same construction.
Skill Level Explanation#
This is a beginner-friendly to intermediate crochet pattern.
You’ll be comfortable if you can
- Crochet single crochet in continuous rounds
- Increase and decrease evenly
- Stuff and shape amigurumi parts
- Sew pieces together securely
- Count rounds and stitches using a marker
You’ll practice
- Making stable feet and balancing a standing plush
- Sewing multiple parts symmetrically (eyes and coils)
- Working clean color changes if you want the gradient neck
- Managing plush yarn tension if you choose chenille/velvet
If you’ve made a basic amigurumi ball before, you can make this monster. The “fancy” look comes from assembly and fun details, not complicated stitches.
Materials Needed#
Yarn
You can make this crochet for beginners project with several yarn types. Your yarn choice changes the final vibe.
Best yarn for the look
- Plush chenille/velvet yarn for a squishy, modern plush finish
- Cotton yarn for crisp stitches and a more “illustrated” look
- Acrylic yarn for softness and easy care
Yarn weight
- Chunky/super bulky for a big plush monster
- Worsted weight for a smaller desk buddy
Color suggestions
- Body: bright green (or any main color)
- Neck: gradient blend (pink to purple), or stripe your own
- Coils/scarf: multicolor or alternating bright colors
- Feet: two-tone gradient for a fun pop
- Eyes: cream/ivory with black accents
Yarn tips
- Plush yarn hides stitches, so use a stitch marker and count carefully
- Cotton shows every stitch, so invisible decreases make a big difference
- If your yarn splits, switch to a slightly larger hook or a smoother yarn
Hook
Pick a hook that creates tight stitches.
- Plush chunky yarn: 5.0 mm to 7.0 mm
- Worsted yarn: 3.25 mm to 4.0 mm
Go down a hook size if stuffing shows through.
Notions
- Stitch marker
- Tapestry needle
- Scissors
- Fiberfill stuffing
- Safety eyes (10 mm to 18 mm depending on size) or embroidered eyes
- Optional: plastic canvas circle for body base (display only)
- Optional: dowel or internal support for neck (display only, not child-safe)
Safety note
For babies and toddlers, embroider eyes and avoid any internal support or hard parts.
Stitches & Techniques Explained#
US terms
Abbreviations
- MR magic ring
- ch chain
- sl st slip stitch
- sc single crochet
- inc increase (2 sc in one stitch)
- dec decrease (sc 2 stitches together)
- BLO back loop only
Invisible decrease
Pick up the front loops of the next two stitches and sc them together. This makes shaping smoother, especially on the eyeballs and body.
Color changes for a gradient
If you don’t have gradient yarn, you can create the effect by switching colors every few rounds and blending with a “fade” row. Change color on the last yarn-over of the last stitch of the round.
Stability tricks
A standing plush looks best when
- Feet are wide and firm
- The body base is slightly flattened
- The neck is stuffed firmly and sewn strongly with multiple passes
Step-by-Step Instructions#
Work in continuous rounds unless stated. Use a stitch marker.
This is written as a free crochet pattern-style tutorial. Adjust stitch counts for your preferred size.
Body
Use main body color (green).
Round 1
6 sc in MR (6)
Round 2
inc around (12)
Round 3
(sc, inc) around (18)
Round 4
(2 sc, inc) around (24)
Round 5
(3 sc, inc) around (30)
Round 6
(4 sc, inc) around (36)
Round 7
(5 sc, inc) around (42)
Round 8
(6 sc, inc) around (48)
Rounds 9 to 16
sc around (48)
Begin shaping down
Round 17
(6 sc, dec) around (42)
Round 18
sc around (42)
Round 19
(5 sc, dec) around (36)
Round 20
sc around (36)
Round 21
(4 sc, dec) around (30)
Round 22
sc around (30)
Stuff firmly now and shape into a smooth ball. Flatten the base slightly with your hands.
Round 23
(3 sc, dec) around (24)
Round 24
(2 sc, dec) around (18)
Round 25
(sc, dec) around (12)
Round 26
dec around (6)
Fasten off and close.
Feet
Make two. Use a fun gradient or two colors.
Create an oval base
Ch 10 (adjust for size)
Round 1
Sc in 2nd ch from hook and across, 3 sc in last ch, then sc back along underside, 2 sc in last ch to close the oval.
Round 2
Sc around, adding increases at both curved ends so the oval grows evenly.
Round 3
Sc around (no increases) for a neat edge.
Build foot height
Rounds 4 to 6
Sc around. Stuff lightly and flatten so the foot is wide rather than tall.
Fasten off leaving a long tail. Make the second foot.
Foot placement tip
Feet should sit forward under the body like big “shoes.” Pin them first and test the balance before sewing.
Neck
Use a gradient yarn or your chosen neck colors.
Round 1
6 sc in MR (6)
Round 2
inc around (12)
Rounds 3 to 18
Sc around (12)
For a taller neck, add more rounds. For a slightly tapered neck, do one decrease round near the top, then continue straight.
Stuff firmly, but don’t overstuff so it bends awkwardly. Fasten off with a long tail for sewing.
Attach neck to body
Sew the neck to the top center of the body with multiple passes around the seam. This join holds a lot of weight (the eyes), so don’t rush this step.
Eye bar
Use the neck’s top color or a matching shade.
Ch 8 to 10
Sc back along the chain to make a firm strip.
Fasten off.
This becomes the bar that sits across the top of the neck and holds the eye stalks. Stitch it securely to the top of the neck.
Eye stalks
Make two in the neck top color.
Round 1
6 sc in MR (6)
Rounds 2 to 6
Sc around (6)
Stuff lightly. Fasten off with tail.
Sew each stalk to the ends of the eye bar.
Eyeballs
Make two in cream/ivory.
Round 1
6 sc in MR (6)
Round 2
inc around (12)
Round 3
(sc, inc) around (18)
Rounds 4 to 6
Sc around (18)
Insert safety eyes between rounds 4 and 5 (centered).
Begin shaping down
Round 7
( sc, dec) around (12)
Stuff firmly.
Round 8
dec around (6)
Fasten off and close.
Sew eyeballs to the tops of the stalks so the eyes face forward evenly.
Coiled neck scarf
This is the signature detail. Make 3 to 5 coils in alternating colors.
Coil tube (make several)
Round 1
6 sc in MR (6)
Round 2
inc around (12)
Rounds 3 to 6
Sc around (12)
Stuff lightly so it stays plump but still flexible. Fasten off.
Stack and attach
Wrap coils around the neck base like a chunky scarf. Stitch each coil to the neck and to the coil beneath it in a few hidden spots so the stack doesn’t slide.
Optional small side coil
Add one extra coil that sits slightly to the side like a “tail” of the scarf for extra personality.
Assembly and final shaping
- Sew feet to the body bottom front.
- Check balance on a flat surface.
- Add extra stuffing to the body base if needed.
- Make sure the neck is straight and secure.
- Adjust eye angle so it looks cute and curious.
Common Mistakes and How to Avoid Them#
The monster won’t stand
- Make feet wider (add one increase round to the oval base)
- Stuff feet more firmly and flatten them
- Stuff the body base more firmly
- Move feet slightly forward so they act like supports
Neck feels floppy
- Stuff more firmly
- Sew the neck join with multiple passes
- Use a thicker neck (increase to 18 stitches, then work straight)
- For display only, add a simple internal support (not for children)
Eyes look uneven
- Measure stalk placement from the center
- Pin eyeballs first before sewing
- Make sure safety eyes are inserted at the same round on both eyeballs
Coils slide around
- Stitch each coil to the neck at 3 to 4 points
- Also tack coil-to-coil in a couple places
- Avoid overstuffing coils (too stiff = harder to wrap)
Plush yarn makes counting hard
- Use a stitch marker every round
- Count with a click counter or write down round numbers
- Feel the stitches with your fingers instead of relying on sight
Expert Tips for Better Results#
- Use invisible decreases on the eyeballs so they look perfectly round
- Add a tiny embroidered smile on the body for extra character
- If you want a more “monster” look, embroider tiny freckles or dots on the neck
- Use one round of BLO at the body base to create a subtle “base edge”
- For a clean finish, weave ends inside and run them through stuffing so they don’t pop out
Variations and Customization Ideas#
- Rainbow monster: make each coil a different color and use a rainbow gradient neck
- Pastel nursery version: mint body, lavender coils, soft peach neck
- Mini version: use sport yarn and smaller safety eyes for a desk buddy
- Extra silly version: add a tiny tongue or a small felt tooth (display only)
- Two-headed version: duplicate the neck and eyes for a twin monster look
- Keychain version: shrink everything and add a loop at the top of the neck (embroidered eyes recommended)
Benefits of This Crochet Project#
- A crochet pattern that’s playful, unique, and highly giftable
- Great stash-buster for bright leftover yarn colors
- Beginner-friendly construction with fun finishing details
- Builds confidence in amigurumi shaping and assembly
- Makes an instant “conversation piece” for desks, shelves, and nurseries
- Looks amazing in plush yarn but works in any yarn you like
Internal Linking Suggestions#
You may also like
- Easy crochet pattern for a plush octopus
- Crochet tutorial for working with plush yarn
- How to do invisible decrease for amigurumi
- Free crochet pattern for beginner amigurumi balls
- DIY crochet tassels and pom-poms for toy details
FAQ Section#
What yarn works best for this crochet pattern
Plush chenille yarn makes it super cuddly, while cotton gives crisp stitches. Both work well—choose based on the look you want.
Can I make this crochet for beginners project without safety eyes
Yes. Embroider the eyes or use felt circles for display. For baby-safe toys, embroidered eyes are best.
How do I make the monster taller
Add more rounds to the neck. You can also increase the neck stitch count to keep it sturdy if you add a lot of height.
How do I keep the neck from bending
Stuff firmly and sew the neck join securely. For display only, you can add internal support, but avoid this for children’s toys.
Do I have to make the coils
No. The coils are decorative. You can replace them with a simple collar band, a scarf strip, or skip them entirely for a cleaner look.
How can I make the monster stand better
Wider feet, firmer stuffing, and slightly forward foot placement are the best fixes. A slightly flattened body base also helps.
Conclusion#
This long-neck monster amigurumi crochet pattern is the perfect “fun make” when you want something cute, goofy, and totally original. The round body and giant feet give it a stable plush shape, the tall neck and wide eyes create instant personality, and the colorful coils make it look like a finished character instead of just a toy.
If you want, tell me what yarn weight you’re using (plush chunky or worsted) and how tall you want the finished monster to be, and I’ll adjust the neck and body stitch counts so your proportions come out perfectly.


