


Introduction#
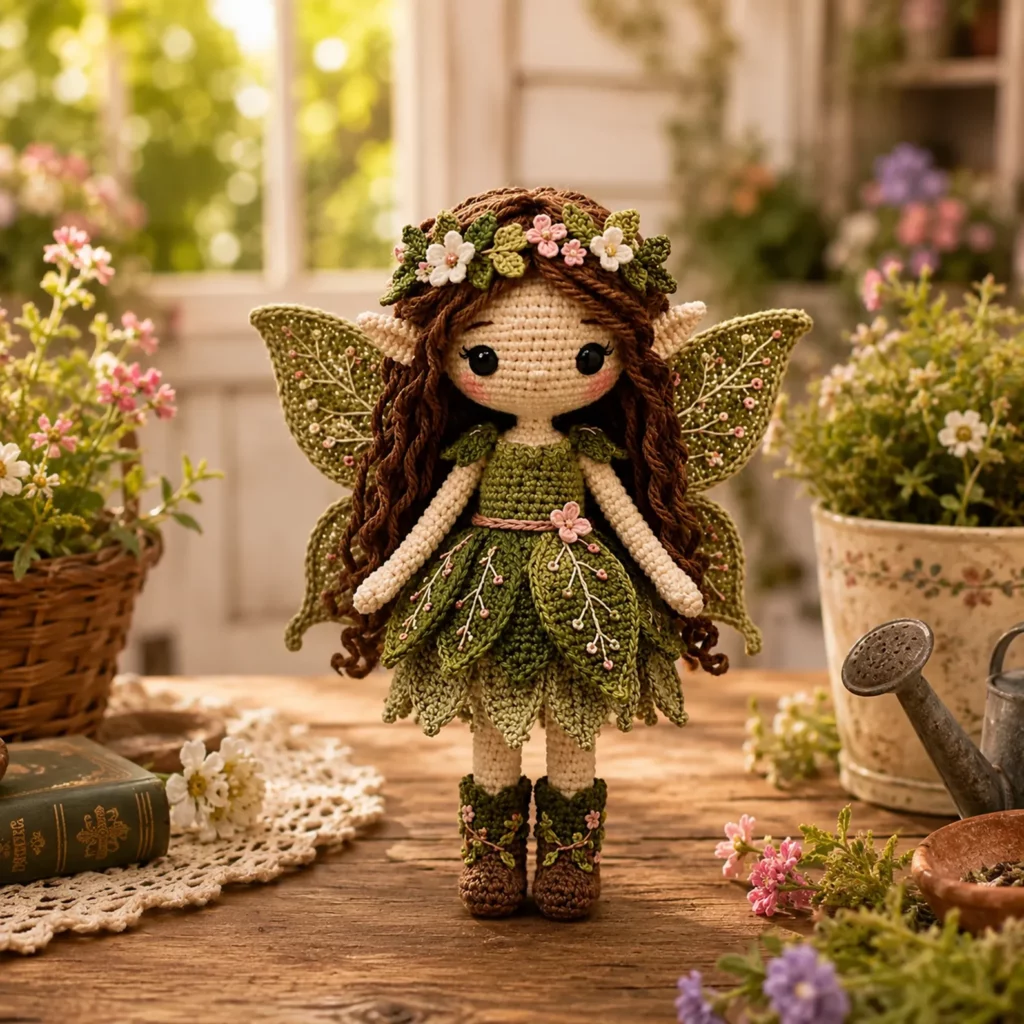
If you’ve been craving a crochet project that feels like a tiny storybook come to life, this woodland fairy amigurumi is the kind of make that instantly sparks joy. She has a sweet oversized doll head, delicate pointed ears, soft curly hair, embroidered blush details, and the most charming nature-inspired outfit: a leafy dress, little boots, and airy wings that look like they belong in a mossy forest glade.
This crochet pattern is designed to feel achievable while still teaching you “wow” techniques you can reuse on future dolls—like shaping a clean face, building a leaf skirt that drapes nicely, making structured wings, and adding floral details without turning the project into a complicated puzzle. The construction follows a simple amigurumi approach: crochet the parts, stuff firmly, assemble neatly, then add the magic with finishing.
Below you’ll find a detailed, educational crochet tutorial-style guide: materials, stitch explanations, step-by-step instructions, assembly, and expert tips for making your fairy look polished and gift-worthy.
Explore more beginner amigurumi crochet patterns in our pattern library.
Detailed Description of the Crochet Pattern#
This is a classic crochet doll build with fantasy details layered on top. The base is a smooth, tight single crochet fabric so the stuffing doesn’t show and the doll holds its shape well. The fairy features:
Head and face (skin tone): worked in continuous rounds with increases/decreases for a round, smooth shape.
Pointed ears (skin tone): small triangles/leaf shapes sewn to the sides of the head.
Body (green dress bodice): a narrow torso that transitions into a skirt base.
Arms (skin tone): slim tubes with optional tiny sleeve ruffles at the shoulders.
Legs (skin tone): slim tubes attached to the body, with separate boots/shoes (brown) crocheted on or added as a separate piece.
Hair (brown): long yarn curls or crocheted strands attached to a hair cap for a full, layered look.
Leaf skirt (greens): overlapping leaf panels that create a petal/leaf silhouette around the waist.
Wings (green, with vein-like embroidery): shaped wing pieces that can be lightly stiffened or backed for structure, then embroidered for delicate botanical detail.
Flower crown (greens + white/pink): tiny flowers and leaves stitched onto the head like a garland.
Overall construction is approachable: create the doll base first (head, body, limbs), then add ears, hair, wings, leaf skirt, and crown as finishing layers.
Skill Level Explanation#
Skill Level: Confident Beginner to Intermediate Beginner
You’ll do great if you already know:
Single crochet (sc)
Increase (inc) and decrease (dec)
Working in continuous rounds (spiral)
Basic sewing/assembly for amigurumi
Newer skills you’ll learn (or practice):
Invisible decrease (for smoother shaping)
Neat color changes (for bodice/boots)
Attaching hair evenly (without bald spots)
Simple embroidery for wing veins and facial details
Making small decorative elements (tiny flowers/leaves)
If you’ve made one basic amigurumi animal, this is a fun next step into dolls because the shaping is familiar—just with extra cute details.
Materials Needed#
Yarn
Use smooth yarn for the face/body so stitches look clean and consistent. For the dress, wings, and leaves, a smooth yarn also helps the texture show.
Suggested yarn weight:
DK (Category 3) for a delicate doll (high detail)
Worsted (Category 4) for a slightly larger, cuddlier doll (faster)
Colors (example set):
A: Skin tone (cream/beige)
B: Hair (medium/dark brown)
C: Dress bodice (moss/olive green)
D: Leaf skirt (two greens: light + dark)
E: Wings (sage/olive)
F: Boots (brown)
G: Flowers (white + soft pink)
Tips for yarn choice:
Cotton gives crisp stitch definition and a very “clean” doll face.
Acrylic is softer and squishier, great for gifts, and usually easier to find.
Try to keep all colors the same yarn brand/weight so the doll stays proportional.
Hook
Use a hook one size smaller than the yarn label suggests to keep stitches tight.
DK: 2.75–3.25 mm
Worsted: 3.25–4.0 mm
If you can see stuffing through the stitches, go down another hook size.
Notions
Stitch marker
Yarn needle
Scissors
Fiberfill stuffing
Safety eyes (8–12 mm depending on doll size)
Black embroidery floss or thin black yarn (for lashes/nose/mouth)
White or pale floss (for wing veins)
Optional: blush (cosmetic blush or pastel chalk)
Optional: pipe cleaner or floral wire (to lightly pose arms/wings—only for display dolls)
Safety Note
If the doll is for a baby/toddler, embroider the eyes instead of using safety eyes, and stitch all decorative elements extremely securely (flowers, crown pieces, wing attachments).
Stitches & Techniques Explained#
Common Abbreviations
MR = magic ring
sc = single crochet
inc = increase (2 sc in same stitch)
dec = decrease (single crochet 2 stitches together)
inv dec = invisible decrease
sl st = slip stitch
ch = chain
BLO = back loop only
FLO = front loop only
( ) = repeat
[ ] = stitch count
Invisible Decrease (Recommended)
Insert hook into the front loop of the next stitch, then into the front loop of the following stitch, yarn over and pull through, yarn over and complete sc. This keeps the decrease smooth and less “bumpy.”
Clean Color Change (For Bodice/Boots)
On the last stitch before the color change, work the stitch until 2 loops remain on hook, yarn over with new color, pull through the last 2 loops, then continue.
Yarn Curl Hair (Easy, Full Look)
Cut strands of yarn, loop-lark’s head knot them onto a crocheted hair cap, and twist or braid small sections for defined curls. This is beginner-friendly and gives that soft, storybook hair style.
Simple Wing Vein Embroidery
Use white/tan/pale green embroidery floss and stitch thin lines outward from a “center vein” to mimic leaf veins. Small French knots or tiny dots can create a magical speckled effect.
Step-by-Step Instructions#
Finished Size
With DK yarn and a 3.0 mm hook: approximately 8–10 inches (20–25 cm) tall.
With worsted yarn and a 3.5–4.0 mm hook: approximately 10–12 inches (25–30 cm) tall.
Size varies based on tension and how firmly you stuff.
Notes Before You Start
Work in continuous rounds unless stated.
Use a stitch marker to track rounds.
Stuff firmly, especially the head and torso, so the doll holds shape.
For the neatest face, embroider details before final assembly when possible.
Color Key
A = Skin tone
B = Hair
C = Bodice green
D1/D2 = Leaf skirt greens
E = Wings green
F = Boots brown
G = Flower colors
Head (Color A)#
Round 1: 6 sc in MR [6]
Round 2: inc around [12]
Round 3: (sc, inc) around [18]
Round 4: (2 sc, inc) around [24]
Round 5: (3 sc, inc) around [30]
Round 6: (4 sc, inc) around [36]
Round 7: (5 sc, inc) around [42]
Rounds 8–12: sc around [42]
Place safety eyes between Rounds 10–11, about 7–9 stitches apart (adjust for your preferred expression).
Round 13: (5 sc, dec) around [36]
Round 14: (4 sc, dec) around [30]
Round 15: (3 sc, dec) around [24]
Stuff firmly, shaping into a smooth sphere.
Round 16: (2 sc, dec) around [18]
Round 17: (sc, dec) around [12]
Round 18: dec around [6]
Fasten off, close opening.
Face Embroidery
With black floss, embroider a tiny nose (small vertical stitch) and a gentle smile. Add lashes if desired (2–3 short stitches angled outward). Add blush lightly beneath the eyes.
Ears (Make 2, Color A)#
Round 1: 4 sc in MR [4]
Round 2: (sc, inc) around [6]
Round 3: (2 sc, inc) around [8]
Round 4: sc around [8]
Flatten ear and sc across the top to close (about 4 sc). Fasten off with a long tail for sewing.
Tip: If you want a sharper “elf” point, make the ear slightly longer by adding one more round at [8] before closing.
Body + Dress Bodice (Start Color C)#
Round 1: 6 sc in MR [6]
Round 2: inc around [12]
Round 3: (sc, inc) around [18]
Round 4: sc around [18]
Round 5: (4 sc, dec) around [15]
Round 6: sc around [15]
Round 7: (3 sc, dec) around [12]
Round 8: sc around [12]
Round 9: (2 sc, dec) around [9]
Rounds 10–12: sc around [9]
Stuff torso firmly but not overly bulky.
Round 13: (2 sc, inc) around [12]
Round 14: (3 sc, inc) around [15]
Round 15: (4 sc, inc) around [18]
Round 16: BLO sc around [18] (this creates a ridge for attaching the leaf skirt)
Round 17: sc around [18]
Fasten off leaving a long tail if you will sew head on later (or continue directly into legs if you prefer a one-piece body; most doll makers attach legs separately for easier positioning).
Arms (Make 2, Color A)#
Round 1: 6 sc in MR [6]
Round 2: sc around [6]
Round 3: (sc, dec) around [4]
Rounds 4–12: sc around [4]
Lightly stuff only the hand/forearm area, leaving the top unstuffed so it sits nicely when sewn.
Optional sleeve ruffle (Color C): join green at top, ch 1, (inc) around for a tiny frill, sl st to join.
Fasten off with a long tail.
Legs (Make 2, Start Color A)#
Round 1: 6 sc in MR [6]
Round 2: inc around [12]
Round 3: sc around [12]
Round 4: (2 sc, dec) around [9]
Rounds 5–12: sc around [9]
Stuff firmly so the legs are stable.
If you prefer longer legs, add 1–3 extra rounds at [9].
Fasten off with a long tail for sewing to the body.
Boots/Shoes (Make 2, Color F, worked as a “boot cover”)#
This is an easy boot that slips over the foot end of the leg. You can also crochet boots directly onto legs by changing colors; the cover method is forgiving and easy to adjust.
Round 1: 6 sc in MR [6]
Round 2: inc around [12]
Round 3: sc around [12]
Round 4: (3 sc, dec) around [10]
Round 5: sc around [10]
Rounds 6–8: sc around [10]
Optional cuff detail (Color C or D1): join yarn, ch 1, sc in FLO around for a cuff edge.
Fasten off, slide onto leg, and stitch in place.
Hair Cap (Color B)#
Round 1: 6 sc in MR [6]
Round 2: inc around [12]
Round 3: (sc, inc) around [18]
Round 4: (2 sc, inc) around [24]
Round 5: (3 sc, inc) around [30]
Round 6: (4 sc, inc) around [36]
Rounds 7–9: sc around [36]
Fasten off with a long tail. Test fit on head: it should cover the crown and sit slightly above the eyes.
Add Yarn Hair Strands
Cut many strands (about 10–14 inches for DK, longer for worsted). Attach to the cap with a lark’s head knot, working in rows from back to front so the hair naturally drapes forward.
For defined curls: twist each strand tightly, fold in half, and let it kink into a spiral, or braid sections and lightly steam (if yarn allows).
Stitch the finished hair cap onto the head securely.
Leaf Skirt (Make 6–10 Leaves, Colors D1 and D2)#
You’ll attach leaves to the BLO ridge created on the body. Alternate two greens for dimension.
Leaf (worked flat):
Ch 8
Row 1: sc in 2nd ch from hook, hdc, dc, dc, hdc, sc, sl st (forming a tapered leaf)
Row 2 (optional for texture): ch 1, work back along the leaf with sc, adding (sc, ch 1, sc) at the tip for a sharper point
Fasten off with a long tail.
Make enough leaves to wrap around the waist, overlapping slightly like petals.
Attach Skirt
Using the BLO round on the body, sew or slip stitch leaves evenly around. Overlap each leaf by about 1/3 so the skirt looks full and layered. If you want a more “dress-like” flare, add a second layer of leaves slightly lower, stitched behind the first layer.
Wings (Make 2, Color E)#
These wings are shaped like soft leaf wings with a rounded top and tapered bottom.
Ch 10
Row 1: sc in 2nd ch from hook, sc across [9], turn
Row 2: ch 1, inc, sc across to last st, inc [11], turn
Row 3: ch 1, sc across [11], turn
Row 4: ch 1, inc, sc across to last st, inc [13], turn
Row 5: ch 1, sc across [13], turn
Row 6: ch 1, dec, sc across to last st, dec [11], turn
Row 7: ch 1, dec, sc across to last st, dec [9], turn
Row 8: ch 1, dec, sc across to last st, dec [7], turn
Fasten off.
Optional edging: sc evenly around the wing for a clean outline.
Embroider wing veins with pale floss: one center line and small branches. Add tiny dot stitches for a magical speckled look.
Stitch wings to the upper back of the body, angled slightly outward.
Flower Crown (Tiny Flowers + Leaves)#
Simple mini flower (Color G):
MR, (ch 2, sl st) x 5 into ring to form 5 tiny petals, tighten ring, fasten off.
Mini leaves (Color D1):
Ch 4, sl st in 2nd ch, sc, sl st, fasten off.
Stitch flowers and leaves onto the head above the forehead, nestling them into the hairline.
Assembly#
Sew ears to the sides of the head, slightly below the widest part of the head (around eye level looks charming).
Sew head to body centered and firmly. Add extra stitches around the neck for strength.
Sew legs to the underside of the body, evenly spaced so the doll stands.
Sew arms to the sides of the body just below the neckline.
Attach boots if using boot covers.
Stitch hair cap securely, then arrange curls forward.
Attach leaf skirt around the waist ridge so it drapes evenly.
Sew wings to the back, symmetrical and secure.
Add flower crown pieces and any final embroidery (dress details, tiny blossoms, vine stitches on boots).
Common Mistakes and How to Avoid Them#
Gaps showing stuffing in the face or body
Cause: hook too large or loose tension
Fix: size down your hook and keep stitches snug, especially on the head
Lopsided head or “bumpy” decreases
Cause: inconsistent stuffing or standard decreases
Fix: stuff in small amounts and use invisible decreases
Hair looks thin or patchy
Cause: too few strands or uneven placement
Fix: attach hair from back to front in rows, and add extra strands around the part and hairline
Wings flop or twist
Cause: fabric too soft or attachment too loose
Fix: add a single crochet edging, embroider veins for structure, and stitch wings on with several anchor points
Leaf skirt doesn’t sit evenly
Cause: leaves placed too far apart or not overlapped
Fix: overlap by about one-third and distribute leaves with the front as your visual “center”
Expert Tips for Better Results#
Use cotton for the face if you want super crisp doll features and neat embroidery.
Test eye placement with pins first; moving the eyes 1 stitch can change the whole expression.
Stuff the head firmly, then “massage” it into a smooth sphere before closing.
For a professional finish, embroider the face before attaching hair and head to body.
If you want extra sparkle, add tiny beads as flower centers (display dolls only), or use French knots with embroidery floss instead.
To reduce end-weaving, plan your greens: use one green for wings and leaf skirt accents, and one for bodice, so you have fewer color switches.
Variations and Customization Ideas#
Make a mini keychain fairy using sport/fingering yarn and a 2.0–2.5 mm hook.
Change the theme: autumn fairy (rust + mustard leaves), winter fairy (icy blue wings + silver crown), spring fairy (pastel flowers), woodland mushroom fairy (add a tiny cap).
Swap yarn hair for crocheted hair: create long chains, stitch them down in spirals for a “storybook braid” look.
Add a removable capelet: crochet a small collar with leaf edging for a forest guardian vibe.
Make sleepy eyes for baby-safe gifting: embroider curved closed eyes with lashes and skip safety eyes.
Benefits of This Crochet Project#
Builds foundational amigurumi skills (shaping, stuffing, assembly)
Teaches decorative techniques that upgrade any crochet pattern (wings, leaves, embroidery)
Uses small amounts of yarn, great for stash-busting
Makes a gift-worthy handmade keepsake for nurseries, birthdays, and collectors
Highly customizable, so you can create a whole fairy “set” in different colors
Internal Linking Suggestions#
How to Crochet a Magic Ring (Beginner Tutorial)
Invisible Decrease for Amigurumi (Smooth Shaping Guide)
How to Attach Yarn Hair to Crochet Dolls
Best Yarn for Amigurumi (Cotton vs Acrylic)
Beginner Embroidery for Crochet (Faces, Details, and Finishing)
FAQ#
Is this crochet pattern suitable for beginners?
Yes, if you’re comfortable with single crochet, increases, and decreases. The doll base is beginner-friendly; the wings and crown are optional “extras” you can add as you gain confidence.
What yarn works best for a crochet doll like this?
Cotton gives the cleanest stitches and a polished face. Acrylic is softer and more squishy. Choose what matches your intended use (display vs cuddly gift).
How do I make it baby-safe?
Embroider the eyes instead of safety eyes, skip beads, and sew all decorations extremely securely. You can also simplify the crown and wings for safety.
Why does my doll’s head look uneven?
Usually it’s stuffing or missed stitch counts. Stuff in small layers, use a stitch marker, and count each round. A firm, even stuffing job makes the biggest difference.
How do I keep the wings from flopping?
Add a single crochet edging, embroider vein lines (they help structure), and stitch wings on with multiple anchor points. For display dolls, you can lightly stiffen wings with fabric stiffener.
Can I resize the fairy?
Absolutely. Use thicker yarn and a larger hook (while keeping stitches tight) for a bigger doll, or thinner yarn and a smaller hook for a mini fairy. Safety eye size should scale with the head size.
Conclusion#
This woodland fairy amigurumi crochet pattern is the perfect blend of sweet and magical: a simple doll base you can confidently build, plus leafy, floral details that make the finished piece feel truly special. Once you’ve made one, it’s hard to stop—different hair colors, seasonal outfits, and wing styles turn into an entire little fairy collection.
If you tell me your yarn weight (DK or worsted) and the approximate size you want, I can suggest the best safety-eye size and a leaf count for the skirt so your fairy’s proportions come out just right.


