


Introduction#
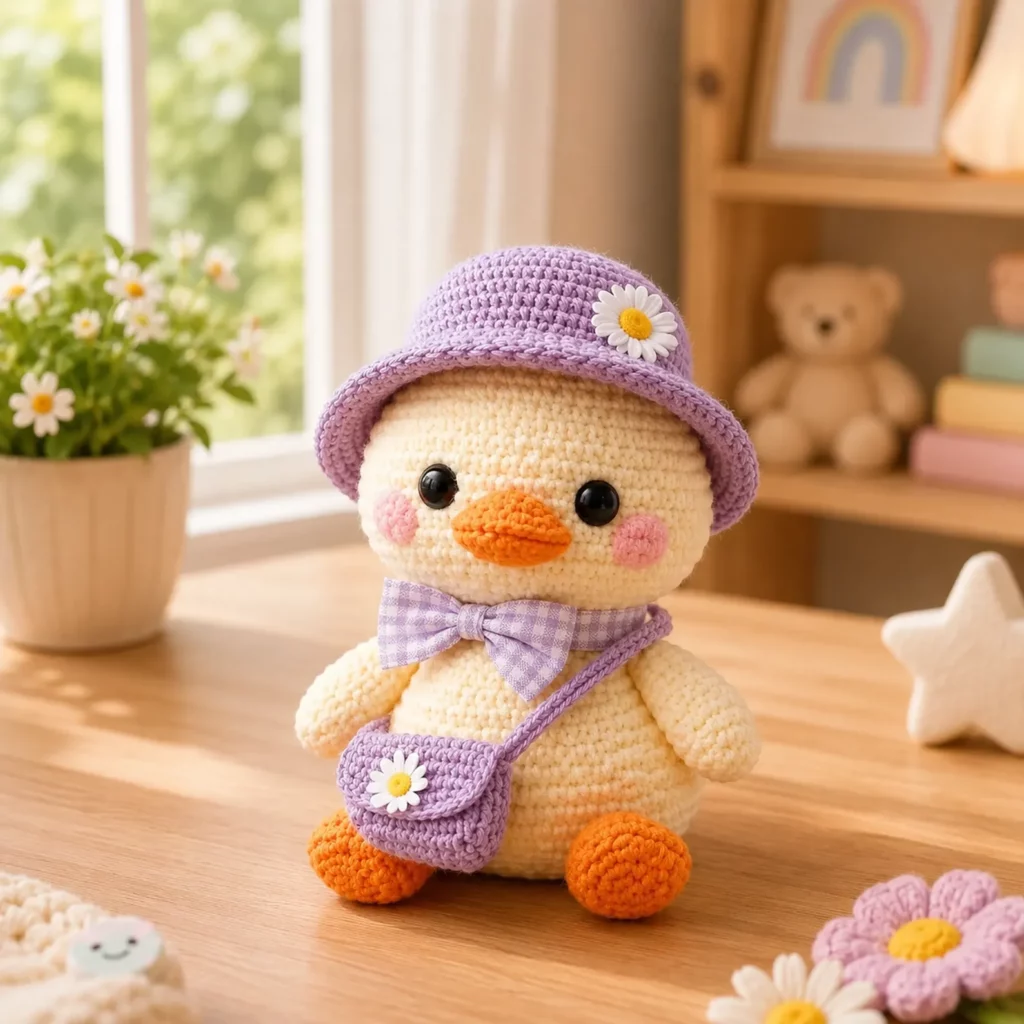
Some crochet projects are cute. And then there are the ones that make you stop mid-scroll and think, “Okay, I have to make that.” A chubby little duck with bright orange beak and feet, soft blush cheeks, and the sweetest accessories (a tiny bucket hat and crossbody bag) is exactly that kind of project.
Explore more beginner amigurumi crochet patterns in our pattern library.
This crochet pattern is meant to feel doable and enjoyable, even if you’re still getting comfortable with amigurumi. The duck itself is built from simple shapes: a round head that blends into a plump body, tiny wings, and two oversized feet that help it sit upright. The accessories are the fun part—you’ll learn how to crochet a neat hat brim and a miniature bag flap, then style everything so it looks polished and intentional.
If you want a handmade gift for a baby shower (with baby-safe options), a desk buddy, spring decor, or a “just because” plush that makes people smile, this is the kind of free crochet pattern you’ll come back to again and again.
Detailed Description of the Crochet Pattern#
This amigurumi duck is a seated plush with a clean, minimal face and cute styling details. The overall look is smooth single crochet with firm stuffing for a rounded shape.
The finished duck includes:
A round head and body worked as one piece for a seamless look
A crocheted beak (oval “pillow” shape) sewn to the face
Two oversized feet (thick ovals) that create a stable sitting base
Two small wings attached to the sides
Optional blush cheeks for extra sweetness
A bucket hat with a small brim and optional daisy embellishment
A mini crossbody bag with a flap and strap (plus optional daisy detail)
The accessories are removable if you prefer a simpler duck, but they’re also what makes this DIY crochet project look especially gift-worthy.
Skill Level Explanation#
Skill Level: Beginner to Confident Beginner
This easy crochet pattern is friendly if you know or are learning:
Magic ring (or an alternative starting method)
Single crochet (sc)
Increase (inc) and decrease (dec)
Working in continuous rounds (spiral)
Basic sewing and weaving in ends
You’ll also practice a few helpful skills:
Shaping a beak so it looks neat and symmetrical
Positioning safety eyes for a cute expression
Working a brim (simple increase round) for the bucket hat
Making a tiny bag strap that doesn’t twist
This crochet tutorial is written with lots of structure so crochet for beginners can follow along without guessing.
Materials Needed#
Yarn
Worsted weight (Category 4) yarn works beautifully for a plush about 7–10 inches tall, depending on tension. DK (Category 3) also works for a smaller duck.
Suggested colors:
Main body: cream, off-white, or pale yellow
Beak and feet: orange (or a softer “carrot” orange)
Hat and bag: tan, beige, or light brown
Optional accent: white and yellow for a daisy appliqué
Optional blush: pink yarn, cosmetic blush, or pastel chalk
Yarn tips for better results:
Cotton gives crisp stitches and very clean edges (great for accessories)
Acrylic gives a softer cuddle feel and is easy to wash
If mixing brands, keep the yarn weight consistent so the pieces fit together
Hook
Use a smaller hook than the yarn label suggests to prevent gaps.
Worsted: 3.25–4.0 mm
DK: 2.75–3.5 mm
If stuffing shows through, go down 0.5 mm.
Notions
Stitch marker
Yarn needle
Scissors
Fiberfill stuffing
Safety eyes 10–12 mm (or embroidery floss for baby-safe eyes)
Black embroidery floss or thin black yarn (optional if embroidering eyes)
Optional: a small scrap of felt for cheek circles (only if not for small children)
Safety Note
If the duck is intended for babies or toddlers, skip safety eyes and embroider the eyes instead. Sew everything securely and avoid glue.
Stitches & Techniques Explained#
Common Abbreviations
MR = magic ring
sc = single crochet
inc = increase (2 sc in the same stitch)
dec = decrease (single crochet 2 together)
sl st = slip stitch
ch = chain
BLO = back loop only
FLO = front loop only
( ) = repeat
[ ] = stitch count
Invisible Decrease (Recommended)
Insert hook into the front loop of the next stitch, then the front loop of the following stitch, yarn over, pull through, yarn over and sc. This creates a smoother finish than a standard decrease.
Clean Color Changes
When changing colors, complete the last yarn over of the final stitch in the old color with the new color. Pull through to finish the stitch, then continue in the new color.
Firm Stuffing for Smooth Shapes
For amigurumi, stuffing density matters as much as stitch counts. Add small bits of fiberfill at a time and push filling into edges so the duck stays round and doesn’t look lumpy.
Step-by-Step Instructions#
Finished Size
With worsted yarn and a 3.75 mm hook: approximately 7–10 inches (18–25 cm) tall seated, depending on how large you make the feet and how firmly you stuff.
Notes Before You Start
Work in continuous rounds unless stated otherwise
Use a stitch marker and move it each round
Stuff as you go, especially the head and body
Read through the whole pattern once so you know what pieces you’ll be making
Color Key (Optional)
A = cream/off-white (duck body)
B = orange (beak and feet)
C = tan/beige (hat and bag)
D = white/yellow (daisy detail)
Head and Body (Worked as One Piece, Color A)
Round 1: 6 sc in MR [6]
Round 2: inc around [12]
Round 3: (sc, inc) around [18]
Round 4: (2 sc, inc) around [24]
Round 5: (3 sc, inc) around [30]
Round 6: (4 sc, inc) around [36]
Round 7: (5 sc, inc) around [42]
Round 8: (6 sc, inc) around [48]
Rounds 9–16: sc around [48]
Eye placement (if using safety eyes):
Place eyes between Rounds 12–13, about 8–9 stitches apart. For a “cute” look, place them slightly lower than you think and a little wider apart.
Begin shaping into body:
Round 17: (6 sc, dec) around [42]
Round 18: (5 sc, dec) around [36]
Round 19: (4 sc, dec) around [30]
This narrows slightly under the head, creating a gentle neck.
Widen for the belly:
Round 20: (4 sc, inc) around [36]
Round 21: (5 sc, inc) around [42]
Round 22: (6 sc, inc) around [48]
Rounds 23–28: sc around [48]
Start stuffing firmly now. Focus on rounding the head first, then the upper body.
Shape down for the base:
Round 29: (6 sc, dec) around [42]
Round 30: sc around [42]
Round 31: (5 sc, dec) around [36]
Round 32: sc around [36]
Round 33: (4 sc, dec) around [30]
Round 34: (3 sc, dec) around [24]
Round 35: (2 sc, dec) around [18]
Round 36: (sc, dec) around [12]
Stuff more firmly, especially at the bottom, so it can sit.
Round 37: dec around [6]
Fasten off and close.
Beak (Color B)
The beak is a small oval that looks best when lightly stuffed and sewn on tightly.
Round 1: 6 sc in MR [6]
Round 2: inc around [12]
Round 3: (sc, inc) around [18]
Rounds 4–5: sc around [18]
Round 6: (sc, dec) around [12]
Round 7: sc around [12]
Fasten off leaving a long tail.
Lightly stuff the beak so it’s plump but not stretched. Sew centered below the eyes. The top edge of the beak should sit about 1–2 rounds under the eyes for a sweet expression.
Optional mouth line:
With a strand of orange or black embroidery floss, stitch a short straight line across the center of the beak to suggest a little “bill split.”
Cheeks (Optional)
For a soft blush look, dab cosmetic blush or pastel chalk lightly on each cheek area. If using yarn, stitch tiny pink ovals under each eye.
Wings (Make 2, Color A)
Round 1: 6 sc in MR [6]
Round 2: (sc, inc) around [9]
Round 3: sc around [9]
Round 4: (2 sc, inc) around [12]
Round 5: sc around [12]
Round 6: (2 sc, dec) around [9]
Round 7: sc around [9]
Flatten and sc across the top to close (about 4–5 sc). Fasten off leaving a long tail.
Sew wings to the sides of the body, slightly forward so the duck looks like it’s giving a tiny hug.
Feet (Make 2, Color B)
These oversized feet are what make the duck sit stably.
Round 1: 6 sc in MR [6]
Round 2: inc around [12]
Round 3: (sc, inc) around [18]
Round 4: (2 sc, inc) around [24]
Round 5: (3 sc, inc) around [30]
Round 6: sc around [30]
Round 7: sc around [30]
Create a shallow “cup” so the foot has some thickness:
Round 8: sc BLO around [30]
Rounds 9–10: sc around [30]
Lightly stuff the front half of the foot (toe area) so it’s rounded, then flatten the opening. Close with sc across (about 12–15 sc depending on how you flatten). Fasten off leaving a long tail.
Sew feet to the lower front of the body. Place them slightly angled outward. The duck should naturally sit with the feet visible in front.
Bucket Hat (Color C)
The hat is a simple cylinder with a brim created by increasing.
Top of hat:
Round 1: 6 sc in MR [6]
Round 2: inc around [12]
Round 3: (sc, inc) around [18]
Round 4: (2 sc, inc) around [24]
Round 5: (3 sc, inc) around [30]
Round 6: (4 sc, inc) around [36]
Round 7: sc around [36]
Rounds 8–12: sc around [36]
If you want a slightly taller bucket hat, add 1–2 more rounds even.
Brim:
Round 13: (5 sc, inc) around [42]
Round 14: sc around [42]
Round 15: (6 sc, inc) around [48]
Round 16: sc around [48]
Fasten off with a long tail.
Try the hat on the duck’s head before sewing. If it’s too tight, add one more increase round at the top (to 42 stitches) and keep the hat sides even. If it’s too loose, reduce the top expansion by stopping at 30 stitches instead of 36.
Daisy Appliqué (Optional, Colors D)
Center (yellow):
Round 1: 6 sc in MR [6], sl st to join, fasten off.
Petals (white):
Join white into any stitch on the center.
Repeat 6 times: ch 3, sl st back into the next stitch on the center.
Fasten off and sew to the hat side.
Mini Crossbody Bag (Color C)
Bag body (small pouch):
Round 1: 6 sc in MR [6]
Round 2: inc around [12]
Round 3: (sc, inc) around [18]
Round 4: (2 sc, inc) around [24]
Round 5: sc around [24]
Rounds 6–10: sc around [24]
Flatten the opening and sc across to close the bottom edge? Instead, we want an opening at the top, so do not close. Fasten off and weave in.
Bag flap:
Attach yarn at the back center of the opening.
Row 1: sc 10, ch 1, turn
Rows 2–4: sc 10, ch 1, turn
Row 5: dec, sc 6, dec (8 sts), ch 1, turn
Row 6: dec, sc 4, dec (6 sts)
Fasten off and sew flap to the bag back edge so it folds over the front.
Strap:
Ch 45–60 (depending on how you want it to sit), then sl st in each chain back to thicken.
Fasten off with long tails. Sew one end to each side of the bag.
Optional daisy detail:
Sew a small daisy (same as the hat) onto the flap corner.
Assembly and Styling
Sew the beak to the face first so you can center the expression
Attach wings next, checking symmetry from the front
Sew feet last and test sitting balance before tightening all stitches
Place hat slightly low on the head for a cozy look, then tack it with a few small stitches (so it stays removable if you only stitch lightly in 2–3 places)
Put the strap across the body and adjust bag position, then stitch the strap ends firmly
Common Mistakes and How to Avoid Them#
The head looks lumpy
Stuff in small pieces and push filling outward with the end of your hook
Make sure the head is fully rounded before the body is completely stuffed
Stuffing shows through stitches
Use a smaller hook
Keep tension firm and even
Avoid overstuffing the beak and feet
The duck won’t sit upright
Sew the feet slightly more forward
Add more stuffing to the lower body
Consider adding a small weighted pouch inside the base (sealed pellets or rice in fabric)
Beak placement looks off
Pin the beak first, then step back and look at the face from a distance
Sew just the top edge first, then adjust before fully stitching around
Hat doesn’t fit right
If tight, increase to a larger top circle before working the sides
If loose, reduce one increase round and shorten the brim
Bag strap twists
Work the strap as chain + slip stitches back, or chain + single crochet back for a flatter strap
Block it gently with steam if needed (keep heat away from acrylic)
Expert Tips for Better Results#
Use invisible decreases on the head and body for a smoother, more professional look
Embroidery thread gives the cleanest eye and smile details if you’re not using safety eyes
For extra neat feet, stuff only the toe area and keep the back flatter so it rests on the surface
Want a perfectly centered beak? Mark the centerline of the face with a temporary stitch marker before sewing
If you want the hat and bag removable, stitch them on with a few “tack” stitches instead of sewing fully around
Variations and Customization Ideas#
Pastel duck: use pale yellow body, peach beak/feet, and a sage hat with tiny white flowers
Classic duckling: bright yellow body, orange beak/feet, simple hat without embellishment
Winter duck: swap the bucket hat for a beanie and add a tiny scarf
Sleepy duck: embroider curved closed eyes and a smaller beak
Mini duck keychain: use DK or sport yarn and reduce hook size, then add a keyring loop on the hat top
Different accessories: replace the bag with a tiny backpack or add a little neck ribbon bow
Benefits of This Crochet Project#
A beginner-friendly crochet pattern with a high “cute payoff”
Teaches clean shaping, stuffing control, and simple accessory construction
A great stash-buster for small amounts of yarn
Works up in manageable pieces, perfect for weekend crocheting
Makes a memorable handmade gift that feels special and styled
Easy to customize for seasons, colors, and themes
Internal Linking Suggestions#
How to Crochet a Magic Ring for Amigurumi
Invisible Decrease Tutorial for Smoother Plush Toys
Best Yarn for Amigurumi and Stuffed Animals
How to Attach Safety Eyes Securely
Beginner Guide to Stuffing Amigurumi Smoothly
Free Crochet Hat Patterns for Small Plushies
FAQ#
Is this crochet pattern good for beginners?
Yes. The duck is built with basic single crochet rounds and simple increases/decreases, which makes it an easy crochet pattern for beginners who want to practice amigurumi.
What yarn weight works best?
Worsted weight yarn creates a sturdy, cuddly duck with clear stitches. DK yarn makes a smaller version with the same stitch counts, just more compact.
What size safety eyes should I use?
For worsted yarn, 10–12 mm safety eyes usually look best. If you want a more “baby” look, choose slightly larger eyes. For kids under 3, embroider eyes instead.
How do I make it sit up without tipping?
Sew the feet slightly forward and stuff the base firmly. Adding a small weighted pouch inside the bottom of the body can also help the duck sit sturdily.
Can I make the hat removable?
Yes. Use a few small tack stitches in 2–3 spots so it stays in place but can still be gently removed if desired.
How do I keep the beak neat and symmetrical?
Lightly stuff it, pin it in place, sew the top edge first, then stitch around evenly. Keep stitches small and close to the edge for a clean outline.
Conclusion#
This sweet duck amigurumi is the kind of crochet pattern that feels calming to make and genuinely charming when finished. The simple body shaping keeps it beginner-friendly, while the bucket hat and tiny crossbody bag add that styled, gift-ready look that makes the whole project stand out.
If you tell me your yarn weight (DK or worsted) and your hook size, I can suggest the best eye size and help you adjust the hat and bag strap length so everything fits your duck perfectly.


