


Introduction#
If you want a crochet project that instantly feels cozy and seasonal, a reindeer amigurumi is one of the sweetest makes you can choose. It’s cute without being overly cartoonish, it looks beautiful as winter décor, and it’s also the kind of handmade gift that people keep for years.
Explore more beginner amigurumi crochet patterns in our pattern library.
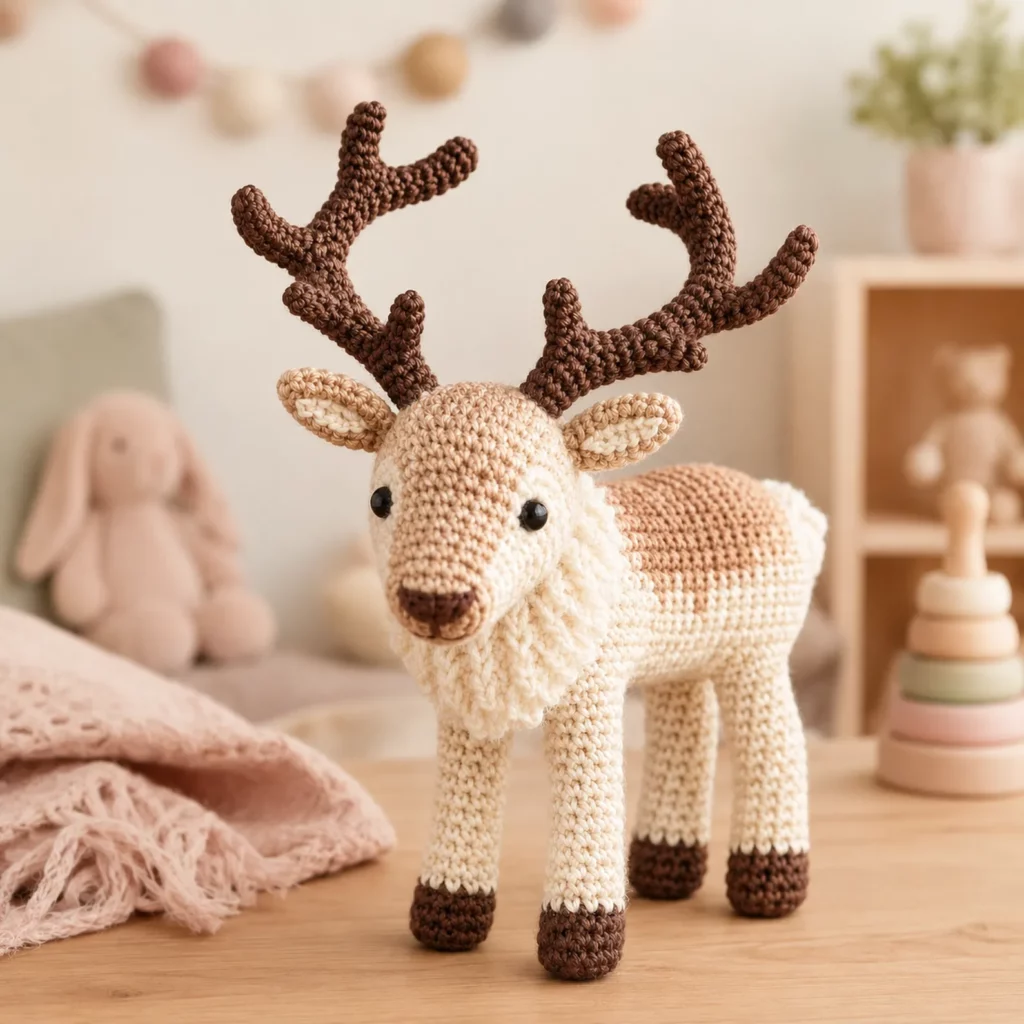
This crochet pattern teaches you how to make a standing reindeer with a long body, sturdy legs, a gentle snout, and branchy antlers that give it that classic woodland look. The extra-special detail is the fluffy neck ruff, which adds texture and makes the finished reindeer look more “life-like” and soft.
In this crochet tutorial, you’ll get a clear, beginner-friendly plan for each piece, plus tips on stuffing, balancing the legs, and assembling everything neatly so your reindeer stands confidently.
Detailed Description of the Crochet Pattern#
This reindeer is designed with a realistic-yet-cute silhouette. The head is slightly elongated into a snout, the body is a smooth cylinder with gentle shaping, and the legs are slim but firm to support standing. The antlers are crocheted separately as branchy shapes, then sewn securely to the top of the head. Small ears sit slightly to the side, and the neck ruff is added like a soft collar for a warm, wintery finish.
Main features you’ll be making
- A smooth head with a shaped snout
- Safety eyes or embroidered eyes placed for a gentle expression
- Two ears with a lighter inner ear detail
- Two antlers with multiple branches
- A long body that balances on four legs
- Dark hooves for contrast
- A fluffy neck ruff made with bobbles or loop stitch for texture
This crochet pattern is built in separate parts, which is great because you can perfect each piece before assembly. It also makes the pattern easier to customize in size and color.
Skill Level Explanation#
This is a confident beginner to intermediate crochet pattern.
You’ll be comfortable if you can
- Crochet single crochet in continuous rounds
- Increase and decrease cleanly
- Count stitches and rounds consistently
- Sew amigurumi parts securely
You’ll also practice
- Shaping long parts (legs and body) without wobble
- Making and attaching antlers symmetrically
- Adding texture for the neck ruff
- Balancing a standing amigurumi so it doesn’t tip
If you’ve made a basic amigurumi animal before, this is a fun next step because it looks detailed but uses mostly simple stitches.
Materials Needed#
Yarn
Smooth yarn gives the cleanest reindeer look, especially for the face and legs.
Recommended yarn weight
- DK weight for a detailed, collectible look
- Worsted weight for a slightly larger, cuddlier reindeer
Suggested colors
- Main body color in light brown, taupe, or soft gray
- Dark brown for antlers
- Cream or white for the neck ruff
- Dark gray or black for hooves and nose details
- Optional lighter shade for muzzle highlights
Yarn tips
- Cotton yarn gives crisp definition and makes the animal look polished
- Acrylic yarn is softer and works well if you keep tension tight
- Avoid fuzzy yarn for the main body because it hides shaping
- If you want extra fluff only at the neck, use a textured yarn just for the ruff
Hook
Choose a hook that creates tight fabric so stuffing doesn’t show.
- DK yarn often works well with a 2.75 mm to 3.25 mm hook
- Worsted yarn often works well with a 3.25 mm to 4.0 mm hook
Notions
- Stitch marker
- Tapestry needle
- Scissors
- Fiberfill stuffing
- Safety eyes 8 mm to 10 mm, or embroidery floss for eyes
- Optional craft wire or pipe cleaners for antler stability
- Optional small weights or pellets in a fabric pouch for the body base (display only)
Safety note
For baby-safe toys, embroider eyes and avoid wire or pellets.
Stitches & Techniques Explained#
Abbreviations in US terms
- MR magic ring
- ch chain
- sl st slip stitch
- sc single crochet
- inc increase (2 sc in same stitch)
- dec decrease (sc two stitches together)
- BLO back loop only
- FLO front loop only
- st stitch
Invisible decrease
Pick up the front loops of the next two stitches, then sc them together. This leaves a smoother finish, especially on the snout and legs.
Tight tension for amigurumi
Amigurumi looks best when stitches are tight and uniform. If you see gaps between stitches, go down a hook size.
Fluffy neck ruff options
You can create the neck ruff in two simple ways
- Loop stitch for a fuzzy, woolly look
- Bobble stitch for a thick, textured collar
If you prefer an easy method, bobble stitch is usually simpler and still creates great texture.
Step-by-Step Instructions#
This free crochet pattern is written in a practical tutorial style. Work in continuous rounds unless stated. Use a stitch marker to track rounds.
Finished size
- DK yarn gives a reindeer around 15 to 22 cm long
- Worsted yarn gives a reindeer around 20 to 28 cm long
Notes
- Stuff firmly for a standing animal
- Insert eyes before fully stuffing the head
- Pin all parts before sewing to check balance
Head and snout
Use main body color.
Round 1
- 6 sc in MR (6)
Round 2
- inc around (12)
Round 3
- (sc, inc) around (18)
Round 4
- (2 sc, inc) around (24)
Round 5
- (3 sc, inc) around (30)
Rounds 6 to 9
- sc around (30)
Begin snout shaping
Round 10
- (3 sc, dec) around (24)
Round 11
- sc around (24)
Round 12
- (2 sc, dec) around (18)
Round 13
- sc around (18)
Eye placement
- Place eyes between rounds 7 and 8, about 6 to 7 stitches apart
- For a softer expression, place them slightly wider apart
Continue shaping
Round 14
- (sc, dec) around (12)
Stuff the snout and head firmly now.
Round 15
- dec around (6)
Fasten off, close the opening, weave in end.
Nose detail
- Embroider a small oval nose in dark yarn at the snout tip
- Add a short vertical stitch downward for a sweet muzzle line
Ears (make two)
Outer ear in main color.
Round 1
- 6 sc in MR (6)
Round 2
- (sc, inc) around (9)
Rounds 3 to 4
- sc around (9)
Flatten and close
- Fold ear flat and sc across the top (about 4 to 5 sc depending on tension)
Fasten off leaving a sewing tail.
Optional inner ear
- With a lighter color, crochet a tiny oval (ch 4, sc/hdc around) and stitch it inside.
Antlers (make two)
Use dark brown.
Antler base
Round 1
- 6 sc in MR (6)
Round 2
- sc around (6)
Round 3
- (sc, inc) around (9)
Rounds 4 to 10
- sc around (9)
Do not stuff heavily; light stuffing is enough. Keep them firm but not bulky.
Create branches
You can form branches by chaining out from the antler and slip stitching back, then continuing around the main antler.
Branch method
- At the top, ch 6, sl st back down the chain, sl st into the next antler stitch
- ch 5, sl st back down, sl st into the next stitch
- ch 4, sl st back down, sl st into the next stitch
Repeat as desired to create a branchy look.
Fasten off leaving a long tail for sewing.
Antler stability option
If you want very firm antlers, insert a small pipe cleaner inside before closing, but only for display pieces.
Body
Use main body color. This body is shaped as a long oval cylinder so the reindeer looks realistic.
Round 1
- 6 sc in MR (6)
Round 2
- inc around (12)
Round 3
- (sc, inc) around (18)
Round 4
- (2 sc, inc) around (24)
Round 5
- (3 sc, inc) around (30)
Rounds 6 to 16
- sc around (30)
Begin tapering slightly toward the back
Round 17
- (3 sc, dec) around (24)
Rounds 18 to 20
- sc around (24)
Stuff firmly as you go. Shape the body into a smooth cylinder.
Close body
Round 21
- (2 sc, dec) around (18)
Round 22
- (sc, dec) around (12)
Round 23
- dec around (6)
Fasten off, close, weave in end.
Legs (make four)
Use dark color for hooves, then main color for legs.
Hoof
Round 1
- 6 sc in MR (6)
Round 2
- inc around (12)
Round 3
- sc around (12)
Change to main color
Round 4
- sc around (12)
Rounds 5 to 12
- sc around (12)
Stuff firmly, especially at the hoof.
Flatten the top slightly
- You can leave the top open for sewing, or close lightly and sew through both layers.
Fasten off leaving a long tail.
Leg placement tip
Front legs sit slightly forward under the chest. Back legs sit slightly back under the body so the reindeer balances.
Fluffy neck ruff
Use cream or white. This is a separate collar piece you sew around the neck.
Option one bobble ruff (easy and cute)
- Ch enough to fit around the neck snugly (test around the head-neck join)
- Join into a ring
- Round 1 sc around
- Round 2 work bobbles every other stitch
- (sc, bobble) repeat around
- Round 3 sc around
Fasten off with a long tail and sew around the neck like a collar.
Bobble stitch quick explanation
- Yarn over, insert hook, pull up loop, yarn over pull through 2
- Repeat that in the same stitch several times
- Yarn over and pull through all loops
Option two loop stitch ruff (fluffier)
- Work sc rounds while pulling up loops each stitch to create shag texture
This looks very “fur-like” but takes a little practice.
Assembly
Sew head to body
- Center the head on the front of the body
- Sew firmly all the way around with strong stitches
Attach legs
- Pin all four legs first
- Set the reindeer on a table to check balance
- Adjust leg angles until it stands without tipping
- Sew each leg securely, adding extra stitches inside the join for strength
Sew ears and antlers
- Antlers sit on top of the head, slightly forward
- Ears sit slightly below antlers and outward
- Pin everything first to check symmetry
Attach neck ruff
- Sew collar around the neck seam
- Shape it with your fingers so it looks fluffy and full
Final touches
- Embroider nose and mouth
- Add optional eyebrow stitches for expression
- Add a tiny tail pom or small crocheted nub at the back
Common Mistakes and How to Avoid Them#
Reindeer won’t stand
- Stuff the legs and body more firmly
- Reposition legs before sewing permanently
- Add a small weight inside the body base for display-only pieces
Antlers lean or droop
- Keep stitches tight and antlers lightly stuffed
- Sew antlers deeper into the head with strong stitches
- Use a hidden pipe cleaner inside for display reindeer
Neck ruff looks flat
- Add more bobbles or use thicker yarn
- Sew the collar slightly gathered so it fluffs outward
Legs look uneven
- Measure and count rounds on all legs
- Pin and test on a flat surface before stitching
Head wobbles
- Stuff neck area firmly
- Sew with multiple passes around the neck seam
Expert Tips for Better Results#
- Use invisible decreases for a smoother face and snout
- Place eyes first, then shape the head with stuffing around them
- Pin every piece before sewing to keep everything symmetrical
- Stuff legs very firmly and flatten the hooves slightly so they stand
- Add a few hidden stitches between legs and body for extra durability
- Lightly steam the neck ruff (without pressing) to open texture and puff it up
Variations and Customization Ideas#
- Make a holiday version with a tiny scarf or bell collar
- Crochet a red nose for a playful look
- Add spotted details with surface crochet
- Make a sitting version by shortening the legs and widening the body base
- Use beige and cream yarn for a softer “winter deer” palette
- Turn it into an ornament by crocheting smaller and adding a hanging loop
- Make a family set by changing yarn weight for different sizes
Benefits of This Crochet Project#
- A standout crochet pattern that feels seasonal and timeless
- Great practice for shaping, symmetry, and assembly
- Uses small amounts of multiple colors, perfect for scraps
- Makes beautiful décor for winter shelves, nurseries, and holiday displays
- Creates a giftable amigurumi with a professional, collectible look
- Teaches useful techniques like texture collars and branch shaping
Internal Linking Suggestions#
- How to Crochet Invisible Decrease for Amigurumi
- Best Yarn for Amigurumi With Tight Stitches
- How to Sew Amigurumi Parts Neatly
- Beginner Crochet Antler and Horn Tutorial
- Easy Bobble Stitch Tutorial for Texture
- How to Make Amigurumi Stand Upright
- Free Crochet Christmas Ornament Patterns
FAQ#
Is this crochet pattern good for beginners
Yes if you’ve made basic amigurumi before. The stitches are simple, but you’ll want to take your time with assembly and balancing the legs.
Can I make this without safety eyes
Yes. Embroider eyes with black yarn or floss for a baby-safe option.
How do I keep the reindeer standing
Stuff firmly, flatten hooves slightly, and test leg placement on a flat surface before sewing. For display pieces, add a small weight inside the body.
What is the easiest way to make the fluffy neck ruff
Bobble stitch is the easiest method. It adds texture quickly and looks like soft fur without needing special yarn.
How do I make the antlers more realistic
Add more branch chains, vary the branch lengths, and sew them at a slight angle. You can also use a hidden pipe cleaner inside for stability.
How can I resize the reindeer
Use thicker yarn and a larger hook for a bigger reindeer, or thinner yarn and a smaller hook for a mini version. Keep stitches tight so stuffing doesn’t show.
Conclusion#
This reindeer amigurumi crochet pattern is a perfect mix of cozy and classy. The standing legs give it a realistic woodland feel, the antlers add that iconic seasonal silhouette, and the fluffy neck ruff brings in texture that makes the whole project look extra special. With careful stuffing and patient assembly, you’ll end up with a sturdy, display-worthy reindeer that feels handmade in the best way.
If you tell me your yarn weight and the size you want your finished reindeer to be, I can suggest the best hook size and easy adjustments to leg length and body width to match your vision.


