


Introduction#
If you’re craving a crochet project that feels small, joyful, and full of personality, a bird amigurumi is the perfect choice. It works up quickly, uses small amounts of yarn, and the finished result is the kind of handmade piece that makes people smile the moment they see it.
Explore more beginner amigurumi crochet patterns in our pattern library.
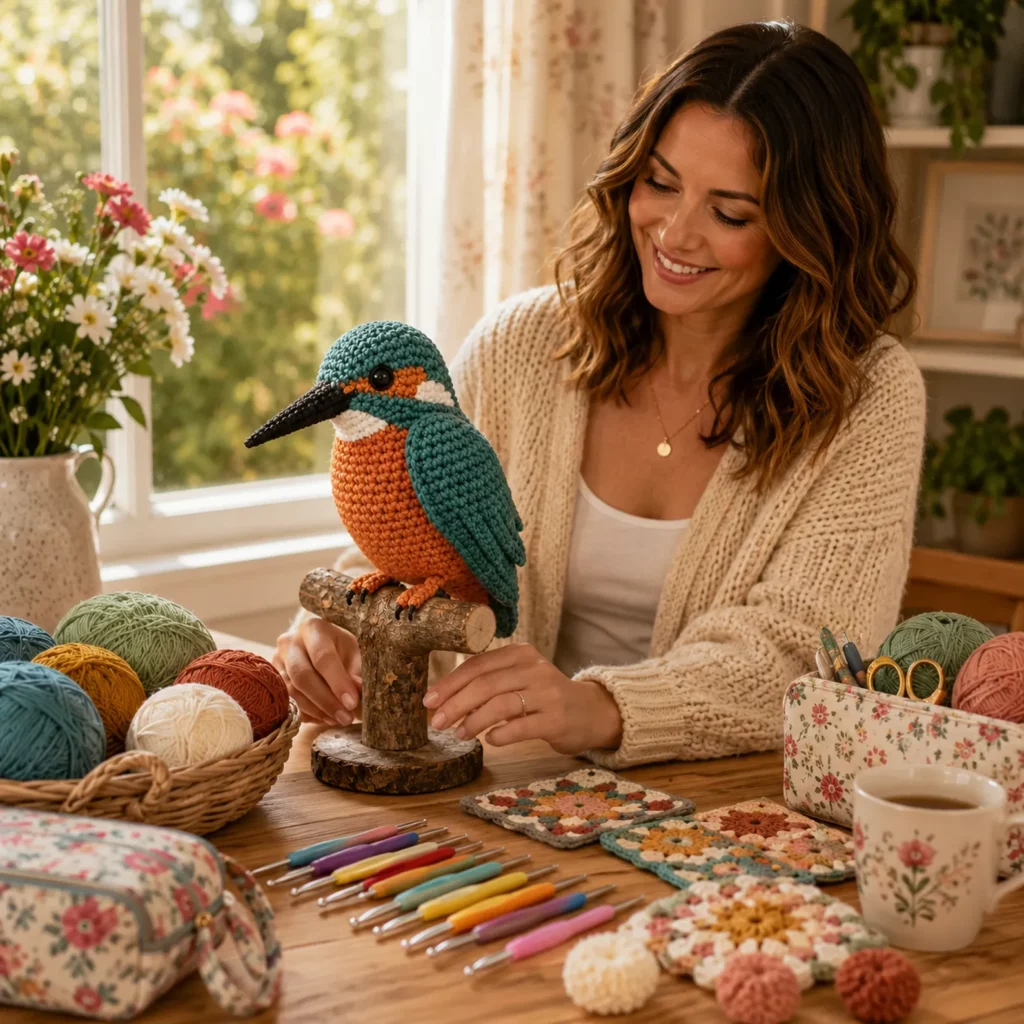
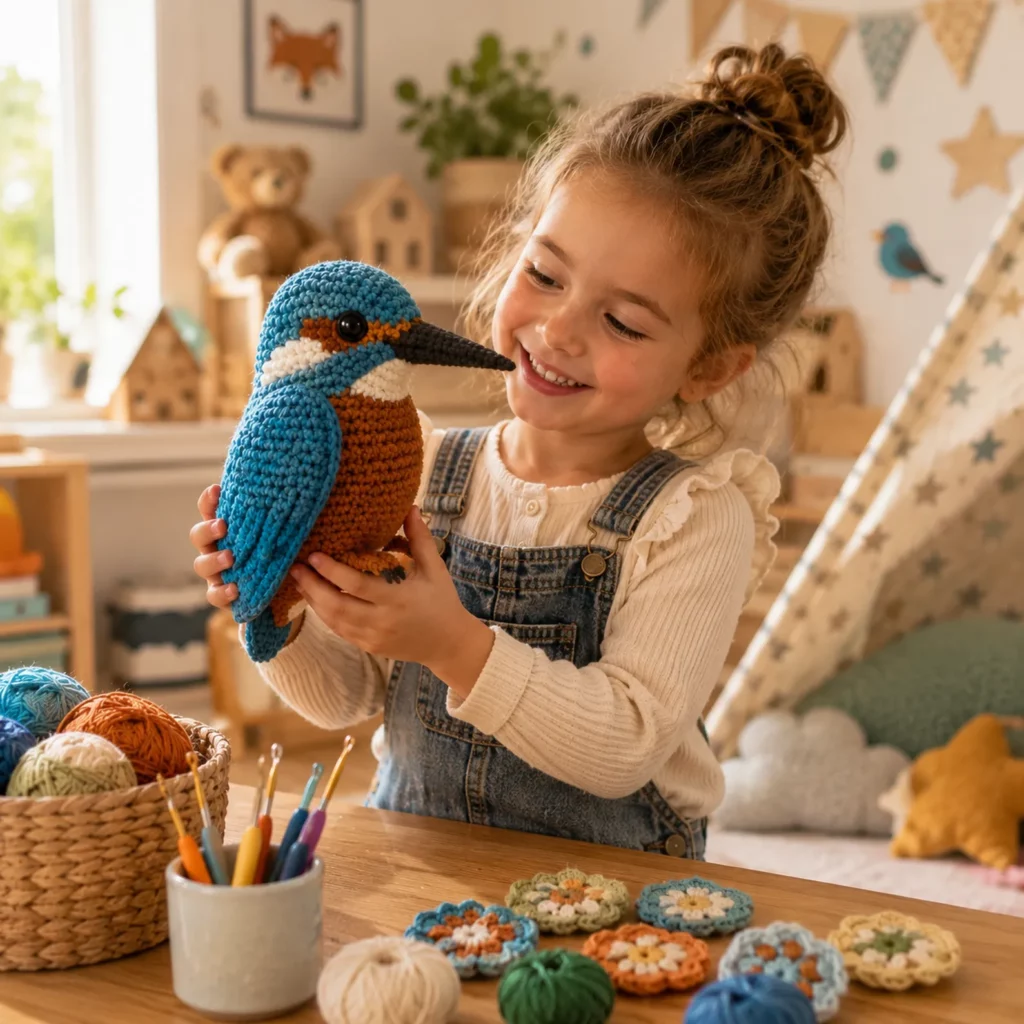
This crochet pattern teaches you how to create a kingfisher-inspired amigurumi bird with a rounded body, a bold long beak, and clean color blocking for that classic blue-and-orange look. Even better, the construction is beginner-friendly: mostly single crochet in continuous rounds, a few simple shaping techniques, and a neat assembly order that keeps the doll-like finish smooth and polished.
In this crochet tutorial, you’ll get everything you need to make your own version, including materials, stitch explanations, detailed step-by-step instructions, troubleshooting, and customization ideas. By the end, you’ll have a bright little bird that looks great as décor, a desk buddy, or a thoughtful handmade gift.

Detailed Description of the Crochet Pattern#
This amigurumi bird is designed with a clean, realistic silhouette while still keeping the cute rounded proportions that make amigurumi so charming. The body is shaped as a smooth oval that transitions into a slightly tapered tail area. The head blends into the body for a seamless look (or you can make it as a separate piece if you prefer easier assembly).
Key features of this crochet pattern
- Rounded head with a defined eye placement area
- Long, tapered beak made separately and sewn securely
- Color-blocked face and chest with a bright “bib” effect
- Small folded wings that sit close to the body for a perched posture
- Tiny feet/claws that wrap around a branch or perch
- Optional perch base so the bird can sit upright as a display piece
The stitch style is tight and structured so the bird holds its shape, with minimal gaps showing stuffing.
Skill Level Explanation#
This is a confident beginner to intermediate crochet pattern.
You’ll do great if you already know
- Single crochet in the round
- Increases and decreases
- Basic color changes
- Simple sewing/assembly
You’ll also practice
- Shaping a clean tapered beak
- Keeping color blocks crisp with tidy yarn changes
- Positioning pieces symmetrically (wings, beak, eyes, feet)
If you’ve made a simple amigurumi animal before, this is an excellent next project.
Materials Needed#
Yarn
Smooth yarn works best for crisp stitches and clean color blocks.
Recommended yarn weight
- DK weight yarn for a neat, detailed bird
- Worsted weight yarn for a slightly larger bird
Suggested colors
- Blue or teal for the head, back, and wings
- Orange for the belly/chest
- White for the throat patch
- Dark gray or black for the beak and claws
- Small amount of black for embroidery if you prefer embroidered eyes
Yarn tips for a polished look
- Choose a smooth, plied yarn (cotton or smooth acrylic) for best stitch definition
- Avoid fuzzy yarns because they hide shaping and make color changes look messy
- If using cotton, keep tension relaxed but firm so the fabric doesn’t become stiff
Hook
Use a smaller hook than the yarn label suggests to create tight amigurumi fabric.
- DK yarn: 2.75 mm to 3.25 mm
- Worsted yarn: 3.25 mm to 4.0 mm
Notions
- Stitch marker
- Tapestry needle
- Scissors
- Fiberfill stuffing
- Safety eyes 8 mm to 10 mm (or embroider eyes)
- Optional: a small amount of craft wire or pipe cleaner for perch stability
- Optional: wooden branch/dowel or a crocheted perch base
Safety note
If making for a small child, embroider the eyes and avoid any hard accessories.
Stitches & Techniques Explained#
Abbreviations in US terms
- MR magic ring
- ch chain
- sl st slip stitch
- sc single crochet
- inc increase (2 sc in same stitch)
- dec decrease (sc 2 stitches together)
- BLO back loop only
- FLO front loop only
- st stitch
- rep repeat
Invisible decrease
For smoother shaping, use invisible decreases: pick up the front loops of the next two stitches and sc them together.
Clean color changes
Change color on the last yarn-over of the stitch before the new color. Keep carried yarn loose to avoid puckering.
Stuffing technique for clean shaping
Stuff in small amounts and press stuffing outward, especially along the belly and cheeks. Overstuffing can stretch stitches and show gaps; understuffing can make the bird look wrinkled.
Step-by-Step Instructions#
This free crochet pattern is written in continuous rounds unless noted. Use a stitch marker to track the first stitch of each round.
Finished size
- DK yarn: about 10 to 14 cm tall (without perch)
- Worsted yarn: about 14 to 18 cm tall
Pattern notes
- Numbers in parentheses are stitch counts at the end of the round
- If you prefer a larger bird, use thicker yarn and a larger hook, but keep stitches tight
- Sew pieces with the same yarn color where possible for invisible seams
Body and head (worked as one piece)
Start at the top of the head with blue.
Round 1
- 6 sc in MR (6)
Round 2
- inc around (12)
Round 3
- (sc, inc) around (18)
Round 4
- (2 sc, inc) around (24)
Round 5
- (3 sc, inc) around (30)
Round 6
- (4 sc, inc) around (36)
Rounds 7 to 10
- sc around (36)
Eye placement
- Place safety eyes between rounds 8 and 9
- Space them about 7 to 8 stitches apart
- If you prefer a softer look, place them slightly lower (between rounds 9 and 10)
Begin face color blocking
This bird has a small white throat patch and an orange chest. To keep it simple and clean, we’ll add the white patch as a small sewn-on piece (included below) and switch to orange for the belly lower down.
Continue head shaping (still blue)
Round 11
- (5 sc, inc) around (42)
Rounds 12 to 14
- sc around (42)
Begin transitioning to body (still blue)
Round 15
- (6 sc, inc) around (48)
Rounds 16 to 17
- sc around (48)
Switch to orange for the belly section
You can do a full round color change to orange here for a clean “shirt” style belly, or use a half-and-half color change for a more realistic look. The easiest method is full orange for the front belly, with wings covering most of the side transitions.
Option A (simplest): change to orange and continue the body in orange from here.
Round 18 (orange)
- sc around (48)
Round 19
- (7 sc, inc) around (54)
Rounds 20 to 24
- sc around (54)
Begin tapering toward the bottom
Round 25
- (7 sc, dec) around (48)
Round 26
- sc around (48)
Round 27
- (6 sc, dec) around (42)
Start stuffing firmly now
Stuff the head and upper body first. Shape the belly so it’s rounded in front.
Round 28
- sc around (42)
Round 29
- (5 sc, dec) around (36)
Round 30
- sc around (36)
Round 31
- (4 sc, dec) around (30)
Round 32
- (3 sc, dec) around (24)
Stuff more firmly
Focus stuffing toward the chest and belly so the bird looks plump and stable.
Round 33
- (2 sc, dec) around (18)
Round 34
- (sc, dec) around (12)
Round 35
- dec around (6)
Fasten off, close the opening, weave in end.
White throat patch (optional but recommended)
This small piece makes the face look crisp.
With white yarn
Row 1
- Ch 6, sc in second ch from hook and across (5)
Row 2
- Ch 1, sc across (5)
Row 3
- Ch 1, sc2tog, sc, sc2tog (3)
Fasten off leaving a long tail. Sew the patch under the beak area, centered between the eyes.
Beak (long tapered)
Use dark gray or black. Work in rows for a neat taper, then seam lightly.
Row 1
- Ch 10, sc in second ch from hook and across (9)
Row 2
- Ch 1, turn, sc across (9)
Row 3
- Ch 1, turn, sc2tog, sc 5, sc2tog (7)
Row 4
- Ch 1, turn, sc across (7)
Row 5
- Ch 1, turn, sc2tog, sc 3, sc2tog (5)
Row 6
- Ch 1, turn, sc across (5)
Row 7
- Ch 1, turn, sc2tog, sc, sc2tog (3)
Row 8
- Ch 1, turn, sc across (3)
Row 9
- Ch 1, turn, sc2tog, sc (2)
Row 10
- Ch 1, turn, sc across (2)
Fasten off leaving a long tail.
Assembly for beak
- Fold the beak lengthwise and whip stitch the long edge to form a slightly rounded beak
- Lightly stuff just the base if you want extra firmness (optional)
- Sew the beak to the face, centered between the eyes, with the base sitting just above the white patch
Wings (make two)
Use blue. These are simple teardrop shapes that sit close to the body.
Round 1
- 6 sc in MR (6)
Round 2
- (sc, inc) around (9)
Round 3
- (2 sc, inc) around (12)
Rounds 4 to 7
- sc around (12)
Round 8
- (2 sc, dec) around (9)
Round 9
- sc around (9)
Round 10
- (sc, dec) around (6)
Flatten the wing
- Do not stuff
- Fold flat and sc across the opening to close (3 sc across is usually enough depending on tension)
Fasten off leaving a long sewing tail.
Sew wings
- Position each wing on the sides of the body, slightly angled back
- The top of the wing should sit around the “shoulder” area, a little below eye level
- Sew with small stitches along the top and back edge so the wing stays snug
Tail (optional for extra detail)
If you want a defined tail tip, make a small flat piece.
With blue
Row 1
- Ch 7, sc in second ch from hook and across (6)
Row 2
- Ch 1, turn, sc across (6)
Row 3
- Ch 1, turn, sc2tog, sc 2, sc2tog (4)
Row 4
- Ch 1, turn, sc across (4)
Fasten off. Sew to the lower back, centered, pointing downward.
Feet and claws (make two)
Use orange for feet and dark gray/black for claws. You can keep them simple to avoid fiddly pieces.
Foot base (orange)
Round 1
- 6 sc in MR (6)
Round 2
- sc around (6)
Round 3
- (sc, inc) around (9)
Round 4
- sc around (9)
Fasten off leaving a tail.
Claws (black/gray)
Make three small claws per foot (or two if you prefer simpler).
- Ch 4, sl st in second ch, sl st in next, sc in last
Fasten off with a tail.
Attach claws
- Sew claws to the front edge of each foot base.
Attach feet
- Sew feet to the underside front of the body so they look like they’re gripping a perch
- Angle them slightly outward for a natural stance
Optional crochet perch base
If you want a stable display, this simple perch helps the bird sit upright.
Perch cylinder (brown or beige)
Round 1
- 6 sc in MR (6)
Round 2
- inc around (12)
Round 3
- (sc, inc) around (18)
Rounds 4 to 18
- sc around (18)
Stuff firmly as you go.
Round 19
- (sc, dec) around (12)
Round 20
- dec around (6)
Fasten off and close.
Attach bird to perch
- Sew feet onto the perch
- Add a few hidden stitches from belly to perch for stability
Common Mistakes and How to Avoid Them#
Stuffing shows through stitches
- Use a smaller hook and keep tension tight
- Stuff more gradually rather than forcing large clumps inside
Beak looks crooked
- Pin the beak in place and check from front and side before sewing
- Count the same number of stitches from each eye to the beak edges
Wings sit unevenly
- Mark wing placement points with stitch markers before sewing
- Sew one wing, then mirror the placement for the second
Color change line looks messy
- Change color on the last yarn-over
- Weave in ends neatly and avoid bulky knots inside
Bird won’t sit upright
- Stuff the bottom firmly and flatten the base slightly with your hands
- Add the optional perch or a small weight inside the base for display-only pieces
Expert Tips for Better Results#
- Use invisible decreases for a smooth head and belly
- Insert eyes before stuffing the head so the backing doesn’t distort shape
- Pin all pieces first, then sew slowly and symmetrically
- Steam-block wings lightly (without stretching) so they lay flat
- For a super clean look, embroider a tiny eyelid line above each eye
- If you want extra realism, add a subtle darker stripe near the eye using surface crochet
Variations and Customization Ideas#
- Make a mini version with sport weight yarn and a 2.25 mm hook
- Make a larger plush with chunky yarn and embroidered details
- Turn it into a keychain by adding a loop at the top of the head (best with embroidered eyes)
- Add a tiny fish accessory for a cute themed display
- Change the color palette to create different bird species looks (bluebird, robin-style belly, or tropical colors)
- Add a sound insert inside the body for a collectible gift (display-only recommended)
- Create a pair and sew them onto a wreath or seasonal décor base
Benefits of This Crochet Project#
- A quick, satisfying crochet pattern that feels detailed and giftable
- Small yarn requirements make it great for using leftover colors
- Teaches clean color blocking and neat beak shaping
- Makes adorable décor for desks, shelves, or nurseries
- A fun “character” project that looks impressive without complicated stitches
- Great for crocheters who want to practice amigurumi shaping beyond basic spheres
Internal Linking Suggestions#
- How to Crochet Invisible Decrease for Amigurumi
- How to Change Colors Cleanly in Crochet
- Best Yarn for Amigurumi and Tight Stitches
- Amigurumi Safety Eyes Placement Guide
- How to Sew Amigurumi Parts Neatly
- Easy Crochet Bird Pattern for Beginners
- Crochet Perch and Stand Ideas for Amigurumi
FAQ#
Is this crochet pattern beginner-friendly
Yes, especially if you’re comfortable with single crochet, increases, and decreases. The pieces are simple, and the shaping becomes repetitive quickly.
What yarn is best for a crochet bird amigurumi
Smooth cotton or smooth acrylic is ideal for clean stitches and sharp color blocks. Cotton gives the most defined texture, while acrylic can be softer and squishier.
Can I make this without safety eyes
Absolutely. Embroidered eyes work beautifully and are safer for small children. You can also add a tiny white highlight stitch to make embroidered eyes look shiny.
How do I keep the beak from drooping
Seam the beak tightly, lightly stuff just the base if needed, and sew with strong repeated stitches at the base. You can also insert a small piece of felt or craft foam inside the beak for extra firmness.
How do I adjust the size of the finished bird
Use thicker yarn and a larger hook for a bigger bird, or thinner yarn and a smaller hook for a smaller bird. Keep tension tight so stuffing doesn’t show.
Why does my amigurumi look lopsided
This usually comes from missed stitch counts or shifting tension. Use a stitch marker every round and count regularly, especially on increase and decrease rounds.
Conclusion#
This kingfisher-inspired amigurumi is a bright, cheerful crochet pattern that combines simple stitches with bold color blocking and a standout long beak. It’s a fun project for anyone who enjoys making cute animals, and it’s flexible enough to customize into your own favorite color palette or display style. With careful stuffing, neat seams, and symmetric placement, you’ll end up with a polished little bird that looks truly handmade in the best way.
If you tell me your yarn weight and hook size, I can suggest the best safety eye size and a quick adjustment to the beak length so your finished proportions look perfect.


