


Introduction#
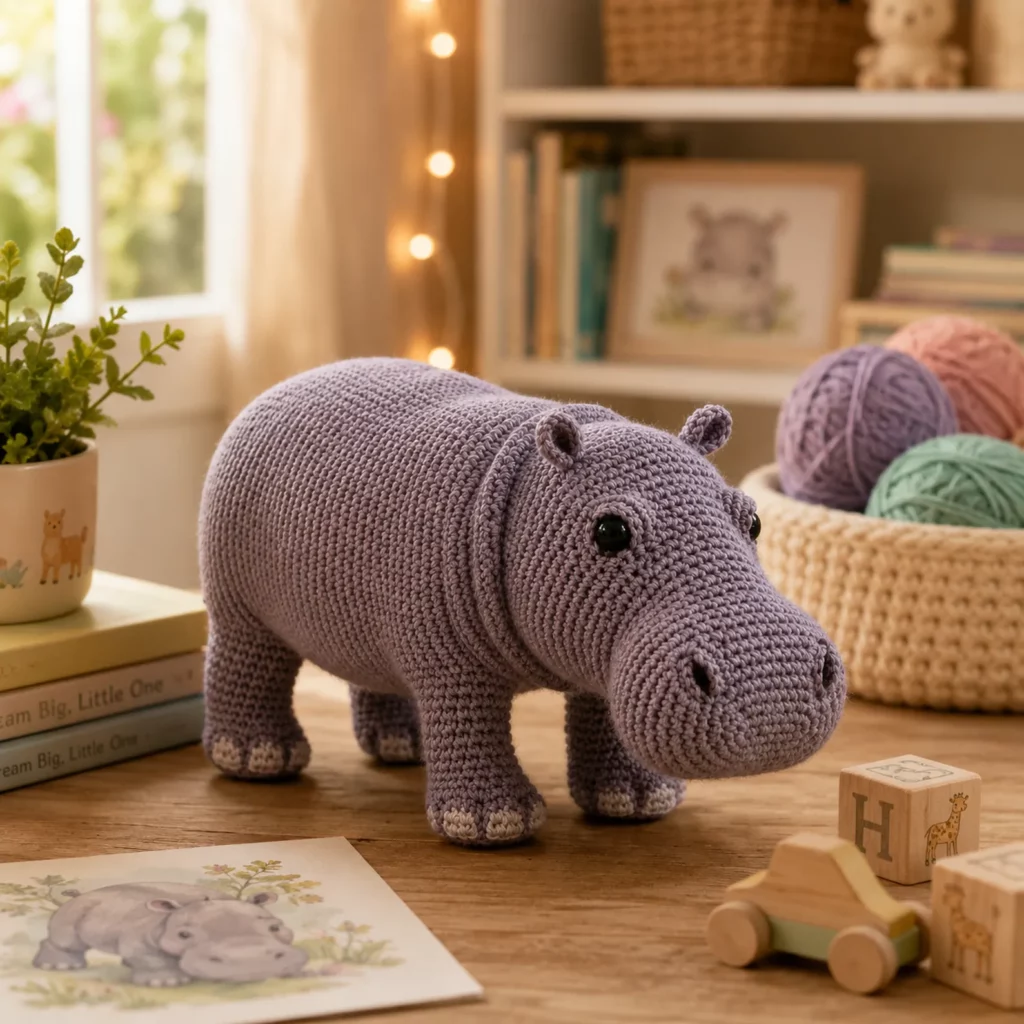
If you love amigurumi that looks soft, sturdy, and a little bit “real” while still being adorable, a hippo is a perfect project. Hippos have that instantly recognizable shape—round barrel body, big snout, tiny ears—and when you crochet them in tight, even stitches, they turn into the kind of plush that looks high-quality and gift-ready.
Explore more beginner amigurumi crochet patterns in our pattern library.
This crochet pattern is designed to help you make a standing hippo amigurumi with a smooth, chunky body and a gently rounded snout. The look is simple and clean, which is exactly why it works so well: there’s nowhere to “hide,” so you’ll learn great skills like consistent tension, clean shaping, and neat assembly. It’s a wonderful DIY crochet project for anyone who wants a plush that feels classic, modern, and timeless.
In this crochet tutorial, you’ll find an easy-to-follow plan for each part—body, head, snout, legs, ears, and finishing details—plus tips for getting the hippo to stand nicely on four legs.
Detailed Description of the Crochet Pattern#
This hippo amigurumi has a realistic silhouette with a cute plush style. The body is long and rounded, like a soft cylinder with a smooth back. The head is large with a pronounced snout that curves outward slightly. Small ears sit high on the head, and the legs are short but thick enough to support the weight of the body.
Details that define the look
- Smooth single crochet fabric with tight stitches for a clean finish
- Subtle neck shaping so the head blends naturally into the body
- Rounded snout that creates the “hippo face” instantly
- Small nostrils placed toward the top/front of the snout
- Four sturdy legs with slightly defined toes
- Simple eyes (safety eyes or embroidered) for a sweet expression
This crochet pattern is built in separate pieces for easier shaping and assembly. You can also adapt it to crochet the head and body as one piece if you prefer, but separate pieces make it easier to control the snout shape.
Skill Level Explanation#
This is a confident beginner to intermediate crochet pattern.
You’ll feel comfortable if you can
- Crochet single crochet in continuous rounds
- Increase and decrease evenly
- Count stitches and rounds consistently
- Sew amigurumi parts securely and neatly
You’ll practice helpful skills
- Making a plush stand by balancing leg placement
- Shaping a larger snout without lumps
- Using firm stuffing to create smooth curves
- Small detail embroidery for nostrils and expression
If you have made a basic amigurumi animal before, you can absolutely make this hippo.
Materials Needed#
Yarn
Smooth yarn works best to show the hippo’s clean silhouette.
Recommended yarn weight
- DK weight for a refined, realistic plush look
- Worsted weight for a larger, cuddlier hippo
Suggested colors
- Main body color in gray, lavender-gray, or taupe-gray
- Slightly darker gray for nostrils and toe shading (optional)
- Black for embroidery details if not using safety eyes
Yarn tips
- Cotton gives crisp stitches and a very polished finish
- Acrylic gives a softer plush feel and works well for toys
- Avoid fuzzy yarn because it hides shaping and can make the snout look less defined
Hook
Use a smaller hook than the yarn label suggests for tight amigurumi fabric.
- DK yarn: 2.75 mm to 3.25 mm
- Worsted yarn: 3.25 mm to 4.0 mm
Notions
- Stitch marker
- Tapestry needle
- Scissors
- Fiberfill stuffing
- Safety eyes (10 to 14 mm depending on size) or embroidery floss
- Optional: small weights or pellets in a fabric pouch for stability (display only)
- Optional: craft wire for extra structure (display only)
Safety note
If making for children under three, embroider the eyes and do not use weights or wire.
Stitches & Techniques Explained#
Abbreviations in US terms
- MR magic ring
- ch chain
- sl st slip stitch
- sc single crochet
- inc increase (2 sc in same stitch)
- dec decrease (sc two stitches together)
- st stitch
Invisible decrease
For a smooth hippo face, use invisible decreases. Pick up the front loops of the next two stitches, then single crochet them together.
Stuffing for smooth curves
Stuff in small amounts and press stuffing outward along the snout and sides of the body. Overstuffing creates gaps; understuffing creates wrinkles.
Shaping a standing body
A standing plush needs a firm base. You’ll achieve this by
- Stuffing the lower body firmly
- Placing legs slightly outward and evenly spaced
- Flattening the feet gently before final sewing
Step-by-Step Instructions#
This is a free crochet pattern written in a crochet tutorial style. Work in continuous rounds unless noted. Use a stitch marker to track rounds.
Finished size
- DK yarn: about 18 to 25 cm long
- Worsted yarn: about 25 to 35 cm long
Notes
- Stuff as you go
- Pin all pieces before sewing
- Test the hippo on a flat surface to check balance before final stitches
Head
Use main color.
Round 1
- 6 sc in MR (6)
Round 2
- inc around (12)
Round 3
- (sc, inc) around (18)
Round 4
- (2 sc, inc) around (24)
Round 5
- (3 sc, inc) around (30)
Round 6
- (4 sc, inc) around (36)
Rounds 7 to 11
- sc around (36)
Eye placement
- Place safety eyes between rounds 9 and 10
- Space them about 9 to 11 stitches apart for a gentle look
Begin narrowing slightly toward the neck
Round 12
- (4 sc, dec) around (30)
Round 13
- sc around (30)
Round 14
- (3 sc, dec) around (24)
Round 15
- sc around (24)
Stuff head firmly now.
Round 16
- (2 sc, dec) around (18)
Round 17
- (sc, dec) around (12)
Round 18
- dec around (6)
Fasten off, close, weave in end.
Snout (muzzle)
Use main color. This piece creates the signature hippo nose.
Round 1
- 6 sc in MR (6)
Round 2
- inc around (12)
Round 3
- (sc, inc) around (18)
Round 4
- (2 sc, inc) around (24)
Rounds 5 to 7
- sc around (24)
Slight rounding at the front
Round 8
- (3 sc, inc) around (30)
Round 9
- sc around (30)
Round 10
- (3 sc, dec) around (24)
Round 11
- sc around (24)
Stuff lightly so it stays rounded but not stiff.
Fasten off leaving a long tail for sewing.
Nostrils
- Embroider two small ovals near the top front of the snout
- Place them evenly spaced and slightly angled for a natural look
Ears (make two)
Use main color.
Round 1
- 6 sc in MR (6)
Round 2
- (sc, inc) around (9)
Round 3
- sc around (9)
Round 4
- (2 sc, inc) around (12)
Round 5
- sc around (12)
Flatten lightly and sew top closed. Fasten off with a tail.
Body
Use main color. This body is a long barrel shape.
Round 1
- 6 sc in MR (6)
Round 2
- inc around (12)
Round 3
- (sc, inc) around (18)
Round 4
- (2 sc, inc) around (24)
Round 5
- (3 sc, inc) around (30)
Round 6
- (4 sc, inc) around (36)
Round 7
- (5 sc, inc) around (42)
Rounds 8 to 20
- sc around (42)
Begin tapering slightly toward the back end
Round 21
- (5 sc, dec) around (36)
Rounds 22 to 24
- sc around (36)
Stuff firmly as you go, especially the belly and base.
Round 25
- (4 sc, dec) around (30)
Round 26
- sc around (30)
Round 27
- (3 sc, dec) around (24)
Round 28
- (2 sc, dec) around (18)
Round 29
- (sc, dec) around (12)
Round 30
- dec around (6)
Fasten off, close, weave in end.
Body stability option
For a display hippo, insert a small weight pouch into the belly area before closing so it stands more confidently.
Legs (make four)
Use main color. Add a darker toe shade if you want.
Round 1
- 6 sc in MR (6)
Round 2
- inc around (12)
Round 3
- sc around (12)
Rounds 4 to 10
- sc around (12)
Stuff firmly. Flatten the bottom slightly by pressing with your fingers so the hippo stands better.
Optional toe definition
- Embroider two or three short vertical stitches at the front of each foot
Or - Crochet one round in BLO near the bottom to create a subtle ridge
Fasten off leaving a long tail for sewing.
Tail (optional)
Hippos have a tiny tail, so keep it subtle.
With main color
- Ch 6, sc in second ch and across (5)
- Fasten off and sew to the back end.
Assembly#
Sew snout to head
- Center the snout on the lower front of the head
- Pin first and check symmetry
- Sew around the edges with small stitches
- Add a little more stuffing as you close if needed
Attach ears
- Place ears high on the head, slightly to the sides
- Sew securely and mirror placement
Sew head to body
- Center head on the front of the body
- For a natural look, angle the head slightly downward
- Sew firmly with multiple passes to prevent wobble
Attach legs
This step determines whether the hippo stands nicely.
Leg placement tips
- Place front legs slightly forward under the chest area
- Place back legs slightly behind center under the body
- Angle legs outward slightly for stability
- Pin all four legs, then set the hippo on a table to test balance
- Adjust until it stands evenly, then sew each leg securely
Final shaping
- Add stuffing adjustments through the neck seam if needed
- Smooth the body by rolling it gently between your hands
- Check that the snout is evenly stuffed and rounded
Common Mistakes and How to Avoid Them#
The hippo won’t stand
- Stuff the legs and belly more firmly
- Widen leg placement slightly
- Flatten the feet gently before sewing
- Add a small weight pouch inside for display-only pieces
Snout looks lumpy
- Stuff in small amounts and shape frequently
- Use invisible decreases for smooth fabric
- Sew snout evenly and add stuffing right before closing
Eyes look uneven
- Count stitches between eye placements
- Use pins to mark positions before inserting safety eyes
Head feels wobbly
- Stuff neck area firmly
- Sew with multiple passes around the join
- Consider a short internal support for display pieces
Gaps show stuffing
- Use a smaller hook
- Keep tension tighter
- Avoid overstuffing which stretches stitches
Expert Tips for Better Results#
- Use stitch markers to keep your increase rounds perfectly aligned
- Insert eyes before you fully stuff the head
- Sew the snout first, then add nostrils so they land in the right position
- Stuff legs very firmly and keep them evenly sized
- Weave in ends as you go so finishing stays clean and stress-free
- If you want a more realistic look, add slight surface crochet lines around the neck area for “skin folds”
Variations and Customization Ideas#
- Make a baby hippo by shortening the body and using larger eyes
- Make a larger plush version with chunky yarn and embroidered features
- Add a tiny felt tooth detail (display only)
- Crochet a little water lily accessory for a themed gift
- Change color to pastel for a nursery-friendly plush
- Add a small scarf for a winter character style
- Turn it into a keychain mini by using sport yarn and a tiny hook (embroidered eyes recommended)
Benefits of This Crochet Project#
- A simple but impressive crochet pattern with a clean, modern look
- Great practice for smooth shaping and consistent tension
- Works up nicely in neutral colors and looks gift-ready
- Uses mostly basic stitches, so it’s relaxing and repetitive
- Customizable in size, expression, and details
- Makes a sweet handmade toy or charming shelf décor piece
Internal Linking Suggestions#
- How to Crochet Invisible Decrease for Amigurumi
- Best Yarn for Amigurumi With Tight Stitches
- How to Place Safety Eyes Symmetrically
- How to Sew Amigurumi Parts Neatly
- How to Make Amigurumi Stand Upright
- Beginner Crochet Animal Patterns Collection
- Simple Amigurumi Snout and Muzzle Shaping Tutorial
FAQ#
Is this crochet pattern beginner-friendly
Yes if you’re comfortable with single crochet, increases, and decreases. The shaping is straightforward, and the main challenge is careful assembly so the hippo stands well.
What yarn is best for amigurumi hippos
Smooth cotton or smooth acrylic is ideal. Cotton gives crisp stitch definition, while acrylic can feel softer and plushier.
Can I make this without safety eyes
Absolutely. Embroider eyes with black yarn or floss for a baby-safe version.
How do I keep the hippo from tipping forward
Place the back legs slightly farther back, stuff the belly firmly, and make sure the snout isn’t overstuffed. A small internal weight helps for display pieces.
How can I resize the hippo
Use thicker yarn and a larger hook for a bigger hippo, or thinner yarn and a smaller hook for a mini version. Keep stitches tight so stuffing doesn’t show.
Why does my hippo look uneven
This usually happens from missed stitch counts or uneven stuffing. Use a stitch marker every round, count regularly, and shape with your hands as you stuff.
Conclusion#
This hippo amigurumi crochet pattern is a perfect example of how simple stitches can create a truly charming plush when the shaping and finishing are done thoughtfully. The chunky body, sweet rounded snout, and sturdy little legs make it feel both realistic and adorable—ideal for gifting, decorating, or adding to your amigurumi animal collection.
If you tell me your yarn weight and the length you want your finished hippo to be, I can suggest the best hook size and quick adjustments to the body rounds so your proportions come out exactly right.


