


Introduction#
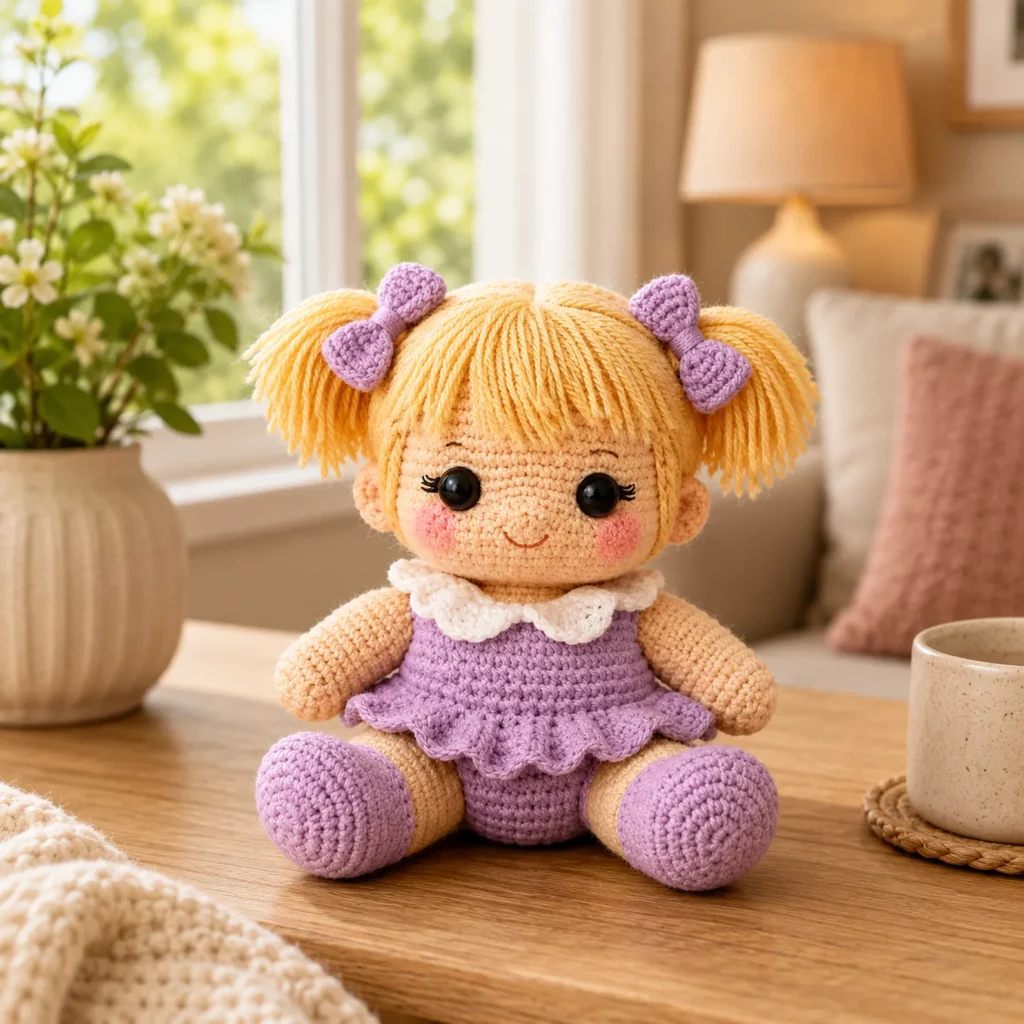
A handmade crochet doll has a special kind of magic. It’s soft, comforting, and full of personality—especially when you add those tiny details that make it feel like a real character: pigtails, little bows, rosy cheeks, and a sweet dress with a ruffled collar. If you’ve been looking for a crochet pattern that feels “keepsake” quality but is still beginner-friendly, this doll style is a perfect choice.
Explore more intermediate amigurumi crochet patterns in our pattern library.
This crochet tutorial walks you through creating a seated amigurumi doll with a rounded head, big expressive eyes, simple embroidered smile, and a pink dress with a flouncy skirt edge. The hair is made from yarn strands gathered into pigtails, finished with crocheted bows. A white scalloped collar adds that classic, cute finishing touch.
You can make this doll as a gift for birthdays, baby showers (with baby-safe modifications), holiday surprises, or nursery décor. And once you’ve made one, you’ll realize how easy it is to customize—different hair colors, outfits, and accessories can turn the same base into a whole doll collection.
Detailed Description of the Crochet Pattern#
This crochet pattern creates a seated doll with a soft body and oversized head (classic amigurumi proportions). The doll’s look is defined by these elements:
A smooth rounded head
The head is crocheted in tight single crochet rounds, stuffed firmly for a clean finish. Big eyes and subtle embroidered brows give it a gentle, cheerful expression.
Pigtail hair with bangs
The hair is made using strands of yarn attached to the scalp area. The bangs are trimmed straight across the forehead, and the rest is gathered into two pigtails, each topped with a crocheted bow.
A simple dress with a ruffled skirt edge
The dress is crocheted in pink, fitted through the torso with a slight flare at the hem. The skirt ruffle is created with increases to form a frilly edge.
A white collar
The collar is a separate piece with scalloped “petals,” stitched around the neckline to instantly make the outfit feel polished and vintage-inspired.
Cute shoes or sock-style feet
The feet are pink, rounded, and slightly oversized, which helps the doll sit nicely and adds to the playful look.
This type of crochet pattern is perfect because the base doll is easy to repeat, and the personality comes from accessories.
Skill Level Explanation#
This crochet pattern is great for confident beginners and intermediate crocheters.
You’ll be comfortable if you can
- Crochet in continuous rounds
- Make increases and decreases
- Stuff and shape amigurumi pieces
- Sew parts together neatly
- Do simple embroidery for face details
You’ll learn or practice
- Yarn hair techniques (attaching and trimming)
- Making tiny bows and a scalloped collar
- Assembly for a stable seated doll shape
- Clean finishing details (blush cheeks, lashes, hairline)
If you’re newer to dolls, don’t worry—the doll is built from simple shapes. The “fancy” look comes from finishing, not complicated stitches.
Materials Needed#
Yarn
Choose smooth yarn for the face and body so the stitches look clean and the doll feels soft.
Recommended yarn weight
- DK weight for a smaller doll with finer detail
- Worsted weight for a slightly bigger, cuddlier doll
Color suggestions
- Skin tone yarn (choose any shade you love)
- Hair color (blonde, brown, black, red, or fantasy colors)
- Dress color (pink in this design)
- White for collar
- Optional: a tiny amount of darker thread for brows and mouth
Yarn tips
- Cotton gives crisp stitches and a “heirloom” finish
- Acrylic is soft and washable, great for toys
- Avoid fuzzy yarn for the face because it hides details
Hook
Use a smaller hook than the label suggests for tight amigurumi fabric.
- DK yarn: 2.75 mm to 3.25 mm
- Worsted yarn: 3.25 mm to 4.0 mm
Notions
- Stitch marker
- Tapestry needle
- Scissors
- Fiberfill stuffing
- Safety eyes (10 mm to 14 mm) or embroidered eyes
- Optional: blush (display only) or pink yarn for cheeks
- Optional: black embroidery floss for lashes and brows
Baby-safe note
If the doll is for a baby or toddler, embroider the eyes and skip anything that can be pulled off (bows should be stitched firmly, no beads).
Stitches & Techniques Explained#
US terms
Abbreviations
- MR magic ring
- ch chain
- sl st slip stitch
- sc single crochet
- inc increase (2 sc in one stitch)
- dec decrease (sc 2 stitches together)
- BLO back loop only
- FLO front loop only
Invisible decrease
For the smoothest shaping, use invisible decreases by picking up the front loops of the next two stitches and single crocheting them together.
Yarn hair attachment
Hair can be attached by pulling folded strands through stitches with a hook, then tightening like a fringe knot. After attaching, you trim and style.
Scalloped collar
A scallop is a cluster of stitches worked into one space to make a rounded “petal.” This is what creates the collar’s soft, cute edge.
Skirt ruffle
The ruffle is created by increasing at the hem. More stitches in the last round = more flare.
Step-by-Step Instructions#
Work in continuous rounds unless stated. Use a stitch marker.
Finished size
Size depends on yarn and tension. With DK/worsted, this doll typically ends up in the “hand-sized” range and sits nicely on a shelf.
Notes before you start
- Stuff firmly for a polished look
- Insert eyes before closing the head if using safety eyes
- Pin parts before sewing to check symmetry
Head
With skin tone.
Round 1
6 sc in MR (6)
Round 2
inc around (12)
Round 3
(sc, inc) around (18)
Round 4
(2 sc, inc) around (24)
Round 5
(3 sc, inc) around (30)
Round 6
(4 sc, inc) around (36)
Round 7
(5 sc, inc) around (42)
Rounds 8 to 13
sc around (42)
Eye placement
Place eyes between the later rounds of the head section, roughly centered on the face. Space them evenly for a sweet look.
Round 14
(5 sc, dec) around (36)
Round 15
sc around (36)
Round 16
(4 sc, dec) around (30)
Round 17
sc around (30)
Round 18
(3 sc, dec) around (24)
Stuff firmly and shape round.
Round 19
(2 sc, dec) around (18)
Round 20
(sc, dec) around (12)
Round 21
dec around (6)
Fasten off and close.
Face details
- Mouth: a small curved smile with embroidery floss
- Brows: tiny curved stitches above the eyes
- Cheeks: a few pink stitches or blush (display only)
- Optional lashes: small black stitches at outer corners
Body
With pink for dress, and skin tone for arms/upper body if you prefer. This version keeps the torso in pink like a dress.
Round 1
6 sc in MR (6)
Round 2
inc around (12)
Round 3
(sc, inc) around (18)
Round 4
(2 sc, inc) around (24)
Rounds 5 to 9
sc around (24)
Begin skirt flare
Round 10
(3 sc, inc) around (30)
Round 11
sc around (30)
Round 12
(4 sc, inc) around (36)
Round 13
sc around (36)
Ruffle edge option
For a frillier skirt, do one more round with extra increases:
(sc, inc) around (54) for a very ruffled edge, or a gentler increase pattern for a softer flare.
Stuff the body firmly in the lower half so the doll sits well.
Fasten off leaving a long tail to sew to the head.
Legs and shoes
This doll has short seated legs with pink shoes.
Make two legs.
Start with pink (shoe)
Round 1
6 sc in MR (6)
Round 2
inc around (12)
Round 3
(sc, inc) around (18)
Rounds 4 to 6
sc around (18)
Switch to skin tone (optional) or continue pink as “tights”
Round 7
(4 sc, dec) around (15)
Rounds 8 to 12
sc around (15)
Stuff firmly, flatten slightly at the top, fasten off with long tail.
Sew legs to the lower front of the body so the doll sits naturally. Position them forward and slightly apart.
Arms
Make two with skin tone.
Round 1
6 sc in MR (6)
Round 2
(sc, inc) around (9)
Rounds 3 to 10
sc around (9)
Stuff lightly. Flatten top and fasten off with long tail. Sew arms to the sides of the body just below the head seam.
Collar
With white.
Collar band
Ch enough to fit around the neckline (test fit). Join into a ring.
Collar scallops
Work into the ring with repeating scallops:
- sl st, ch 1, (hdc, dc, hdc) into next stitch/space, sl st into next
Repeat around to create petal shapes.
Sew collar around the neckline, centered at the front.
Hair
With hair color (blonde here).
Hair base planning
You’ll cover the top and sides of the head. Leave the face clear.
Attach strands
- Cut strands about 18 to 25 cm long (longer if you want fuller pigtails)
- Fold strand in half, pull loop through a stitch on the scalp area
- Pull ends through loop and tighten
Repeat in rows from crown to sides.
Bangs
Attach a shorter row at the forehead edge, then trim straight across.
Pigtails
Gather hair on each side into a pigtail and tie with a strand of yarn. Trim ends evenly.
Bows
With pink.
Bow strip
Ch 10, sc in second ch and across (9)
Work 3 to 4 rows sc across. Fasten off.
Pinch in the middle, wrap yarn around center to form a bow, stitch securely. Make two and sew onto pigtails.
Common Mistakes and How to Avoid Them#
Hair looks thin or patchy
- Add more strands, especially around the crown and sides
- Use thicker yarn for hair, or double strands
- Layer rows closer together
Head wobbles
- Sew head to body with multiple passes
- Add extra stuffing at the neck area
- Use a stronger yarn tail for sewing
Doll won’t sit nicely
- Stuff lower body firmly
- Sew legs slightly forward
- Flatten the base while stuffing
Collar flips up
- Add extra anchor stitches at the back and shoulders
- Use a slightly smaller hook so scallops hold shape
Skirt ruffle is too wavy
- Reduce increases in the final round
- Block lightly to settle the fabric
Expert Tips for Better Results#
- Use invisible decreases on the head for a smooth face
- Add a tiny white highlight stitch on each eye for extra sparkle
- Brush yarn hair gently with fingers for a fuller look
- Trim bangs slowly in small amounts to avoid cutting too short
- If you want a super polished finish, lightly steam the collar and skirt edge (avoid direct heat on acrylic)
Variations and Customization Ideas#
- Make different outfits: a pinafore dress, a romper, or a sweater
- Add striped stockings by changing colors on the legs
- Create different hairstyles: braided pigtails, a bun, or straight long hair
- Add a tiny headband instead of bows
- Make a matching tiny bag or plush accessory
- Turn it into a baby-safe doll by embroidering eyes and stitching hair as a cap rather than loose strands
Benefits of This Crochet Project#
- A high-value crochet pattern that looks handmade and special
- Great gift for birthdays, nursery décor, and keepsakes
- Teaches useful skills like yarn hair, scallops, and doll assembly
- Easy to customize into many different characters
- Uses mostly basic stitches, so it’s relaxing once you start
- A perfect scrap-buster for outfits and accessories
Internal Linking Suggestions#
You may also like
- Crochet tutorial for amigurumi doll hair techniques
- Free crochet pattern for mini bows and headbands
- Crochet for beginners guide to sewing amigurumi parts
- Easy crochet pattern for doll dresses and collars
- DIY crochet accessories for amigurumi dolls
FAQ Section#
What yarn is best for a crochet doll
Cotton or smooth acrylic works best. Cotton gives crisp stitches and holds shape well, while acrylic can be softer and more washable.
Can I make this doll baby-safe
Yes. Embroider the eyes, avoid small detachable pieces, and secure the hair firmly (or crochet a hair cap instead of strand hair).
How do I keep the hair from shedding
Use tight strand knots, stitch the hairline down with extra sewing, and avoid brushing aggressively. For maximum durability, crochet hair as a cap.
How do I resize the doll
Use thicker yarn and a bigger hook for a larger doll, or thinner yarn and a smaller hook for a mini. Keep stitches tight to prevent gaps.
How do I keep the doll sitting upright
Stuff the base firmly, flatten the bottom while stuffing, and sew legs slightly forward as supports.
Can I change the dress style
Absolutely. You can make the body one color and crochet a removable dress, or add stripes, pockets, and different collars.
Conclusion#
This crochet doll amigurumi crochet pattern is a charming, gift-ready project that combines simple construction with delightful finishing details. The pigtails, bows, scalloped collar, and ruffled skirt make the doll feel extra special, while the basic stitches keep it approachable. Once you’ve made one, you’ll have a reusable base that can turn into endless characters just by changing hair, outfit colors, and accessories.
If you tell me your yarn weight and the approximate doll height you want, I can suggest the best eye size and an easy strand count plan for full pigtails and neat bangs.


