


Introduction#
Some crochet projects are cute… and some feel like an entire tiny world in your hands. A bear doll with a little dress is already sweet, but when you add a matching suitcase (that actually opens!) plus mini accessories, it becomes the kind of handmade gift people keep for years.
Explore more beginner amigurumi crochet patterns in our pattern library.
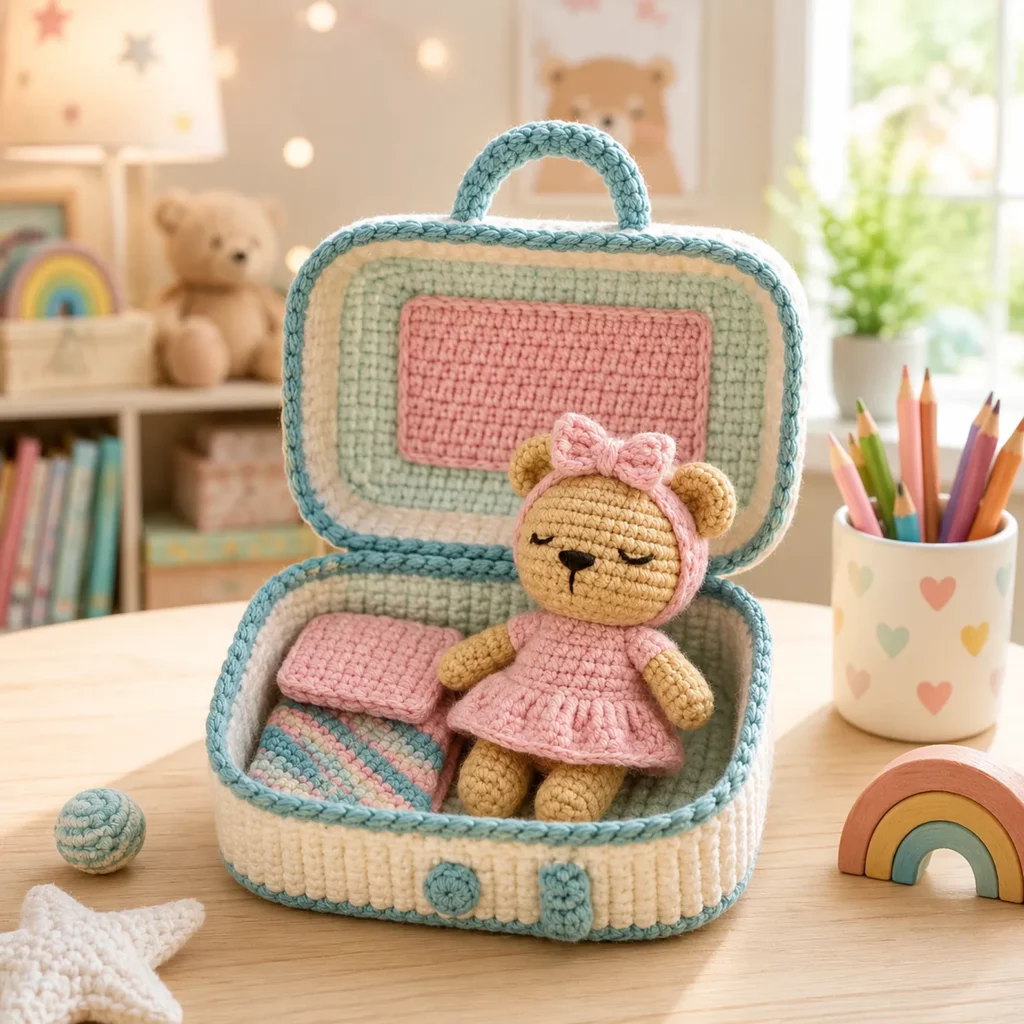
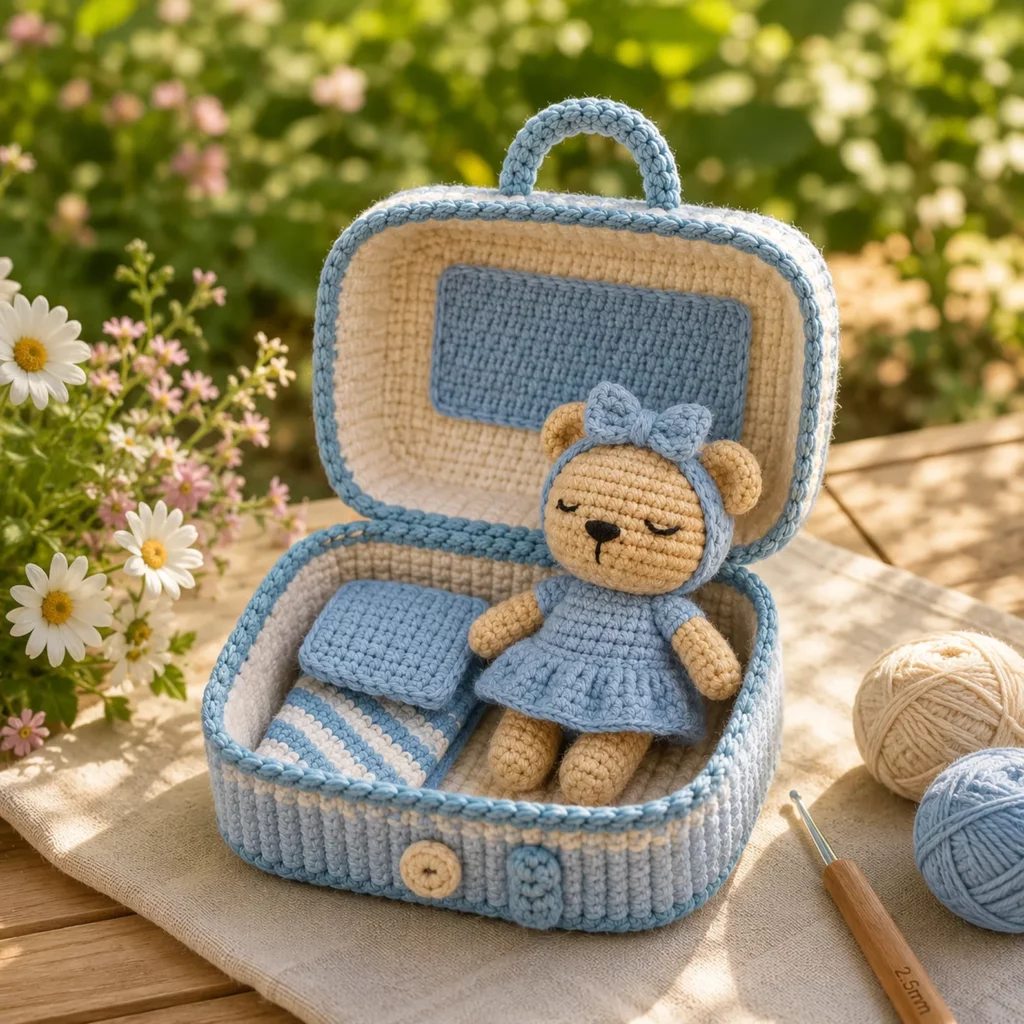
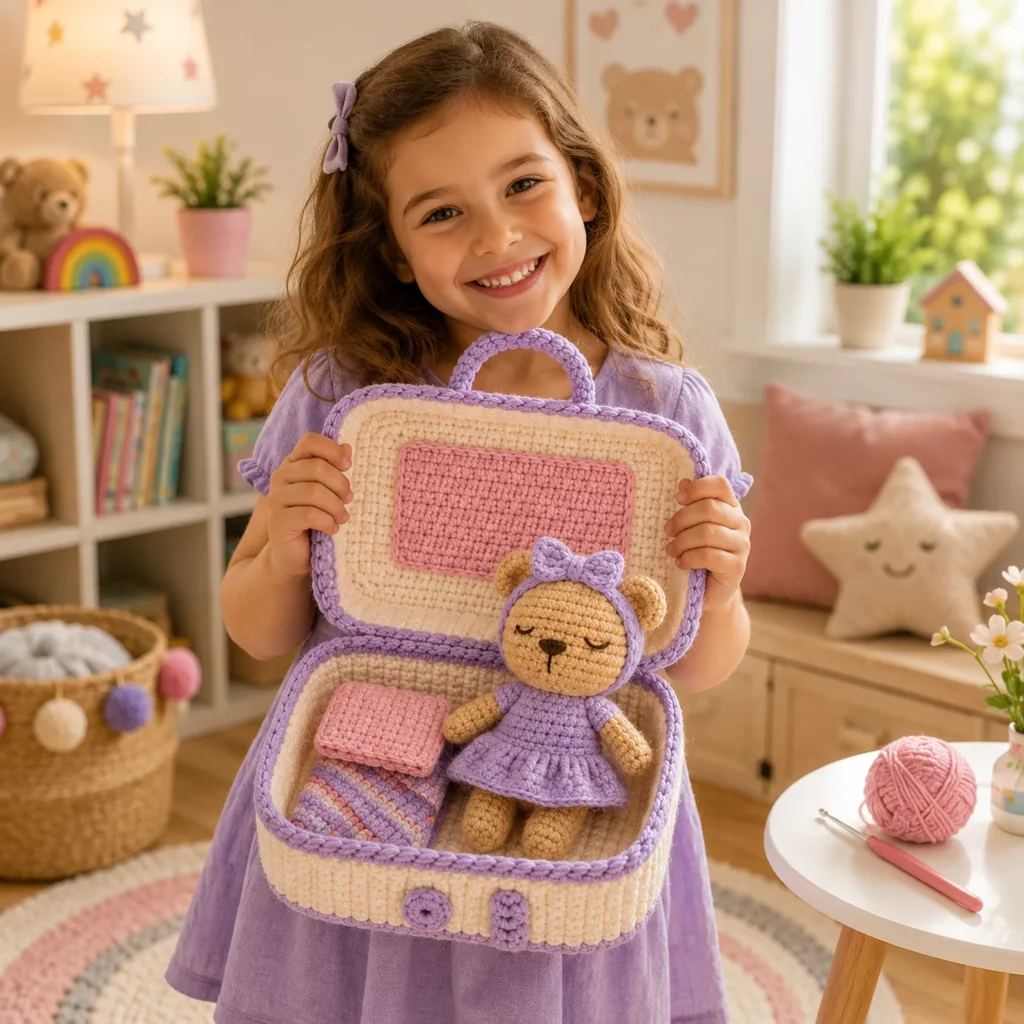
This crochet pattern is a complete playset: a small teddy bear doll in a simple dress with a bow headband, tucked inside a structured suitcase-style case. It’s perfect for nursery decor, birthday gifts, travel toys, or a “busy hands” quiet-time set. Even better? The construction is much more beginner-friendly than it looks, because everything is built from basic shapes: rounds, rectangles, and a few tidy seams.
Below you’ll find a detailed, beginner-friendly crochet tutorial style guide you can follow to recreate the set, plus tips for structure (so the suitcase keeps its shape), customization ideas, and common mistakes to avoid.
Detailed Description of the Crochet Pattern#
This project includes two main parts:
1) The Bear Doll
A small amigurumi-style teddy with:
- Round head and small ears
- Simple arms and legs
- A sweet embroidered sleeping face (or open eyes if you prefer)
- A removable or attached dress with a skirt flare
- A bow headband for a finished “doll” look
The body is compact and huggable, and the clothing is designed to be simple so it doesn’t overwhelm beginners.
2) The Suitcase Case
A structured, hinged “suitcase” that opens and closes with:
- A top lid and bottom base
- Inner lining panels (crocheted)
- A handle
- Decorative edging that mimics piping
- Optional closure (button, snap, or magnetic)
Inside the case, you can add mini folded blanket pieces, a pillow, or tiny accessories—making it feel like a complete set.
Why it’s special: This is a high-value make because it’s both a toy and storage. It looks boutique-level but relies on repeatable, simple techniques.
Skill Level Explanation#
This is an easy-to-intermediate crochet project.
Beginner-friendly parts:
- Basic amigurumi shaping (sc, inc, dec)
- Simple sewing/assembly
- Easy clothing pieces (dress and headband)
Intermediate elements (still manageable):
- Building a structured suitcase (keeping edges straight)
- Creating a hinge-like join between lid and base
- Adding stiffening (optional but recommended)
If you’ve made a basic amigurumi ball or a simple pouch before, you can absolutely tackle this. The key is to go step by step and focus on neat assembly.
Materials Needed#
Yarn
For the best results, use yarn with good stitch definition for the suitcase and soft feel for the doll.
Recommended yarn types:
- Worsted weight (#4) cotton or cotton-blend (best structure for the suitcase)
- Worsted acrylic or baby yarn (soft for the bear doll)
- DK (#3) works too—your finished set will be smaller
Suggested colors (customize freely):
- Bear: beige/tan
- Dress + accessories: lavender/pink tones
- Suitcase outer: neutral (beige/tan)
- Suitcase lining: pastel pink/lilac
- Accent/piping: brown/tan
Hook
- 2.75–3.5 mm for tighter amigurumi fabric (doll)
- 4.0–5.0 mm for the suitcase (if using worsted cotton)
Tip: If your suitcase fabric feels floppy, go down a hook size or switch to cotton.
Notions
- Stitch markers
- Yarn needle
- Scissors
- Fiberfill stuffing
- Optional: plastic canvas sheet, craft foam, or sturdy felt for stiffening
- Optional: magnetic snap/button/snap set for closure
- Optional: embroidery thread for face details
Stitches & Techniques Explained#
Abbreviations (US terms)
- MR = magic ring
- sc = single crochet
- inc = increase (2 sc in one stitch)
- dec = invisible decrease
- sl st = slip stitch
- ch = chain
- hdc = half double crochet
- dc = double crochet
- BLO = back loop only
Key techniques you’ll use
1) Tight single crochet fabric (amigurumi standard)
This keeps stuffing from showing and makes the doll look smooth.
2) Invisible decreases
Cleaner shaping, especially on the bear head.
3) Working in panels + joining for structure
The suitcase is easier when you treat it like a box: base panel + walls.
4) Optional stiffening inserts
A plastic canvas rectangle inside the walls/base can make the suitcase hold its shape beautifully.
Step-by-Step Instructions#
Part A: Bear Doll
1) Head (bear color)
Rnd 1: MR, 6 sc (6)
Rnd 2: inc around (12)
Rnd 3: (sc, inc) around (18)
Rnd 4: (2 sc, inc) around (24)
Rnd 5: (3 sc, inc) around (30)
Rnd 6: (4 sc, inc) around (36)
Rnd 7–11: sc around (36)
Place eyes or plan embroidery. Stuff firmly.
Rnd 12: (4 sc, dec) around (30)
Rnd 13: (3 sc, dec) around (24)
Rnd 14: (2 sc, dec) around (18)
Rnd 15: (sc, dec) around (12)
Rnd 16: dec around (6), close.
2) Ears (make 2)
Rnd 1: MR 6 sc
Rnd 2: (sc, inc) around (9)
Rnd 3: sc around (9)
Flatten, sew to head top sides.
3) Body (bear color)
Make a small rounded body that sits well:
Rnd 1: MR 6
Rnd 2: inc (12)
Rnd 3: (sc, inc) (18)
Rnd 4: (2 sc, inc) (24)
Rnd 5: (3 sc, inc) (30)
Rnd 6–9: sc around (30)
Rnd 10: (3 sc, dec) (24)
Stuff.
Rnd 11: (2 sc, dec) (18)
Rnd 12: (sc, dec) (12)
Rnd 13: dec (6), close.
4) Arms (make 2)
Rnd 1: MR 6
Rnd 2: (sc, inc) (9)
Rnd 3–7: sc around (9)
Lightly stuff, flatten and close.
5) Legs (make 2)
Rnd 1: MR 6
Rnd 2: inc (12)
Rnd 3: sc around (12)
Rnd 4: (2 sc, dec) (9)
Rnd 5: sc around (9)
Stuff lightly, flatten and close.
6) Face (embroidered, baby-safe)
- Nose: small triangle or oval in dark brown
- Mouth: short line down + tiny curve
- Eyes: two curved “sleepy” lines for a calm doll look
Optional blush: light pink yarn or fabric blush (for decor pieces)
7) Assemble bear
- Sew head to body
- Attach arms at upper sides
- Sew legs at bottom front so it sits nicely
Part B: Dress and Bow Headband
1) Simple dress (lavender)
Make a top tube and a skirt flare.
Top:
Ch to fit around body (join to form ring).
Work 4–6 rounds of sc or hdc.
Skirt flare:
Increase evenly in the next round (ex: inc every 3rd stitch).
Then work 2–4 rounds even.
Optional: add a picot or scallop edge.
2) Headband + bow
Headband: ch to fit around head, sl st to join, sc around once.
Bow: small rectangle strip, pinch center, wrap yarn around middle, stitch onto headband.
Part C: Suitcase Case
This is the “wow” part—and it’s still very doable when broken into shapes.
1) Decide suitcase size
A practical doll suitcase size is about:
- 6–8″ wide
- 4–6″ tall
- 2–3″ deep
Adjust by changing your base chain.
2) Crochet the bottom base panel (outer color)
Work a rectangle in sc rows:
- Ch to desired width
- Sc back and forth until desired length
Example: ch 31, sc 30 across; work 22 rows (adjust).
3) Build the bottom walls
Join yarn around the base panel edge and work sc in rounds upward.
- First round: sc evenly around, place 3 sc at each corner for turning
- Work 6–10 rounds depending on depth
Structure upgrade: slide a plastic canvas rectangle inside the base (trim to fit).
4) Crochet the lid (top)
Repeat the same steps:
- Make a lid top panel rectangle
- Work wall rounds downward (same depth as base)
5) Create the hinge
Place lid and base aligned at the back edge.
- Stitch the back edge together with whip stitch, leaving enough flexibility for opening.
- Reinforce with a second seam pass.
6) Inner lining panels (optional but pretty)
Crochet simple rectangles in the lining color and stitch inside lid/base, or crochet the case in two colors (outer + inner) by switching yarn when starting wall rounds.
7) Handle
Make a thick strap:
- Ch 10–14, sc back across
- Work 4–6 rows
Sew ends to lid top securely.
8) Piping/edge detail (brown)
Surface crochet slip stitches around the lid edge, or crochet a cord:
- ch long cord, sl st back along chain
Stitch around the perimeter for a finished look.
9) Closure
Choose one:
- Button + loop
- Sew-on snap
- Magnetic snap (reinforce with felt squares behind it)
Common Mistakes and How to Avoid Them#
- Suitcase won’t hold shape: use cotton yarn, smaller hook, and add a plastic canvas insert.
- Corners look wavy: put 3 sc in each corner when turning around edges.
- Lid doesn’t align with base: block panels before assembly and count rounds carefully.
- Bear head looks pointy: don’t overstuff near the final decreases.
- Dress is too tight: add 2–4 chains to the starting ring.
- Handle pulls loose: sew with multiple passes and weave ends deep.
Expert Tips for Better Results#
- Block the suitcase panels before joining. Even light shaping makes edges crisp.
- For the neatest “box,” keep stitch counts consistent along each side.
- Use invisible decreases for the bear face so it looks smooth.
- Add a hidden support stitch inside the hinge area if your lid flops backward.
- Make accessories from leftovers: mini blanket, pillow, tiny pouch, scarf.
Variations and Customization Ideas#
- Different animals: bunny, kitty, puppy—same suitcase pattern, new face.
- Seasonal outfits: winter coat, summer dress, holiday hat.
- Personalized color theme: match nursery colors or favorite shades.
- Mini “sleep set”: add a tiny crochet sleep mask and mini pillow.
- Travel set: add a mini “passport” felt piece and tiny tote.
- Sibling set: make two dolls and one bigger suitcase.
Benefits of This Crochet Project#
- High-value handmade gift (toy + storage in one)
- Modular: make doll first, suitcase later
- Great skill builder (amigurumi + structured crochet)
- Customizable size and colors
- Works as nursery decor and playtime toy
- Perfect for birthdays, baby showers, and keepsakes
Internal Linking Suggestions#
You may also like…
- Free Crochet Pattern: Beginner Amigurumi Bear Tutorial
- Crochet Tutorial: How to Crochet a Sturdy Basket Base
- DIY Crochet: Adding Plastic Canvas Inserts for Structure
- Free Crochet Pattern: Mini Doll Dress and Accessories
- Crochet for Beginners: Embroidering Faces Safely
- Free Crochet Pattern: Small Zipper Pouch or Button Pouch
FAQ Section#
What yarn is best for a crochet suitcase and doll set?
Cotton or cotton blends are best for the suitcase because they hold shape. For the doll, soft acrylic or baby yarn works beautifully.
Is this an easy crochet pattern for beginners?
Yes, especially if you’ve made a simple amigurumi before. The suitcase looks advanced, but it’s mostly rectangles and single crochet walls.
How do I make the suitcase more rigid?
Use a smaller hook, choose cotton yarn, and add a plastic canvas or craft foam insert in the base and lid.
Can I wash this project?
Yes if your yarn is washable. Remove stiff inserts if they aren’t washable. Air-drying while reshaping helps maintain structure.
Can I make the doll’s clothes removable?
Absolutely. Crochet the dress as a separate tube and skirt, and avoid sewing it onto the body.
How do I keep the lid from flopping backward?
Make the hinge seam slightly tighter, add a small inner “stop strap” inside, or position the hinge lower along the back edge.
Conclusion#
This bear doll and suitcase playset is the kind of crochet pattern that becomes a treasured gift—sweet, practical, and packed with handmade charm. The doll is beginner-friendly, the suitcase is easier than it looks, and the whole set is endlessly customizable.
If you tell me the approximate suitcase size you want (small travel toy vs larger keepsake case), I can suggest exact starting chain counts and wall rounds so your free crochet pattern build comes out perfectly proportional.


