


Introduction#
If you’ve ever wanted to crochet a baby blanket that feels classic, handmade, and extra special—without needing advanced shaping—this teddy bear granny square blanket is the perfect project. It combines two things crocheters love: simple, repeatable squares and adorable appliqué details that turn a basic blanket into a keepsake.
Explore more beginner granny squares crochet patterns in our pattern library.
The beauty of this crochet pattern is that you can make it one square at a time. That means it’s easy to pick up whenever you have a spare hour, and it’s also easy to adjust the size. Make a small stroller blanket, a full crib blanket, or even a big throw by simply changing the number of squares. The teddy bear faces add that “aww” factor, while the solid granny-style squares keep it neat, cozy, and beginner-friendly.
In this free crochet pattern and tutorial, you’ll learn how to crochet the blanket squares, create the bear face appliqués, join everything cleanly, and finish with a charming border that looks polished and gift-ready.
Detailed Description of the Crochet Pattern#
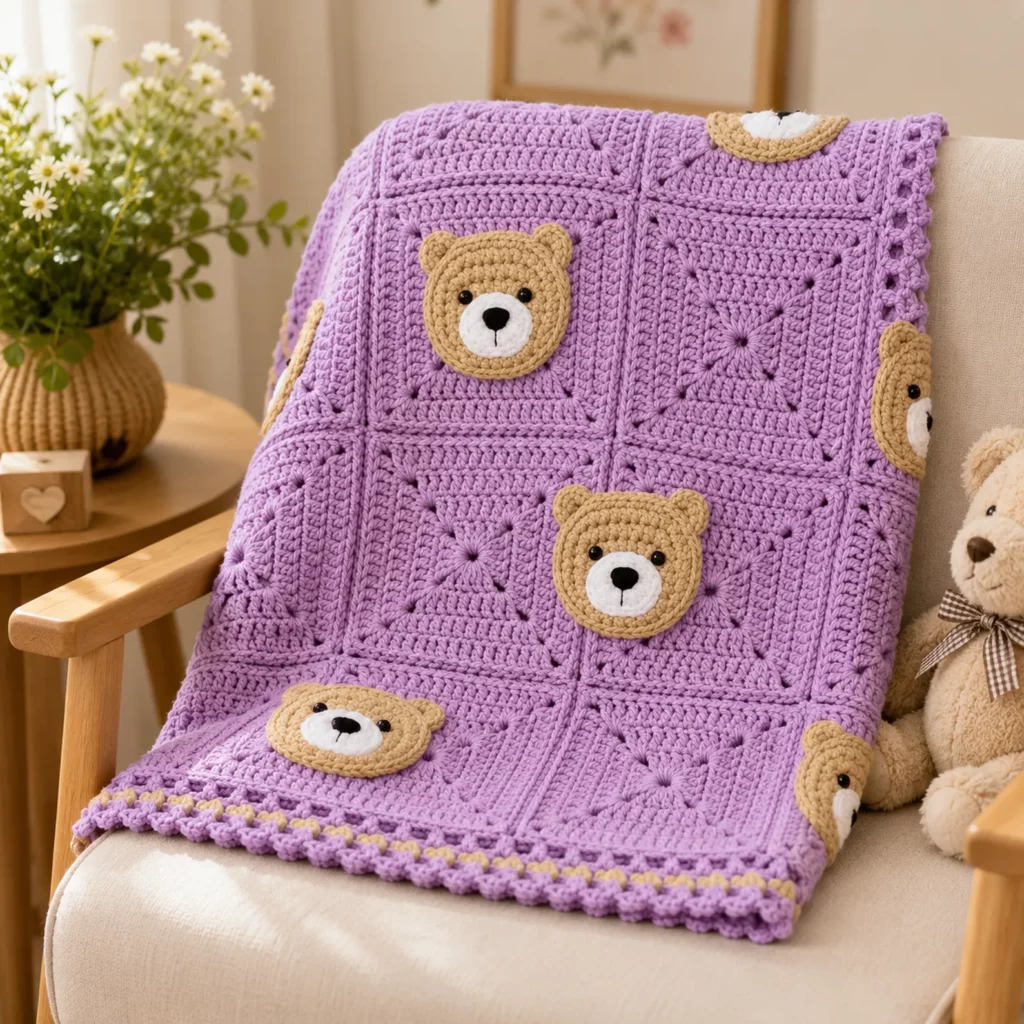
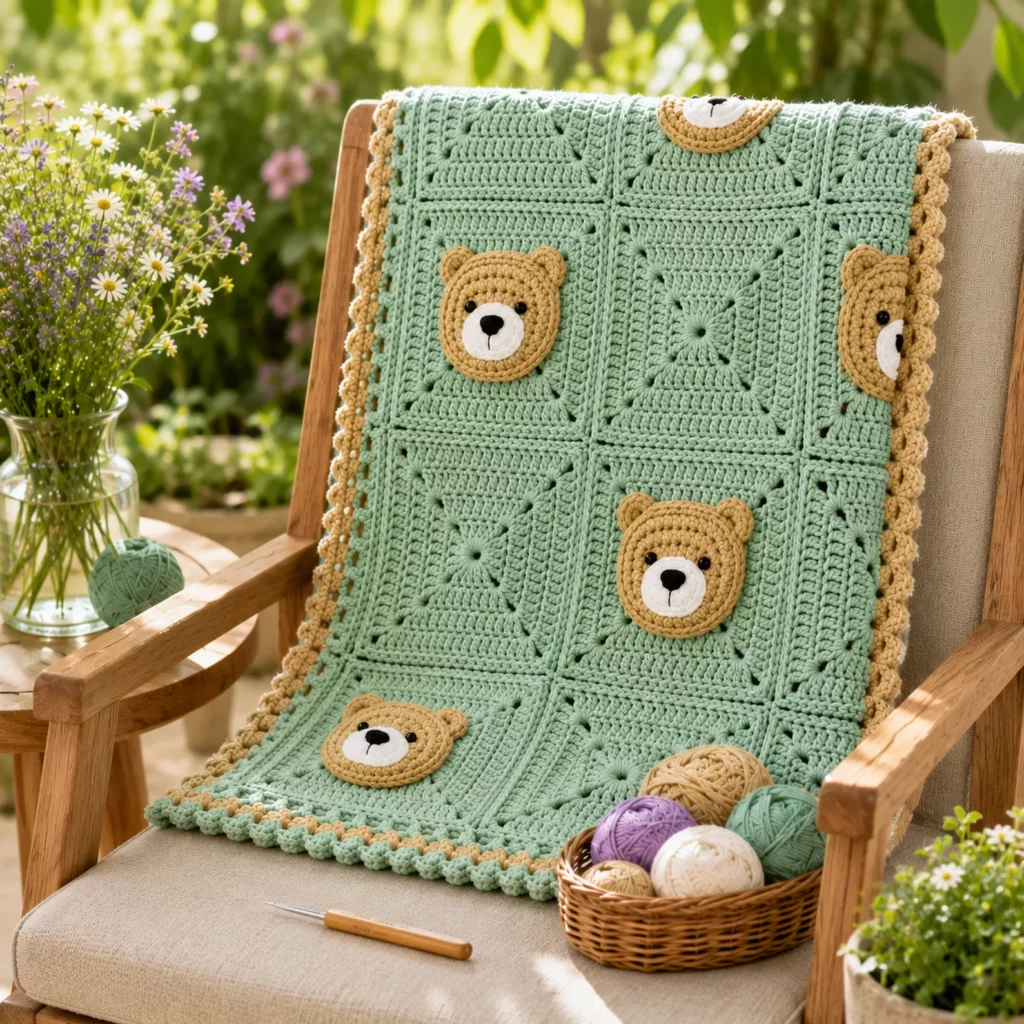
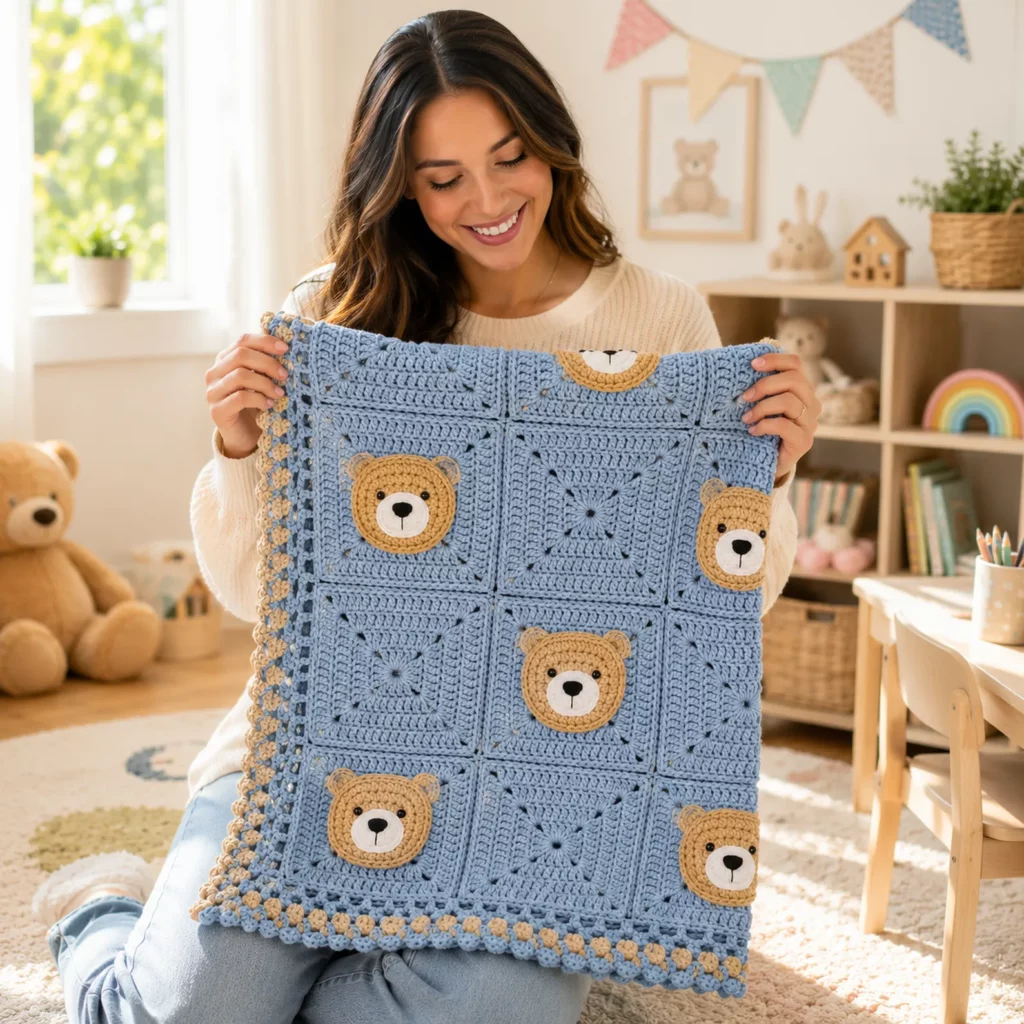
This project is a modular blanket made from granny-style squares arranged in a grid. Some squares stay plain (texture-only) to give the eye a place to rest, while other squares feature a teddy bear face appliqué that sits on top of the square for a soft 3D effect.
Key design elements
- Solid granny squares (structured, cozy, and not too holey)
- Bear face appliqués (easy shapes sewn on top—great for beginners)
- Consistent layout (balanced mix of bear squares and plain squares)
- Border with texture (a finishing edge that frames the blanket nicely)
What makes it beginner-friendly
- No complicated shaping
- No garment-style sizing
- Easy repeats and clear steps
- Customizable size (add or remove squares)
Best uses
- Baby shower gift
- Nursery blanket
- Toddler nap blanket
- Comfort lovey-style throw (make fewer squares)
- Teddy-themed nursery decor
Skill Level Explanation#
This is an easy-to-intermediate project, mainly because it’s a larger make with multiple parts.
You’ll be comfortable if you can:
- Crochet basic stitches (sc, dc)
- Work in rounds
- Make a simple granny square
- Sew appliqués onto fabric (basic whip stitch)
- Join squares together
Intermediate (optional) upgrades:
- Invisible/mattress stitch joining
- Neat blocking for perfect edges
- Adding a lining behind bear faces (if you want extra firmness)
If you’re new to blankets, this is a great “first big project” because it’s built from small, manageable pieces.
Materials Needed#
Yarn
For baby blankets, softness + washability matter most.
Recommended yarn types
- Worsted weight (#4) acrylic (soft, easy-care, budget-friendly)
- Cotton/acrylic blend (great stitch definition, good for sensitive skin)
- Baby yarn (often DK/#3—works great; you’ll just adjust hook and square size)
Color palette (suggested)
- Background squares: lavender, blush, sage, cream—anything soft
- Bear faces: tan/beige
- Muzzle: white/cream
- Nose + mouth: black or dark brown
Yardage estimate (approx.)
- Small baby blanket (9–12 squares): 900–1400 yards total
- Crib blanket (20 squares): 1600–2500 yards total
- Throw (30+ squares): 2500–4000 yards total
(These are estimates—square size and border thickness change usage.)
Hook
- Worsted (#4): 5.0 mm (H/8) is a great starting point
- DK (#3): 4.0 mm (G/6)
Tip: Choose a hook that gives you a soft drape but doesn’t create large gaps.
Notions
- Yarn needle (for sewing faces and joining squares)
- Scissors
- Stitch markers (optional, helpful for corners)
- Measuring tape
- Blocking tools (mat + pins) strongly recommended for polished results
Optional baby-safe choices
- Use embroidered eyes instead of safety eyes or buttons
- Avoid loose embellishments if gifting to infants
Stitches & Techniques Explained#
Abbreviations (US terms)
- ch = chain
- sl st = slip stitch
- sc = single crochet
- dc = double crochet
- hdc = half double crochet
- st(s) = stitches
- sp = space
- rep = repeat
Solid granny square basics
A solid granny square is perfect for blankets because it’s warmer and less holey than classic open granny squares.
Solid granny squares usually use:
- dc clusters
- dc stitches across sides
- corner increases (2 dc, ch 2, 2 dc or similar)
Appliqué sewing
You’ll sew bear faces onto squares using:
- small whip stitches around the edge
- stitches placed through the back loop of the appliqué and the top loops of the square (cleaner look)
Joining squares
Best beginner joins:
- Whip stitch join (easy and strong)
- Slip stitch join (slightly raised ridge)
- Mattress stitch (cleanest, nearly invisible)
Step-by-Step Instructions#
Below is a beginner-friendly method to recreate this blanket style.
Choose your blanket size and square count
Here are simple layout options:
- Stroller blanket: 3 x 3 squares (9 squares)
- Baby blanket: 3 x 4 squares (12 squares)
- Crib blanket: 4 x 5 squares (20 squares)
- Throw: 5 x 6 squares (30 squares)
A balanced look often uses:
- 1 bear square for every 2–3 plain squares
Example (4 x 5):
- 6–8 bear squares + the rest plain
Crochet the Solid Granny Square Base
Solid Square Pattern (US terms)
Start with your background color.
Round 1: MR, ch 3 (counts as dc), 2 dc into ring, ch 2.
(3 dc, ch 2) repeat 3 times. Join with sl st to top of ch 3.
Round 2: sl st into corner sp. Ch 3, (dc, ch 2, 2 dc) in same corner.
Dc in each dc across to next corner. In corner: (2 dc, ch 2, 2 dc).
Repeat around. Join.
Round 3+: Repeat Round 2 logic:
- Work dc across sides
- Work (2 dc, ch 2, 2 dc) in each corner
Stop when your square is your desired size, commonly 6–8 inches for baby blankets.
Tip for consistent sizing:
Count your rounds and make every square with the same number of rounds.
Make:
- your total square count (example: 20 squares)
- set aside the number you want for bear faces
Crochet the Teddy Bear Face Appliqué
This bear face is made in layers:
- head base (tan circle, slightly squared with shaping)
- ears (2 small half-circles)
- muzzle (white oval)
- eyes + nose + mouth (embroidered for safety)
Bear Head (tan)
Round 1: MR, 6 sc (6)
Round 2: inc around (12)
Round 3: (sc, inc) around (18)
Round 4: (2 sc, inc) around (24)
Round 5: (3 sc, inc) around (30)
Round 6: sc around (30)
To give a gentle “bear face” shape, you can do a light squaring effect:
- At 4 points evenly spaced, add an extra sc (or 2 hdc) to create subtle corners.
Or keep it fully round for a softer look.
Fasten off leaving a long tail for sewing.
Ears (make 2)
Round 1: MR, 6 sc
Round 2: (sc, inc) around (9)
Round 3: sc around (9)
Fasten off, flatten slightly.
Sew ears to top sides of the head.
Muzzle (white oval)
Ch 6
Round 1 (oval): sc in 2nd ch from hook and next 3 ch, 3 sc in last ch.
Work down other side: sc in next 3 ch, 2 sc in last ch. (12)
Round 2: inc, sc 3, inc x3, sc 3, inc x2 (18)
Fasten off leaving tail.
Sew muzzle centered low on the face.
Face details (embroider)
- Eyes: small vertical stitches or french knots
- Nose: small triangle/oval in black
- Mouth: a short line down + tiny curve
This keeps it baby-safe and durable.
Attach Bear Faces to Squares
- Pick your “bear squares.”
- Center the bear face on the square.
- Use stitch markers to hold it in place (top, bottom, sides).
- Sew around the head edge with small whip stitches.
- Sew muzzle and details last if you prefer perfect placement.
Pro tip: Sew the bear head first, then add muzzle. This helps the muzzle sit perfectly centered.
Join the Squares
Arrange squares into your chosen layout first.
Easy whip stitch join
- Place squares right sides together
- Whip stitch through both loops along the edge
- Repeat across rows, then join rows together
Cleaner join (mattress stitch)
- Keep squares right-side up
- Stitch through the “bars” between stitches for an invisible seam
Add the Border
A border makes the blanket look finished and helps it lay flat.
Simple border option (clean + classic)
- Round 1: sc evenly around, 3 sc in each corner
- Round 2: dc around or hdc around for a taller edge
Decorative edge idea
- Add one round in a contrasting bear-color (tan)
- Finish with a bobble or scallop border for a soft nursery feel
If you want a “raised dot” effect like the sample style:
- Work a round with bobbles spaced evenly (example: bobble every 3–4 stitches)
Common Mistakes and How to Avoid Them#
- Squares are different sizes:
Count rounds and block. Even small tension differences show up when joining. - Blanket ripples at joins:
You may have mismatched stitch counts on edges. Block squares and join carefully. - Appliqués pucker the square:
Don’t sew too tightly. Stitch gently and flatten the fabric as you go. - Corners curl:
Use 3 stitches in each corner for sc borders, and block the finished blanket. - Face placement looks crooked:
Pin/mark first. Don’t eyeball—measure from square edges.
Expert Tips for Better Results#
- Block your squares before joining. It’s the fastest way to make the blanket look professional.
- Use embroidered eyes for baby gifts (safer + washable).
- Weave in ends as you go. A blanket can create a lot of tails.
- Keep bear faces consistent: same ear placement, same muzzle height, same eye spacing.
- If you want extra durability, sew bear faces on with a second pass around the edges.
Variations and Customization Ideas#
- Color theme swaps: sage + cream bears, pink + tan bears, navy + gray bears
- Add a bow: tiny crochet bow on one ear for variety
- Make it seasonal: winter scarf bear, holiday hat bear
- Add texture squares: alternate solid squares with waffle stitch squares
- Personalization: embroider baby name or initials on one plain square
Benefits of This Crochet Project#
- Modular and manageable (one square at a time)
- High “gift value” with simple techniques
- Easy to resize for any blanket size
- Customizable colors and layout
- Baby-friendly if you embroider features
- Great stash-buster for leftover yarn
Internal Linking Suggestions#
You may also like…
- Free Crochet Pattern: Solid Granny Square Tutorial
- Crochet Tutorial: How to Block Granny Squares Perfectly
- DIY Crochet: Best Ways to Join Granny Squares (Whip vs Mattress vs Slip Stitch)
- Crochet for Beginners: How to Embroider Cute Amigurumi Faces
- Free Crochet Pattern: Animal Appliqué Squares (Bunny, Fox, Cat)
- Free Crochet Pattern: Nursery Blanket Border Ideas
FAQ Section#
What yarn is best for a teddy bear granny square blanket?
A soft worsted acrylic or cotton blend is ideal. Acrylic is easy-care and cozy; cotton blends give crisp stitches and great definition for bear faces.
Is this an easy crochet pattern for beginners?
Yes. The squares are repetitive and simple, and the bear faces are basic appliqués sewn on top. The only “big” part is joining, which is very learnable.
How many squares do I need for a baby blanket?
A common size is 12 squares (3×4) for a baby blanket, or 20 squares (4×5) for a crib-sized blanket—depending on your square size.
Can I use safety eyes on the bear faces?
You can, but embroidered eyes are safer for babies and also hold up better in the wash.
How do I stop my blanket from curling?
Block your squares, join evenly, and add a border with proper corner increases (3 stitches in each corner for sc rounds).
Can I make this blanket bigger without changing the pattern?
Yes—just add more squares. That’s the beauty of a granny-square blanket.
Conclusion#
A teddy bear granny square blanket is the perfect mix of cozy and cute: easy repeating squares, adorable bear faces, and a finished look that feels like a true keepsake. This free crochet pattern is approachable for beginners, customizable for any nursery style, and satisfying to make one square at a time.
If you tell me the square size you want (6″, 7″, or 8″) and your target blanket size (stroller, crib, or throw), I can suggest an exact square layout plan and a simple color chart so your crochet pattern comes together smoothly.


