


Introduction#
There’s something instantly comforting about a soft, sleepy puppy plush—especially one with droopy ears, a big snuggly nose, and that calm “eyes closed” expression that makes it look like it’s mid-nap. This is the kind of crochet project that feels like a warm cup of tea: soothing to make, satisfying to finish, and perfect for gifting.
Explore more beginner amigurumi crochet patterns in our pattern library.
In this crochet tutorial, you’ll learn how to create a classic floppy-eared puppy amigurumi with a round head, chunky paws, contrast ears, and a simple little scarf that adds personality without extra complexity. The construction is built from beginner-friendly shapes (spheres and tubes), so even if you’re new to amigurumi, you can take it step-by-step and end up with a plush that looks polished and professionally finished.
This crochet pattern is designed to be flexible: you can make it in smooth worsted yarn for crisp stitch definition or use plush yarn for a super cuddly, squishy look. Either way, you’ll get a timeless stuffed puppy that’s adorable on a nursery shelf, cozy on a couch, or sweet as a handmade gift.
Detailed Description of the Crochet Pattern#
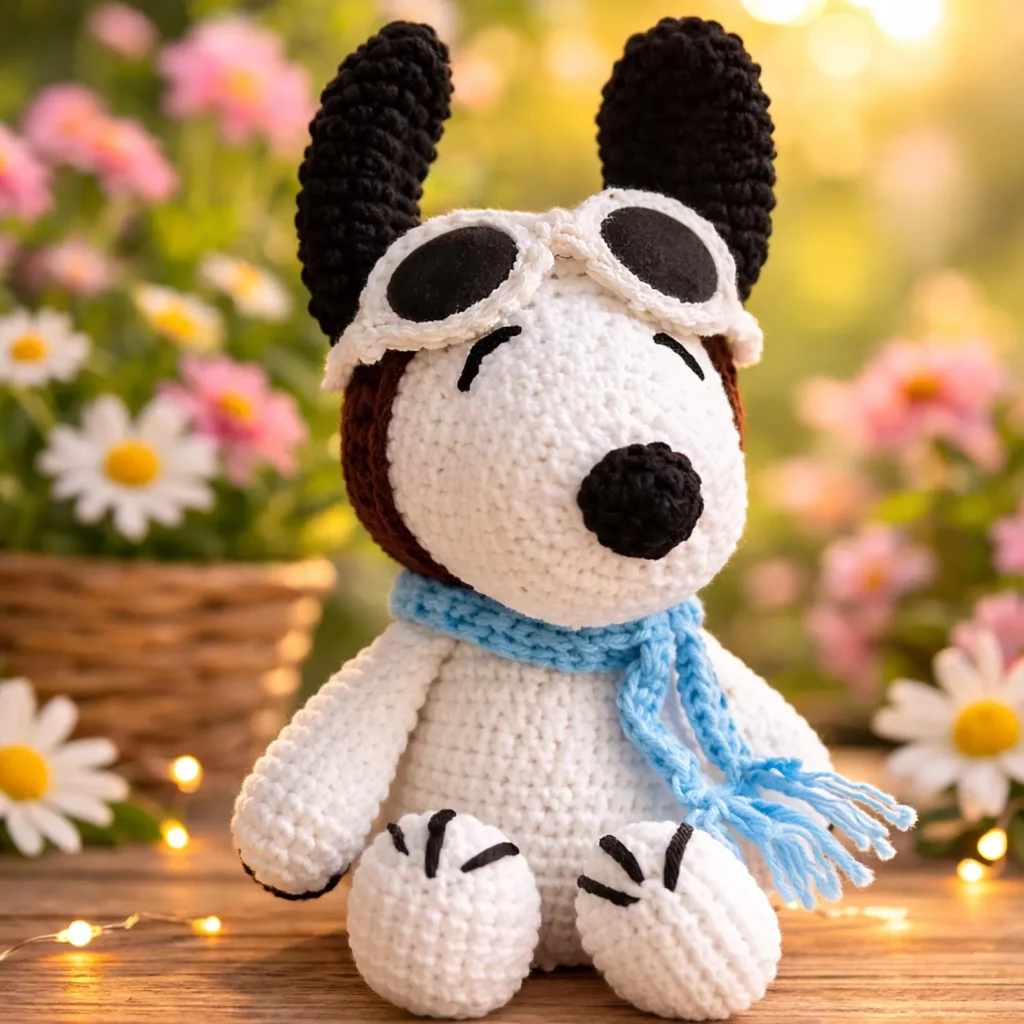
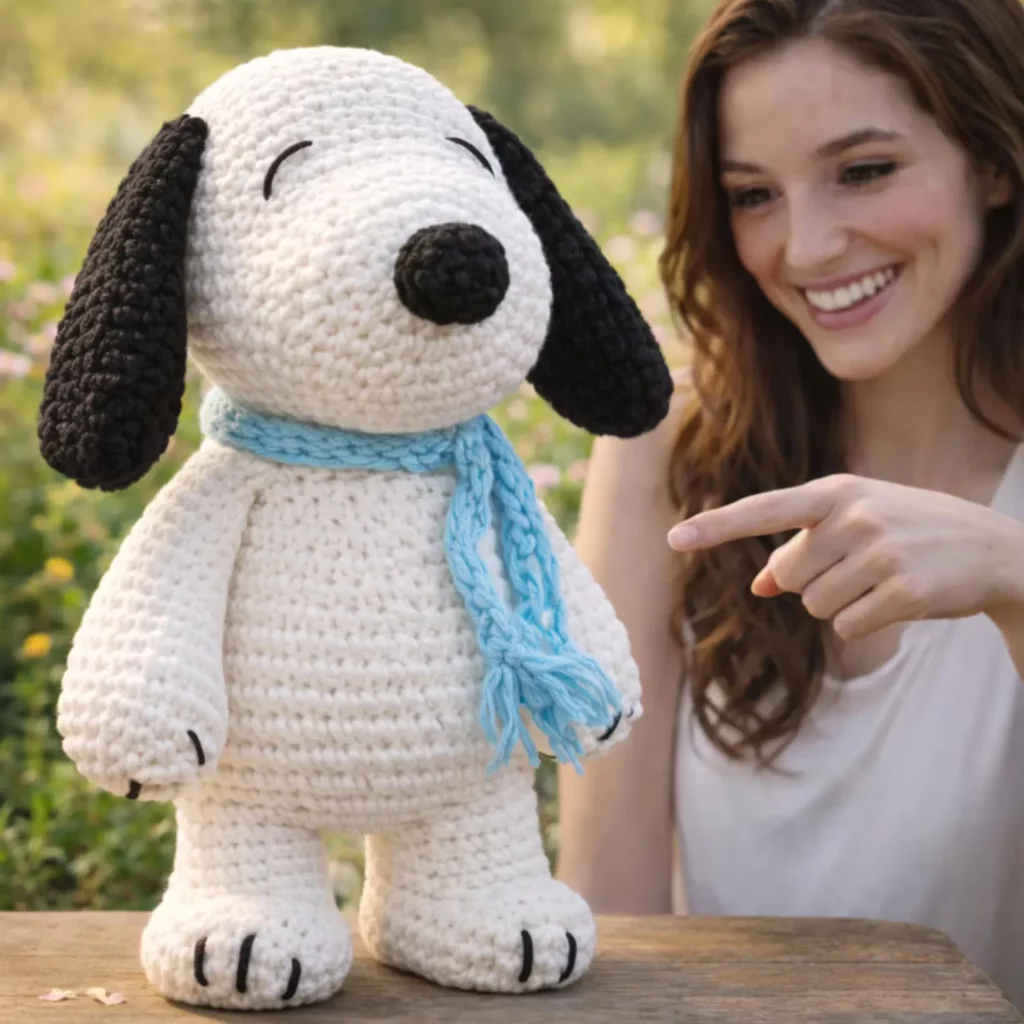
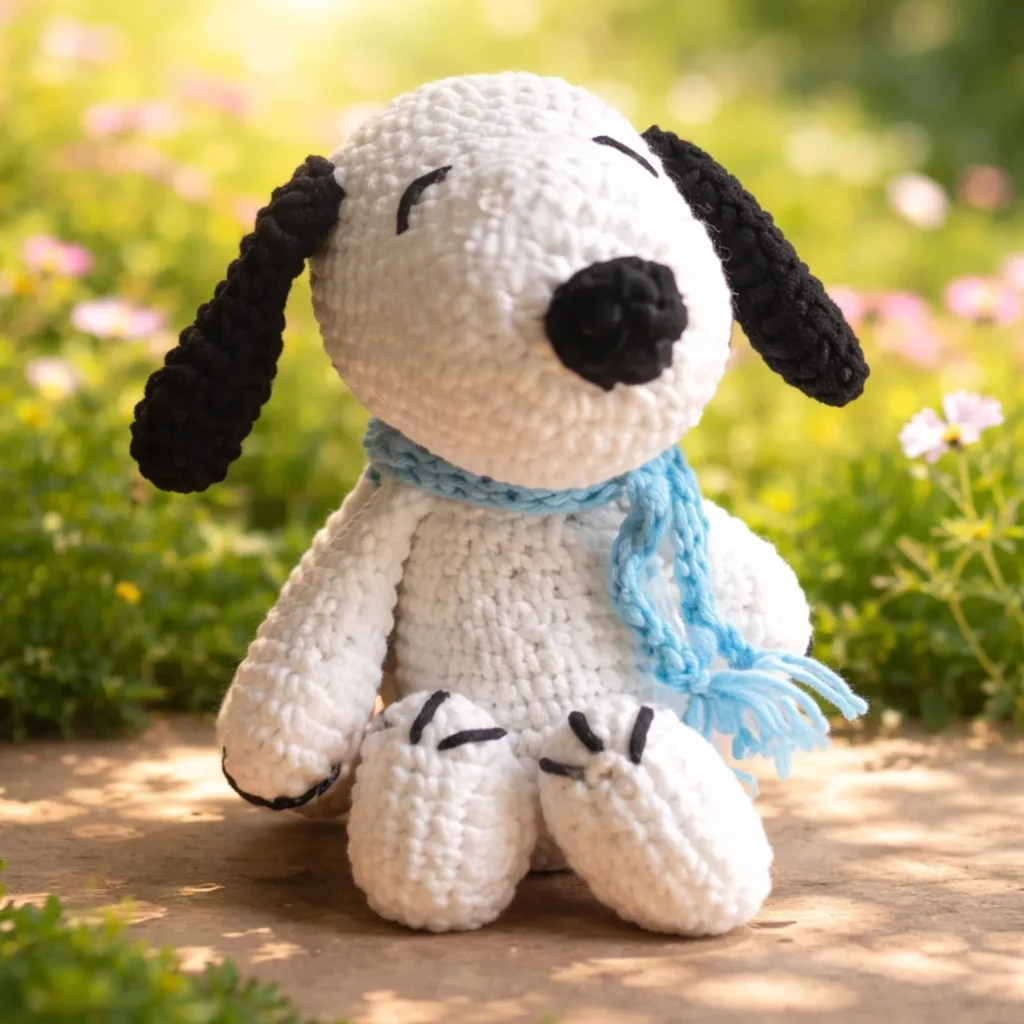
This puppy amigurumi is a seated plush with a simple, modern silhouette and a few standout details:
- Large rounded head for that cute, baby-animal proportion
- Soft “sleepy” face made with embroidered curved eyes (no fiddly tiny safety eyes required)
- Oversized rounded nose in a contrasting color, centered on the front of the face
- Long floppy ears in a darker contrast shade, attached low on the sides of the head
- Plump paws with minimal toe embroidery for extra character
- Simple scarf accessory to add color and a gift-ready touch
- Classic seated body that’s stable and display-friendly
The overall vibe is clean and minimal: no complicated colorwork, no tiny fiddly parts, and no advanced shaping—just good basic amigurumi technique and thoughtful assembly.
Skill Level Explanation#
This is an easy crochet pattern for confident beginners and a relaxing make for experienced crocheters.
You’ll be comfortable with this project if you can:
- crochet in the round (magic ring or alternative start)
- single crochet consistently
- increase and decrease for shaping
- sew pieces together neatly
- embroider simple lines (eyes and toes)
If you’ve never embroidered on crochet before, don’t worry—this project uses very simple stitches, and the “sleepy eye” look is forgiving (and honestly, it’s one of the cutest beginner-friendly faces).
Materials Needed#
Yarn
You can make this puppy in different yarn types depending on the look you want:
Option: Smooth yarn (recommended for beginners)
- Worsted weight (#4) acrylic or cotton-blend
- Gives crisp stitch definition and makes counting stitches easy
Option: Plush yarn (extra cuddly)
- Super bulky (#6) chenille/blanket yarn
- Works up fast and looks ultra soft (stitch counting is a bit harder)
Color suggestions (classic puppy palette):
- Main color (MC): white or cream (body + head)
- Contrast (CC): black or charcoal (ears + nose)
- Accessory color: soft blue (scarf) or any color you love
- Embroidery: black yarn or embroidery floss for eyes/toes
Hook
Choose a hook smaller than the yarn label suggests to create a tight fabric:
- Worsted yarn: 3.0–3.5 mm (tight fabric for amigurumi)
- Plush yarn: 5.5–7.0 mm (depending on yarn thickness)
Stuffing and Notions
- Fiberfill stuffing
- Stitch marker (highly recommended)
- Yarn needle
- Scissors
- Pins (helpful for positioning ears and limbs)
- Optional: safety eyes if you prefer open eyes (but embroidery is great here)
Finished Size
Approximate sizing depends on yarn:
- Worsted yarn: about 8–10 in (20–25 cm) seated
- Plush yarn: about 12–16 in (30–40 cm) seated
Stitches & Techniques Explained#
Abbreviations (US terms)
- MR = magic ring
- ch = chain
- sc = single crochet
- inc = increase (2 sc in same stitch)
- dec = invisible decrease (sc2tog through front loops)
- sl st = slip stitch
- BLO/FLO = back/front loop only
- ( ) = repeat
- [ ] = stitch count
Techniques you’ll use
Crocheting in continuous rounds
You won’t join rounds—use a stitch marker to track the first stitch.
Invisible decrease (strongly recommended)
This makes the shaping smoother and less “bumpy,” especially on the head.
Stuff as you go
Stuff firmly but don’t overstuff. A slightly squishy plush looks cuter and hides stitches better.
Simple embroidery
- Curved eyes: small arcs stitched with black yarn
- Toe lines: short straight stitches on the paws
Step-by-Step Instructions#
Notes: Work in continuous rounds unless stated. Use a stitch marker. Stuff pieces gradually. All counts are written for a medium plush using worsted yarn; you can scale up with thicker yarn/hook while keeping the same stitch counts.
Head (MC)
R1: MR, 6 sc [6]
R2: inc x6 [12]
R3: (sc, inc) x6 [18]
R4: (2 sc, inc) x6 [24]
R5: (3 sc, inc) x6 [30]
R6: (4 sc, inc) x6 [36]
R7: (5 sc, inc) x6 [42]
R8: (6 sc, inc) x6 [48]
R9–R14: sc around [48]
Begin shaping closed:
R15: (6 sc, dec) x6 [42]
R16: (5 sc, dec) x6 [36]
R17: (4 sc, dec) x6 [30]
Stuff firmly.
R18: (3 sc, dec) x6 [24]
R19: (2 sc, dec) x6 [18]
R20: (sc, dec) x6 [12]
R21: dec x6 [6]
Fasten off, weave in.
Nose (CC)
This nose is a soft oval “button” that you sew onto the face.
R1: MR, 6 sc [6]
R2: inc x6 [12]
R3: (sc, inc) x6 [18]
R4: sc around [18]
R5: (sc, dec) x6 [12]
Lightly stuff. Fasten off with a long sewing tail.
Attach nose: Center it on the lower half of the face. For a cute look, place it slightly forward so it “pops.”
Ears (make 2, CC)
Long floppy ears are made as simple tapered tubes.
R1: MR, 6 sc [6]
R2: (sc, inc) x3 [9]
R3–R4: sc around [9]
R5: (2 sc, inc) x3 [12]
R6–R12: sc around [12]
Lightly stuff just the base (optional), or leave unstuffed so they flop naturally.
Flatten top and close with 6 sc across. Leave a tail for sewing.
Body (MC)
This body is a rounded cylinder that supports a seated pose.
R1: MR, 6 sc [6]
R2: inc x6 [12]
R3: (sc, inc) x6 [18]
R4: (2 sc, inc) x6 [24]
R5: (3 sc, inc) x6 [30]
R6: (4 sc, inc) x6 [36]
R7–R12: sc around [36]
R13: (4 sc, dec) x6 [30]
R14–R15: sc around [30]
Stuff firmly, especially at the bottom.
R16: (3 sc, dec) x6 [24]
R17: (2 sc, dec) x6 [18]
Fasten off with a long tail for attaching the head.
Arms (make 2, MC)
R1: MR, 6 sc [6]
R2: (sc, inc) x3 [9]
R3–R7: sc around [9]
Lightly stuff.
Flatten and close with 4–5 sc across. Leave tail.
Legs/Paws (make 2, MC)
These are chunky paws that sit forward.
R1: MR, 6 sc [6]
R2: inc x6 [12]
R3: (sc, inc) x6 [18]
R4: sc around [18]
R5: (sc, dec) x6 [12]
Stuff firmly.
R6–R8: sc around [12]
Fasten off with tail.
Optional Tail (MC)
R1: MR, 5 sc [5]
R2–R6: sc around [5]
Lightly stuff and sew to the back of the body.
Scarf (Accessory Color)
A simple scarf finishes the look and makes it gift-ready.
Ch to desired length (wrap around neck with a little extra for tails).
- For worsted yarn: ch 55–70 (adjust to your plush size)
Row 1: sc in 2nd ch from hook and across. Turn.
Row 2: ch 1, sc across.
Repeat Row 2 until scarf is the thickness you like (2–4 rows is usually enough).
Fasten off.
Optional fringe: Cut short strands and knot onto scarf ends.
Assembly#
Take your time here—clean assembly is what makes amigurumi look “professional.”
Attach the head to the body
- Pin the head centered on top of the body.
- Sew around the opening using a whip stitch.
- Add extra stitches around the “neck” area for strength.
Attach the legs/paws
- Position paws at the lower front of the body so the plush sits nicely.
- Pin and sew securely.
Attach the arms
- Sew arms to the sides, slightly forward for a cuddly pose.
Attach ears
- Place ears low on the sides of the head, slightly behind the nose line.
- Pin both ears before sewing to ensure symmetry.
Add the nose
- Sew the nose to the front center of the face.
- Lightly stuff if needed before closing the last few stitches.
Embroider the sleepy face
Use black yarn or embroidery floss:
Eyes:
- Stitch two curved lines above the nose area (gentle arcs).
- Keep them evenly spaced for a calm, sleepy look.
Toes:
- Add 2–3 short lines on each paw for simple toe detail.
Add scarf
Wrap and tie the scarf around the neck. A simple knot looks cute, or you can stitch it in place for a permanent accessory.
Common Mistakes and How to Avoid Them#
- Lopsided face: Pin the nose and eyes placement first. Take a photo to check symmetry before sewing.
- Ears too stiff: Don’t overstuff them. Leaving ears unstuffed makes them drape naturally.
- Head wobble: Stuff the body firmly, and reinforce the head seam with an extra round of stitches.
- Visible stuffing: Use a smaller hook or tighten tension. Plush yarn especially needs tight stitches.
- Embroidery looks messy: Use fewer stitches. Smooth, minimal lines look cleaner than many tiny stitches.
Expert Tips for Better Results#
- Use invisible decreases on the head for smoother shaping.
- Stuff the bottom extra firmly so the plush sits without tipping.
- Try “face mapping” with pins: pin the nose, then pin eye positions, then embroider.
- Weave ends inside the head rather than cutting short—loose ends can pop out over time.
- Child-safe version: skip safety eyes and use embroidered eyes only (still supervise and follow your local toy safety guidance).
Variations and Customization Ideas#
- Change the scarf color to match seasons (red for winter, pastel for spring).
- Add a tiny sweater (simple tube with armholes) for extra cuteness.
- Make it a keychain mini by using DK yarn and a smaller hook, then add a hanging loop.
- Add blush cheeks with pink embroidery or a tiny dab of fabric-safe color.
- Different puppy looks: swap ear color, add a spot around one eye, or add a little tail curl.
Benefits of This Crochet Project#
- Works up quickly with simple amigurumi shapes
- Great “confidence builder” crochet for beginners
- Minimal pieces, maximum cuteness
- Customizable colors and accessories
- Makes a sweet nursery gift or comfort plush
- Relaxing, repetitive stitching (perfect for evening crochet)
Internal Linking Suggestions#
If you’re posting this on a crochet blog, link to helpful related posts like:
- “How to Crochet a Magic Ring (Step-by-Step)”
- “Invisible Decrease for Amigurumi”
- “How to Embroider Faces on Crochet Toys”
- “Best Yarn for Amigurumi and Plush Toys”
- “How to Sew Amigurumi Pieces Neatly”
- “Beginner Amigurumi Patterns You Can Finish Fast”
FAQ Section#
Is this a good crochet pattern for beginners?
Yes. The shapes are simple and the face uses easy embroidery. If you can single crochet in the round, you can make this.
Can I use plush yarn for this free crochet pattern?
Absolutely. Use a larger hook and rely on a stitch marker for counting. Plush yarn makes a larger, cuddlier puppy.
How do I make the ears floppier?
Leave the ears unstuffed and use a yarn with good drape. You can also make the ear slightly longer by adding a few extra rounds.
Do I have to embroider the eyes?
No—if you prefer, you can use safety eyes. But the embroidered sleepy eyes are very beginner-friendly and give a sweet expression.
How do I keep the head from flopping over?
Stuff the neck area firmly, sew with tight stitches, and add extra reinforcement stitches around the join.
Can I resize the crochet pattern?
Yes. Change yarn weight and hook size to scale up or down. Keep the same stitch counts for the same proportions.
Conclusion#
A sleepy floppy-eared puppy amigurumi is one of those timeless crochet makes you’ll come back to again and again—because it’s cute, calming to stitch, and endlessly giftable. Once you’ve made one, you can easily create variations with different scarf colors, ear placements, and facial expressions to make each puppy feel unique.
If you tell me what yarn weight you plan to use (worsted, DK, or plush) and how tall you want your puppy to be, I can help you choose the best hook size and adjust details like ear length and scarf size so your finished plush comes out exactly how you imagined.


