


Introduction#
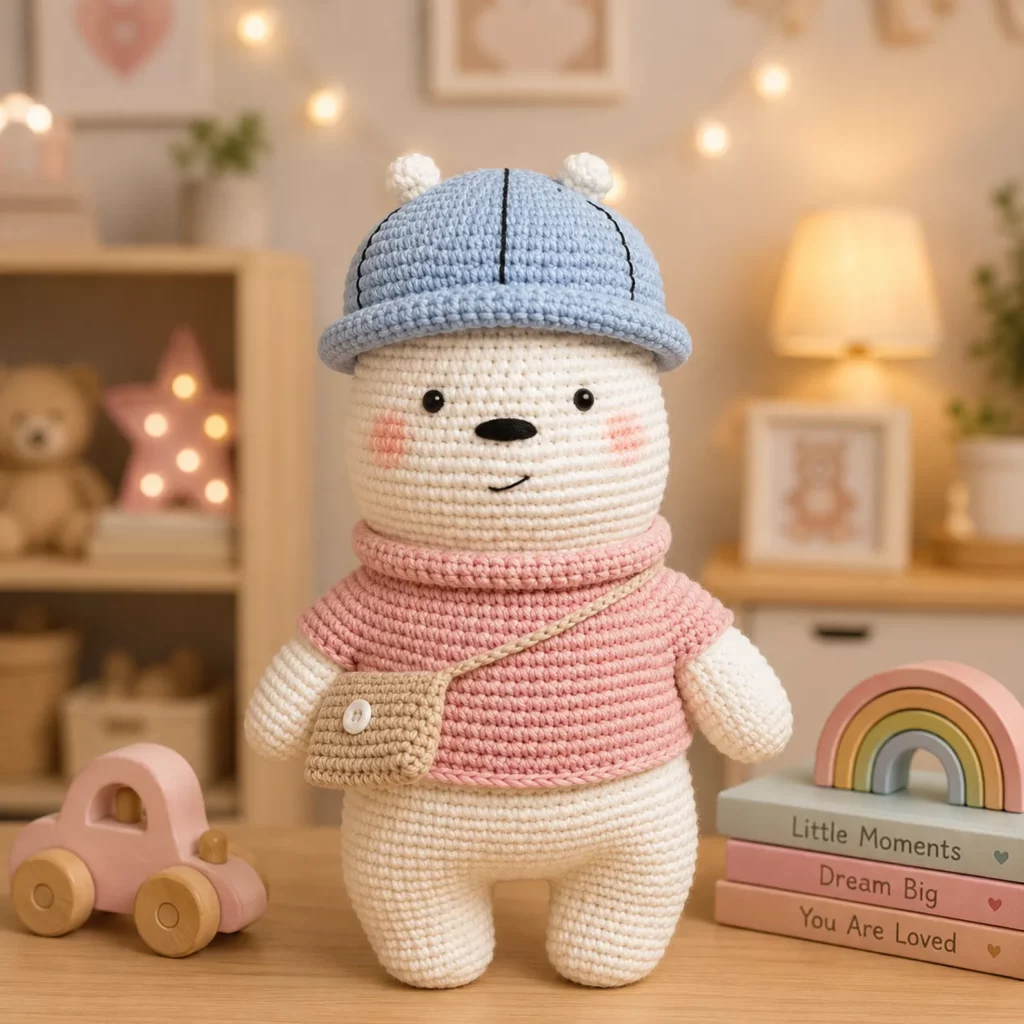
If you’re in the mood for a crochet project that feels like a full little character (not just a toy), this explorer bear is the perfect make. It has that charming “storybook” look: a simple, friendly face, a cozy sweater, a sweet little bucket hat, and an adorable crossbody bag that instantly turns the bear into a traveling buddy. It’s the kind of handmade gift that people keep on a shelf long after childhood, and it’s also a fun project for crocheters who want to practice clean amigurumi shaping and clothing details without getting overwhelmed.
Explore more beginner amigurumi crochet patterns in our pattern library.
This crochet pattern is built from beginner-friendly amigurumi shapes. The head is a smooth sphere, the body is a sturdy cylinder with gentle shaping, and the arms and legs are simple tubes. The outfit pieces are straightforward too: the sweater is essentially a tube with a neck band, the hat is a classic bucket-hat shape, and the tiny bag is a mini rectangle with a strap. The details do the heavy lifting, so you get a polished result without advanced techniques.
If you’ve been searching for a free crochet pattern that teaches useful finishing skills (clean color changes, neat sewing, and simple embroidery) and gives you a doll that looks boutique-quality, this is a great one to save.
Detailed Description of the Crochet Pattern#
This project is a bear amigurumi wearing three accessories that create the “explorer” theme: a bucket hat, a sweater (or turtleneck-style top), and a small crossbody bag. The bear body is mostly a single neutral color (cream/white), which highlights the outfit colors beautifully. The hat is worked in the round and finished with a firm brim. The sweater is worked as a separate piece and slipped onto the bear (or you can stitch it in place), and the crossbody bag is a mini pouch with a flap or a button detail.
The face is intentionally simple: small round eyes, a tiny oval nose, a subtle smile line, and optional blush cheeks. This clean style is perfect for a modern nursery or minimalist décor, and it also makes the bear feel calm and sweet.
The overall build is practical and sturdy. The proportions are “plush doll” style, not tiny amigurumi, which means it feels substantial in the hands. You can scale it up or down depending on yarn weight, but it works best in worsted yarn with a tight hook for smooth stitches.
Skill Level Explanation#
This is an easy-to-intermediate crochet pattern. The stitches are basic, but the project includes multiple components (bear + clothing + accessories), so it’s a great “next step” after your first simple amigurumi.
Beginner-friendly skills used
Single crochet in the round
Increases and invisible decreases
Basic seaming with a yarn needle
Simple color changes for clothing
Skills that feel slightly intermediate (but totally learnable)
Keeping stitch counts consistent across multiple pieces
Placing facial features symmetrically
Attaching clothing so it sits neatly without puckering
Making a firm hat brim that holds shape
If you’re comfortable with the basics and want a project that looks impressive without complicated shaping, this crochet for beginners friendly pattern is a perfect fit.
Materials Needed#
Yarn
Worsted weight (#4) yarn is ideal for a smooth, sturdy toy. Cotton blends give crisp stitches, while acrylic is softer and widely available.
Main bear color: cream/white
Sweater color: light blue
Hat color: pale yellow
Bag color: soft pink or beige
Small amounts of black for nose/mouth embroidery and optional hat detail lines
Optional: a tiny amount of blush pink yarn or embroidery floss for cheeks
Yardage estimate (approximate)
Main bear: 250–400 yards depending on size
Sweater: 80–150 yards
Hat: 50–100 yards
Bag + strap: 30–60 yards
Small scraps for face embroidery
Hook
2.75–3.5 mm for tighter amigurumi fabric with worsted yarn
If you prefer a slightly larger plush, use 3.5–4.0 mm, but keep stitches tight to prevent stuffing from showing.
Notions
Stitch marker
Yarn needle
Scissors
Fiberfill stuffing
Optional safety eyes (embroidered eyes recommended for baby-safe gifting)
Optional felt circles behind safety eyes
Optional small button for bag flap (or crochet a button)
Stitches & Techniques Explained#
Abbreviations (US terms)
MR = magic ring
sc = single crochet
inc = increase (2 sc in one stitch)
dec = invisible decrease
sl st = slip stitch
ch = chain
BLO = back loop only
st(s) = stitches
Invisible decrease
Invisible decreases keep shaping smooth, especially on the head and body. Insert your hook through the front loop of the next stitch and the front loop of the stitch after that, yarn over and pull through, yarn over and finish like a normal sc.
Working in continuous rounds
Most amigurumi is worked in continuous rounds. Always use a stitch marker in the first stitch of each round.
Tight fabric for toys
Toys look best when the fabric is dense. If you see gaps, go down a hook size or tighten tension.
Basic embroidery for face
A small nose and mouth are easiest to embroider with black yarn or embroidery thread. Use short stitches and keep them centered.
Step-by-Step Instructions#
Pattern notes
This is a practical, beginner-friendly crochet tutorial style pattern. Numbers in parentheses are stitch counts. Work in continuous rounds unless stated. Stuff as you go, especially for the head and body. For baby-safe toys, embroider eyes instead of using safety eyes.
Part 1: Head (main color)
Rnd 1: MR, 6 sc (6)
Rnd 2: inc around (12)
Rnd 3: (sc, inc) around (18)
Rnd 4: (2 sc, inc) around (24)
Rnd 5: (3 sc, inc) around (30)
Rnd 6: (4 sc, inc) around (36)
Rnd 7: (5 sc, inc) around (42)
Rnd 8–12: sc around (42) for 5 rounds
Place eyes between Rnd 10–11, about 8–10 stitches apart.
Rnd 13: (5 sc, dec) around (36)
Rnd 14: (4 sc, dec) around (30)
Rnd 15: (3 sc, dec) around (24)
Stuff firmly and shape into a smooth sphere.
Rnd 16: (2 sc, dec) around (18)
Rnd 17: (sc, dec) around (12)
Rnd 18: dec around (6)
Fasten off, close, weave in.
Face embroidery
Nose: small horizontal oval or triangle centered below the eyes
Mouth: short vertical stitch down from nose, then a small curved smile line
Optional blush: light pink stitches or blush powder for display-only toys
Part 2: Ears (make 2, main color)
Rnd 1: MR, 6 sc (6)
Rnd 2: (sc, inc) around (9)
Rnd 3: sc around (9)
Fasten off leaving a tail. Flatten slightly and sew to the top sides of the head, evenly spaced.
Part 3: Body (main color)
Rnd 1: MR, 6 sc (6)
Rnd 2: inc around (12)
Rnd 3: (sc, inc) around (18)
Rnd 4: (2 sc, inc) around (24)
Rnd 5: (3 sc, inc) around (30)
Rnd 6–12: sc around (30) for 7 rounds
Rnd 13: (3 sc, dec) around (24)
Rnd 14: sc around (24)
Stuff firmly but not rock-hard (you want a plush feel).
Rnd 15: (2 sc, dec) around (18)
Rnd 16: (sc, dec) around (12)
Rnd 17: dec around (6)
Fasten off, close, leave a tail for sewing head to body.
Sew head to body
Pin first so it’s centered. Stitch around the neck opening with small, strong stitches. Reinforce the seam with a second pass if the toy will be handled often.
Part 4: Arms (make 2, main color)
Rnd 1: MR, 6 sc (6)
Rnd 2: inc around (12)
Rnd 3: sc around (12)
Rnd 4: (2 sc, dec) around (9)
Rnd 5–12: sc around (9) for 8 rounds
Lightly stuff the hand area only. Keep the upper arm softer.
Flatten the top and close. Fasten off leaving a tail.
Sew arms to the sides of the body just under the neckline area (or slightly lower if you want a relaxed pose).
Part 5: Legs (make 2, main color)
Rnd 1: MR, 6 sc (6)
Rnd 2: inc around (12)
Rnd 3: sc around (12)
Rnd 4: (2 sc, dec) around (9)
Rnd 5–14: sc around (9) for 10 rounds
Stuff the foot and lower leg lightly.
Flatten the top, close, leave a tail.
Sew legs to the bottom front of the body so the bear sits nicely.
Part 6: Sweater (light blue)
This sweater is a simple tube that slides onto the body. You can sew it in place if you want it permanent.
Start at the bottom hem
Ch enough to fit around the body comfortably (for a 30-st body, start with ch 31 and join, adjust if needed).
Round 1: ch 1, sc around (30)
Rounds 2–8: sc around (30)
Neck shaping
To create a turtleneck look, work a few rounds without increasing, then add a collar band.
Round 9: BLO sc around (30)
Rounds 10–12: sc around (30)
Collar
Switch to hdc for a thicker collar if you like.
Rounds 13–14: hdc around (30)
Fasten off, weave in ends.
Fit tip
If the sweater is too tight, add 2 stitches to the starting chain. If it’s too loose, reduce by 2 stitches. The goal is snug but not stretched.
Part 7: Bucket Hat (pale yellow)
Top of hat
Rnd 1: MR, 6 sc (6)
Rnd 2: inc around (12)
Rnd 3: (sc, inc) around (18)
Rnd 4: (2 sc, inc) around (24)
Rnd 5: (3 sc, inc) around (30)
Rnd 6: (4 sc, inc) around (36)
Rnd 7: (5 sc, inc) around (42)
Rnd 8: sc around (42)
Hat sides
Rounds 9–12: sc around (42) for 4 rounds
Add one BLO round at the base of the crown to create a crisp edge.
Round 13: BLO sc around (42)
Brim
Increase gradually so it flares slightly.
Round 14: (6 sc, inc) around (48)
Round 15: sc around (48)
Round 16: (7 sc, inc) around (54)
Round 17: sc around (54)
Fasten off, weave in ends.
Optional hat details
If you want those simple stitched “panel lines,” embroider 4–6 long straight lines from the top down the sides using black yarn.
Optional tiny top nubs: crochet two mini bumps in white and sew on top (MR 4 sc, one round sc, fasten off).
Part 8: Crossbody Bag (soft pink/beige)
Bag body (mini rectangle, worked in rows)
Ch 16
Row 1: sc in 2nd ch from hook and across (15), turn
Rows 2–10: ch 1, sc across (15), turn
Fold rectangle in half and seam sides, leaving the top open.
Flap (optional)
Join yarn at the back top edge.
Row 1: sc across the back top only (15), turn
Row 2: ch 1, dec, sc 11, dec (13), turn
Row 3: ch 1, dec, sc 9, dec (11), turn
Row 4: ch 1, dec, sc 7, dec (9), turn
Fasten off.
Strap
Ch long enough to go crossbody on the bear (usually 40–60 chains depending on bear size).
Sc back along the chain for strength.
Sew strap ends to the sides of the bag.
Add a small button detail on the front (sew on a real button or crochet a tiny circle button).
How to position the bag
Place strap across the bear chest and stitch lightly at the shoulder area if you want it to stay put.
Final assembly check
Put on sweater, then hat, then bag. Adjust placements and tack stitch any accessory if needed for durability.
Common Mistakes and How to Avoid Them#
The head looks oval instead of round
This usually means uneven stuffing or tension changes. Stuff firmly in small pieces and massage the head into shape before closing.
The hat brim curls
Make sure brim increases are spaced evenly. If it still curls, add one more increase round, or lightly steam-block the brim (for acrylic) to flatten.
The sweater won’t fit
Amigurumi tension varies a lot. Don’t hesitate to adjust the starting chain by 2 stitches up or down. Always test-fit before finishing.
The bag strap stretches
Single crochet back along the chain makes a huge difference. If you used only chains, it will stretch. You can also sew a ribbon to the inside of the strap for extra stability.
Face features look uneven
Mark the center of the face with a pin and count stitches outward for eye placement. Symmetry is everything for a cute expression.
Parts feel loose after sewing
Reinforce stress points (neck, arms, strap joins) with a second sewing pass.
Expert Tips for Better Results#
Use a smaller hook for the bear than for the clothing. Tight stitches make a smooth plush, and slightly looser clothing drapes better.
Pin everything before sewing. Two minutes pinning saves a lot of seam ripping later.
For a cleaner look, sew ears and limbs using mattress stitch style stitches that hide in the fabric ridges.
If you’re gifting, embroider eyes instead of using safety eyes. It’s safer and washes better.
Want a more “designer plush” finish? Add a small fabric lining inside the bag and a tiny snap closure on the flap.
Variations and Customization Ideas#
Change the outfit theme: make a raincoat (yellow body tube with buttons), a scarf, or tiny overalls.
Swap colors: sage sweater + cream hat, pink sweater + tan hat, navy sweater + beige hat.
Add a tiny backpack instead of a crossbody bag using the same pouch method with two straps.
Make the hat a beanie by skipping the brim rounds and adding ribbing at the bottom.
Personalize with initials on the bag flap using surface embroidery.
Create a whole collection: same bear base, different hats and bags for different “characters.”
Benefits of This Crochet Project#
It’s a high-value crochet pattern because you get a full character plus accessories.
It teaches practical amigurumi skills: shaping, sewing, and clean finishing.
It’s customizable for any color palette and theme.
It makes a memorable gift for birthdays, baby showers, and nursery décor.
It works well for using leftover yarn in small accessory pieces.
It looks polished even for newer crocheters because the shapes are simple and forgiving.
Internal Linking Suggestions#
You may also like these related posts
Beginner Amigurumi Crochet Tutorial: How to Increase and Decrease Smoothly
How to Embroider Cute Faces on Crochet Toys
Free Crochet Pattern: Simple Amigurumi Teddy Bear Base
DIY Crochet: How to Make a No-Stretch Strap for Bags
Free Crochet Pattern: Mini Crochet Pouch with Flap and Button
Crochet Tutorial: Making a Bucket Hat in the Round
FAQ Section#
Is this an easy crochet pattern for beginners?
Yes. The bear body uses basic single crochet rounds with increases and decreases. The outfit pieces are simple tubes and rectangles. The only “advanced” part is neat assembly, which is very doable with pinning and patience.
What yarn is best for an amigurumi bear like this?
Worsted weight cotton or cotton-blend gives the cleanest stitch definition and holds shape well. Acrylic works too and can feel softer, especially for gifts.
Can I make the clothes removable?
Yes. Crochet the sweater and hat as separate pieces and don’t tack stitch them to the bear. For the bag, you can keep it removable or lightly stitch the strap in place for stability.
How big will the finished toy be?
With worsted yarn and a 3.0–3.5 mm hook, it’s typically 10–14 inches tall depending on how long you make the body and limbs. Smaller hooks create a slightly smaller, firmer plush.
Are safety eyes safe for kids?
For babies and toddlers, embroidered eyes are safer. Safety eyes are better for décor items or older children, and you should always attach them securely with the proper washers.
How do I keep the hat brim from turning up?
Make sure your brim increases are evenly spaced, and consider adding one extra plain round after an increase round. A light steam block can also help shape the brim.
Conclusion#
This explorer bear amigurumi is the kind of crochet pattern that feels like a full little story. The sweet face, cozy sweater, bucket hat, and tiny crossbody bag come together into a plush that looks handmade in the best way: thoughtful, detailed, and gift-worthy. It’s also a fantastic project for improving your finishing skills, because the accessories teach you how to shape, fit, and assemble with confidence.
If you tell me the yarn weight you’re using (worsted, DK, or plush) and the approximate size you want (small shelf doll or larger cuddle plush), I can adjust the stitch counts so the hat, sweater, and bag fit your bear perfectly.


