Introduction#
If you love crochet wearables that look like they came from a boutique, a matching two-piece set is one of the most satisfying projects you can make. It feels elevated, it photographs beautifully, and it gives you multiple styling options: wear the pieces together for a complete look, or mix and match each piece with basics you already own.
Explore more intermediate tops crochet patterns in our pattern library.
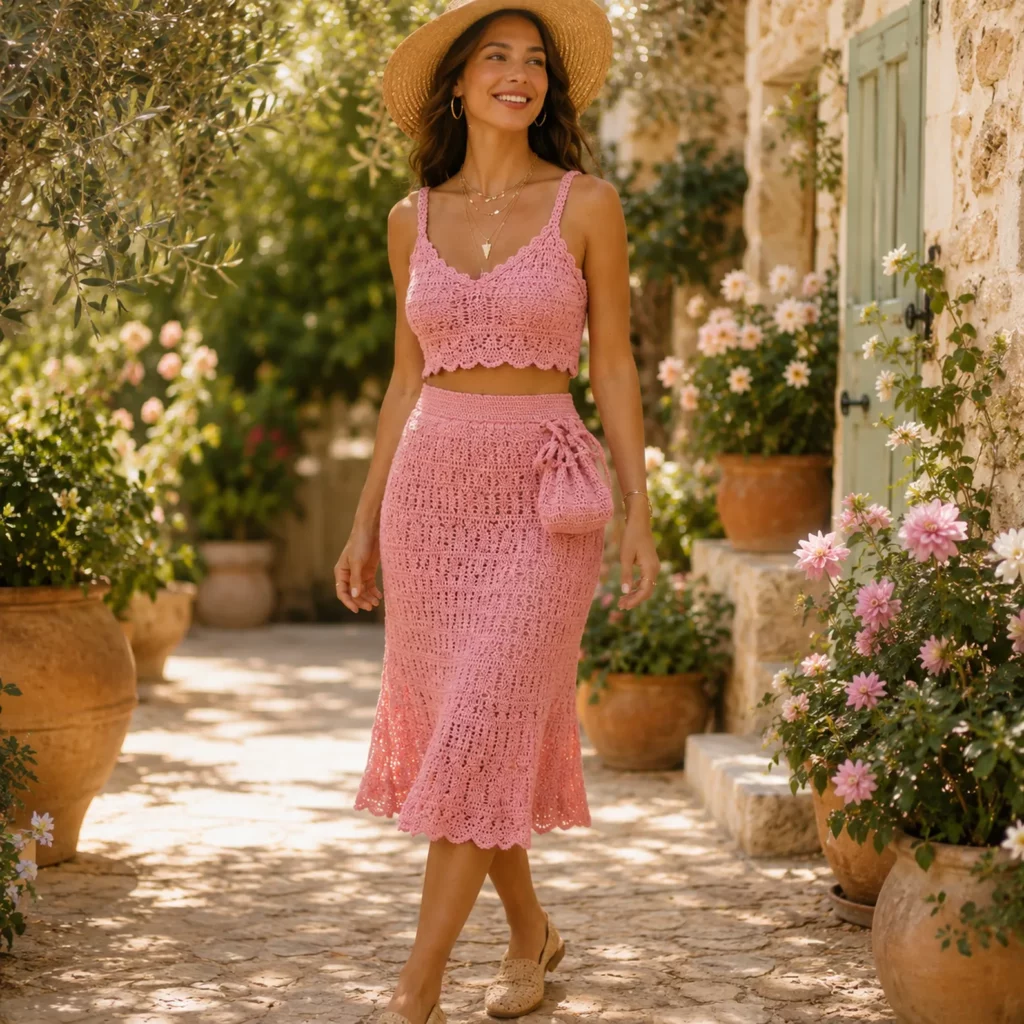
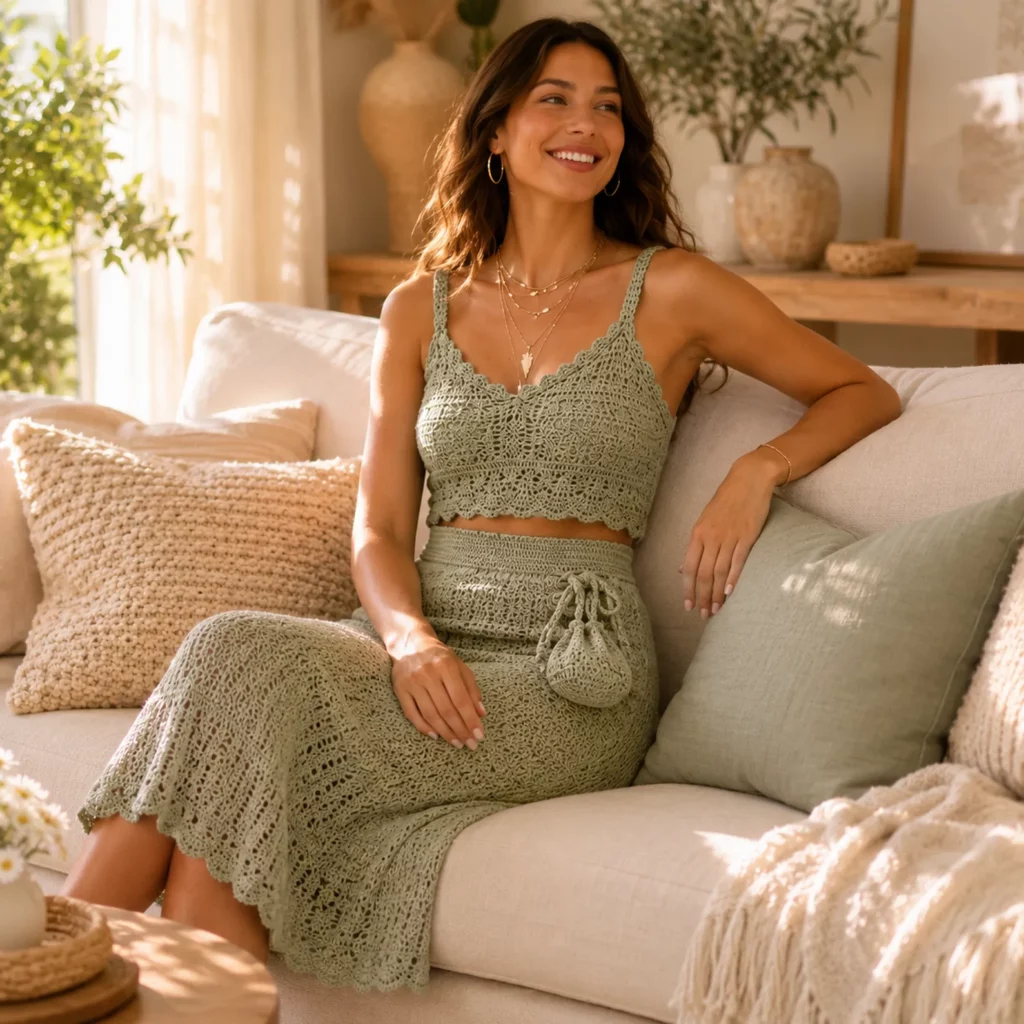
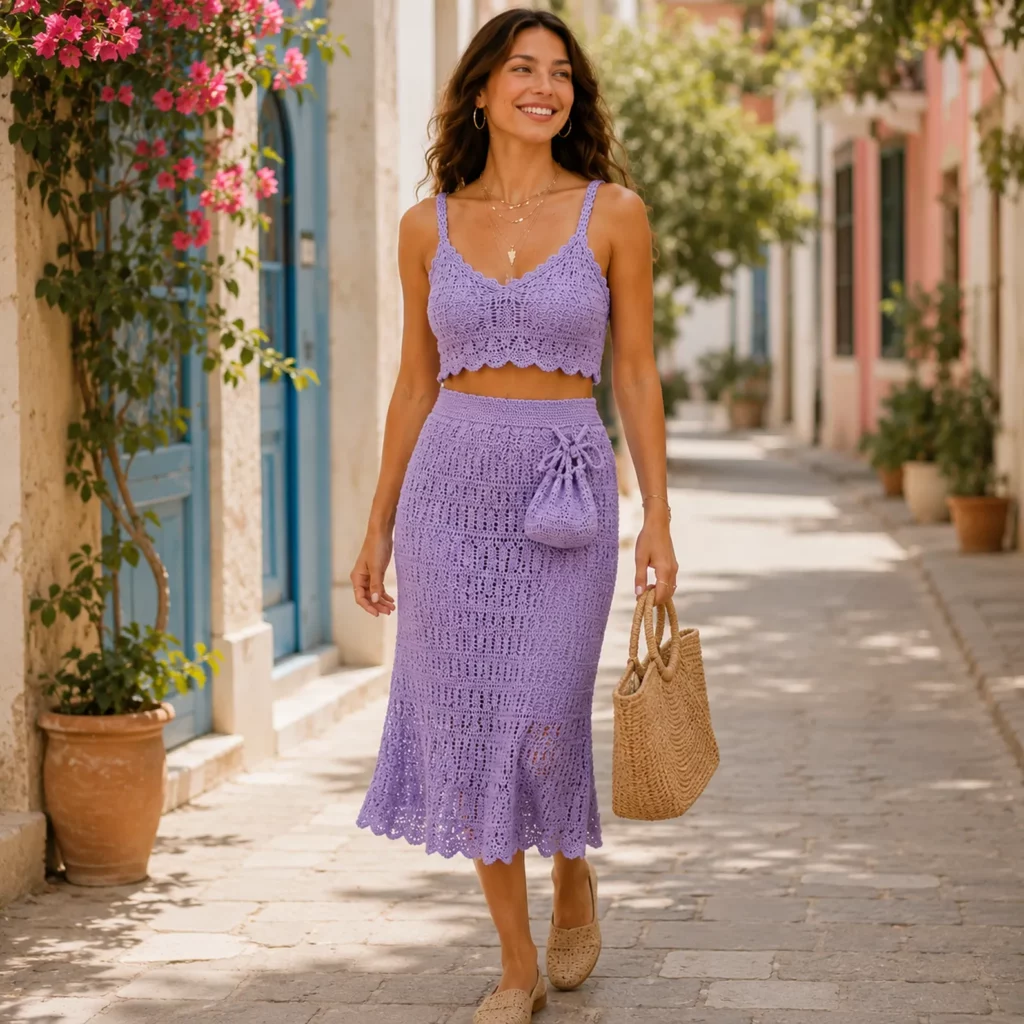
This crochet pattern teaches you how to create a lace-textured crop top and matching midi skirt with a flattering fitted shape, delicate edging, and a soft, feminine drape. The set has a romantic, summer-ready feel: a crop top with straps and a shaped neckline, paired with a skirt that hugs gently through the hips and flares slightly at the bottom with a scalloped hem. There’s also a cute side tie pouch detail that adds personality and makes the outfit feel unique.
You’ll find everything you need below—materials, stitch explanations, made-to-measure sizing guidance, and very detailed instructions so you can confidently crochet your own set.
Detailed Description of the Crochet Pattern#
This two-piece set is built around a repeating lace texture that creates a lightly open, airy fabric without feeling too “holey.” The stitch pattern reads as delicate and structured, which is exactly what you want in a fitted garment.
Top features
- Cropped length that sits above the waist
- Straps that provide support and keep the top secure
- A gently shaped neckline (soft sweetheart vibe)
- A scalloped or picot-style edge along the hem for a finished look
- Textured lace panels that give dimension while staying wearable
Skirt features
- High-waisted fit with a smooth waistband
- Straight-to-slightly-tapered body through the hips
- A softer flare at the lower skirt for movement
- A scalloped hem that mirrors the top’s edging
- Optional side tie pouch (decorative or functional, depending on how you construct it)
Because the pieces share the same stitch language, they look cohesive even if you change the color. This crochet pattern works beautifully in solid shades, ombré yarns, or subtle heathered yarns.
Skill Level Explanation#
This is best for advanced beginners to intermediate crocheters.
You’ll be comfortable if you can
- Crochet evenly in rows and rounds
- Read stitch repeats and keep counts consistent
- Make clean edges and tidy color changes (if used)
- Join pieces neatly and weave in ends securely
- Try on a garment and adjust fit as you go
You’ll practice
- Simple shaping for neckline and bust fit
- Working lace patterns with chain spaces
- Creating a smooth waistband and clean hems
- Balancing drape vs structure with yarn and hook choice
If you’ve made a basic tank top or simple skirt before, this crochet tutorial will feel very achievable.
Materials Needed#
Yarn
For a set like this, yarn choice makes a big difference in comfort and drape.
Best yarn fibers
- Cotton or cotton-blend (best for summer wear, structure, and stitch definition)
- Bamboo/cotton (softer drape, slightly more flowy skirt)
- Linen blend (beautiful texture, crisp feel, great stitch definition)
Yarn weight
- DK or light worsted gives the best balance of coverage and drape
- Sport weight works for a lighter fabric but may need more rows
Estimated yarn amounts
- Crop top: 200–400 g depending on size and length
- Midi skirt: 500–900 g depending on size and length
- Optional pouch: 30–70 g
If you’re between sizes, buy a little extra. Skirts use more yarn than most people expect.
Hook
- DK: 3.5 mm to 4.5 mm
- Light worsted: 4.0 mm to 5.0 mm
For fitted wearables, choose a hook that creates a fabric you like against the skin: not stiff, not too airy.
Notions
- Stitch markers
- Tapestry needle
- Measuring tape
- Scissors
- Optional: elastic thread for waistband stability
- Optional: lining fabric for skirt (if you want full opacity)
Stitches & Techniques Explained#
US terms
Common abbreviations
- ch chain
- sl st slip stitch
- sc single crochet
- hdc half double crochet
- dc double crochet
- tr treble crochet
- sk skip
- sp space
- inc increase
Lace texture concept
This set uses a repeating pattern built from dc (or hdc) with chain spaces. This creates a consistent, elegant texture and helps the garment stretch gently with the body.
Scalloped edging
Scallops are usually made by working multiple dc into one stitch or chain space, then skipping stitches to create the curve. This gives the hem that soft decorative finish.
Shaping without stress
Instead of complex shaping, this design relies on:
- Slight increases/decreases at the sides
- Optional short rows at the bust
- Strap placement that supports the top
Step-by-Step Instructions#
This crochet tutorial is written in a made-to-measure format so you can fit your body and your gauge.
Measurements to take
For the top
- Bust circumference (fullest point)
- Underbust circumference
- Desired crop length (from underarm or bust down to hem)
For the skirt
- Waist circumference (where you want waistband to sit)
- Hip circumference (fullest point)
- Waist-to-hem length
Decide ease
- Fitted: 2–5 cm negative ease at bust/waist
- Comfortable: 0–2 cm negative ease
- Relaxed: 2–5 cm positive ease
Gauge and swatch
Make a swatch in your lace stitch pattern, at least 12 x 12 cm. Measure:
- stitches per 10 cm
- rows per 10 cm
This helps you calculate stitch counts for the waistband and skirt body so they fit correctly.
Crochet crop top construction
You can build the top in two easy methods: panel method or in-the-round method. The cleanest for a lace top is often the panel method.
Front panel
- Chain to the width of half your bust (minus a little for stretch).
- Work in your lace stitch repeat until you reach the height from hem to neckline.
- For a gentle neckline shape, decrease a small amount at the top edges over a few rows, leaving a center section for the neckline.
- If you want a soft sweetheart shape, create two slight slopes toward the center.
Try-on tip
Hold the panel against your body to check width and height before making the back.
Back panel
- Make it the same width as the front.
- For more support, make the back slightly higher than the front by a few rows.
Join side seams
- Sew or slip stitch the sides together, leaving armholes.
- Try it on before finishing seams to ensure the armholes feel comfortable.
Strap options
Simple straps
- Attach yarn at the front strap point, chain to the back, and reinforce with sc back along the chain.
Structured straps (recommended)
- Chain to length
- Work sc back along the chain
- Work a second row sc for width
Attach straps evenly so the neckline sits balanced.
Top edging and scalloped hem
- Add a round of sc around neckline and armholes for a clean finish.
- Add scallops along the bottom hem to match the skirt’s hem later.
Crochet skirt construction
The skirt is easiest in the round from the waistband down.
Waistband
Start with a firm waistband so the skirt stays in place.
Option one: simple waistband
- Chain to match your waist measurement with slight negative ease.
- Join in a ring carefully without twisting.
- Work several rounds of sc or hdc for a smooth waistband.
Option two: ribbed waistband (best fit)
- Crochet a strip of ribbing in BLO sc (or BLO hdc) long enough to fit your waist.
- Join ends to create a loop.
- Pick up stitches evenly around one edge and begin skirt body.
Optional stability upgrade
Thread a thin elastic through the waistband using a yarn needle.
Skirt body
- Work the lace stitch repeat in rounds.
- For a fitted shape, keep increases minimal through the waist and add slight increases at hips if needed.
Shaping method
- If it feels tight at hips, add a few evenly spaced increases in one round.
- If it feels loose, decrease slightly along side “seams” (two points opposite each other).
Try-on checkpoints
- After 10 cm: check hip ease
- Midway down: check if you want more taper or more straight fall
- Before hem flare: decide how much movement you want
Flare section
Near the lower skirt, add more increases evenly to create movement. This helps the skirt swing gently rather than cling.
Scalloped hem
Finish with a scallop round. A classic scallop approach:
- work multiple dc into a chain space
- skip a small number of stitches
- repeat evenly around
This gives a romantic, finished edge that ties the set together visually.
Optional side tie pouch detail
This little pouch can be decorative or functional.
Basic pouch construction
- Crochet a small rectangle or oval base in the same lace or a tighter stitch.
- Fold and seam sides to form a small bag shape.
- Add a drawstring chain and weave it through the top edge.
- Attach the pouch at the side of the waistband with a few strong stitches so it hangs neatly.
Styling note
Keeping the pouch in the same yarn and stitch pattern helps it feel intentional, not like an afterthought.
Common Mistakes and How to Avoid Them#
Uneven lace texture
- Keep chain spaces consistent
- Count repeats at the end of each round/row
- Use stitch markers to mark pattern sections
Top gaping at the neckline
- Move straps slightly inward
- Add one more edging round to tighten
- Use a smaller hook for the neckline edging
Skirt slipping down
- Add negative ease in waistband
- Use ribbed waistband or add elastic
- Avoid overly stretchy yarn for waistband
Hem curling or flaring too much
- Curling: add a sc round before scallops
- Too much flare: reduce increases before the hem
Sheerness
- Use a slightly smaller hook
- Choose a denser lace repeat
- Add a lining for the skirt if you want full coverage
Expert Tips for Better Results#
- Block both pieces lightly so the lace pattern opens evenly and hems look crisp
- Weave in ends as you go—wearables have more movement and ends can work loose
- Use a foundation chain with good stretch for the waistband if you crochet it directly in the round
- Place “side seams” intentionally by marking two opposite points so shaping stays symmetrical
- If you want a more “designer” finish, add a thin slip stitch round after scallops for definition
Variations and Customization Ideas#
- Make the top longer into a tank instead of a crop
- Add a matching shrug or short sleeve bolero
- Turn the skirt into a maxi by adding more rounds before the flare
- Swap scallops for a picot edging for a sharper, delicate look
- Create a slit in the skirt by working in rows for the last section
- Make the pouch removable with a button loop or tie tabs
Benefits of This Crochet Project#
- A wearable crochet pattern with high visual impact
- Two pieces means more outfit combinations
- Great for summer vacations, festivals, and beach dinners
- Customizable fit using made-to-measure instructions
- Beautiful stitch texture that looks expensive in solid color
- A satisfying DIY crochet project that teaches wearable construction skills
Internal Linking Suggestions#
You may also like
- Easy crochet pattern for a simple bralette
- Crochet tutorial for clean scalloped edging
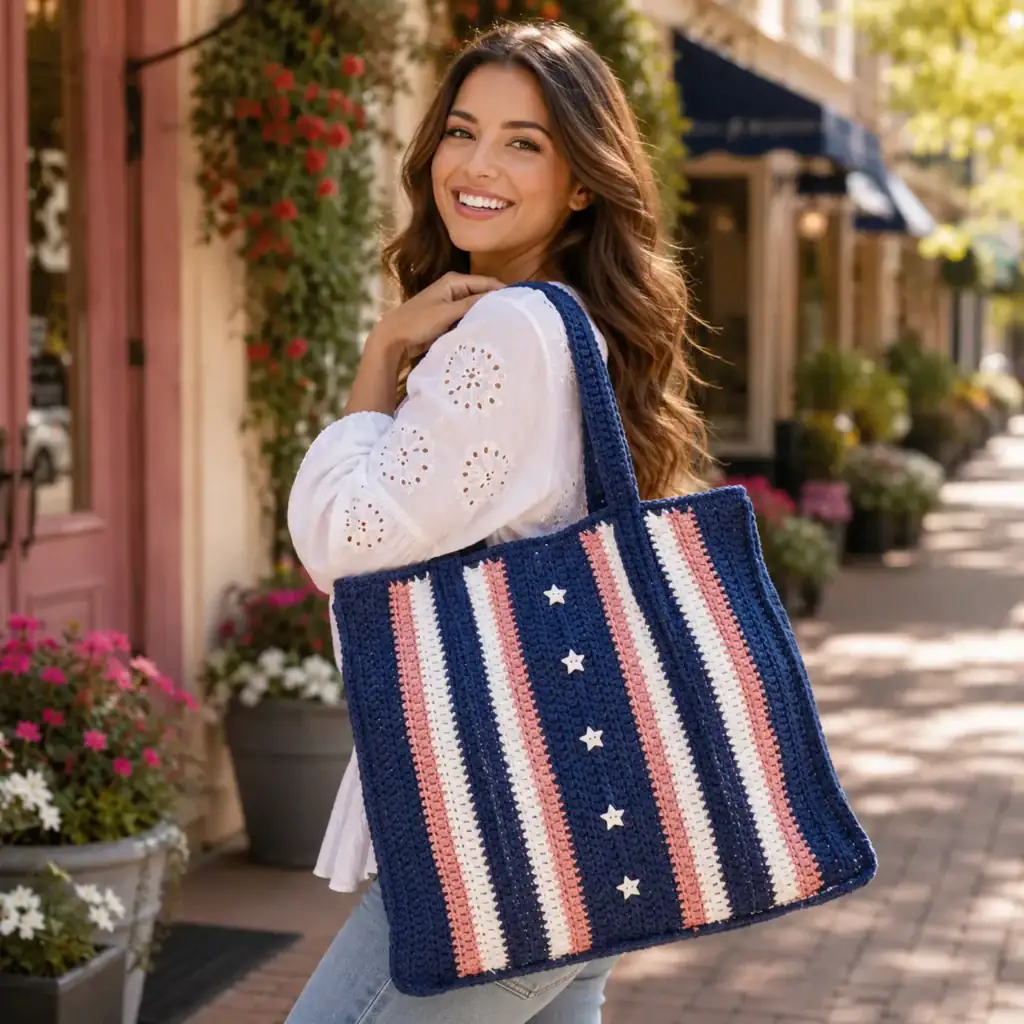
- Free crochet pattern for a summer tote bag
- Crochet for beginners guide to wearable sizing
- DIY crochet skirt patterns roundup
- How to add elastic to crochet waistbands
FAQ Section#
What yarn is best for this crochet pattern
Cotton or cotton blends are best for structure and comfort. Bamboo blends add drape, and linen blends give a crisp, elegant finish.
Can beginners make this two-piece set
Yes, if you’re comfortable with basic stitches and counting repeats. The shaping is gentle and the fit is adjustable.
How do I size the skirt without a size chart
Use your waist and hip measurements, then calculate stitch counts from your gauge swatch. Try on as you go and adjust with small increase/decrease rounds.
How can I make the waistband stay tight
Use ribbing or add a thin elastic. Also make sure the waistband has slight negative ease.
Is the skirt see-through
It depends on stitch choice and yarn. Use a smaller hook for denser fabric, or add a simple lining if you want full coverage.
Can I wear the top with a bra
You can. For better bra-friendliness, make straps slightly wider and raise the back panel a few rows.
Conclusion#
This crochet two-piece set crochet pattern is the kind of project that feels truly rewarding: elegant lace texture, flattering shapes, and matching details like scalloped hems that make it look cohesive and high-end. Once you make one set, you’ll probably want another—different colors, different lengths, and maybe a matching bag or pouch detail for extra charm.
If you tell me your yarn weight and whether you want the skirt fitted or more relaxed, I can give you a quick made-to-measure starting stitch estimate for the waistband and the top panels so you can begin with confidence.