


Introduction#
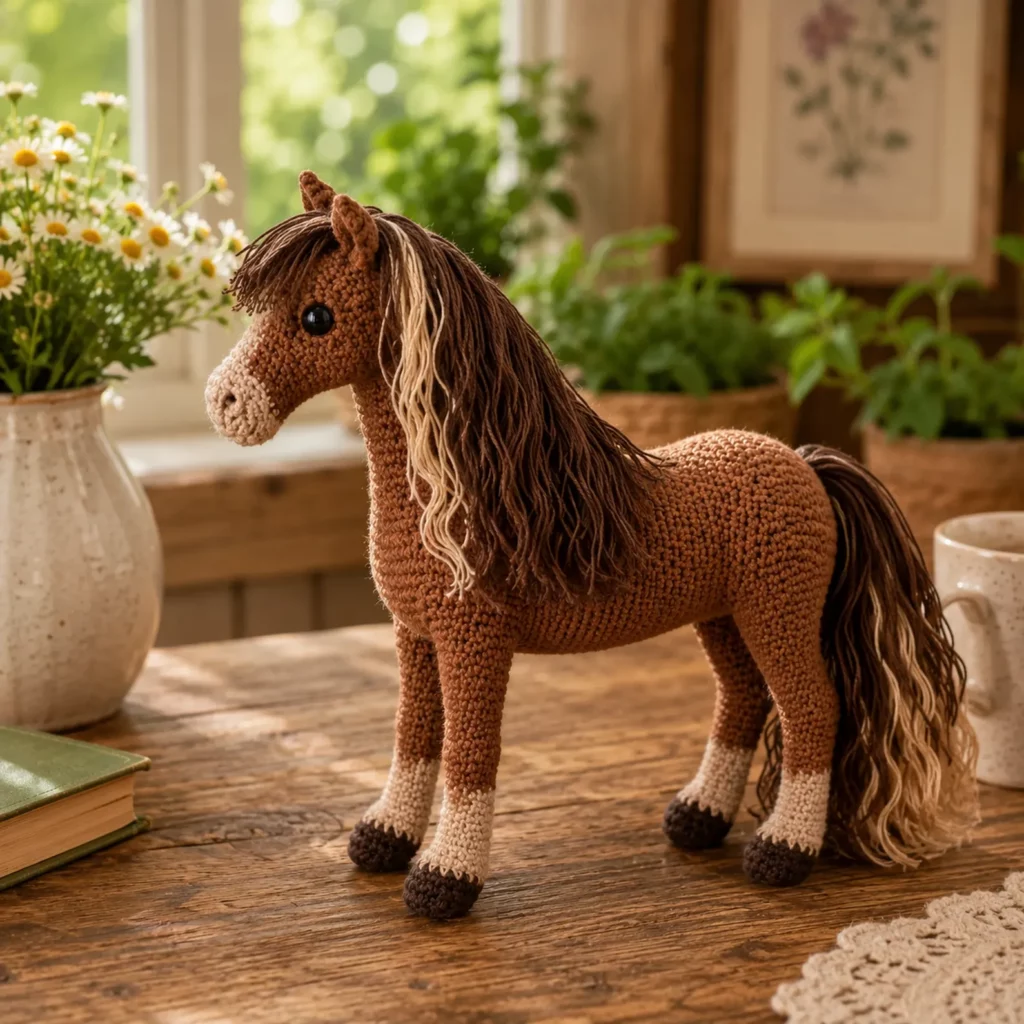
A crochet horse is one of those projects that feels extra special the moment you start shaping the long neck and that sweet little muzzle. Horses have such a recognizable silhouette—upright ears, a gentle face, a proud stance, and flowing hair—so when you translate that into amigurumi, the finished plush looks instantly “real,” even with simple stitches.
Explore more beginner amigurumi crochet patterns in our pattern library.
This crochet pattern is designed to create a standing horse (or pony) with a smooth body, contrasting sock-style legs and hooves, and a dramatic mane and tail made from yarn strands. The stitches stay beginner-friendly (mostly single crochet with increases and decreases), but the final result looks detailed because of the shaping and finishing. If you’ve been searching for a free crochet pattern that feels gift-worthy and collectible, this one is a perfect pick.
Detailed Description of the Crochet Pattern#
This amigurumi horse is built as a sturdy standing plush with four legs that support a rounded body. The neck is long and slightly curved, leading to a shaped head with a defined muzzle. The legs have two-tone coloring: lighter “socks” and darker hooves, which makes the design feel realistic. The mane is attached along the neck and falls to one side in waves, while the tail is a thick bundle with a lighter gradient at the bottom.
Key design elements you’ll recreate
A smooth horse head with a rounded muzzle and centered nostril detail
Upright ears sewn slightly forward for expression
Long neck that blends naturally into the shoulders
Standing body with gentle barrel shape
Four legs with contrasting socks and hooves
Mane and tail made from strands for a natural hair look
Optional subtle face shaping for cheeks and a more lifelike profile
How it’s made
You crochet separate parts (head, body, neck, legs, ears, muzzle), then assemble. Hair is added last so you can style it and control how full it looks.
Skill Level Explanation#
Skill level: Confident Beginner to Intermediate Beginner
You should feel comfortable with
Magic ring
Single crochet (sc)
Increase (inc) and decrease (dec)
Working in continuous rounds
Basic sewing and assembly
Skills you’ll practice
Shaping longer pieces (neck and legs) so they stay straight
Balancing a standing plush by positioning legs evenly
Creating realistic hair using yarn strands
Neat color changes for socks and hooves
This is an easy crochet pattern stitch-wise, but it rewards careful finishing.
Materials Needed#
Yarn
Worsted weight (Category 4) makes a medium plush with solid structure
DK weight (Category 3) makes a smaller, more delicate horse
Suggested colors (classic chestnut pony style)
A: Main body (medium brown)
B: Muzzle (light beige)
C: Socks (light beige)
D: Hooves (dark brown)
E: Mane and tail (dark brown + optional cream strands for highlights)
Yarn tips
Cotton gives crisp stitch definition and a clean face
Acrylic gives a softer plush feel and easier hair strands
For the mane and tail, choose a yarn that drapes nicely (not too stiff)
Hook
Use a smaller hook than the yarn label suggests so stuffing doesn’t show
Worsted: 3.0–4.0 mm
DK: 2.75–3.25 mm
Notions
Stitch marker
Tapestry needle
Scissors
Fiberfill stuffing
Safety eyes (10–14 mm depending on size) or embroidered eyes
Optional: floral wire/pipe cleaners for pose support (display only, not for children)
Optional: poly pellets in a fabric pouch for weight (helps standing)
Safety note
If making for babies or toddlers, embroider eyes and avoid wire.
Stitches & Techniques Explained#
Abbreviations
MR = magic ring
sc = single crochet
inc = increase (2 sc in one stitch)
dec = invisible decrease
sl st = slip stitch
ch = chain
hdc = half double crochet
dc = double crochet
BLO = back loop only
FLO = front loop only
( ) repeat
[ ] stitch count
Invisible decrease
Insert hook into the front loop of the next stitch, then the front loop of the following stitch, yarn over, pull through, yarn over, pull through two.
Clean color changes
Change color on the last yarn over of the previous stitch. This keeps socks and hooves looking neat.
Yarn strand mane and tail
Cut strands, fold in half, pull the loop through a stitch with your hook, then pull ends through the loop and tighten. Trim and style.
Step-by-Step Instructions#
Finished size
With worsted yarn and a 3.5 mm hook, expect around 10–12 inches (25–30 cm) from nose to rump, not including mane length.
Notes before you start
Work in continuous rounds unless stated
Use a stitch marker
Stuff firmly but avoid stretching stitches
Pin pieces before sewing for symmetry and balance
Color Key
A main body
B muzzle
C socks
D hooves
E mane and tail
Head (A)#
Round 1: 6 sc in MR [6]
Round 2: inc around [12]
Round 3: (sc, inc) around [18]
Round 4: (2 sc, inc) around [24]
Round 5: (3 sc, inc) around [30]
Round 6: (4 sc, inc) around [36]
Rounds 7–10: sc around [36]
Eye placement
Place eyes between Rounds 8–9, about 7–9 stitches apart. If you want a gentle pony look, place them slightly more to the sides.
Shape toward muzzle
Round 11: (4 sc, dec) around [30]
Round 12: sc around [30]
Round 13: (3 sc, dec) around [24]
Round 14: sc around [24]
Stuff firmly, shaping cheeks.
Round 15: (2 sc, dec) around [18]
Round 16: (sc, dec) around [12]
Round 17: dec around [6]
Fasten off and close. Leave a tail for sewing.
Muzzle (B)#
Round 1: 6 sc in MR [6]
Round 2: inc around [12]
Round 3: (sc, inc) around [18]
Rounds 4–5: sc around [18]
Fasten off leaving a long tail. Lightly stuff or keep flat.
Embroider nostrils
Add two small dark stitches near the front.
Sew muzzle to the lower front of the head, centered.
Ears (Make 2, A)#
Round 1: 4 sc in MR [4]
Round 2: (sc, inc) around [6]
Round 3: (2 sc, inc) around [8]
Round 4: sc around [8]
Round 5: (3 sc, inc) around [10]
Round 6: sc around [10]
Fasten off with a tail. Flatten slightly and sew to top of head.
Ear tip
Angle ears slightly forward for a curious, friendly expression.
Neck (A)#
Round 1: 6 sc in MR [6]
Round 2: (sc, inc) around [9]
Rounds 3–6: sc around [9]
Round 7: (2 sc, inc) around [12]
Rounds 8–18: sc around [12]
Fasten off with a long tail. Stuff moderately firm.
Neck support option
If you want a proud upright neck, insert a folded pipe cleaner before closing the base (display only).
Body (A)#
Round 1: 6 sc in MR [6]
Round 2: inc around [12]
Round 3: (sc, inc) around [18]
Round 4: (2 sc, inc) around [24]
Round 5: (3 sc, inc) around [30]
Round 6: (4 sc, inc) around [36]
Round 7: (5 sc, inc) around [42]
Rounds 8–12: sc around [42]
Create barrel shape
Round 13: (6 sc, inc) around [48]
Rounds 14–16: sc around [48]
Shape toward rump
Round 17: (6 sc, dec) around [42]
Round 18: sc around [42]
Round 19: (5 sc, dec) around [36]
Round 20: sc around [36]
Stuff firmly. Add a weight pouch at the belly base if you want extra standing stability.
Round 21: (4 sc, dec) around [30]
Round 22: sc around [30]
Round 23: (3 sc, dec) around [24]
Round 24: (2 sc, dec) around [18]
Round 25: (sc, dec) around [12]
Round 26: dec around [6]
Fasten off and close.
Legs (Make 4)#
These legs include dark hooves, light socks, and main body color above.
Hoof (D)
Round 1: 6 sc in MR [6]
Round 2: inc around [12]
Round 3: (sc, inc) around [18]
Round 4: sc around [18]
Round 5: sc in BLO around [18] (turns up)
Sock (C)
Rounds 6–10: sc around [18]
Switch to A
Round 11: (4 sc, dec) around [15]
Rounds 12–18: sc around [15]
Stuff firmly, especially at the hoof so it stays flat. Flatten the top and fasten off with a long tail.
Leg placement tip
Pin all four legs to the body before sewing. Stand the body on a flat surface and adjust until it balances, then sew.
Tail (A base + E hair)#
Tail base (A)
Round 1: 6 sc in MR [6]
Rounds 2–6: sc around [6]
Round 7: (sc, dec) around [4]
Rounds 8–14: sc around [4]
Fasten off with a tail for sewing. Stuff lightly at base only.
Attach hair strands (E)
Cut 10–18 strands about 10–14 inches long (25–36 cm). Attach through stitches at the tail base and trim into a natural tail shape. Add a few lighter strands for a highlighted tail tip.
Mane (E)#
Mane placement
Attach along the top of the head, down the neck, stopping at the shoulders.
How to attach
Cut strands 10–12 inches (25–30 cm). Attach in a center line, then add a second row on one side for a fuller “side fall” look. Trim into a gentle curve.
Wavy mane trick
If you want waves, lightly dampen strands, braid loosely, let dry, then undo.
Assembly#
Attach neck to head
Sew neck securely to the base of the head with tight stitches.
Attach head/neck to body
Pin the neck slightly forward on the body front. Sew firmly. Add extra stitches at the back of the neck for strength.
Attach legs
Sew two front legs slightly forward and two back legs slightly back. Make sure hooves sit flat.
Attach tail
Sew tail base to the back of the body. Curve slightly downward and tack with one stitch if needed.
Attach ears and facial details
If not already attached, sew ears and finish nostrils.
Common Mistakes and How to Avoid Them#
Horse won’t stand
Stuff the body base very firmly
Flatten hooves while stuffing
Position legs wider apart
Add a small weight pouch inside the belly
Neck flops
Stuff neck more firmly
Add anchor stitches from neck into body
Use optional pipe cleaner support for display pieces
Mane looks sparse
Add a second row of strands along the neck
Use thicker yarn for hair
Trim less at first and shape gradually
Hooves look uneven
Count rounds carefully
Make sure BLO turning round is consistent
Press hooves flat while stuffing
Head looks crooked
Mark body center front with a stitch marker
Pin head and check from front and side before sewing
Expert Tips for Better Results#
Use cotton for the body and acrylic for hair if you want the best of both worlds
Add subtle face shaping by stitching a tiny indentation under the eye line to create cheeks
For a more realistic muzzle, stuff the muzzle piece slightly and stitch tighter along the top edge so it angles outward
If you want a more “pony” look, shorten the legs by 2–3 rounds and make the head slightly larger proportionally
Weave in ends as you go because hair attachment can hide ends, but the body won’t
Variations and Customization Ideas#
Make a palomino
Use tan body with cream mane and tail.
Make a black horse
Use black body with dark gray muzzle and black mane.
Add markings
Crochet a white blaze stripe for the face and sew it on
Add a white star patch on the forehead
Add more socks by extending the light color rounds on legs
Add accessories
Tiny saddle blanket (rectangle with edging)
Mini scarf
Flower crown around the ears
Bridle-style straps (simple chain and slip stitch strips)
Make it a unicorn
Add a spiraled horn on the forehead and pastel mane.
Benefits of This Crochet Project#
A show-stopping crochet pattern with realistic details
Great gift for horse lovers and kids
Customizable colors for any horse coat
Teaches standing plush structure and hair techniques
Looks collectible and display-worthy
Uses mostly basic stitches, so it’s approachable
Internal Linking Suggestions#
How to Crochet Invisible Decreases for Amigurumi
How to Attach Yarn Hair to Crochet Dolls and Animals
How to Make Amigurumi Stand Without Tipping
Beginner Crochet Animal Patterns Collection
Easy Crochet Accessories for Amigurumi
FAQ Section#
Is this crochet pattern beginner-friendly?
Yes for confident beginners. The stitches are simple, but it has multiple parts and requires careful assembly to make it stand.
What yarn is best for a crochet horse?
Cotton or a cotton blend gives crisp shape and detail. Acrylic is softer and works great for the mane and tail.
How do I make the horse stand up?
Stuff the body base firmly, flatten hooves, pin legs until balanced, and optionally add a small weight pouch inside the belly.
How do I make the mane and tail look realistic?
Attach yarn strands in layers, then trim gradually. Add a few lighter strands for highlights and braid-dry-unbraid for waves.
Can I make it bigger or smaller?
Yes. Change yarn weight and hook size to scale it, or add extra rounds to the body and neck for a taller horse.
How do I keep the neck from drooping?
Stuff the neck firmly, add anchor stitches at the back of the neck into the body, or use a pipe cleaner for display pieces.
Conclusion#
A crochet horse amigurumi is one of the most satisfying crochet pattern projects because it combines simple shaping with dramatic details like a flowing mane and tail. With clean sock hooves, a sweet muzzle, and a sturdy standing body, you’ll end up with a plush that looks polished, giftable, and full of personality.
If you tell me your yarn weight and hook size, I can suggest the best eye size and the exact leg length (how many rounds) to match the proportions you want, pony-short or tall-and-elegant.


