


Introduction#
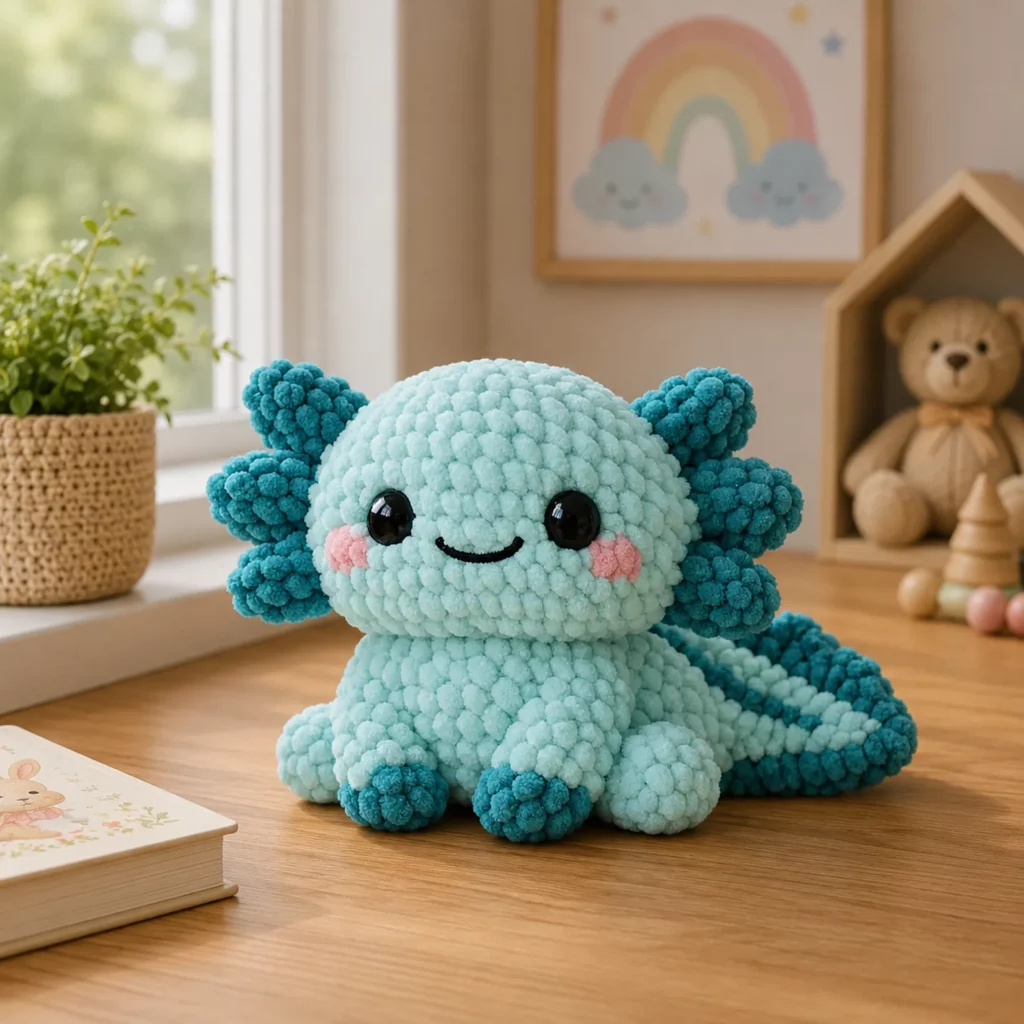
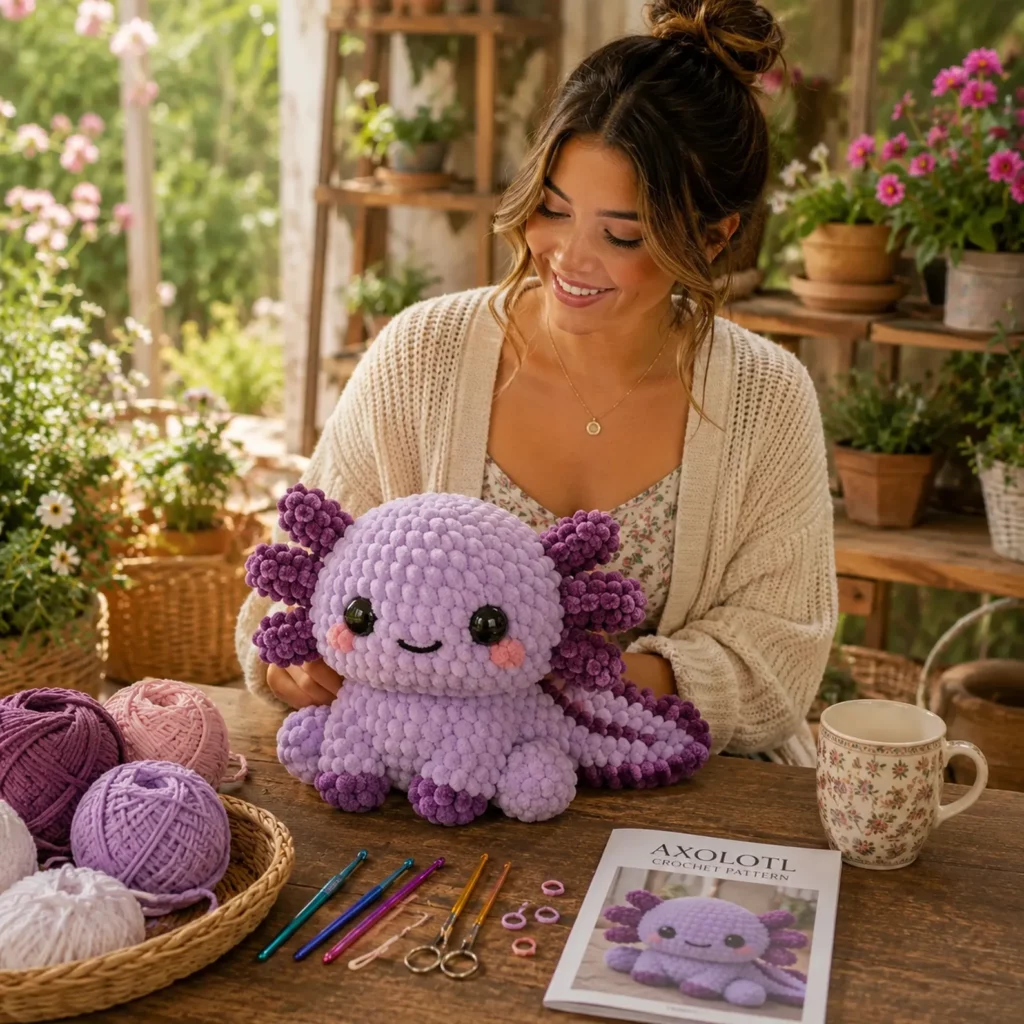
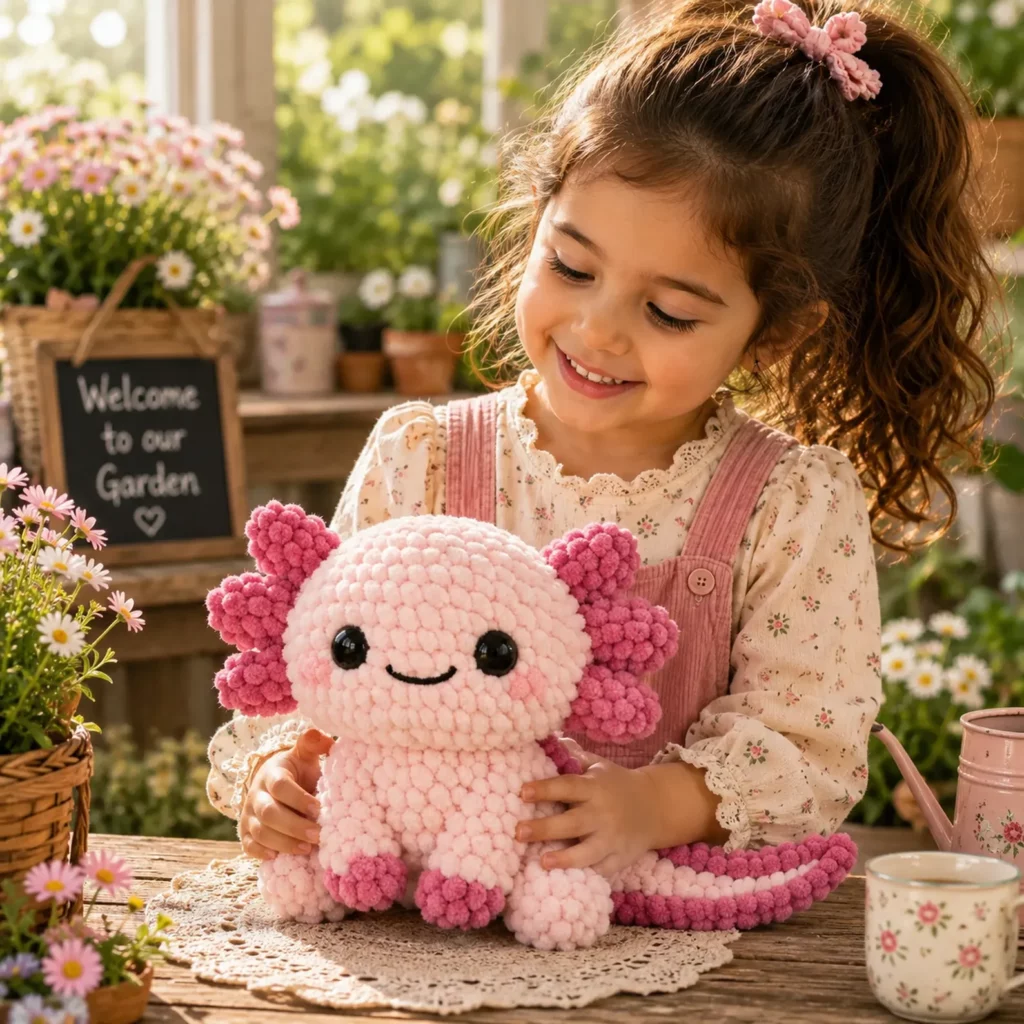
If you’re in the mood for a crochet pattern that’s equal parts adorable and instantly giftable, a plush axolotl is the perfect project. Axolotls have that magical “cute creature” vibe: a round smiling face, tiny feet, and those signature frilly gills that make them look like they’re wearing little flower crowns on the sides of their head. The best part is that you can crochet all of that with very simple shapes—especially when you use plush yarn, which makes the finished toy look extra squishy and professional.
Explore more beginner amigurumi crochet patterns in our pattern library.
This crochet tutorial is built for beginners who want a clean result without complicated shaping. The body and tail are one smooth piece, the gills are small “frill clusters” that work up quickly, and the face is minimal: big eyes, blush cheeks, and a tiny smile. You’ll also get tips for working with chenille yarn (because it’s soft but can be tricky), plus easy ways to customize your axolotl into different colors, sizes, and styles.
By the end, you’ll have a plush that’s perfect for nurseries, desks, craft fairs, and cozy handmade gifts. It’s also a wonderful stash-buster if you have leftover plush yarn in pastel shades.
Detailed Description of the Crochet Pattern#
This crochet pattern creates a soft, chubby axolotl plush with a rounded head-body shape and a long tail that curves behind. The axolotl has four little paws and decorative gills on both sides of the head. The design is intentionally simple: it’s a “kawaii” style axolotl that looks polished without needing advanced techniques.
Key design features
Round, squishy head and body with a clean silhouette
Long tail that sits behind the body like a soft fin
Frilly side gills in a contrasting accent color
Chunky paws with optional darker “toe pads”
Big safety eyes and a small embroidered smile
Optional blush cheeks for extra cuteness
How it’s constructed
You crochet one main body piece from the head down into the tail
You crochet four small paws and sew them on
You crochet gill frills separately and attach them to the sides
You add the face details last so you can adjust expression
This is an easy crochet pattern in terms of stitches, but it looks detailed because the gills add texture and dimension.
Skill Level Explanation#
Skill level: Beginner-Friendly
You’ll use
Magic ring
Single crochet (sc)
Increase (inc) and decrease (dec)
Working in continuous rounds
Basic sewing/assembly
Simple embroidery (smile)
Why this is great for crochet for beginners
The main shape is repetitive and forgiving
Small parts are simple (no complicated shaping)
Plush yarn hides tiny imperfections
You can skip extras (like toe pads) and still get a cute result
If you’ve made one basic amigurumi before, this crochet tutorial will feel comfortable.
Materials Needed#
Yarn
This plush axolotl looks best in chenille/plush yarn, but you can also use worsted.
Recommended yarn options
Plush/chenille yarn (for the squishy look)
Worsted/DK yarn (for a smaller, more defined axolotl)
Color suggestions
A: Main body color (light pink)
B: Accent gill color (hot pink or darker pink)
Optional C: White/cream for belly stripe or toe pads
Yarn tips for plush yarn
Choose a chenille that doesn’t shed too easily when frogging
Use stitch markers often because stitches can be hard to see
Keep tension consistent so the surface looks smooth
Hook
Plush yarn: 4.5–6.0 mm (pick a size that creates tight stitches)
Worsted: 3.0–4.0 mm
Notions
Stitch marker
Tapestry needle
Scissors
Fiberfill stuffing
Safety eyes (12–18 mm depending on size) or embroidered eyes
Embroidery thread/yarn for smile (black)
Blush powder or pink yarn for cheeks
Optional: felt circles behind safety eyes for extra security
Safety note
If making for babies or toddlers, embroider eyes and skip any hard accessories.
Stitches & Techniques Explained#
Abbreviations
MR = magic ring
sc = single crochet
inc = increase (2 sc in one stitch)
dec = invisible decrease
sl st = slip stitch
ch = chain
BLO = back loop only
( ) repeat
[ ] stitch count
Invisible decrease (smooth finish)
Insert hook into the front loop of the next stitch, then the front loop of the following stitch, yarn over and pull through, yarn over and pull through two.
Plush yarn counting tip
Place a stitch marker every round
If you struggle to see stitches, feel the “bumps” with your fingers and count slowly
Neat sewing tip
Pin parts first
Sew using small stitches and take your time—plush yarn hides thread, but neat placement makes a huge difference in the final look
Step-by-Step Instructions#
Finished size (approximate)
With plush yarn: about 7–10 inches (18–25 cm) long depending on yarn thickness
With worsted yarn: about 4–6 inches (10–15 cm) long
Notes before you begin
Work in continuous rounds unless stated
Stuff gradually and shape as you go
Place eyes before closing the head so you can adjust expression
Color Key
A main body
B gills and accents
C optional belly/toe details
Main Body and Tail (A)
You will crochet from the top of the head down into the body and tail.
Round 1: 6 sc in MR [6]
Round 2: inc around [12]
Round 3: (sc, inc) around [18]
Round 4: (2 sc, inc) around [24]
Round 5: (3 sc, inc) around [30]
Round 6: (4 sc, inc) around [36]
Round 7: (5 sc, inc) around [42]
Rounds 8–12: sc around [42]
Eye placement
Place eyes between Rounds 9–10 or 10–11, about 8–10 stitches apart (wider spacing looks gentle and cute).
If using plush yarn, push the pile aside to find stitch holes.
Shape into the body
Round 13: (5 sc, dec) around [36]
Round 14: sc around [36]
Round 15: (4 sc, dec) around [30]
Round 16: sc around [30]
Round 17: (3 sc, dec) around [24]
Round 18: sc around [24]
Start stuffing now
Stuff firmly but keep it squishy. Shape the head-body into a rounded “bean.”
Begin tail narrowing
Round 19: (2 sc, dec) around [18]
Round 20: sc around [18]
Round 21: (sc, dec) around [12]
Rounds 22–26: sc around [12]
Tail tip shaping
Round 27: (2 sc, dec) around [9]
Rounds 28–30: sc around [9]
Round 31: (sc, dec) around [6]
Rounds 32–33: sc around [6]
Fasten off with a tail and close lightly (or leave slightly open and flatten if you want a fin-like tail end).
Tail shaping tip
If you want the tail to look flatter like a fin, do not stuff the last 6–8 rounds much. Press it flat and sew the end closed with a few stitches.
Belly Patch (Optional, C)
If you want a lighter belly, a sew-on patch is the cleanest method (especially with plush yarn).
Belly oval
Round 1: 6 sc in MR [6]
Round 2: inc around [12]
Round 3: (sc, inc) around [18]
Round 4: sc around [18]
Fasten off with a long tail and sew centered on the lower front.
If you prefer no belly patch, skip this—your axolotl will still look adorable.
Paws (Make 4)
Two front paws and two back paws can be the same size for a cute plush style.
Paw base (A)
Round 1: 6 sc in MR [6]
Round 2: inc around [12]
Round 3: sc around [12]
Round 4: (4 sc, dec) around [10]
Stuff lightly (just enough to keep shape).
Fasten off leaving a long tail.
Optional toe pads (B or C)
Embroider 2–3 small stitches on the front of each paw, or crochet tiny circles and sew them on.
Attach paws
Sew two front paws near the front underside (closer to the face).
Sew two back paws near the belly area where the body transitions toward the tail.
Position them slightly outward so the plush looks like it’s sitting comfortably.
Side Gills (Make 6 frills, B)
This axolotl style has layered gills, usually three on each side.
Gill frill (make 6)
Round 1: 6 sc in MR [6]
Round 2: inc around [12]
Round 3: sc around [12]
Fasten off leaving a tail.
Shape tip
Pinch each gill slightly and sew it with a small “gather” at the base so it looks more ruffled instead of perfectly round.
Attach gills
On each side of the head, sew three gills in a fan shape behind the eyes.
Place them like a little flower cluster: one slightly higher, one centered, one slightly lower.
If you want extra frill
Make 8 gills total (4 per side) for a fluffier look.
Face Details
Smile
Use black embroidery thread or thin black yarn.
Stitch a small curved smile centered between the eyes.
Blush cheeks
Use blush powder lightly under each eye, or embroider soft pink ovals.
Optional: tiny nose dots
Some people like two tiny stitched dots above the smile. Keep it subtle so the face stays clean.
Common Mistakes and How to Avoid Them#
Plush yarn stitches are hard to see
Use lots of stitch markers
Count slowly and feel the stitches with your fingers
Work in good lighting
Body looks lumpy
Stuff in small pieces
Shape as you go instead of stuffing all at once
Massage the stuffing into place for a smooth finish
Eyes look uneven
Mark the center line of the face with a pin
Measure stitch distance from the center
Insert eyes before closing and check from the front
Gills look crooked
Pin all gills before sewing
Sew the center gill first, then the top and bottom
Make sure both sides match in height
Axolotl doesn’t sit nicely
Flatten the underside gently while stuffing
Place back paws slightly wider
Curve the tail around the side and tack it with one stitch if needed
Stuffing shows through
Go down a hook size
Keep tension tight
Avoid overstuffing, especially near decreases
Expert Tips for Better Results#
For the cutest expression, place the eyes slightly lower on the face and keep the smile small
If you want a more “axolotl” silhouette, keep the tail longer by adding 2–4 extra rounds in the 12-stitch tail section
To make gills extra fluffy, crochet them in a slightly thicker yarn or double-strand the accent yarn
If you want a super polished look, add a tiny white highlight stitch on each eye (if embroidered)
Weave in ends deeply—plush yarn hides ends well, but secure them with a few back-and-forth passes
Variations and Customization Ideas#
Mini axolotl keychain
Use DK yarn and a smaller hook, skip stuffing in gills, and add a top loop.
Rainbow axolotl
Use a gradient plush yarn for the body and a solid color for gills.
Pastel axolotl family
Make three sizes by changing yarn weight: bulky plush, worsted, then DK.
Sleeping axolotl
Embroider closed eyes with tiny lashes instead of safety eyes.
Valentine axolotl
Add a small heart belly patch and use red or pink gills.
Strawberry axolotl
Add a tiny green leaf crown and seed stitches on the body for a fruit theme.
Benefits of This Crochet Project#
Quick, beginner-friendly crochet pattern with big “wow” cuteness
Plush yarn makes it extra soft and giftable
Minimal sewing compared to many amigurumi designs
Customizable colors and gill styles
Great for markets, baby gifts, and desk décor
Teaches core amigurumi skills in a fun, low-stress way
Internal Linking Suggestions#
How to Crochet With Plush Yarn Without Losing Stitches
Beginner Guide to the Magic Ring
How to Place Safety Eyes for Cute Amigurumi Faces
Invisible Decrease Tutorial for Smooth Crochet Toys
Easy Crochet Sea Creature and Cute Critter Patterns Collection
FAQ Section#
Is this crochet axolotl pattern beginner-friendly?
Yes. The shapes are simple and the details are small add-ons. Plush yarn can be tricky to count, but the pattern is repetitive and forgiving.
What yarn is best for a squishy axolotl plush?
Plush/chenille yarn gives the softest, most huggable result. Worsted yarn works too for a smaller, firmer plush.
What size safety eyes should I use?
For plush yarn axolotls, 14–18 mm eyes look great. For worsted yarn, 10–12 mm is usually better.
Can I make it baby-safe?
Yes. Embroider the eyes and avoid any detachable parts. Keep gills securely stitched with multiple passes.
How do I make the gills more frilly?
Use more gill pieces per side, pinch and gather them when sewing, or use slightly thicker accent yarn.
How do I make it bigger or smaller?
Change yarn weight and hook size. You can also add extra increase rounds for a larger body or fewer rounds for a mini.
Conclusion#
This plush axolotl is the kind of crochet pattern that’s simple to crochet but looks unbelievably cute when finished. With its round smiling face, frilly gills, and squishy paws, it’s perfect for gifts, nursery décor, and anyone who loves soft handmade plushies. Once you make one, it’s hard to stop—different colors and gill styles make each axolotl feel like its own little personality.
If you tell me whether you’re using plush yarn or worsted yarn (and your hook size), I can recommend the best eye size and the exact round to place the eyes for the cutest proportions.


