


Introduction#
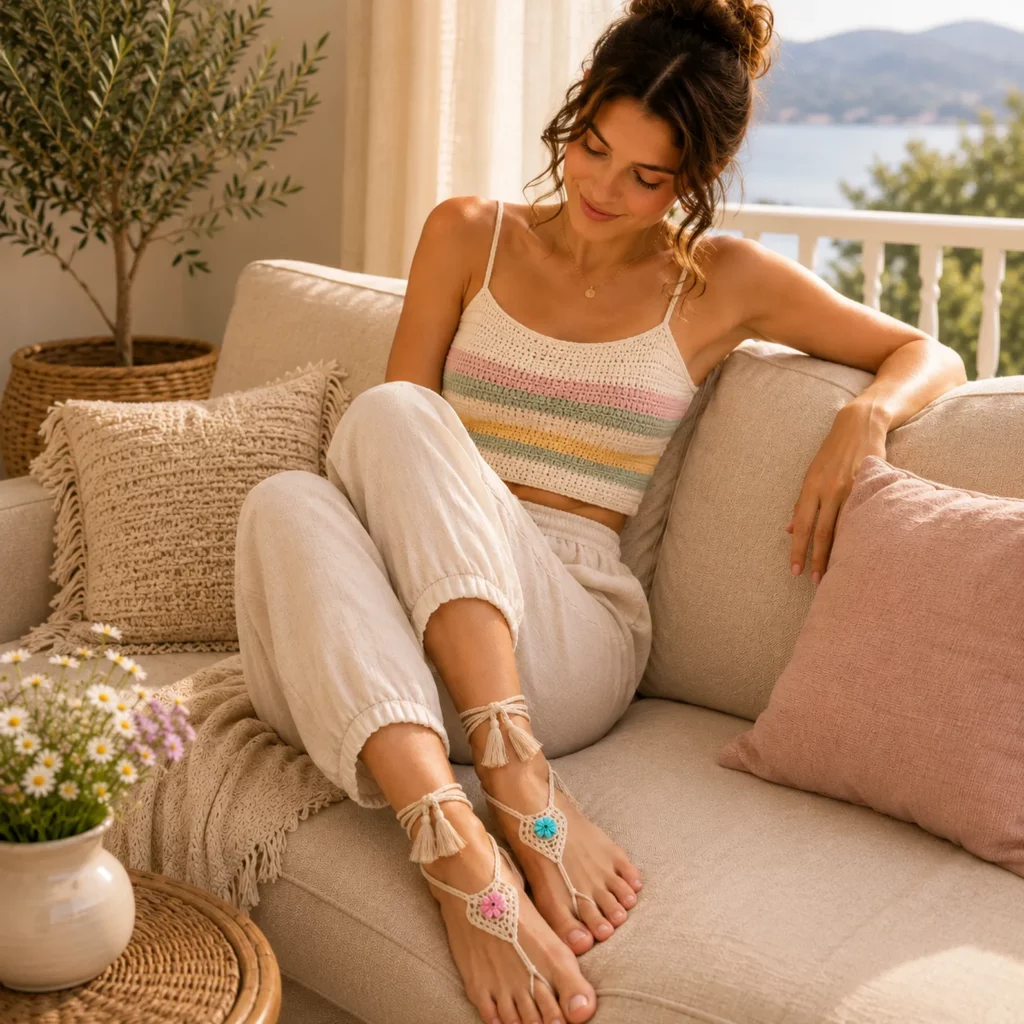
Barefoot sandals are one of those crochet projects that feel instantly “vacation ready.” They’re lightweight, pack flat, and add that effortless boho finish to beach days, pool lounging, weddings, festivals, and summer photos. If you love the look of delicate foot jewelry but want something soft and handmade, this crochet pattern is a perfect fit.
Explore more beginner tops crochet patterns in our pattern library.
This crochet tutorial will walk you through creating a pair of crochet barefoot sandals made from a lacy triangle foot panel, a sweet little flower motif at the center, and long ankle ties finished with tassels. The design is adjustable, beginner-friendly, and quick to make—especially once you’ve finished the first sandal and understand the layout.
You’ll learn how to measure for your foot, customize the toe loop so it’s comfortable, and create straps that stay secure without feeling tight. You’ll also get options for different yarns, different flower styles, and easy ways to make the sandals more durable for repeated wear.
Detailed Description of the Crochet Pattern#
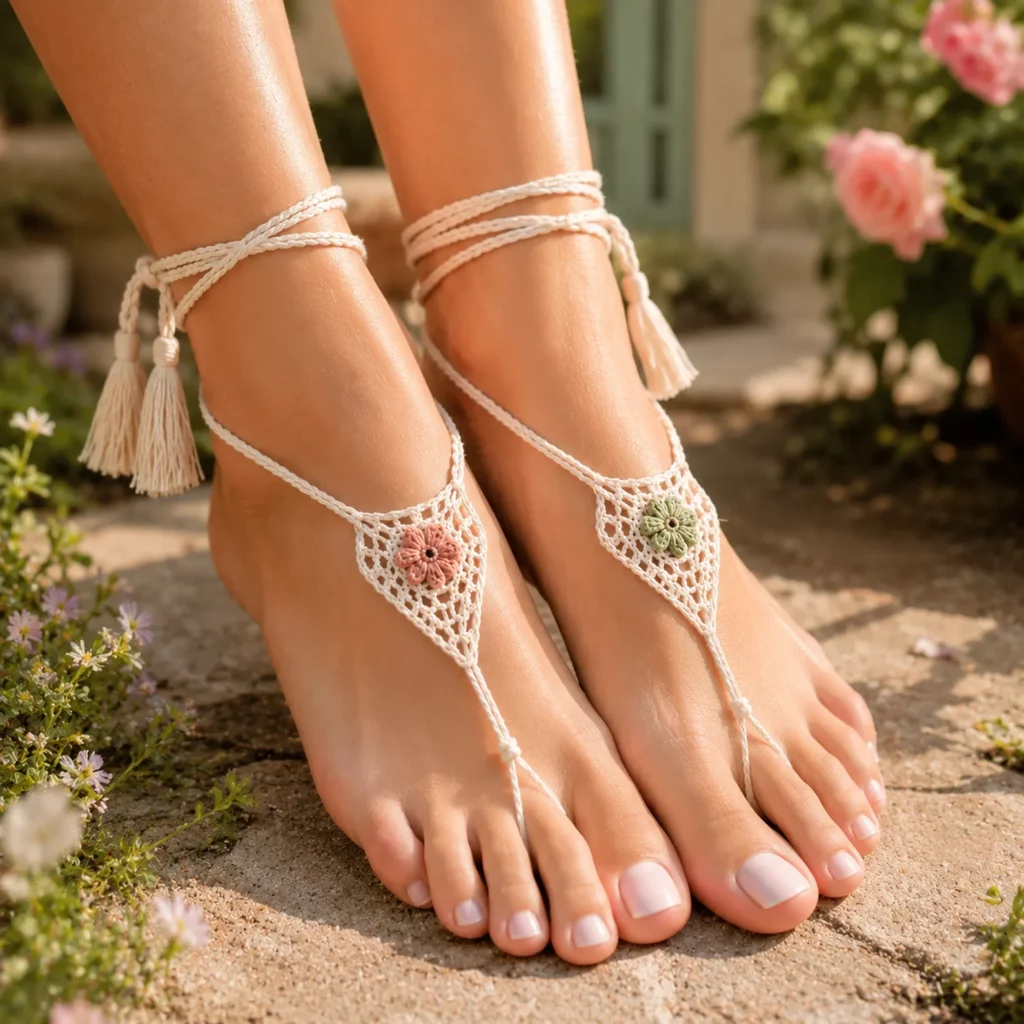
These barefoot sandals are designed like a piece of foot jewelry, not a shoe. They sit on top of the foot and are held in place by three key points:
- A toe loop that slips around one toe (usually the second toe)
- A center lace panel that forms a pretty triangle/diamond shape across the top of the foot
- Ankle ties that wrap around the ankle and tie in the back or side, finished with tassels
At the center of the lace panel is a small floral accent. The motif acts as the focal point and makes the sandals look finished and intentional. A delicate mesh pattern creates the airy triangle shape, which feels comfortable in warm weather.
This crochet pattern looks intricate, but it’s built from simple stitches: chains, single crochet, double crochet, and small repeats. Because it’s “made-to-measure,” you can easily adjust it for narrow feet, wider feet, or a higher instep.
Skill Level Explanation#
This is an easy crochet pattern for confident beginners.
You’ll be comfortable if you can
- Chain consistently
- Work single crochet and double crochet
- Crochet small motifs (a basic flower)
- Count stitches and repeats
- Weave in ends neatly
You’ll practice
- Working lace mesh without twisting
- Measuring for fit as you go
- Creating a strong toe loop and secure ankle ties
- Making tassels and attaching them cleanly
If you’re new to lace, this is a great introduction because the piece is small and forgiving.
Materials Needed#
Yarn
For barefoot sandals, choose yarn that is smooth and comfortable against the skin.
Best yarn choices
- Cotton yarn or cotton blend (recommended for breathability and structure)
- Bamboo/cotton blend (soft with nice drape)
- Mercerized cotton (polished look, great stitch definition)
Yarn weight
- Sport or DK weight for a delicate, jewelry-like look
- Worsted weight for a slightly bolder, sturdier sandal
Color ideas
- Neutral boho: cream, sand, taupe
- Beachy: white with pastel flowers
- Bold: black with bright flower centers
- Bridal: ivory with pearl bead accents (optional, display use)
Hook
- Sport/DK yarn: 2.75 mm to 3.5 mm
- Worsted yarn: 3.5 mm to 4.5 mm
Choose a hook that makes a neat fabric without stiff tension.
Notions
- Scissors
- Tapestry needle
- Measuring tape
- Optional beads (for tassels or flower center)
- Optional fabric stiffener spray (for photos only, not necessary for wear)
Stitches & Techniques Explained#
US terms
Abbreviations
- ch chain
- sl st slip stitch
- sc single crochet
- dc double crochet
- sp space
How the lace panel works
The top panel is built with a simple mesh repeat:
- dc, ch spaces, and dc clusters that create open “windows”
This keeps the design light and airy and makes it easy to adjust size by adding repeats.
Clean joins
Use slip stitches to move into the next space without adding bulk.
Strong ties
For ankle ties, a chain alone can stretch. The most durable method is:
- chain to length, then single crochet back along the chain
This creates a cord-like strap that holds up better.
Tassels
Tassels are made by wrapping yarn around fingers or a small piece of cardboard, tying off, trimming, and securing to the strap ends.
Step-by-Step Instructions#
This is a free crochet pattern written in a crochet tutorial style. Make two identical sandals.
Fit notes before you start
- Toe loop should be snug but not tight
- Triangle panel should lie flat across the top of the foot
- Ankle ties should wrap at least one and a half times around the ankle for a secure bow
Toe loop
With main color yarn:
- Ch 14 to 18 (adjust for toe size)
- Join into a ring with sl st, being careful not to twist
- Round: sc around the ring, join with sl st
Optional for extra comfort: work one more round sc around
Test fit
Slide onto your second toe. It should sit comfortably without squeezing.
Center ring for the flower placement
From the toe loop, create a small connector chain:
- Ch 6 to 10 (this becomes the “stem” from toe loop to lace panel)
- Sl st into the first chain of a small ring or directly begin the flower motif next
Adjust length
Shorter chain brings the triangle closer to the toes. Longer chain shifts it up toward the ankle.
Flower motif
Use an accent color for the flower (pink or aqua), or keep it the same color for a minimal look.
Simple five-petal flower
- MR
- Ch 1, work 10 sc into ring, join with sl st
- Ch 3, 2 dc in same st, ch 3, sl st in next st repeat five times
Fasten off and leave a tail for sewing if you made it separately.
Alternative easy flower
- MR
- Ch 2, sl st repeated 6 times into ring for simple rounded petals
Attach flower
If you crocheted it separately, sew it to the top center of the lace panel later. If you crocheted it in place, continue from the motif into the lace panel.
Triangle lace panel
Switch back to main color (or keep consistent).
Foundation for the triangle
- Attach yarn at the bottom point (near the flower)
- Ch 5, dc into the same point to create the first “V”
- Ch 2, dc in the same point again (this creates a fan-like start)
Build the triangle with mesh rows
Each row grows outward by adding mesh repeats on both sides.
Row repeat concept
- Turn
- Ch 3 (counts as dc), work dc into the first ch-2 space
- Ch 2, dc into next space
Continue across
At the end of the row, add an extra dc, ch 2, dc in the last space to widen
Keep working rows until
The top edge of the triangle reaches the width you want across the top of your foot (usually from one side near the big toe area to the other side near the pinky toe area).
Quick sizing guide
- Small foot: 4 to 6 triangle rows
- Medium foot: 6 to 8 triangle rows
- Larger/wider foot: 8 to 10 triangle rows
Side connectors to the ankle ties
Once the triangle top edge is wide enough, you’ll create two straps from the top corners.
At one top corner
- Ch 40 to 70 depending on ankle wrap length
- Sc back along the chain for a sturdy tie
Fasten off
Repeat on the other top corner
Make sure both ties match in length.
Ankle wrap tip
A good length is enough to wrap around your ankle once or twice and tie a bow. If you want dramatic tassels and long tails, go longer.
Optional top edging for a polished finish
To make the lace panel look cleaner, add a border:
- Sc evenly around the triangle edges
- In corners, work 2 sc to prevent curling
This also helps stabilize the mesh.
Tassels
Make two tassels for each sandal (one for each ankle tie end), or one tassel per tie depending on style.
How to make a tassel
- Wrap yarn around 2 to 3 fingers about 12 to 18 times
- Slide off and tie tightly at the top
- Cut the bottom loops
- Wrap a small piece of yarn around the neck and knot securely
- Trim evenly
Attach tassels
Use the yarn tail to tie or sew tassels onto strap ends. Weave the ends back into the strap for durability.
Assemble and test fit
- Put the sandal on with toe loop in place
- Spread the lace triangle across the top of your foot
- Wrap ties around the ankle and tie at the back or side
Adjustments you can make easily - Toe loop: add or remove 2 chains
- Connector chain: shorten or lengthen to change placement
- Triangle: add one more row if you want more coverage
- Ties: add length if you want a bigger bow
Common Mistakes and How to Avoid Them#
Toe loop too tight
- Add 2 chains to the loop
- Use sc rounds instead of dc to keep it soft and flexible
Triangle panel curls
- Add a sc border around the edge
- Block lightly by spritzing with water and pinning flat to dry
Mesh looks uneven
- Keep chain spaces consistent
- Count repeats per row so both sides match
Ties stretch out
- Always sc back along the chain for a stronger cord
- Use cotton yarn for better shape retention
Sandal slides around while walking
- Shorten the connector chain slightly
- Make toe loop snugger
- Tie ankle straps tighter and slightly higher above the ankle bone

Expert Tips for Better Results#
- Use mercerized cotton for a crisp “lace jewelry” look
- Block the finished sandals lightly before wearing for the first time
- Reinforce the toe loop join by stitching over it once with a yarn needle
- If you want extra security, add a second toe loop or a tiny side loop that catches another toe
- Add tiny beads to tassels or flower centers for a polished, boutique finish (best for display, not rough wear)
Variations and Customization Ideas#
- Minimal version: skip the flower and use a simple mesh triangle
- Bridal version: ivory yarn, pearl bead center, shorter tassels
- Festival version: bright yarns, longer ties, extra flowers
- No-tassel version: finish strap ends with small knots or beads
- Anklet-only look: shorten the triangle and focus on a decorative ankle band
- Kid size version: reduce triangle rows and tie length, use embroidered flower instead of bulky motif
Benefits of This Crochet Project#
- Fast and satisfying crochet pattern with a big style payoff
- Uses small amounts of yarn (great stash buster)
- Perfect warm-weather accessory for beach days and photos
- Beginner-friendly lace project that teaches useful techniques
- Highly customizable fit and color palette
- Makes a thoughtful handmade gift
Internal Linking Suggestions#
You may also like
- Easy crochet pattern for a boho anklet
- Crochet tutorial for tassels and cords
- Free crochet pattern for simple flower motifs
- Crochet lace stitches for beginners
- DIY crochet beach accessories collection
FAQ Section#
Are crochet barefoot sandals comfortable
Yes, especially in soft cotton. Keep the toe loop comfortable and avoid overly tight ankle ties.
What yarn works best for barefoot sandals
Cotton or cotton-blend yarn is best because it’s breathable, durable, and holds shape well.
How do I size this crochet pattern for my feet
Use the made-to-measure method. Adjust the toe loop chain count, the connector chain length, and the number of triangle rows for coverage.
Can I wear these in water
They can get wet, especially if made with cotton, but they’re not designed for heavy walking in water or rough surfaces. Rinse and air dry flat.
How do I keep the sandals from sliding off
Make the toe loop slightly snug, shorten the connector chain, and wrap the ankle ties securely. Adding a small sc border can also help.
Can beginners make this
Yes. The stitches are simple, and the project is small. The key is measuring as you go.
Conclusion#
These crochet barefoot sandals are the kind of project that instantly upgrades your summer style. The delicate lace triangle, the sweet flower accent, and the tassel ankle ties give that effortless beachy look while staying lightweight and comfortable. Because the crochet pattern is made-to-measure, you can create a perfect fit for your feet and customize colors to match any outfit.
If you tell me your yarn weight and whether you want the ties to wrap once or twice around the ankle, I can give you a quick chain-length guide so your sandals come out perfectly sized.


