


Introduction#
A crochet crop top is one of the most satisfying warm-weather projects because it’s fast, wearable, and endlessly customizable. You can keep it simple and minimal for everyday outfits, or play with color stripes for that soft, summery vibe that looks amazing with linen pants, denim shorts, or a flowy skirt.
Explore more beginner tops crochet patterns in our pattern library.
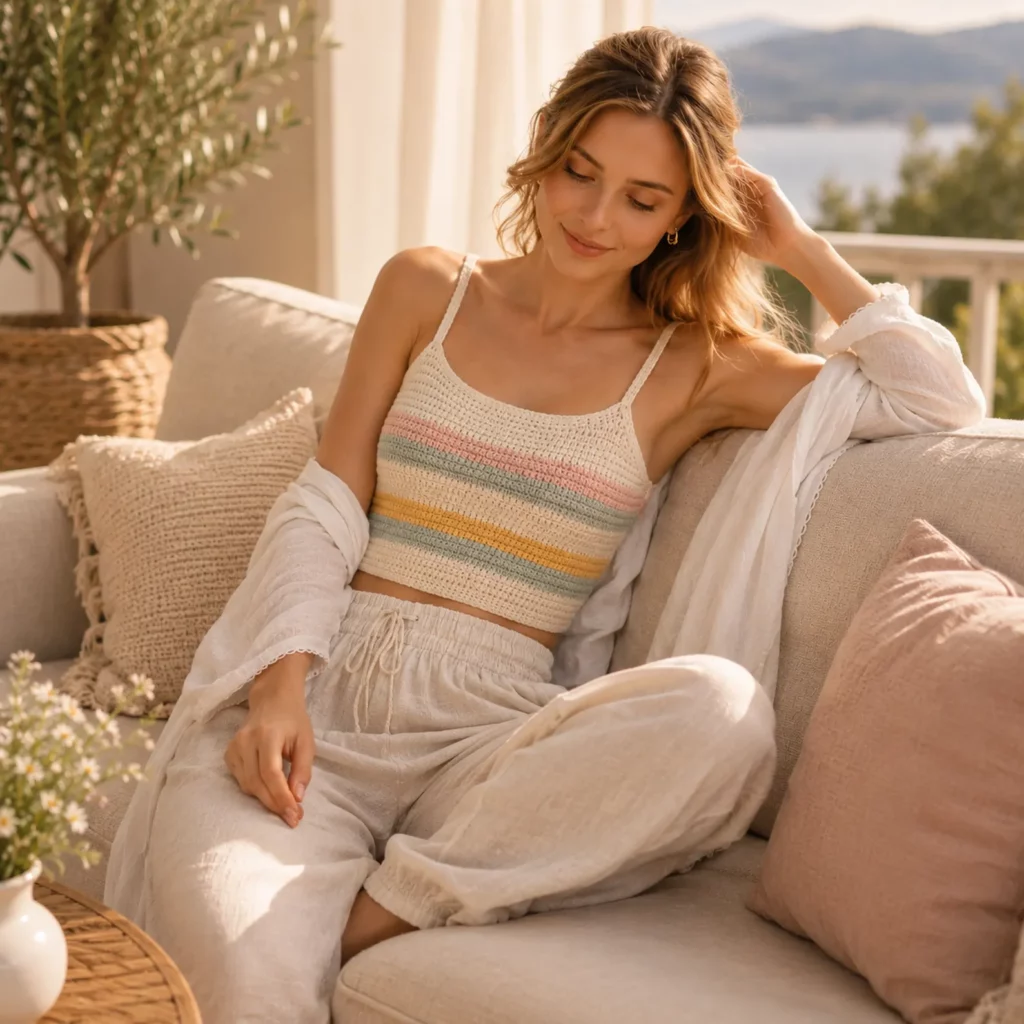
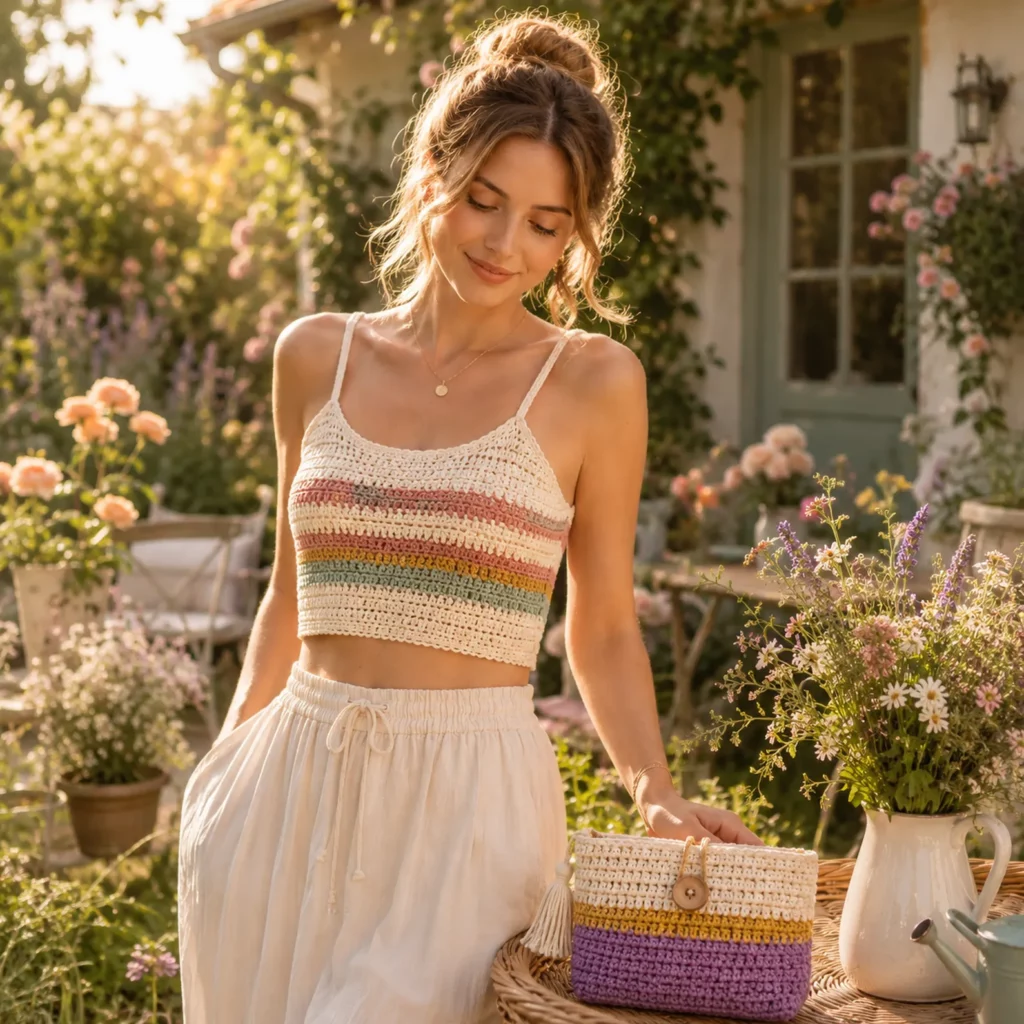
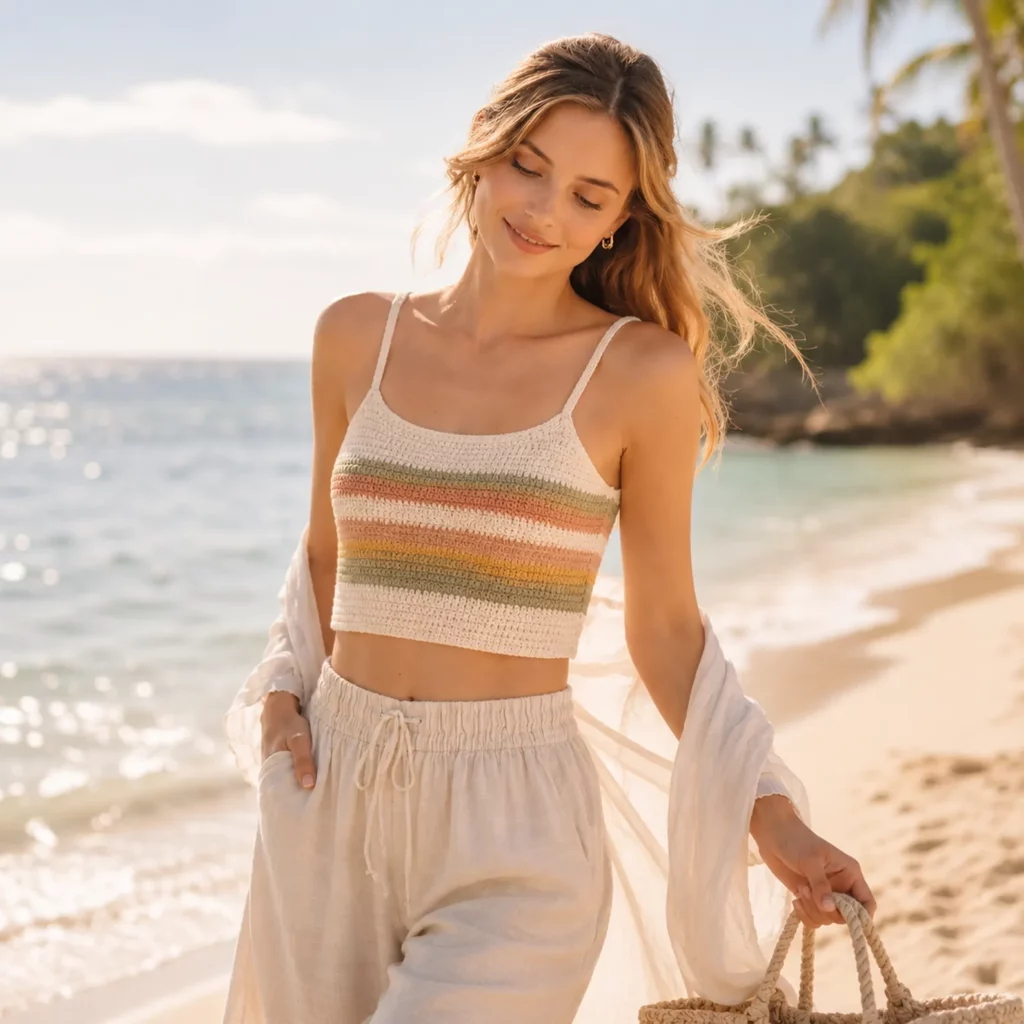
This crochet pattern teaches you how to create a striped camisole-style crop top with thin spaghetti straps, a straight neckline, and a smooth, modern fit. The design is built around clean stitches and simple shaping, making it a great “easy crochet pattern” for anyone who wants something cute without complicated construction.
You’ll get a complete crochet tutorial style guide: materials, stitch explanations, sizing tips, and step-by-step instructions. You can also adapt it into a longer tank top, add ribbing, or change the strap style.
Detailed Description of the Crochet Pattern#
This top is a classic camisole silhouette with a straight front, straight back, and thin straps. The body is worked mostly in rows (or rounds if you prefer), using simple stitches to create a neat fabric that sits smoothly against the body. The beauty is in the details:
- A straight neckline that looks modern and clean
- Even horizontal stripes placed across the bust and torso
- A slightly cropped length that pairs perfectly with high-waisted bottoms
- Thin straps that keep the look light and summery
- A structured but comfortable fabric when made with cotton or cotton-blend yarn
It’s the kind of crochet pattern you’ll want to make more than once—different colors, different lengths, and different fits depending on your wardrobe.
Skill Level Explanation#
This is a beginner-friendly crochet pattern.
You’ll be comfortable if you can
- Chain and work basic stitches consistently
- Crochet in rows with even edges
- Count stitches and rows
- Change colors for stripes
- Sew or join seams neatly
You’ll practice
- Measuring for fit (bust width and strap length)
- Neat color changes for clean stripes
- Finishing edges so they look polished
This is an excellent crochet for beginners project because the shaping is minimal and the fit is adjustable.
Materials Needed#
Yarn
For a summer crop top, choose yarn that’s breathable and comfortable against the skin.
Best yarn choices
- Cotton or cotton-blend (recommended for structure and cool wear)
- Bamboo blend (drapey and soft, great for a relaxed fit)
- Linen blend (beautiful texture, slightly stiffer hand)
Yarn weight
- DK or light worsted works best for this style
- Sport weight also works if you want a lighter, thinner fabric (you’ll need more rows)
Color palette idea
- Main color: cream/ivory (base)
- Accent stripes: soft pink, sky blue, and pale yellow
You can swap for any palette—earth tones, brights, or monochrome.
How much yarn you’ll need (approximate)
- Crop length: 200–450 g depending on size and yarn weight
- Longer tank: add 50–150 g
Hook
Choose a hook that gives you a fabric that’s not too stiff and not too holey.
- DK: 3.5 mm to 4.5 mm
- Light worsted: 4.0 mm to 5.0 mm
If your stitches look gappy, go down a hook size.
Notions
- Stitch markers
- Tapestry needle
- Scissors
- Measuring tape
- Optional: blocking mat and pins
Stitches & Techniques Explained#
Abbreviations (US terms)
- ch: chain
- sl st: slip stitch
- sc: single crochet
- hdc: half double crochet
- dc: double crochet
- st(s): stitch(es)
- sk: skip
- inc: increase
Recommended stitch for the body
A simple half double crochet fabric gives a smooth look with good coverage. Single crochet also works (more structured, slightly thicker). Double crochet is airier but may need a lining depending on your preference.
Neat stripe color change
To change colors cleanly in hdc:
- Work the last yarn-over of the final hdc with the new color
- Pull snugly and continue
This keeps the stripe edge crisp.
Clean edges
- Chain one or two at the start of rows consistently (depending on stitch)
- Work the last stitch carefully so your sides stay straight
Step-by-Step Instructions#
This crochet tutorial explains a made-to-measure method so the crochet pattern fits your body. It’s more reliable than guessing stitch counts, especially if your tension is different from someone else’s.
Getting your measurements
Measure around your bust at the fullest point. Decide how fitted you want the top:
- Snug fit: subtract 2–5 cm from bust measurement
- Comfortable fit: use bust measurement as-is
- Relaxed fit: add 2–5 cm
Decide your length
Measure from the top of your bust (where the neckline will sit) down to your desired hem.
Gauge check
Make a small swatch in your chosen stitch (hdc recommended).
- Measure how many stitches fit in 10 cm
- Measure how many rows fit in 10 cm
This helps you predict how many stitches you’ll need for width and how many rows for length.
If you skip gauge, you can still succeed by measuring the fabric as you go.
Constructing the body
You can build the body in two main ways:
- Two panels (front and back) sewn at the sides
- One long panel seamed at the back (tube method)
The two-panel method is easiest for beginners.
Front panel
- Chain until the width matches half your bust (or half of your desired finished circumference), minus a little for stretch.
Example: If your desired finished circumference is 86 cm, each panel should be about 43 cm wide. - Work in hdc rows until the panel reaches your desired length from hem to neckline.
Stripe placement
For a clean look, keep most of the body in the base color and place stripes across the bust area.
Example stripe plan
- Base color for a few rows
- A thin pink stripe
- A thin blue stripe
- A wider yellow stripe
- A thin blue stripe
- Finish in base color toward the neckline
You can repeat stripes lower if you want a more colorful top.
Back panel
Make the back panel the same width and length as the front for a straight, modern camisole shape.
If you want a more secure fit, make the back slightly taller by a few rows.
Shaping options
This top can be made without shaping, but here are easy upgrades:
Optional gentle side shaping
- For a slightly more fitted waist, decrease one stitch at each side every few rows for the midsection, then increase back near the bust.
Keep changes minimal so stripes stay straight.
Optional bust shaping (simple method)
- Work the front panel slightly longer than the back panel by a few rows, then ease it when sewing to create a subtle front lift.
Joining the body
Block panels lightly if needed (especially cotton).
Then assemble:
- Place front and back panels right sides together
- Sew side seams from hem upward, leaving armhole openings at the top
- Sew the shoulder area only where straps will attach (or leave open and use straps only)
Try it on before you finalize seam height. The armholes should feel comfortable and not gap.
Creating the neckline and armhole edging
A simple edging makes the crochet pattern look clean and professional.
- Attach yarn at a side seam near the top
- Work a round of sc evenly around the neckline and armholes
- If the edge flares, skip an occasional stitch
- If it pulls tight, add an occasional extra sc
Optional polished finish
Add a second round of slip stitches or crab stitch for a firm edge.
Straps
Spaghetti straps should be sturdy so they don’t stretch too much.
Simple chain strap (fast)
- Attach yarn at the front strap point
- Chain until it reaches the back strap point comfortably
- Slip stitch or sew to attach
- Reinforce by working sc back along the chain (this helps prevent stretching)
Better strap (recommended)
- Chain strap length
- Work sc back along the chain
- Then work one more row of sc to thicken slightly
Attach securely.
Strap placement tip
Place straps slightly closer to the center of the top for a flattering neckline and better support.
Hem finish
For a neat hem:
- Work one round of sc around the bottom edge
Optional: add a slim ribbed hem - Work a short ribbing strip separately (BLO sc ribbing), then sew it on.
Common Mistakes and How to Avoid Them#
Straps stretching out
- Always reinforce straps with sc
- Use cotton yarn for straps
- Avoid overly loose tension
Top too loose or too tight
- Measure your panel width before sewing
- Remember the fabric stretches slightly with wear
- Try on after joining side seams before adding edging
Edges flaring
- Too many stitches in edging rounds causes ruffles
- Skip stitches evenly around the neckline/armholes
Uneven stripes
- Count rows for each stripe section
- Change colors on the last yarn-over of the row
- Keep yarn tension consistent at color changes
Fabric looks see-through
- Use a smaller hook
- Choose hdc or sc instead of dc
- Use a cotton yarn with good stitch definition
- Consider adding a simple lining if desired
Expert Tips for Better Results#
- Block the finished top lightly so the stitches relax and stripes look crisp
- Weave in ends as you go, especially with multiple stripe colors
- For the cleanest look, keep color changes on the same side of the work for both panels
- Add a tiny elastic thread in the last neckline round if you want extra security (optional)
- If you want a more “store-bought” finish, add a slim i-cord strap instead of chain straps
Variations and Customization Ideas#
Longer tank top version
- Simply crochet more rows before the neckline
- Add a deeper hem border for weight
Adjustable tie straps
- Make longer straps and tie at the shoulders in bows
Ribbed body version
- Work the body in BLO hdc for subtle horizontal ridges
Square neckline upgrade
- Keep the neckline straight and place straps closer to the outer corners
Lace stripe version
- Replace one stripe section with a lace stitch band for texture
Bra-friendly version
- Make straps slightly wider
- Add a higher back panel
- Use a firmer edging around the top
Benefits of This Crochet Project#
- A wearable crochet pattern that’s quick to finish
- Great for warm-weather wardrobes
- Easy crochet pattern with minimal shaping
- Perfect stash-buster for leftover yarn colors
- Customizable fit, length, and strap style
- Makes a thoughtful handmade gift
Internal Linking Suggestions#
You may also like
- Easy crochet pattern for a summer tank top
- Crochet tutorial for neat color changes and stripes
- Free crochet pattern for a simple bralette top
- DIY crochet tote bag pattern for summer outfits
- Crochet for beginners guide to sizing wearables
FAQ Section#
What yarn is best for a crochet crop top
Cotton or cotton-blend yarn is the best choice because it’s breathable, holds shape, and feels comfortable against the skin.
How do I size this crochet pattern without a chart
Use the made-to-measure method. Crochet panels to your desired width and length, then try on before finishing seams and straps.
Can beginners make this top
Yes. This crochet tutorial uses basic stitches and simple construction. The most important part is measuring as you go.
How do I keep straps from stretching
Reinforce straps by single crocheting back along the chain and keep tension firm. Cotton yarn helps a lot.
Is this top see-through
It depends on stitch choice and yarn. Half double crochet with a smaller hook gives good coverage. If you want extra coverage, add a lining or wear a camisole underneath.
Can I turn this into a full-length tank
Absolutely. Add more rows to the body before finishing the neckline and straps.
Conclusion#
This striped crochet crop top crochet pattern is a perfect summer make: simple stitches, clean lines, and just enough color to feel playful without being complicated. Because it’s made-to-measure, you can tailor the fit to your body and style—cropped or longer, thin straps or ties, subtle stripes or bold color blocks.
If you tell me the yarn weight you’re using and whether you want a snug or relaxed fit, I can give you a quick stitch-and-row estimate for your starting chain and body length so your top comes out perfectly sized.


