Introduction#
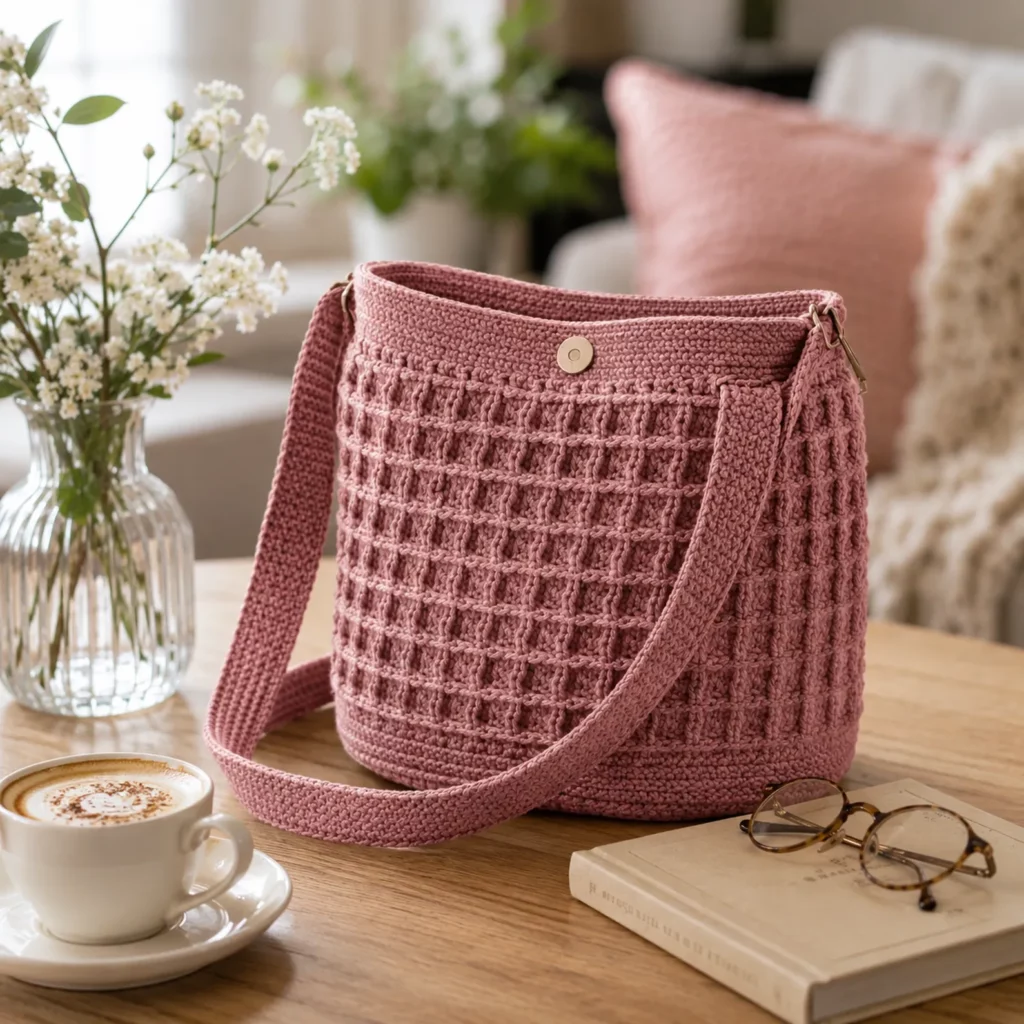
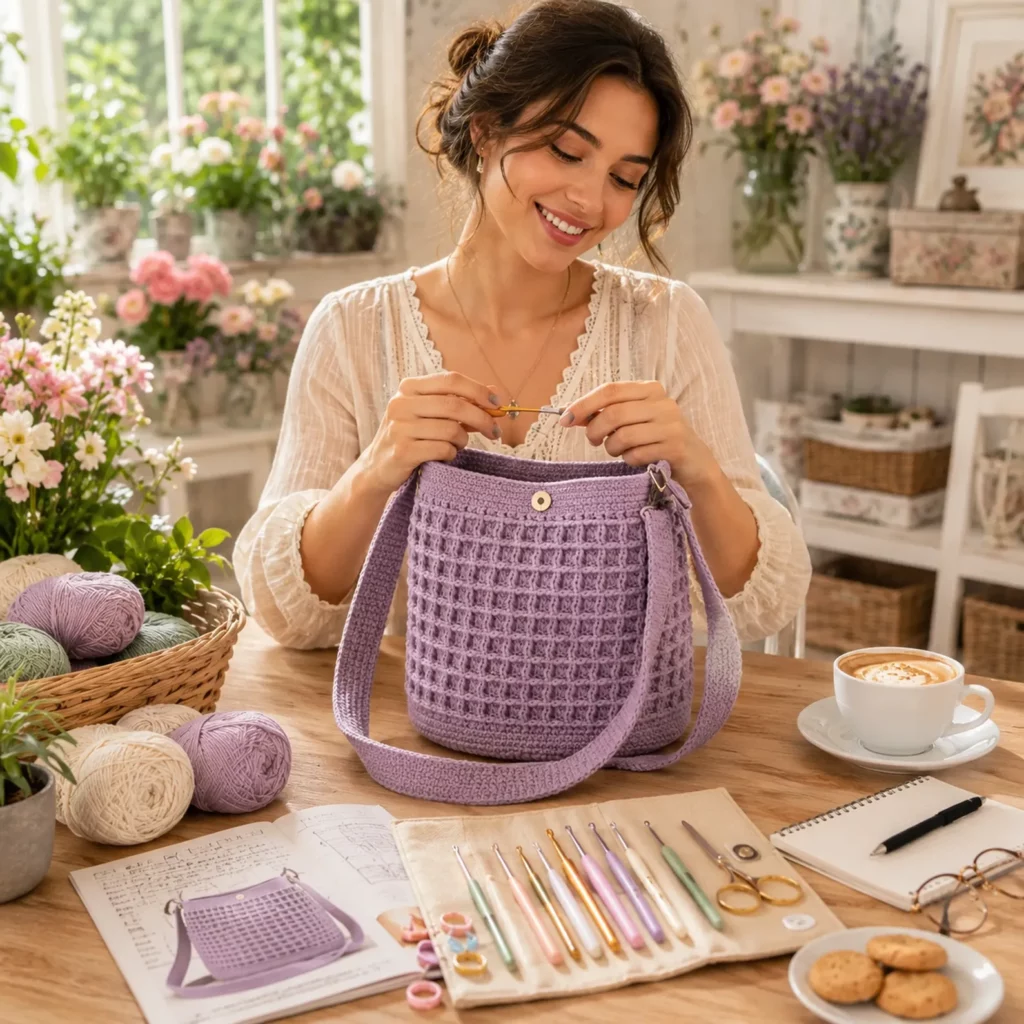
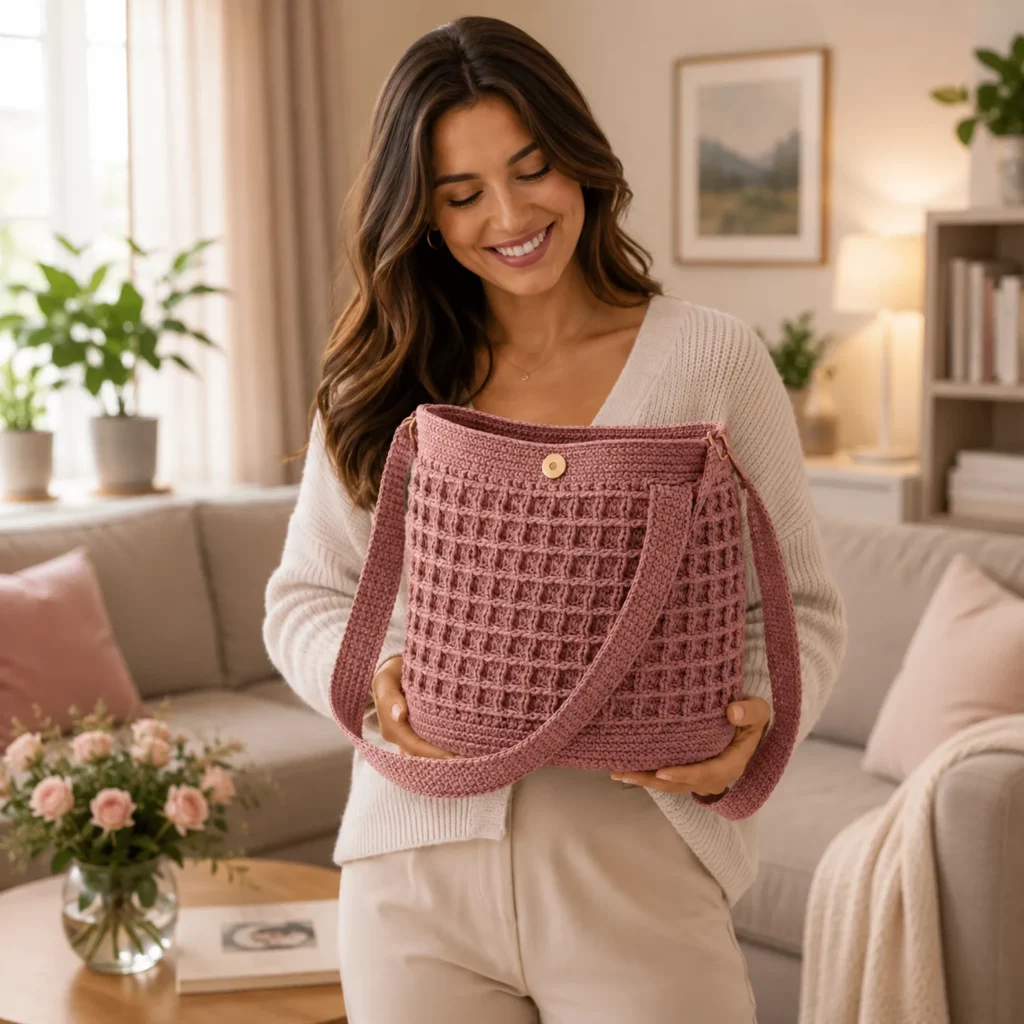
A handmade bag hits different when it’s both beautiful and genuinely useful. This textured crochet crossbody has that “everyday favorite” feel: a clean silhouette, a structured body that doesn’t collapse, and a woven-looking stitch pattern that makes the whole bag look elevated without requiring complicated techniques.
Explore more beginner bags crochet patterns in our pattern library.
This crochet pattern is also a great way to learn the most important bag-making skills in one project. You’ll build a firm base, work a textured stitch repeat that creates the raised grid effect, shape a clean top edge, and add hardware (or a simple crochet alternative) for a professional finish. The result is a minimalist, modern purse you can wear with anything—plus it’s easy to customize into a tote, a bucket bag, or a smaller phone pouch once you understand the construction.
Below is a detailed, tutorial-style free crochet pattern with materials, stitch guidance, step-by-step instructions, and expert finishing tips so your bag feels sturdy, sits nicely, and holds up over time.
Detailed Description of the Crochet Pattern#
This bag is built in three main stages, each with a purpose.
A structured base and lower body worked in dense stitches. This gives the bag shape and prevents it from sagging or stretching too quickly, especially when you carry heavier items like a wallet, keys, or a small notebook.
A textured body section that creates a “woven” or “basket” look. Visually, it appears like raised vertical bars framed by horizontal ridges. You can recreate this effect using a very approachable stitch combination: alternating single crochet rows and front-post stitches, or a modified basketweave-style repeat. Either approach gives you that tidy grid texture that looks high-end.
A reinforced top band and strap attachment points. The top band keeps the opening from stretching. The strap is wide and flat (so it’s comfortable), and it’s either attached directly or connected with simple hardware like D-rings. A small snap closure (magnetic snap or sew-on snap) finishes it cleanly.
The overall construction is straightforward: crochet the body in one piece, add a top band, then add straps and closure. A lining is optional but highly recommended for a bag like this because it improves structure and prevents stretching.
Skill Level Explanation#
Skill Level: Confident Beginner to Intermediate Beginner
You’ll do great if you already know
- Chain (ch)
- Single crochet (sc)
- Half double crochet (hdc) or double crochet (dc) basics
- Working in rounds or rows
- Counting stitches and repeats
- Basic sewing with a yarn needle
Newer skills you’ll learn (or practice)
- Creating a firm base that stays flat
- Working a textured stitch repeat consistently
- Reinforcing edges and strap areas
- Optional lining and installing a snap closure
- Preventing strap stretch (the #1 issue with crochet bags)
If you’ve made a basic tote or a basket before, this is the perfect “upgrade” project because it teaches structure and finishing.
Materials Needed#
Yarn#
For bags, yarn choice matters more than almost anything else. You want stitch definition, strength, and minimal stretch.
Best fiber choices
- Cotton (top choice for structure and durability)
- Cotton-linen blends (sturdy, slightly rustic, very strong)
- Cotton-acrylic blends (softer, but may stretch more over time)
Recommended yarn weight
- Worsted (Category 4) for a medium crossbody
- DK (Category 3) for a slightly lighter bag (add rounds for size)
- Cord/rope yarn for a very structured “designer” look (more advanced on the hands)
Color tip
Solid colors show textured stitches best. Deep green, black, cream, or navy look especially polished with woven textures.
Yardage estimate
- Small crossbody: 400–650 yards (worsted cotton)
- Medium crossbody: 650–900 yards
- Add extra if you’ll crochet a wide strap and a firm top band.
Hook#
Use a hook that creates a firm fabric. For cotton, you’ll often go down a size from the label.
Typical hook ranges
- Worsted cotton: 4.0–5.0 mm
- DK cotton: 3.5–4.5 mm
If your stitches look “holey,” size down.
Notions#
- Stitch marker
- Yarn needle
- Scissors
- Measuring tape
Optional but highly recommended - Fabric for lining (quilting cotton or canvas)
- Magnetic snap or sew-on snap
- 2 D-rings or swivel hooks (optional)
- Twill tape or ribbon (strap reinforcement)
Stitches & Techniques Explained#
Common Abbreviations#
- ch = chain
- sc = single crochet
- hdc = half double crochet
- dc = double crochet
- sl st = slip stitch
- st(s) = stitch(es)
- BLO = back loop only
- FPdc = front post double crochet
- rep = repeat
- ( ) = repeat
- = stitch count (optional)
The Woven Texture Stitch (Beginner-Friendly Version)#
To mimic the raised “grid” texture, we’ll use a simple, reliable combo:
Texture Repeat (2 rounds)
Round A (ridge): sc in BLO around
Round B (woven bars): alternate FPdc and dc around, working FPdc around the posts from Round A below
Why it works
- BLO sc creates a clean horizontal ridge line
- FPdc grabs the post and pulls it forward, creating vertical raised bars
- Repeating these gives a woven, basket-like surface without complicated counting
Alternative option (even easier)
Use waistcoat stitch (sc into the “V” center) for a knit-like texture. It looks great but can be tighter and slower.
Clean, Strong Strap Construction#
For straps, avoid tall stitches. The best strap stitches are
- sc in rows (dense, low-stretch)
- slip stitch BLO (very firm, slightly stiff)
- thermal stitch (thick and strong, slower)
If you want a strap that truly won’t stretch, crochet the strap and then stitch twill tape to the underside.
Step-by-Step Instructions#
Finished Size#
This crochet pattern is adjustable, but here’s a helpful baseline for a medium crossbody
- Width: 10–11″
- Height: 9–10″
- Depth (boxed bottom): 2.5–3.5″
- Strap drop: 20–24″ (adjust to preference)
Notes Before You Start#
- For the neatest texture, work in continuous rounds and use a stitch marker to track round starts.
- For perfectly aligned “rows,” use joined rounds (sl st join, ch 1) especially if you want a clean seam line.
- Bags need structure: choose cotton and aim for firm tension.
- If you plan to line the bag, do it after the top band and before attaching the strap.
Option A: Oval Base (Most Structured)#
This creates a bag that sits nicely and has a clean shape.
Foundation
Ch 31 (adjust to change width)
Round 1
Sc in 2nd ch from hook and sc across to last ch.
3 sc in last ch.
Working along underside of chain, sc across back.
2 sc in last ch.
Join or continue in spiral.
Round 2
Sc around. Increase only at the curved ends to keep the oval shape flat.
At each end curve: inc evenly across the 3-stitch curve area (usually inc in each of those 3 sts).
Round 3
Sc around, increasing at the curved ends again, spacing increases slightly more than Round 2.
Continue base rounds until your base is about 10–11″ long and 4–5″ wide (medium crossbody).
Flat-base check
- If the base ruffles, reduce increases.
- If it cups, add one more increase on each curve.
Option B: Flat Circle Base (Fastest)#
If you prefer a rounded bag shape, use a circle base and then “box” it lightly later.
Round 1: 6 sc in MR
Round 2: inc around [12]
Round 3: (sc, inc) around [18]
Continue increasing evenly until desired diameter, then proceed.
Most people prefer Option A for structured crossbody bags, but both work.
Turn the Corner#
After the base is the size you want, work 1 round sc in BLO.
This creates a crisp fold line so the bag body rises neatly from the base.
Lower Body#
Work 4–8 rounds of sc around (no increases).
This creates a strong foundation before you add the texture and prevents distortion at the bottom.
Textured Body Section#
Now work the woven texture repeat until the bag is almost tall enough.
Repeat these 2 rounds
Round A (ridge): sc in BLO around
Round B (woven bars): (FPdc around the post from Round A below, dc in next st) repeat around
Continue until the bag height is about 8–9″ from the base (or your preferred height).
If you want a taller bag, add more repeats. If you want a shorter “bucket purse” look, stop earlier.
Tip for neat FPdc placement
Make sure your FPdc is truly wrapped around the ridge-post below, not into the stitch on top. This is what makes the raised bars stand out.
Top Band (Prevents Stretch)#
Work 3–5 rounds of sc around (regular sc, not BLO).
This stabilizes the opening and gives you a firm edge for closures and strap attachments.
Optional polished edge
Finish with crab stitch (reverse sc) for a clean rope-like rim.
Closure Options#
Option 1: Magnetic Snap (Cleanest)#
Install a magnetic snap on the inside of the top band. If you’re lining the bag, install it through the lining + crocheted fabric for the strongest hold.
Option 2: Sew-On Snap (Easy)#
Sew the snap halves to the inside front and inside back near the top edge.
Option 3: Button + Loop (No Hardware)#
Make a small chain loop on the inside front edge and sew a button to the inside back edge.
Strap Instructions#
Strap Style 1: Wide Crochet Strap (Most Comfortable)#
Ch 9–11 (strap width).
Row 1: sc in 2nd ch from hook, sc across, turn
Row 2: ch 1, sc across, turn
Repeat Row 2 until strap is desired length (usually 40–50″ total length for crossbody).
Fasten off with long tails.
Reinforce strap (recommended)
Stitch twill tape along the underside of the strap using needle and thread. This prevents long-term stretching.
Strap Style 2: Strap With Hardware (More Professional)#
Attach D-rings to each side of the bag opening using small sc tabs.
Then clip on a strap (crocheted or purchased webbing).
Simple D-ring tab
Ch 8, sc back across, fold around D-ring, sew tab to bag side with multiple passes.
Strap Attachment (No Hardware)#
Pin strap ends to the inside of the bag, about 1–1.5″ below the top edge, aligned symmetrically.
Sew each strap end using a box-and-X reinforcement
- Stitch a rectangle around the strap end
- Then stitch an X across the rectangle
This is how real bag straps are reinforced.
Optional Lining (Highly Recommended)#
A lining makes the bag feel “finished” and prevents items from poking through texture gaps.
Easy lining method
Cut fabric to match bag body + base, sew a simple fabric pouch, then hand stitch it to the inside top band.
If you’re using a snap, install the snap through the lining.
If you want extra structure
Use a medium-weight canvas lining or insert a thin interfacing panel.
Common Mistakes and How to Avoid Them#
The bag stretches and slouches
Cause: soft yarn, loose tension, no lining
Fix: use cotton, size down hook, add lining, reinforce top band
The base ruffles
Cause: too many increases
Fix: reduce increases at curves or add plain rounds between increase rounds
The base cups
Cause: too few increases
Fix: add extra increases at ends or expand base one more round
The textured stitch looks messy
Cause: FPdc not placed consistently
Fix: always wrap FPdc around the same ridge-post round; keep a steady rhythm
Straps stretch over time
Cause: tall stitches or no reinforcement
Fix: use sc straps and add twill tape reinforcement
Top edge looks wavy
Cause: too many stitches in top band
Fix: redo top band with fewer stitches or a smaller hook; keep it firm and flat
Expert Tips for Better Results#
- Use cotton and a smaller hook than usual for a bag that holds its shape.
- Add the lining even if you think you don’t need it. It upgrades the bag instantly.
- If you want the texture to pop, use a matte cotton (not fuzzy yarn).
- For extra durability, crochet with two strands of DK held together instead of bulky yarn—structure stays high without stiffness.
- Weave ends into dense areas (base and top band) so they don’t show through texture sections.
- If your bag will carry weight, reinforce the strap attachment with extra stitching and consider a small leather patch under the strap end (optional).
Variations and Customization Ideas#
Make it a bucket bag
Increase base diameter slightly and make the body taller, then add a drawstring channel at the top instead of a snap.
Make it a tote
Widen the base and add two shorter straps instead of one crossbody strap.
Make it a mini phone purse
Stop the base earlier for a smaller width, add a slim strap, and skip the lining if the stitch fabric is dense.
Add pockets
Sew a simple fabric pocket into the lining, or crochet a flat sc pocket and stitch it inside.
Change the texture
Try one of these stitch patterns for a different look
- Lemon peel stitch (sc, dc alternating)
- Moss stitch (sc, ch 1)
- Thermal stitch (very thick, great for structure)
Benefits of This Crochet Project#
- A practical crochet pattern you’ll actually use
- Looks modern and “store-bought” with the woven texture
- Great skill builder for bag structure, straps, and finishing
- Customizable sizing for many bag styles
- Works beautifully with cotton yarn and holds up well with lining
Internal Linking Suggestions#
- Best Yarn for Crochet Bags (Cotton vs Acrylic vs Cord)
- How to Crochet Straps That Don’t Stretch
- How to Line a Crochet Bag Step-by-Step
- Beginner Guide to Front Post Stitches
- Easy Crochet Closures: Snaps, Buttons, and Zippers
FAQ#
Is this crochet pattern beginner-friendly?
Yes for confident beginners. The stitches are basic, and the texture is a repeat. The “advanced” part is finishing: straps, top band, and closure.
What yarn is best for a crochet crossbody bag?
Cotton is ideal because it holds shape and doesn’t stretch as much. Cotton-linen blends are even sturdier.
Do I need to line the bag?
Not required, but strongly recommended. Lining improves structure, prevents stretching, and keeps small items from catching on stitches.
How do I keep crochet straps from stretching?
Use single crochet straps and reinforce with twill tape or ribbon stitched underneath. Also attach straps with box-and-X reinforcement.
Can I resize the bag?
Yes. Make the base longer/wider for a bigger bag, add more body repeats for height, and adjust strap length for your preferred fit.
What closure works best?
A magnetic snap is clean and easy, especially with a lining. A sew-on snap or button loop also works if you want no hardware.
Why does my textured stitch look uneven?
It’s usually tension or inconsistent FPdc placement. Keep your FPdc wrapping the same post round each time and maintain even chain tension between stitches.
Conclusion#
This textured crochet crossbody bag is the kind of project that feels satisfying from the first round to the last stitch: strong structure, a beautiful woven surface, and a polished finish that makes it look truly wearable. Once you’ve made one, you’ll have a repeatable “bag formula” you can customize endlessly—different sizes, different textures, different straps, same reliable construction.
If you tell me your yarn weight (DK, worsted, or cord) and the size you want (mini, medium, or large), I can suggest an exact base chain number and how many texture repeats to crochet so your finished bag lands perfectly on your measurements.