


Introduction#
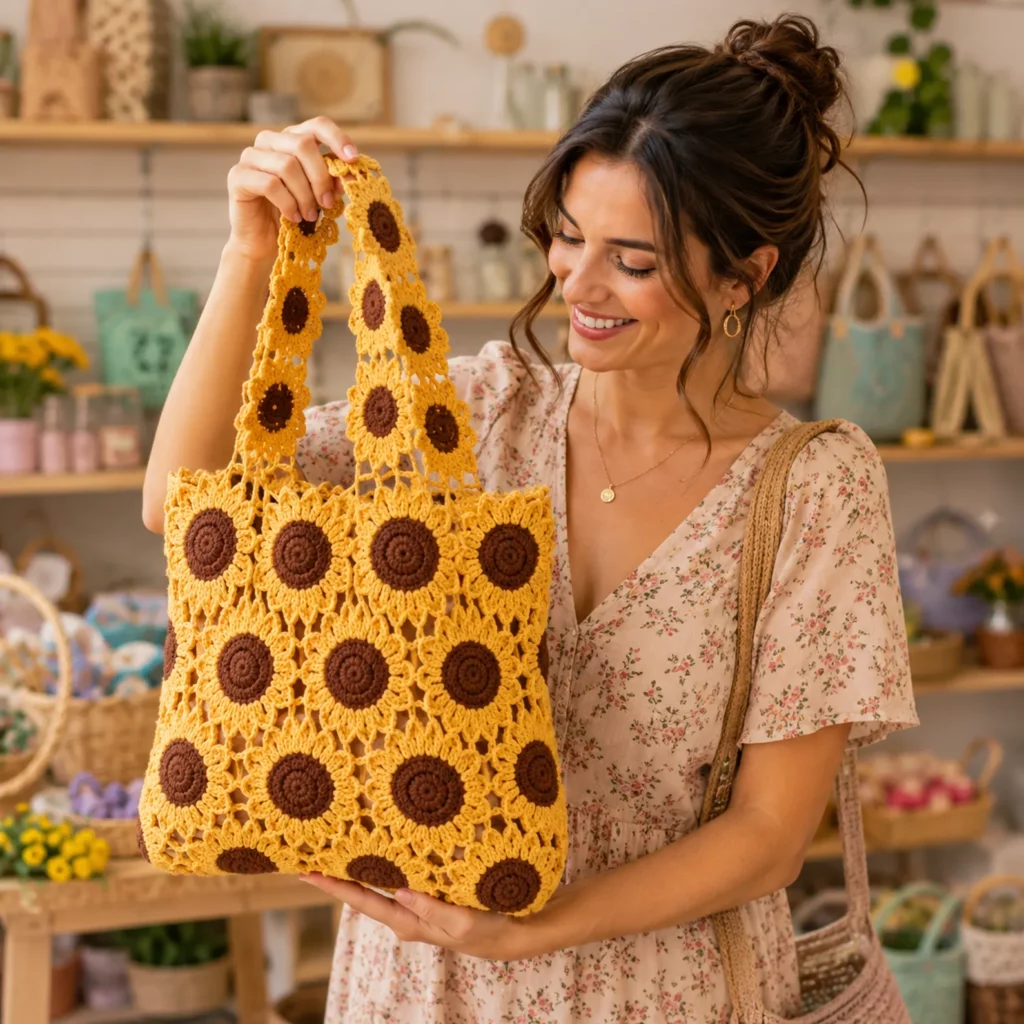
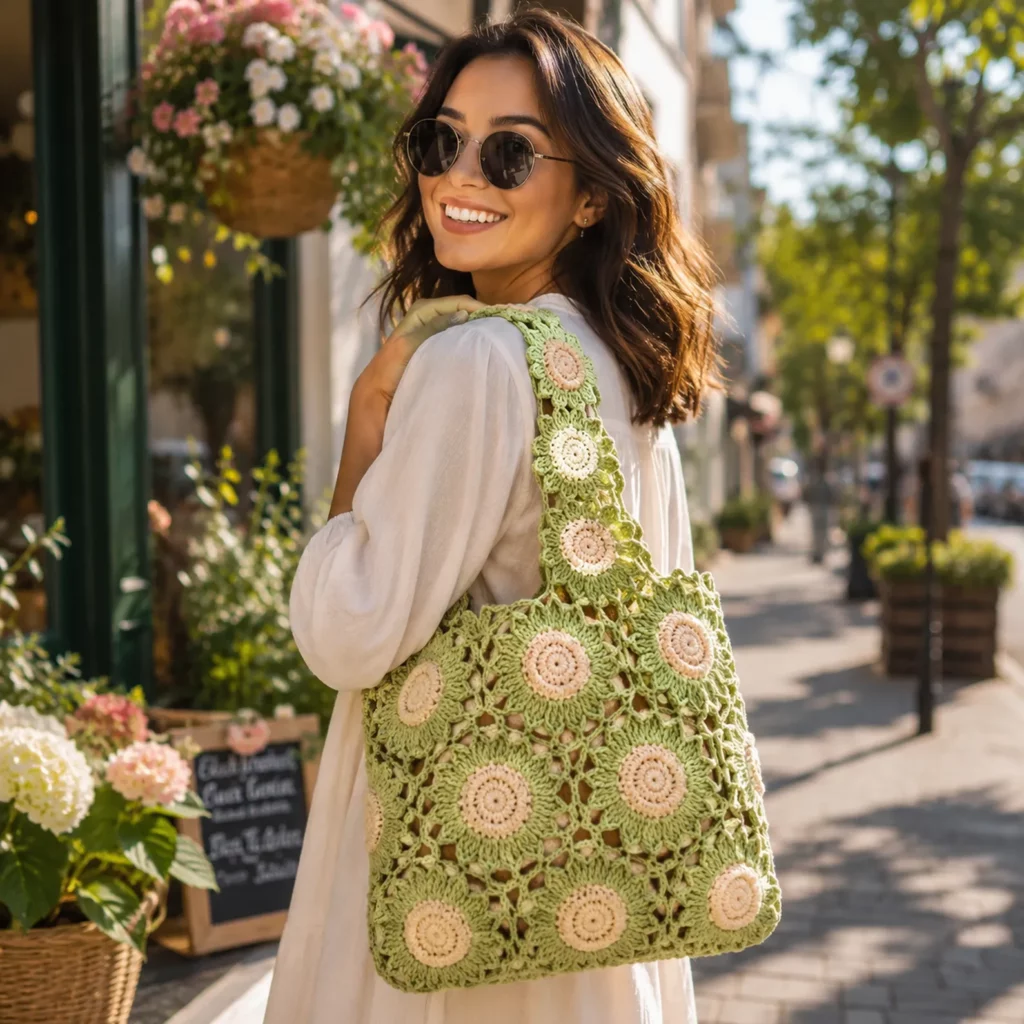
There’s something instantly happy about sunflower crochet—warm gold petals, a rich brown center, and that cheerful “summer all year” vibe. Pair that with a classic granny-square construction and you’ve got a tote bag that looks handmade in the best possible way: nostalgic, bold, and surprisingly versatile.
Explore more beginner granny squares crochet patterns in our pattern library.
This crochet pattern is a perfect blend of fun and functional. You’ll make a set of sunflower motifs, join them into a bag shape, and add straps that are comfortable on the shoulder. The openwork between motifs keeps the bag light, while the structure of the motifs and edging gives it enough stability for everyday use. It’s the kind of project that turns heads at the farmer’s market, makes a gorgeous handmade gift, and helps you practice skills you can reuse in blankets, cardigans, and more.
Below is a full, detailed free crochet pattern written in a beginner-friendly crochet tutorial style. You’ll learn how to make the sunflower motifs, how to join them neatly, how to shape the tote, and how to finish the top edge and straps so your bag holds up over time.
Detailed Description of the Crochet Pattern#
This tote bag is built from repeating sunflower motifs (think “sunflower granny squares,” but with a floral center and petal round). Each motif has a brown circular center, a round of golden petals, and a final round that creates joining points (either squared-off corners or rounded join loops). The motifs are arranged in a simple grid to form the front and back panels, with additional motifs or joins creating the sides and base.
What makes this bag stand out is the continuity: the sunflower motifs aren’t just on the body of the bag, they also flow right into the straps. That gives the finished piece a cohesive, boutique feel and makes the straps look intentional rather than like an afterthought.
Core construction steps
Make identical sunflower motifs
Block motifs (optional but highly recommended)
Join motifs into panels and form the bag body
Add a top border to stabilize the opening
Create straps (motif-based or solid) and attach securely
Optional lining for strength and to prevent stretching
If you’ve never made a motif bag before, you’ll love how modular and manageable it feels. You can crochet a motif in a sitting, stack them up, then assemble when you’re ready.
Skill Level Explanation#
Skill Level: Confident Beginner to Intermediate Beginner
You’ll do great if you already know
Chain (ch)
Slip stitch (sl st)
Single crochet (sc)
Double crochet (dc)
Working in the round
Basic seaming or joining
Newer skills you’ll learn (or practice)
Changing colors neatly in the round
Creating petals (clusters/shells)
Joining motifs cleanly (slip stitch join, whip stitch join, or join-as-you-go)
Building sturdy straps that don’t stretch too much
Finishing edges so the bag keeps its shape
This is an excellent “next-step” DIY crochet project: it’s not technically hard, but it teaches the exact skills that make handmade bags look polished.
Materials Needed#
Yarn
For tote bags, the yarn choice really matters. You want something that holds shape and can handle some weight without stretching dramatically.
Recommended yarn fibers
Cotton (best for structure and stitch definition)
Cotton blends (soft but still stable)
Acrylic can work, but it’s more likely to stretch with weight, especially in straps
Suggested yarn weight
Worsted (Category 4) is ideal for a sturdy, medium-size tote
DK (Category 3) works for a smaller, lighter bag (you may need more motifs for the same size)
Color palette (classic sunflower look)
Color A: Brown (center)
Color B: Golden yellow (petals)
Color C: Background/outline (yellow or a slightly deeper mustard for a monochrome look, or cream if you want contrast)
Yardage estimate (varies by size and motif count)
Small tote: 600–900 yards total
Medium tote: 900–1400 yards total
If you add a lining and reinforced straps, you can comfortably use the bag for heavier items without worrying about stretch.
Hook
Use the hook size that gives you a firm fabric. For most worsted cottons:
4.0 mm to 5.0 mm
If your motifs feel floppy or have big gaps, size down.
Notions
Stitch markers (optional)
Yarn needle (for joining and weaving in ends)
Scissors
Measuring tape
Optional: fabric lining + needle/thread
Optional: magnetic snap or button closure
Stitches & Techniques Explained#
Common Abbreviations
MR = magic ring
ch = chain
sl st = slip stitch
sc = single crochet
hdc = half double crochet
dc = double crochet
sp = space
st(s) = stitch(es)
( ) = repeat
[ ] = stitch count
Color Changes in the Round
For clean color changes: finish the last stitch of the old color until two loops remain on your hook, yarn over with the new color, pull through the last two loops, then continue. This prevents little “dots” of the old color in your new round.
Petal Round (Sunflower Look)
Most sunflower motifs use a shell-like petal: multiple dc into the same stitch/space, separated by chains. Even if your petal shape varies slightly, the key is consistency. Matching motif sizes makes joining much easier.
Joining Motifs
Three popular methods, all beginner-friendly
Whip stitch join (sew motifs together from the back, clean and strong)
Slip stitch join (join with a hook for a slightly raised “ridge” seam)
Join-as-you-go (JAYG) (join while crocheting the final round, fewer ends, very tidy)
For a tote bag, whip stitch or slip stitch joins are especially sturdy.
Preventing Stretch (Important for Bags)
Two areas stretch the most: the top edge and the straps. The fix is simple
Add a firm border (sc rounds) around the opening
Use tighter stitches for straps (sc or linked stitches) or reinforce straps with lining/tape
Step-by-Step Instructions#
Finished Size
This pattern is easy to resize. A common tote size is about 12–14 inches wide and 12–14 inches tall (not counting straps). Your exact size depends on motif size and how many motifs you use.
Notes Before You Start
Keep motif tension consistent so all motifs match
Weave in ends as you go if possible (motifs create ends fast)
Block motifs before joining for the cleanest finish
If you plan to line the bag, keep the inside joins neat
Motif Count (Two Easy Layout Options)
Option A (medium tote, simple grid)
Front panel: 3 motifs across x 3 motifs tall (9 motifs)
Back panel: 3 x 3 (9 motifs)
Sides/base: 1 motif strip around or joined edges (varies by assembly style)
Straps: motif strip or solid straps
Option B (smaller tote)
Front: 3 across x 2 tall (6 motifs)
Back: 3 x 2 (6 motifs)
Sides/base formed by joining edges and adding a base round
You can also create a long rectangle and fold it, but the panel method is easiest to visualize.
Sunflower Motif (Make as Many as Needed)
This motif is written to create a sunflower center, petal ring, and a joining round. You can adjust the final round to make it more square or more lacy depending on the look you want.
Round 1 (Center, Color A brown)
6 sc in MR [6]
If you prefer a smoother circle, use 8 sc in MR.
Round 2
Inc around [12]
Round 3
(sc, inc) around [18]
Round 4 (Optional for a bigger center)
(2 sc, inc) around [24]
If you want smaller flowers, stop at Round 3.
Fasten off Color A and join Color B.
Round 5 (Petals setup, Color B yellow)
Ch 1, sc in same st, (ch 2, sk 1, sc in next st) repeat around
Join with sl st to first sc
This creates small chain spaces for petals.
Round 6 (Petals, Color B)
Sl st into first ch-2 sp
Work a petal into each ch-2 sp: (sc, hdc, 3 dc, hdc, sc) all in the same space
Sl st into next ch-2 sp and repeat around
Join and fasten off
Tip: If your petals curl, your tension may be tight. Try a slightly larger hook for the petal round only, or add one extra chain in the petal setup round.
Round 7 (Join/outline round, Color C or continue Color B)
Join yarn in any space between petals. Work a round of chains and stitches that creates joining points. A simple option:
(sc between petals, ch 3) repeat around
Join
If you want a squarer motif for easier panel joining, you can convert this to four corners:
Pick four evenly spaced points around the motif as corners.
At corners: (sc, ch 5, sc)
Between corners: (sc, ch 3)
This gives you clearer corners for a grid layout.
Fasten off and weave in ends.
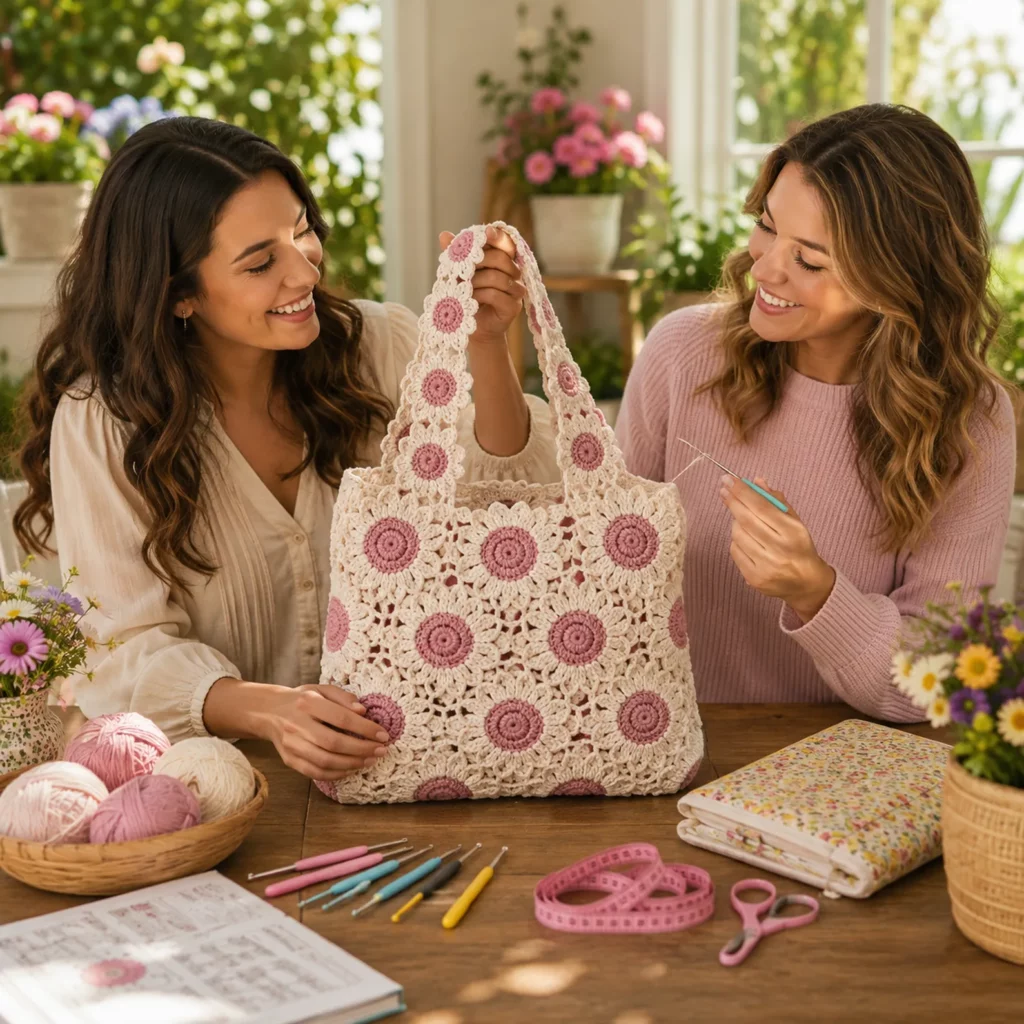
Block Motifs (Recommended)
Lightly steam block or wet block each motif to the same size. Motif bags look dramatically better when every sunflower matches. Blocking also makes joining faster because the edges align naturally.
Join Motifs Into Panels
Arrange your motifs into your chosen grid for the front panel. Join motifs edge-to-edge.
Slip stitch join (sturdy and slightly raised)
Hold motifs with wrong sides together
Insert hook through both loops of both motifs at the edge
Sl st across the seam, working through matched stitches/spaces
Fasten off
Whip stitch join (very strong and flatter)
Place motifs right sides up
Use a yarn needle and stitch through corresponding loops along the edge
Keep stitches even so the seam doesn’t pucker
Make two identical panels for front and back.
Form the Bag Body
With panels complete, join the sides and bottom.
Simple tote assembly
Place front and back panels right sides together
Join the side seams from top down to bottom corner
Join across the bottom edge
Turn right side out
If your motif layout includes extra motifs as a base, join those before closing the bottom. If you want a flat base, you can box the corners later.
Optional boxed corners (adds depth)
With bag inside out, pinch one bottom corner flat so the side seam meets the bottom seam
Measure 1.5–2 inches from the tip, stitch across that line
Repeat on the other corner
This creates a flat bottom so the bag sits better
Top Border (Prevents Stretch)
This is one of the most important steps for a sturdy tote.
Round 1
Join Color C at a side seam
Ch 1, sc evenly around the opening
Place 1 sc in each stitch or joining point
At corners/joins where gaps are larger, add an extra sc so the edge stays smooth
Join with sl st
Round 2
Ch 1, sc around
Join
Round 3 (Optional, extra structure)
Ch 1, sc around
Join
Tip: If your top edge ripples, you added too many stitches. If it pulls tight, add a few more evenly. The goal is a flat, firm edge.
Strap Construction (Two Options)#
Straps determine whether your bag feels “cute” or truly functional. Here are two reliable choices.
Option 1: Motif Strap (Matches the Bag)
Create a strip of small sunflower motifs (or half motifs) and join them into a strap.
Common strap build
Make 6–8 small motifs per strap (depending on your desired length)
Join motifs in a straight line
Add a sc border around the entire strap to stabilize it
Sew strap ends to the inside of the top border, reinforcing with multiple passes
Pros: visually cohesive, very “boutique”
Cons: can stretch more than solid straps unless reinforced
Option 2: Solid Reinforced Strap (Most Practical)
Make two straps with tight stitches.
Strap pattern (simple and sturdy)
Ch 8–10 (strap width)
Row 1: sc in 2nd ch from hook, sc across, turn
Row 2–until desired length: ch 1, sc across, turn
Make two straps
Attach straps evenly spaced on the inside of the bag. Stitch a box shape with an X through it (box-and-X stitch pattern) using yarn or strong thread to reinforce.
Pro tip: For minimal stretch, line the strap underside with ribbon, twill tape, or a strip of fabric stitched in place.
Common Mistakes and How to Avoid Them#
Motifs are different sizes
Cause: tension changes or hook size switching
Fix: block all motifs to the same measurement before joining; try to keep the same hook and yarn throughout
Bag looks slouchy
Cause: yarn too soft or no top border
Fix: use cotton and add 2–3 sc rounds at the top edge; consider lining for extra structure
Seams look messy or bulky
Cause: joining through the wrong loops or uneven tension
Fix: choose one join method and stay consistent; keep seam tension even, not tight
Straps stretch too much
Cause: loose stitches or carrying heavy items without reinforcement
Fix: use sc straps, add a strap border, and reinforce with ribbon/twill tape or lining
Gaps between motifs feel too open
Cause: join round chain spaces too large
Fix: reduce chain spaces on the final motif round, or add a fabric lining
Expert Tips for Better Results#
Choose mercerized cotton if you want crisp stitch definition and a slightly glossy “store-bought” look
Use a consistent joining direction (always join in the same orientation) so the texture looks uniform
Add a lining if you plan to carry small items like keys, lip balm, or coins (openwork motifs can let small items slip through)
If you want a cleaner inside, whip stitch joins are often flatter than slip stitch joins
Weave in ends with intention: go through multiple stitches in one direction, then change direction so ends don’t wiggle out
Steam block gently after assembly to relax the joins and sharpen the motif edges
Variations and Customization Ideas#
Change the sunflower colors
Try cream petals with a dark center for a vintage look
Use burnt orange petals for an autumn sunflower vibe
Make the background round in black for a bold contrast
Adjust the bag size
More motifs = larger tote
Fewer motifs = cute mini bag
You can also make a wider bag by doing 4 motifs across instead of 3
Add a lining and pocket
A simple cotton lining makes the bag stronger and more functional
Add a small inside pocket for a phone or card holder
Add a closure
Magnetic snap (hidden inside)
Button and loop closure
Drawstring top (if you prefer a more secure opening)
Make it a set
Match a sunflower pouch, coin purse, or water bottle holder using the same motif
Create matching sunflower coasters or a mini wall hanging with leftover motifs
Benefits of This Crochet Project#
A joyful crochet pattern that looks impressive but is built from repeatable motifs
Perfect stash buster for small amounts of brown and yellow
Teaches joining skills you can use in many other crochet projects
Makes a practical tote that’s also decorative
Great handmade gift for birthdays, Mother’s Day, summer outings, and market season
Internal Linking Suggestions#
How to Crochet a Sunflower Granny Square (Beginner Tutorial)
Best Yarn for Crochet Bags (Cotton vs Acrylic)
How to Join Granny Squares Neatly (Slip Stitch, Whip Stitch, JAYG)
How to Line a Crochet Bag (Step-by-Step)
How to Make Crochet Straps That Don’t Stretch
FAQ#
Is this crochet pattern beginner-friendly?
Yes, especially if you’re comfortable with basic stitches. The motifs are repetitive and the joining is straightforward once you pick a method and stick with it.
What yarn is best for a sunflower tote bag?
Cotton is the best choice for structure and durability. Acrylic can work, but it may stretch more, especially in straps.
How many sunflower motifs do I need?
It depends on your size. A common medium tote uses 18 motifs (9 front + 9 back), plus either a strap design or additional motifs for handles.
Do I need to line the bag?
Not required, but highly recommended if you’ll carry small items or want extra strength. Lining also prevents the bag from stretching out over time.
How do I keep my straps from stretching?
Use single crochet straps, keep tension firm, and reinforce with ribbon/twill tape or a fabric lining stitched onto the strap underside.
Can I wash this bag?
If you use machine-washable cotton yarn, gentle washing is usually fine. To keep shape, lay flat to dry and reshape the straps while damp.
How do I make the motifs more square for easier joining?
Add a final round that creates four corners using chain spaces (corner: sc, ch 5, sc) spaced evenly around the motif. This gives clearer alignment for a grid layout.
Conclusion#
This sunflower tote bag is one of those crochet projects that feels both nostalgic and totally wearable: bright floral motifs, a breezy openwork look, and a practical shape you’ll actually use. The modular design makes it fun to crochet in small sessions, and the finishing steps—especially the top border and sturdy straps—turn it into a bag that holds up beyond just being “cute.”
If you tell me the size you want (mini, medium, or large) and what yarn weight you’re using, I can suggest an exact motif count and a strap length plan so your finished tote fits your lifestyle perfectly.


