


Introduction#
There’s a reason sunflower motifs never go out of style in crochet: they’re cheerful, instantly recognizable, and they make even simple projects look special. A sunflower granny square takes that feel-good flower energy and turns it into a practical building block you can use for almost anything—blankets, pillow covers, tote bags, cardigans, table runners, and even coasters.
Explore more beginner granny squares crochet patterns in our pattern library.
This crochet pattern is designed to be beginner-friendly but high-impact. The center is worked in warm browns for that realistic sunflower core, the petals are made with plump puff stitches that look beautifully raised, and the square is framed with leafy green rounds before finishing with a clean neutral border. The result is a square that looks “fancy,” but is made with repeatable, learnable steps.
In this crochet tutorial, you’ll get a complete free crochet pattern plus the kind of details that actually help: stitch explanations, tension tips for puff stitches, how to keep your square flat, and multiple ways to customize the size and style.
Detailed Description of the Crochet Pattern#
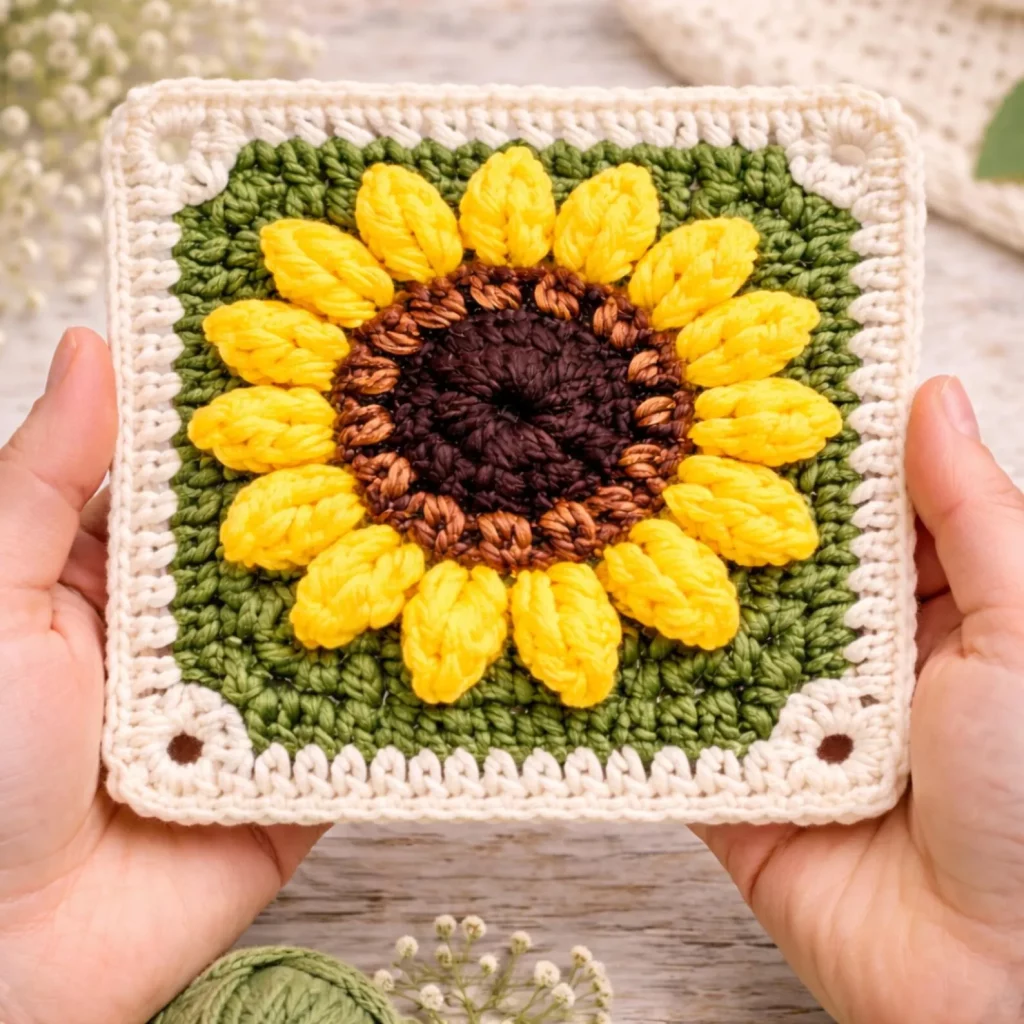
This sunflower granny square is a textured, layered square motif with clear color zones:
- Sunflower center (dark brown): a dense circle that forms the “seed” core
- Seed highlight ring (light brown/tan): optional but adds depth and realism
- Petal round (yellow): raised puff petals that sit on top of the center rounds
- Leafy framing (green): solid rounds that transition the motif into a square
- Final border (cream/white): clean frame with simple corner details
The stitch texture is part of the charm: the raised petals pop forward, while the background rounds stay flatter so the sunflower remains the star. This is the kind of crochet pattern that looks impressive in photos and in real life—perfect for a blog post, a gift project, or an AdSense-friendly tutorial people will bookmark.
Skill Level Explanation#
This is an easy-to-intermediate crochet pattern.
You can absolutely make it as a confident beginner if you’re comfortable with:
- working in the round
- basic stitches like single crochet and double crochet
- joining new colors
- counting stitches and chain spaces
The one “new” skill for many beginners is the puff stitch (or a puff-like petal stitch). Don’t worry—once you do a few petals, it becomes very rhythmic. I also include troubleshooting tips if your petals look uneven or your square starts to ripple.
Materials Needed#
Yarn
This square works best with yarn that shows stitch definition clearly.
Recommended yarn weight:
- Worsted weight (#4) for a classic granny square size
- DK weight (#3) for a smaller, more delicate square
Fiber suggestions:
- Acrylic (budget-friendly, easy care)
- Cotton or cotton blend (crisp stitches, great for home decor)
- Wool blend (soft, warm, perfect for blankets and wearables)
Color palette (traditional sunflower look):
- Dark brown (center)
- Light brown or tan (seed ring highlight)
- Bright yellow (petals)
- Medium green (leafy background)
- Cream/white (border)
Hook
- Worsted (#4): 4.5 mm to 5.5 mm
- DK (#3): 3.5 mm to 4.5 mm
Choose a hook that gives you a fabric that’s not stiff. Puff petals look best when they’re plush, not tight and cramped.
Notions
- Scissors
- Yarn needle (weaving ends)
- Stitch markers (optional, helpful for corners and petal placement)
- Measuring tape (if you’re matching squares to a project size)
Stitches & Techniques Explained#
Abbreviations (US terms)
- MR = magic ring
- ch = chain
- sl st = slip stitch
- sc = single crochet
- hdc = half double crochet
- dc = double crochet
- tr = treble crochet
- sp = space
- sk = skip
- rep = repeat
- FO = fasten off
Puff Stitch (Puff)
There are multiple puff styles. This pattern uses a yarn-over, insert, pull up loop method repeated several times, then closed.
How to make a Puff (5-loop puff example):
Yarn over, insert hook into stitch/space, pull up a loop (3 loops on hook). Repeat yarn over + insert + pull up loop until you have 11 loops on hook (this varies by puff size). Yarn over and pull through all loops, then ch 1 to lock.
Beginner tip: Pull up each loop to the same height so your puff looks neat. If your puff is too tight to close, loosen your tension slightly on the last yarn over.
Keeping Squares Flat
Most sunflower squares ripple for one of two reasons:
- too many stitches in a round
- puff stitches are too tight and pulling inward
Fixes:
- size up your hook slightly for the petal round
- make sure you lock each puff with a chain
- block your square lightly when finished

Step-by-Step Instructions#
This free crochet pattern is written as a standard sunflower granny square. You can make it larger by adding more green or border rounds at the end.
Notes before you start
- Join rounds with a sl st to the first stitch unless stated otherwise.
- Ch-3 at the start of a round counts as a dc unless noted.
- For the neatest look, start each new round in a corner/space when possible.
Sunflower Center (dark brown)
Round 1: MR, ch 1, work 12 sc into the ring. Join.
Round 2: ch 1, 2 sc in each stitch around (24 sc). Join.
This creates a firm, slightly raised center.
Seed Highlight Ring (light brown/tan)
This round adds depth and that “seed” texture look around the center.
Round 3: Join light brown in any stitch. Ch 2 (counts as hdc), work 1 hdc in same stitch, then 2 hdc in each stitch around (48 hdc). Join.
If your circle starts to ripple here: switch to (hdc, 2 hdc) repeating instead of doubling every stitch. Different yarns behave differently—flat is the goal.
Petal Base Round (prep for petals)
This creates chain spaces where petals will be anchored.
Round 4 (green or brown—your choice):
Join yarn in any stitch.
(sc, ch 2, sk 1) repeat around. Join.
You should end with a repeating set of chain spaces. These spaces become the petal anchors.
Puff Petals (yellow)
This is the fun round that makes it look like a sunflower.
Round 5: Join yellow with a sl st into any ch-2 space.
In the same space, make Puff, ch 2.
Repeat: (Puff in next ch-2 space, ch 2) around. Join.
Petal count tip: You want an even, balanced number of petals. If your base round created fewer spaces than you’d like, you can adjust by changing Round 4 to (sc, ch 2) in every stitch (no skipping) to create more petal anchors.
How puffy should petals be?
- For a soft, plush petal: use a slightly larger puff (more loops)
- For a tighter, neater petal: use fewer loops
Leafy Background Rounds (green)
Now you transform the circle into a square.
Round 6: Join green in any ch-2 space between petals.
Work (3 dc) in each ch-2 space around, with corners formed every fourth “side” cluster:
- In corner spaces: (3 dc, ch 2, 3 dc)
Join.
If your corners don’t line up perfectly, don’t panic—just choose four evenly spaced corner points and be consistent.
Round 7: Continue in green.
In each side ch space, work 3 dc.
In each corner ch-2 space, work (3 dc, ch 2, 3 dc). Join.
At this point, it should clearly be a square with a sunflower center.
Clean Border (cream/white)
The border frames the square and makes it easier to join squares later.
Round 8 (border): Join cream/white in any corner space.
Corner: (sc, ch 2, sc) in corner ch-2 space.
Along the side: sc evenly across (place 1 sc in each dc, and 1 sc in each ch space).
Repeat around, joining at the end.
Optional Round 9 (extra polish):
Work another round of sc or a decorative edge like:
- sl st all the way around for a tight finish
- picot edge for a lacy look (sc, ch 3, sl st into sc)
Optional Corner Holes for Joining
If you want clean holes in the corners for joining later, keep your corner as ch 3 instead of ch 2 on the final border round.
Common Mistakes and How to Avoid Them#
- My petals look flat.
Make your puff larger (more loops) and always lock with ch 1. Also loosen tension slightly. - My square is wavy.
Too many stitches in a round or your hook is too big. Try fewer increases in the seed ring or tighten your stitch count on the green rounds. - My square curls into a bowl.
Petals are too tight or the center rounds are too small. Use a slightly larger hook for the petal round, and make sure the center has enough increases. - Corners don’t look sharp.
Use (3 dc, ch 2, 3 dc) consistently, and block the square when finished. - Color changes look messy.
Change colors on the last yarn-over of the joining stitch, and weave ends into the same color section to hide them.
Expert Tips for Better Results#
- Block your square. Even a quick steam block makes petals pop and corners crisp.
- Use stitch markers for corners. Especially if you’re making many squares—consistency matters for joining.
- Keep your green rounds slightly looser. A stiff background can make petals look squished.
- Weave ends as you go. Sunflower squares use multiple colors; weaving at the end can feel overwhelming.
- Make one “test square” first. Measure it after blocking, then decide how many squares you need for your project.
Variations and Customization Ideas#
- Coaster version: Stop after the green round and add a simple border—perfect for quick gifts.
- Bag or tote panels: Make larger squares by adding extra green rounds for structure.
- Blanket squares: Use a consistent border color across all squares to unify the look.
- Muted sunflower palette: Try mustard petals, olive green, and warm taupe for a modern home decor vibe.
- Daisy style: Swap yellow petals for white and keep the brown center for a daisy-sunflower hybrid.
- Textured center: Use bobbles instead of sc/hdc for a very “seeded” look.
Benefits of This Crochet Project#
- Quick to finish and satisfying (you see the sunflower emerge fast)
- Great stash-buster for small amounts of yarn
- Teaches key crochet skills: working in rounds, puff stitches, color changes
- Highly versatile: blankets, pillows, garments, accessories
- Looks high-value and gift-ready
- Perfect for seasonal makes (spring, summer, fall decor)
Internal Linking Suggestions#
If you’re building a crochet blog, link this post to related tutorials and patterns like:
- “How to Crochet a Magic Ring”
- “Puff Stitch Crochet Tutorial”
- “How to Change Colors Cleanly in Crochet”
- “Best Methods to Join Granny Squares”
- “How to Block Crochet Squares”
- “Easy Crochet Blanket Layout Ideas Using Granny Squares”
FAQ Section#
Is this sunflower granny square a good crochet pattern for beginners?
Yes. If you’re comfortable with single crochet and double crochet, you can learn the puff petals easily with a little practice.
What yarn is best for sunflower granny squares?
Worsted acrylic or cotton blends work great. Cotton gives crisp stitches; acrylic is soft and easy-care.
How do I keep my granny square from curling?
Use a slightly larger hook for the puff round, keep puff stitches relaxed, and block the finished square.
How big should my sunflower granny square be?
It depends on yarn and hook size. After blocking, most worsted-weight versions land around 6–8 inches. Add extra rounds to make it bigger.
Can I make this into a blanket?
Absolutely. Make multiple squares, block them, then join with slip stitch, whip stitch, or join-as-you-go. A consistent border color helps unify the blanket.
Can I sell items made from this free crochet pattern?
You can typically sell finished items you make yourself. If you publish the pattern, keep your wording and photos original to stay unique and AdSense-friendly.
Conclusion#
A sunflower granny square is one of those crochet patterns that gives you the best of everything: easy stitches, bold texture, and endless project possibilities. Whether you make one as a cute coaster or stitch dozens together into a stunning blanket or cardigan, the motif always looks intentional and joyful.
If you tell me what yarn weight you’re using (DK, worsted, or bulky) and what you’re making (blanket, bag, cardigan, pillow), I can help you choose the best square size, petal puff style, and border rounds so your finished project comes out perfectly consistent.


