


Introduction#
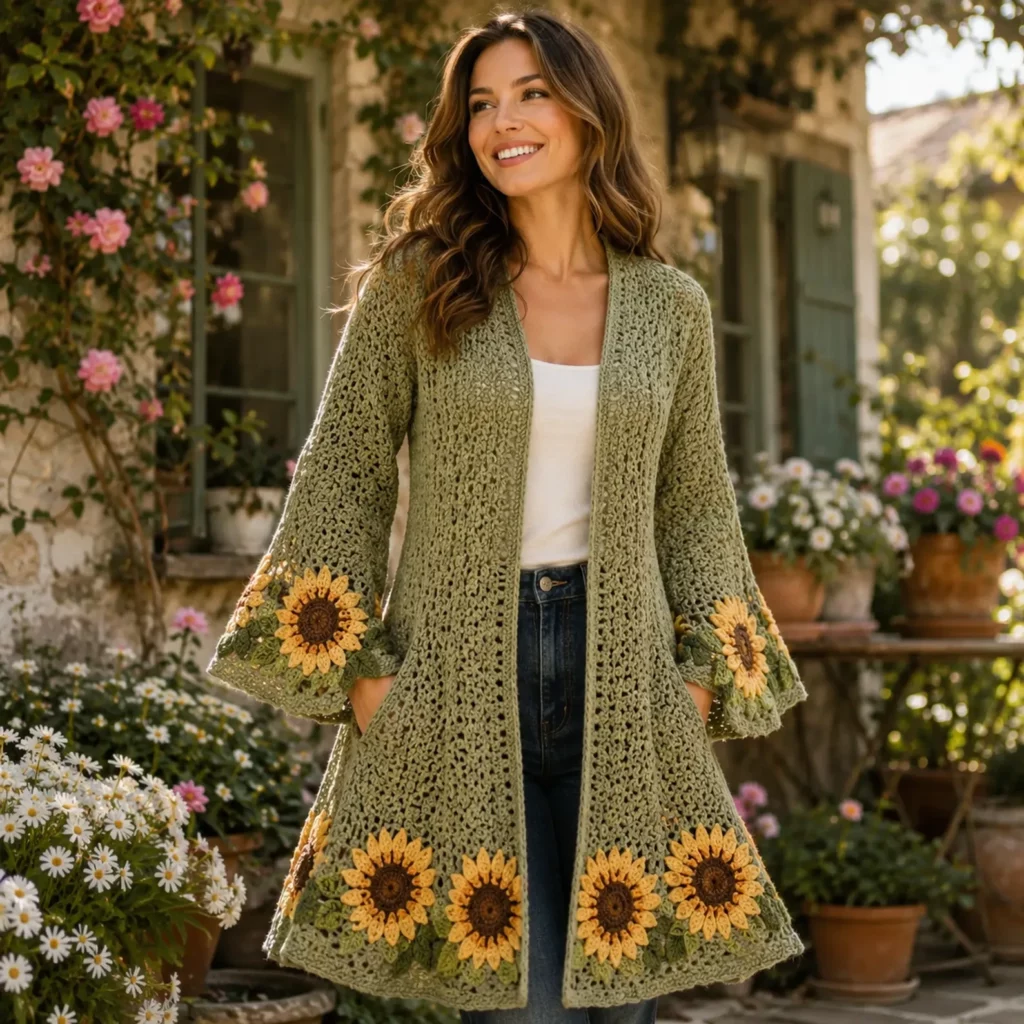
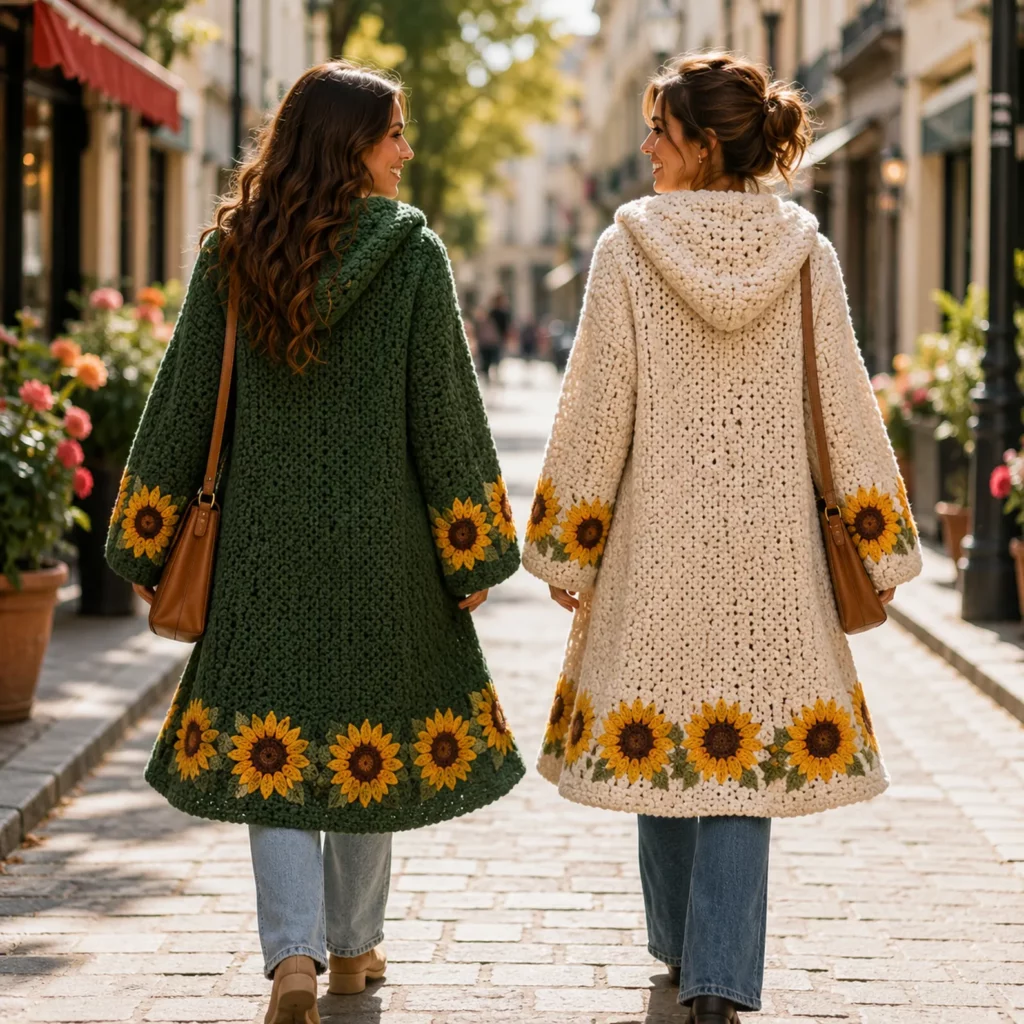
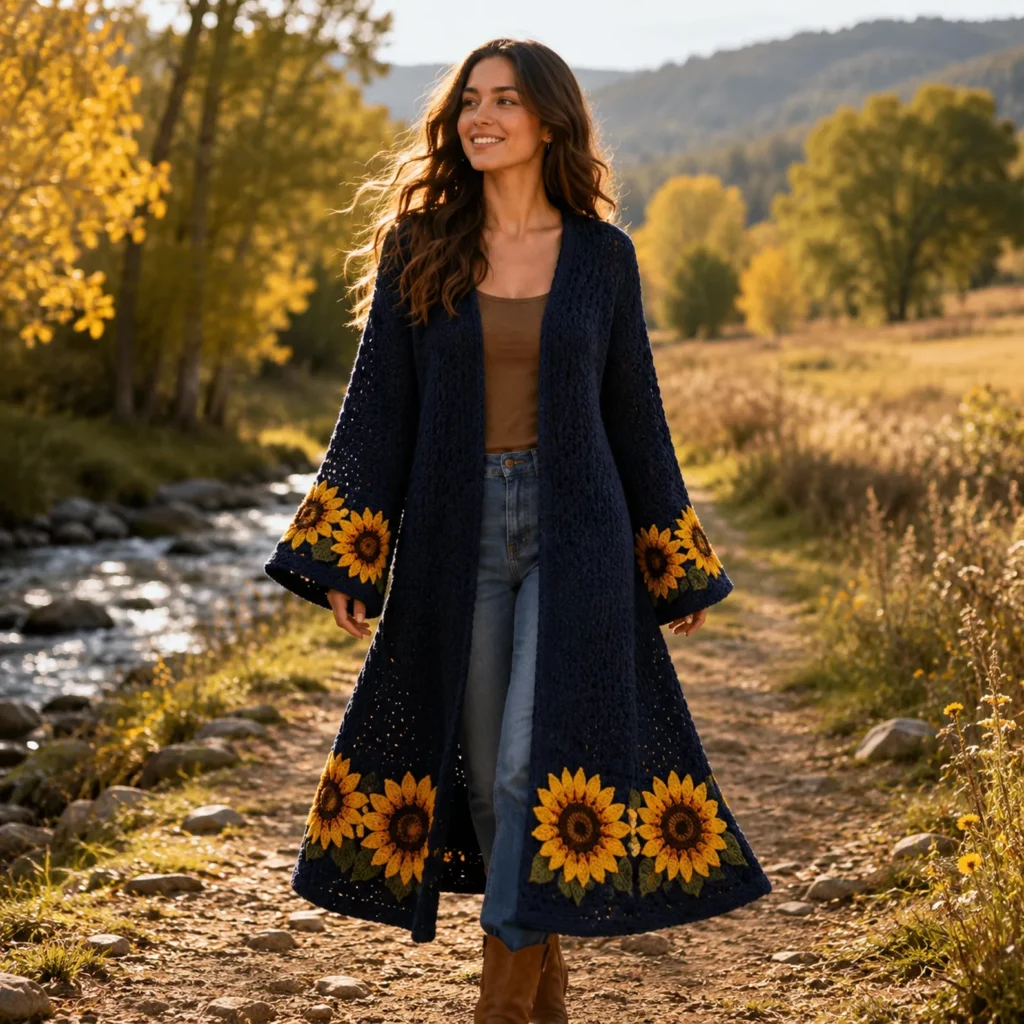
Some crochet projects are cozy basics, and some are full-on statement pieces that make people stop and ask, “Where did you buy that?” A sunflower duster cardigan is definitely the second kind. With its long, flowing shape, open front, and bold sunflower borders at the hem and sleeves, it has that dramatic “crochet coat” energy while still being totally wearable.
Explore more beginner cardigans crochet patterns in our pattern library.
What’s especially fun about this crochet pattern style is that it’s built from simple, repeatable components. The main body is a textured fabric worked in rows, the sleeves are roomy and slightly flared, and the sunflowers are made as motifs and then attached like a border. The result looks high-end and artistic, but the steps are approachable if you take it section by section.
This crochet tutorial will walk you through the construction, explain how to make sunflower motifs that look dimensional, show you how to build the long cardigan panels, and give you a simple sizing method so you can make your duster fit exactly the way you want.
Detailed Description of the Crochet Pattern#
This is a long open-front cardigan that fits like a coatigan. It’s designed to drape and move, with a slightly flared silhouette toward the bottom and wide bell sleeves. The standout detail is the sunflower motif border placed along the hem and around the sleeve cuffs.
Key design elements
- Open front with a soft shawl-like edge (no buttons required, optional belt/ties possible)
- Long duster length, typically knee to mid-calf
- Relaxed drop-shoulder construction for easier garment shaping
- Bell sleeves with sunflower cuff accent
- Bold sunflower border at the hem with leaf accents for a realistic floral look
- Textured stitch body that reads rich and structured even in dark yarn
How it’s made
- Back panel worked in rows from hem to shoulder
- Two front panels worked in rows from hem to shoulder
- Sleeves worked in rows and seamed into tubes, then flared at the cuff
- Sunflower motifs made separately and sewn or joined to the hem and cuffs
- Optional edging added to the front opening and neckline to finish cleanly
The best part is that you can make the garment body first, try it on, confirm the fit, and then add the sunflowers as the finishing “wow” detail.
Skill Level Explanation#
Skill Level: Confident Beginner to Intermediate Beginner
You’ll do great if you already know
- Chain (ch), single crochet (sc), half double crochet (hdc), double crochet (dc)
- Working in rows and turning
- Basic garment seaming (whip stitch or mattress stitch)
- Reading stitch counts and keeping edges straight
Newer skills you’ll learn or practice
- Motif making and consistent sizing of motifs
- Joining motifs to fabric without puckering
- Simple sleeve shaping for a bell cuff
- Edging techniques that keep long borders flat
If sunflower motifs feel intimidating, don’t worry. The petals are just repeats, and once you make one, the rest feel much faster.
Materials Needed#
Yarn
To get a coat-like drape that still holds structure, choose a worsted or aran weight yarn with good stitch definition.
Recommended yarn weights
- Worsted (Category 4) for a classic sturdy duster
- Aran (heavy worsted) for a thicker, more coat-like feel
Fiber suggestions
- Acrylic or acrylic/wool blend for warmth and easy care
- Wool blend for rich texture and bounce
- Cotton blend for a heavier drape and crisp stitch definition
Color palette suggestion
- Main color: deep navy or black (dramatic background for sunflowers)
- Sunflower center: dark brown
- Sunflower petals: golden yellow plus a slightly deeper amber for shading
- Leaves: medium green and darker green for dimension
Yardage estimate (varies by length and sleeve flare)
- XS–S: 1400–1800 yards (1280–1650 m)
- M–L: 1800–2300 yards (1650–2100 m)
- XL–2XL: 2300–2900 yards (2100–2650 m)
- 3XL–5XL: 2900–3600 yards (2650–3300 m)
Motif tip
If you’re using scraps for petals and leaves, weigh one finished sunflower motif and multiply by the number of motifs you plan to make. It’s the easiest way to predict if you have enough accent yarn.
Hook
- 5.0 mm (H/8) for worsted weight is a great starting point
- Go down to 4.5 mm for a denser “coat” fabric
- Go up to 5.5 mm if you want more drape
Notions
- Stitch markers
- Tapestry needle
- Scissors
- Measuring tape
- Optional blocking supplies
- Optional buttons, toggles, belt buckle, or clasp (if you want closure)
Stitches & Techniques Explained#
Common Abbreviations
- ch = chain
- sc = single crochet
- hdc = half double crochet
- dc = double crochet
- tr = treble crochet
- sl st = slip stitch
- blo = back loop only
- ( ) = repeat
- = stitch count
Body Stitch Options
You want a stitch that looks rich and slightly textured, not lacy.
Option A: Hdc blo (subtle ridges)
- Produces a knit-like texture
- Great drape
- Easy for long rows
Option B: Lemon peel stitch (dense texture)
- Repeat across: sc, dc, sc, dc
- Very coat-like and stylish
- Great stitch definition in dark yarn
Option C: Suzette stitch (also dense)
- sc + dc worked in the same stitch, then skip 1
- Quick and textured
- Slightly more open than lemon peel
For the look of a dramatic long duster, lemon peel or hdc blo are both excellent.
Motif Joining Technique
To attach sunflowers smoothly, you want the hem and cuffs to stay flat. That means
- Blocking motifs first (or at least flattening them with steam)
- Pinning motifs evenly before sewing
- Using whip stitch through the back loops so the join doesn’t show heavily on the front
Keeping Long Edges Straight
Long garment panels love to creep and wave. The best habits
- Mark the first and last stitch of each row
- Count rows and measure as you go
- Add a simple sc border to stabilize edges if needed before attaching motifs
Step-by-Step Instructions#
Finished Fit
This pattern is designed as a made-to-measure crochet pattern so you can create your preferred duster fit.
Ease guidelines
- Regular relaxed fit: bust + 4–8 inches (10–20 cm)
- Oversized coatigan fit: bust + 8–14 inches (20–35 cm)
Length guidelines
- Above knee: easy everyday cardigan
- Knee: classic duster
- Mid-calf: dramatic statement coat
Quick Gauge
Make a swatch in your chosen body stitch. Even if you plan to measure panels, a swatch helps you estimate starting chain counts.
A helpful goal range for worsted + 5.0 mm
- 14–16 stitches and 10–12 rows = 4 inches (10 cm) in hdc or lemon peel
Gauge doesn’t need to be perfect for made-to-measure, but consistency does.
Measurements You Need
- Bust circumference
- Desired finished width (bust + ease)
- Desired length (shoulder to hem)
- Shoulder width preference (drop shoulder or more fitted)
- Upper arm circumference
- Sleeve length
- Cuff circumference (how wide you want the bell sleeve opening)
Construction Overview
- Crochet back panel rectangle
- Crochet two front panel rectangles
- Seam shoulders and sides, leaving armholes
- Crochet sleeves and seam into tubes
- Create bell flare at cuffs (either by increasing or adding a flared cuff section)
- Attach sleeves
- Make sunflower motifs and leaf accents
- Attach motifs to hem and sleeve cuffs
- Add optional edging around front opening and neckline
- Weave ends and block for final polish
Back Panel
The back panel is a rectangle worked from hem upward.
Back panel width
- Typically 35–45% of your total finished garment width
Example: if finished width target is 48 inches, back panel could be 18–22 inches wide.
Back panel length
- From shoulder to hem. Add 1–2 inches if you want extra drape and a heavier look.
Back panel pattern (lemon peel stitch)
- Foundation: chain to your desired width
- Row 1: sc in 2nd ch from hook, dc in next, repeat sc, dc across, ch 1, turn
- Row 2: sc in first stitch, dc in next, repeat across, ch 1, turn
- Repeat Row 2 until back panel reaches desired length
- Fasten off
If you prefer hdc blo
- Foundation: chain to desired width
- Row 1: hdc across, ch 2, turn
- Row 2: hdc blo across, ch 2, turn
- Repeat Row 2 until desired length
- Fasten off
Front Panels
Make two front panels the same length as the back.
Front panel width
- Combined front widths should equal the remaining width after the back panel
Example: finished width 48 inches, back panel 20 inches - Remaining 28 inches, so each front panel 14 inches
Front panel pattern
Work exactly like the back panel in your chosen stitch and match row count for length.
Neckline shaping options
Option A: No shaping (easiest)
- Keep front panels rectangular. The neckline becomes a soft open drape with edging later.
Option B: Gentle neckline taper (still easy)
- In the last 6–10 inches of the panel height, decrease 1 stitch every other row at the inner front edge only.
This creates a more defined opening without complicated shaping.
Seaming the Body
Lay panels flat: front, back, front.
Shoulder seams
- Seam the top edges of the front panels to the top of the back panel.
- Leave a neck opening in the center.
A simple guideline
- Seam 4–6 inches at each shoulder, leaving the middle open.
Side seams and armholes
- Seam from the hem upward, then stop to leave armholes.
Armhole depth guidelines
- S–M: 8–9 inches
- L–XL: 9–10 inches
- 2XL–5XL: 10–11 inches
This is a duster coat, so a slightly deeper armhole is comfortable for layering.
Sleeves
The sleeves are roomy and finished with a bell flare plus sunflower cuff band.
Sleeve rectangle sizing
- Sleeve width: upper arm circumference + 4–8 inches ease
- Sleeve length: shoulder seam to wrist, plus extra if you want a longer bell
Sleeve pattern
Work in the same stitch as the body. Crochet a rectangle to your sleeve width and length, then seam into a tube.
Bell flare option 1 (simple flared cuff panel)
- After making the sleeve tube, add a cuff section at the wrist.
- Join yarn around the wrist opening.
- Work 6–10 rounds in dc or hdc, increasing evenly each round.
- Example increase method: increase every 4th stitch for a gentle flare, or every 3rd stitch for a bigger bell.
Bell flare option 2 (worked as a trapezoid)
- Crochet sleeve as a trapezoid instead of a rectangle by increasing at both edges every few rows.
- This gives a gradual flare that looks elegant.
Attach Sleeves
- Match sleeve seam to body side seam.
- Pin sleeve around armhole.
- Seam evenly.
Try-on tip
Before you fully seam both sleeves, try it on and check sleeve length and flare. It’s easier to adjust before sunflower cuffs go on.
Sunflower Motifs and Leaves#
Sunflower Motif Size Planning
For a dramatic border, aim for sunflowers around
- 4 to 6 inches wide for cuffs
- 5 to 7 inches wide for hem motifs
You can scale up by using taller stitches in petals (tr instead of dc) or by adding one extra petal round.
Sunflower Center (Brown)
Round 1: magic ring, 12 dc, join
Round 2: ch 2, 2 dc in each stitch around, join
Optional texture round: work puff stitches or front post dc around to create a raised center.
Petal Round (Yellow)
A classic petal look uses repeated petals around the center.
Simple petal repeat
- Join yellow in any stitch
- (sl st, ch 2, dc, tr, dc, ch 2, sl st) all in the same stitch to form one petal
- sl st in next stitch
- Repeat around
For sharper petals
- Use dc, tr, tr, dc for a longer petal
For rounder petals - Use dc, dc, tr, dc
If your motif curls
- Add a round of sc behind the petals to stabilize.
Optional Second Petal Layer (Golden Amber)
To make the sunflowers look more dimensional, add a second layer behind the first petals using back loops or a round worked around the post of the center stitches. This is optional but very pretty in a statement coat.
Leaves (Green)
Make simple leaf motifs and stitch them under each sunflower.
Easy leaf (make 2 per sunflower if desired)
- Ch 10
- Sc in 2nd ch, hdc, dc, dc, tr, dc, dc, hdc, sc
- Sl st in the last stitch, fasten off
For a more realistic leaf
- Work a second pass around the leaf with sc and picots for serration.
Blocking the Motifs
Lightly block motifs so they lie flat
- Steam-block gently or pin and mist with water
- Let them dry completely before attaching
Attaching the Sunflower Borders#
Hem Placement
Plan motif spacing before sewing
- Lay the cardigan flat
- Place sunflowers along the hem evenly
- Keep the motifs centered and symmetrical if you want a balanced look
- For an artistic look, cluster slightly and vary spacing
Attachment method
- Whip stitch through the back loops of the motif and the hem edge
- Keep stitches evenly spaced so the hem stays flat
- If the hem begins to ripple, reduce stitching tension and re-pin
Sleeve Cuff Placement
Cuffs look best when the sunflower sits slightly toward the outer sleeve rather than directly centered on the seam.
A clean approach
- Place 1 sunflower on each sleeve cuff for a bold statement
- Or place 2 smaller sunflowers around each cuff if you want a fuller floral band
Optional Front and Neck Edging#
An edging makes the duster look finished and helps the front opening hang neatly.
Simple edging option
- Work 1 round of sc evenly around front opening, neckline, and bottom hem (go slowly and keep it flat)
- Add 1–2 more rounds if you want a thicker band
- For a subtle texture band, make the second round sc blo
Corner tip
At bottom corners of the front opening, work 2–3 sc into the corner space so it doesn’t pucker.
Common Mistakes and How to Avoid Them#
- Garment panels become different lengths
- Count rows and match the number of rows on both front panels
- Edges wave or curl
- Add a stabilizing sc border before assembling
- Keep turning chains consistent
- Sunflower motifs make the hem pucker
- Block motifs first and pin them in place
- Sew with even tension and avoid pulling the hem edge
- Sleeves feel too bulky at the upper arm
- Reduce sleeve width slightly or use hdc blo for a smoother sleeve fabric
- Bell sleeves flare too dramatically
- Use fewer increases per round or shorten the flared cuff section
- Motif colors look “flat”
- Add a second petal layer or mix two yellows for more depth
Expert Tips for Better Results#
- Choose a main yarn with excellent stitch definition. The body texture is what makes the coat look expensive.
- If you want extra drape, go up one hook size for the body only, then return to the original hook for edging and motifs.
- Use mattress stitch for seams if you want them to disappear. Whip stitch is faster and still great.
- Weave in motif ends before attaching them. It keeps the inside of your coat from feeling bulky and messy.
- Add a light lining only if you’re comfortable sewing. A lining can make it warmer and reduce stretching over time, but it’s totally optional.
Variations and Customization Ideas#
- Add pockets
- Crochet two rectangles in the main stitch and sew them onto the front panels at hip level
- Add a belt
- Chain a long strip and work sc rows until thick, then tie at the waist
- Add more sunflowers
- Place smaller motifs up the front edges for a full sunflower frame
- Change sleeve shape
- Make sleeves straight instead of bell for a more minimal look
- Change length
- Make it knee-length for everyday wear or mid-calf for maximum drama
- Swap the flower
- Use daisies, roses, or granny square florals in the same border placement style
Benefits of This Crochet Project#
- Statement piece with major visual impact
- Simple garment construction with manageable steps
- Great motif practice and creative color play
- Customizable fit and length without complicated grading
- Perfect layering piece for fall and spring
- A crochet pattern you can personalize endlessly and still get a polished result
Internal Linking Suggestions#
- How to Crochet Sunflower Motifs Step by Step
- Best Yarn for Crochet Cardigans and Coats
- How to Seam Crochet Garments Neatly
- Crochet Gauge Guide for Wearables
- Easy Crochet Pockets for Cardigans
FAQ#
Is this sunflower duster cardigan crochet pattern beginner-friendly?
Yes, especially if you’re comfortable with rows and seaming. The motifs add time, but the stitches are straightforward.
What stitch is best for a coat-like fabric?
Lemon peel stitch and hdc blo both create a dense, rich texture that works beautifully for long cardigans.
How do I keep the sunflower hem from stretching?
Block the motifs, pin them before sewing, and consider adding a stabilizing sc edging round on the hem before attaching.
Can I make this in different sizes?
Yes. Make it made-to-measure by choosing your finished width (bust plus ease) and crocheting panels to that measurement.
How many sunflowers do I need for the hem?
It depends on your motif size and cardigan width. Lay them out along the hem first and adjust spacing until it looks balanced.
Can I add buttons or a clasp?
Absolutely. Add a sturdier front edging band, then sew on a clasp, toggle, or buttons where the cardigan sits comfortably.
Conclusion#
A sunflower duster cardigan is the kind of crochet pattern that feels like wearable art. The construction stays approachable with simple panels and easy sleeves, and the sunflower borders are what transform it into a true statement coat. Take it step by step, block your motifs, and focus on neat edges and seams, and you’ll end up with a finished piece that looks dramatic, intentional, and beautifully handmade.
If you tell me your bust measurement, desired finished length, and whether you want a regular relaxed fit or true oversized, I can give you a specific panel plan with suggested widths and a motif count estimate for your hem and cuffs.


