Introduction#
A lovey is one of those crochet projects that becomes a forever favorite. It’s part blanket, part plush, and completely comforting—especially for little ones who like something soft to hold while they nap, ride in the stroller, or cuddle on the couch. And when you add a sleepy raccoon character on top? That lovey instantly becomes a storybook companion.
Explore more beginner baby crochet patterns in our pattern library.
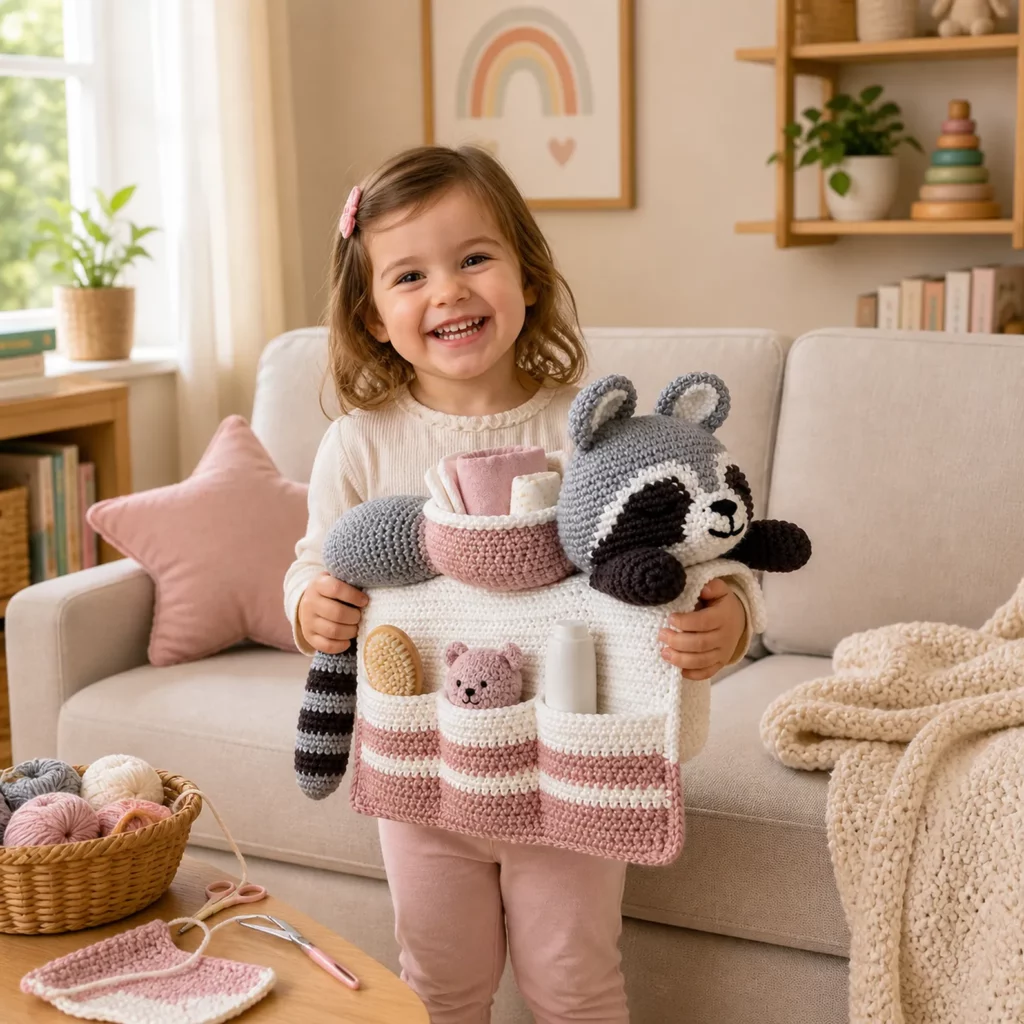
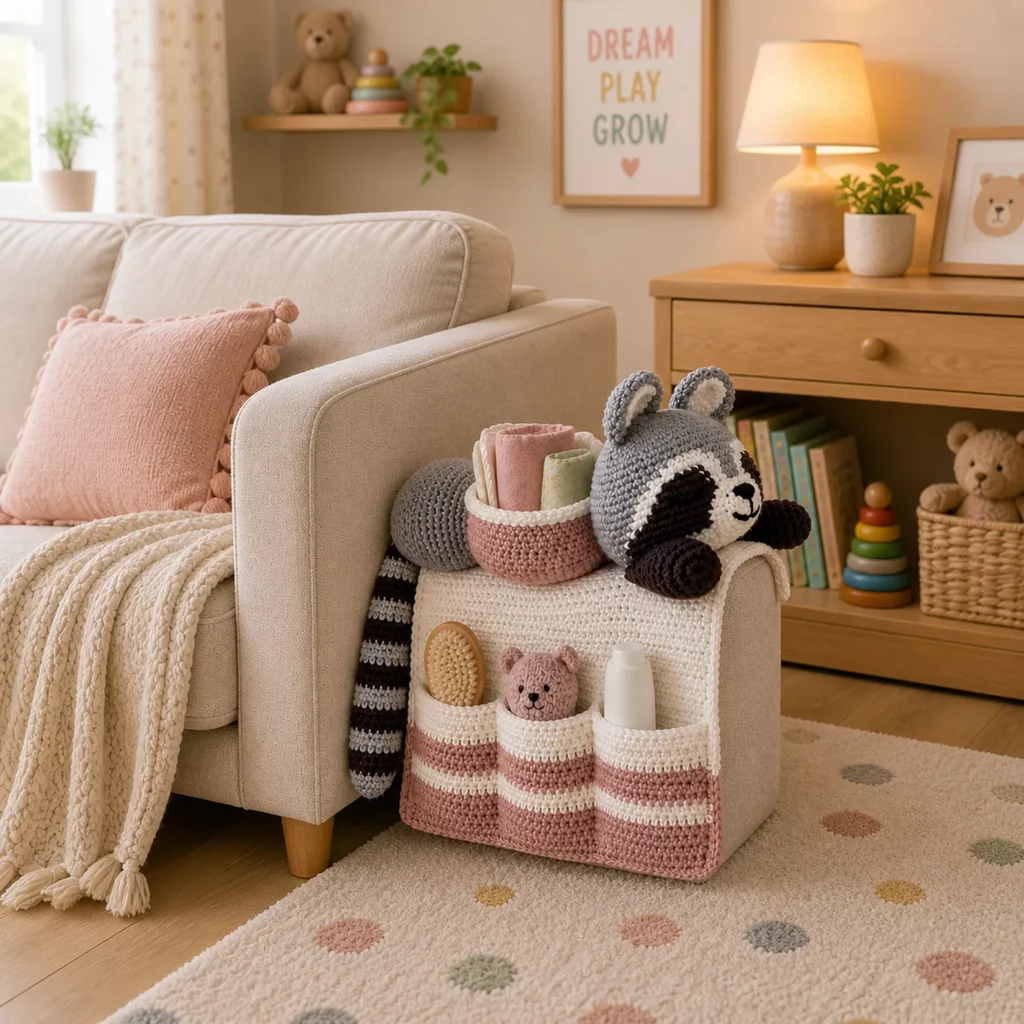
This crochet pattern teaches you how to make a raccoon-themed lovey with a smooth, drapey blanket section and a plush raccoon topper that rests over the edge like it’s taking a cozy nap. The design is made with classic amigurumi techniques (tight single crochet for the animal parts) paired with a simple blanket stitch pattern (so the base stays flexible and soft).
You’ll also learn a few “pro finish” tricks: how to keep the blanket edges straight, how to attach the topper securely so it can handle real-life use, and how to make that signature raccoon face (mask + muzzle) look neat and symmetrical. Whether you’re gifting this to a new baby (with baby-safe adjustments) or making it as a keepsake, this is the kind of free crochet pattern that feels truly special.

Detailed Description of the Crochet Pattern#
This raccoon lovey is built in two main parts:
- Blanket base: a medium-sized comfort blanket panel (square or rectangle) with simple texture and striped edging. It’s designed to be soft and drapey rather than stiff.
- Raccoon topper: a plush raccoon character section that sits at the top edge of the blanket. It includes:
- round raccoon head
- small rounded ears with inner ear contrast
- a raccoon “mask” patch around the eyes
- muzzle and nose embroidery
- two arms that drape forward like hugging the blanket
- a striped tail that hangs down the side for extra charm
The topper is shaped so it looks like the raccoon is lounging across the top, which gives the finished project a high-end, boutique feel. The tail adds movement and makes the lovey extra fun for little hands to explore.
Skill Level Explanation#
This is an easy-to-intermediate crochet project.
Great for confident beginners who can:
- crochet in rows and rounds
- work basic increases and decreases
- sew amigurumi pieces together
- count stitches and use a stitch marker
Beginner-friendly elements:
- the blanket base uses simple, repetitive stitches
- the animal pieces are standard amigurumi shapes (head, ears, arms, tail)
Intermediate elements (still totally manageable):
- colorwork pieces for the face mask
- careful placement of facial features
- secure attachment so the topper holds up well
If you’ve made a simple amigurumi animal and a basic blanket before, you’re ready.
Materials Needed#
Yarn
Choose yarn based on your goal: baby gift, everyday lovey, or display piece.
Recommended yarn:
- Worsted weight (#4) acrylic or cotton blend for the blanket base
- Worsted weight (#4) for raccoon parts (for consistent scale)
Fiber tips:
- Soft acrylic: washable and cuddly (great for baby gifts)
- Cotton blend: crisp stitches, less fuzz (great for definition)
- Avoid scratchy wool if this will touch sensitive skin
Suggested colors:
- Medium gray (raccoon head/body)
- Dark brown or charcoal (mask and paws)
- White or cream (muzzle + blanket base)
- Optional: darker gray for stripes
Hook
Use two hooks if you like:
- 3.0–3.5 mm for raccoon amigurumi parts (tight stitches)
- 4.0–5.0 mm for the blanket base (softer drape)
If you prefer one hook: choose 4.0 mm and keep tension tight on the amigurumi parts.
Notions
- Fiberfill stuffing
- Stitch marker
- Yarn needle
- Scissors
- Optional safety eyes (10–12 mm) or embroidery thread for baby-safe eyes
- Optional: small piece of felt for extra reinforcement inside (not required)
Stitches & Techniques Explained#
Abbreviations (US terms)
- MR = magic ring
- ch = chain
- sl st = slip stitch
- sc = single crochet
- hdc = half double crochet
- dc = double crochet
- inc = increase (2 sc in one stitch)
- dec = invisible decrease (sc2tog through front loops)
- BLO = back loop only
- rep = repeat
Invisible decrease
Invisible decreases keep the raccoon head smooth and reduce holes:
- insert hook into front loop of next stitch, then front loop of following stitch, yarn over, pull through, yarn over, pull through two
Clean stripe changes for the blanket
To keep stripes neat:
- change color on the last yarn-over of the final stitch before the new color
- keep yarn tails long enough to weave securely along the edge
Secure amigurumi-to-blanket attachment
Because a lovey gets tugged and carried, attach the topper with:
- a wide sewing area (not just a few stitches)
- multiple passes of stitching
- optionally stitching through a “base circle” under the raccoon body for added stability
Step-by-Step Instructions#
This pattern is written in a practical, beginner-friendly way with customization options for size.
Blanket Base
You can make the blanket square or rectangle. A common lovey size is around 14–18 inches across, but you can adjust easily.
Option A: Simple striped blanket (easy + classic)
Foundation: ch to desired width (example: ch 61 for a medium width).
Row 1: dc in 3rd ch from hook and across. Turn.
Row 2: ch 2, dc across. Turn.
Repeat Row 2 until desired length.
Add stripes by switching colors every 4–10 rows.
Border:
Round 1: sc evenly around all sides, placing (sc, ch 1, sc) in each corner.
Round 2: switch color for a stripe border, sc around.
Round 3: switch again if you want a multi-stripe edge.
This creates a smooth, sturdy blanket base that matches the clean look of a modern lovey.
Option B: Slightly textured blanket (still beginner-friendly)
Use hdc BLO for a subtle ribbed texture:
Row 1: hdc across, turn
Row 2: ch 1, hdc BLO across, turn
Repeat to length, then add border as above.
Raccoon Head (gray)
R1: MR 6 sc [6]
R2: inc x6 [12]
R3: (sc, inc) x6 [18]
R4: (2 sc, inc) x6 [24]
R5: (3 sc, inc) x6 [30]
R6: (4 sc, inc) x6 [36]
R7–R11: sc around [36]
Place eyes (if using safety eyes) between R9–R10, about 7–9 stitches apart.
R12: (4 sc, dec) x6 [30]
R13: (3 sc, dec) x6 [24]
Stuff firmly.
R14: (2 sc, dec) x6 [18]
R15: (sc, dec) x6 [12]
R16: dec x6 [6]
Fasten off, close, weave in.
Muzzle (white/cream)
R1: MR 6 sc [6]
R2: inc x6 [12]
R3: (sc, inc) x6 [18]
R4: sc around [18]
Lightly stuff (optional) and sew centered below eyes.
Embroider nose and mouth:
- nose: small black triangle/oval
- mouth: short line down, then a gentle smile curve
Mask Patch (dark brown/charcoal)
Make two oval patches to frame the eyes.
Ch 7
Round 1: sc in 2nd ch from hook, sc 5, 3 sc in last ch, sc 5 on underside, 2 sc in last ch. Join.
Round 2: sc around, adding slight increases at curve ends if needed.
Fasten off, sew patches around each eye area.
Tip: If you prefer simpler, make two small circles instead of ovals.
Ears (make 2)
Outer ear (gray):
R1: MR 6 sc [6]
R2: (sc, inc) x3 [9]
R3: sc around [9]
Flatten and sew.
Inner ear (white):
R1: MR 5 sc [5]
R2: sc around [5]
Sew inside outer ear, then attach ears to head.
Arms (make 2, dark brown)
R1: MR 6 sc [6]
R2: (sc, inc) x3 [9]
R3–R8: sc around [9]
Lightly stuff, flatten, sew closed. Leave tail.
These arms should look like they rest forward over the blanket top.
Tail (striped)
Tail base (start dark brown):
R1: MR 6 sc [6]
R2: inc x6 [12]
R3–R4: sc around [12]
Switch to gray for 2 rounds, then dark again, repeating to create stripes.
Continue until tail is the length you want (often 8–12 inches).
Stuff lightly so it stays flexible, not stiff. Fasten off and sew to back of raccoon body area.
Simple Topper Body (gray)
To make the raccoon look like it’s lying across the blanket edge, crochet a short “body tube” that attaches behind the head and connects to the blanket.
R1: MR 6 sc [6]
R2: inc x6 [12]
R3: (sc, inc) x6 [18]
R4–R8: sc around [18]
Stuff lightly. Flatten the open end and sew to the back of the head so it forms a soft “torso” that rests on the blanket edge.
Assembly and Attachment to Blanket
- Sew muzzle and mask patches to head
- Attach ears to head
- Sew arms to the sides of the topper so they drape forward
- Sew tail to the back/side of the topper
Now attach topper to blanket:
- Place topper centered on the top edge of the blanket
- Stitch along a wide area under the body/tummy portion (at least 3–5 inches of attachment)
- Make a second pass of stitching for strength
Optional reinforcement:
- Crochet a flat oval base in gray and sew it under the topper before attaching to blanket. This spreads stress and makes the join extra durable.
Common Mistakes and How to Avoid Them#
- Topper feels loose or floppy: attach over a wider area and stitch twice.
- Stuffing shows in head: use a smaller hook or tighten tension; amigurumi should be dense.
- Mask looks uneven: pin placement first and count stitches from center line.
- Tail too stiff: stuff lightly and avoid overpacking.
- Blanket edges wave: add a single sc border round first, then stripes; keep corner stitches consistent.
Expert Tips for Better Results#
- Use embroidered eyes instead of safety eyes for baby-safe versions.
- Use cotton blend for the blanket if you want less pilling from washing.
- For crisp stripes, carry yarn only on the border, not through the blanket rows.
- Add a small rattle insert inside the raccoon head if making a sensory lovey (only if safe and securely enclosed).
- Keep the blanket fabric drapey—avoid very tight tension on the base.
Variations and Customization Ideas#
- Add a security tag corner: crochet a small loop at one corner for pacifier clips (use only with supervision).
- Change the animal: keep the blanket base pattern and swap topper features:
- bunny: long ears, small nose
- kitty: triangle ears, whiskers
- fox: orange body, white snout
- Make a mini lovey: use DK yarn and smaller hook for a smaller version.
- Add a name patch: embroider baby’s initials on the blanket corner.
- Different border style: scallop border for a softer look or picot border for delicate detail.
Benefits of This Crochet Project#
- A meaningful handmade gift that gets used daily
- Combines blanket comfort with plush character charm
- Great skill-builder: amigurumi + simple blanket + assembly
- Easy to customize colors and size
- Washable and durable with the right yarn
- Excellent blog content topic because “lovey crochet pattern” and “amigurumi blanket” are evergreen searches
Internal Linking Suggestions#
You may also like…
- Magic Ring Tutorial for Beginners
- Invisible Decrease Crochet Tutorial
- How to Sew Amigurumi Pieces Neatly
- Easy Crochet Baby Blanket Patterns
- Crochet Animal Face Appliqué Patterns
- Baby-Safe Crochet Toy Guidelines
FAQ Section#
What is a lovey in crochet?
A lovey is a small comfort blanket with a plush topper (often an animal head/arms) designed to be cuddled and carried.
Is this crochet pattern beginner-friendly?
Yes. The blanket is simple rows, and the raccoon parts use basic amigurumi shaping with single crochet.
Can I make it baby-safe?
Yes. Use embroidered eyes instead of safety eyes, avoid small detachable parts, and stitch everything securely.
What yarn is best for a crochet lovey?
Soft, washable yarn is ideal—acrylic or cotton blends in worsted weight work well. Choose something gentle on skin.
How do I keep the topper attached securely?
Sew it on over a wide area, stitch twice, and consider adding a small base oval underneath to spread stress.
Can I resize the blanket portion?
Absolutely. Add chains for width, add rows for length, and keep the topper centered along the top edge.
Conclusion#
This raccoon lovey crochet pattern is the perfect mix of cozy and cute: a soft striped blanket base paired with a sleepy raccoon topper, hugging arms, and a classic striped tail. It’s a project that feels special to make and even more special to gift—because it becomes part of someone’s everyday comfort.
If you tell me the blanket size you want (for example 14″, 16″, or 18″ square) and your yarn weight, I can give you an exact starting chain and row count to match your finished dimensions perfectly.