


Introduction#
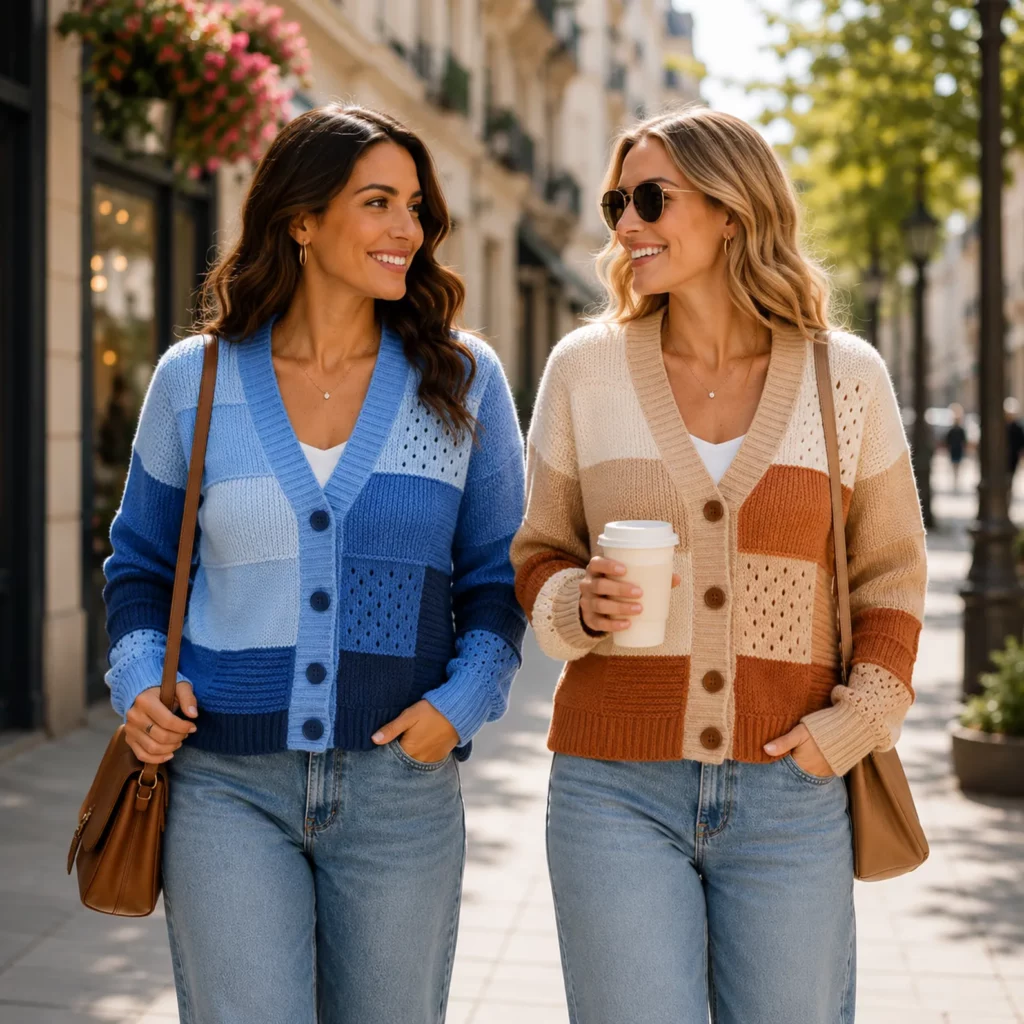
If you’ve been craving a cardigan that looks boutique-level stylish but still feels totally achievable with your own two hands, a patchwork crochet cardigan is the answer. The beauty of this kind of crochet pattern is that it’s built from simple shapes—mostly rectangles and squares—so you get a polished, “designer” look without complicated shaping.
Explore more beginner cardigans crochet patterns in our pattern library.
This cardigan style is especially satisfying because you can work on it in small, portable chunks: one square while watching a show, another square over coffee, sleeves later. And because it’s color-blocked, it’s also a dream stash-buster. Use coordinated shades of one color family (like a gradient of blues) for a calm, elevated vibe, or go bold and mix high-contrast colors for a playful statement piece.
Below you’ll find a detailed crochet tutorial-style guide: how the cardigan is constructed, what stitches create that tidy knit-like texture, how to plan your patchwork layout, and beginner-friendly step-by-step instructions you can actually follow. The goal is a cardigan that’s warm, structured, and wearable—something you’ll reach for all season.
Detailed Description of the Crochet Pattern#
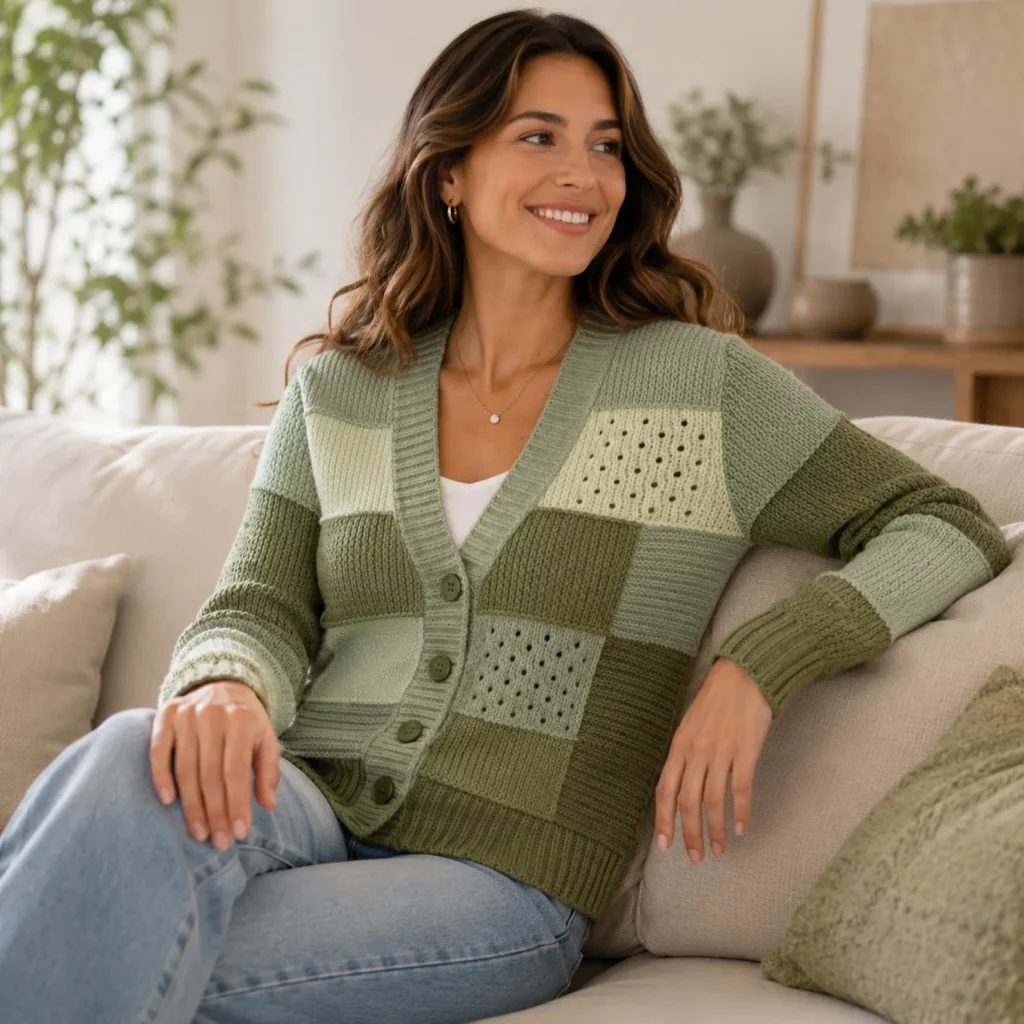
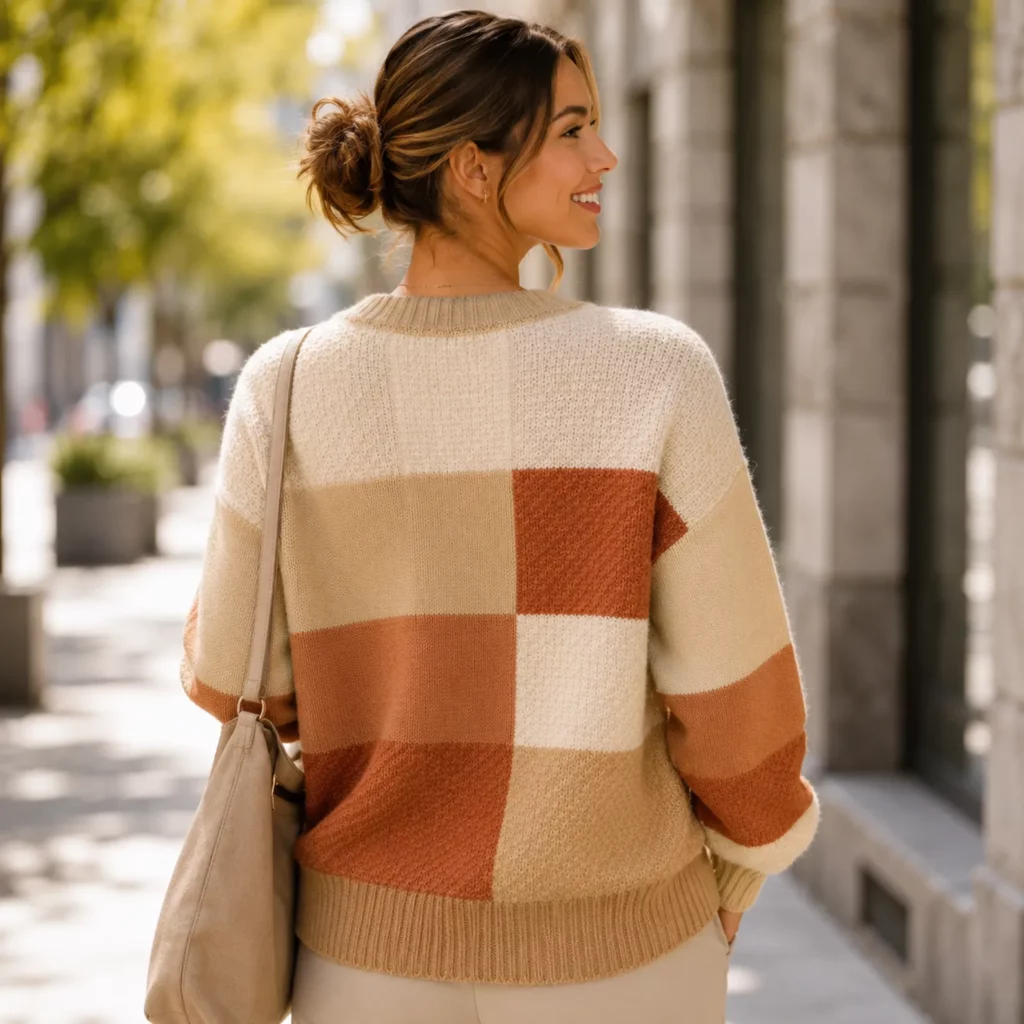
This patchwork cardigan is a relaxed-fit, button-front style with a classic V-neck. It has a clean, slightly “knit-look” texture, bold color blocks, and cozy ribbed finishing at the hem, cuffs, and button bands.
Here’s what makes the design work:
- Patchwork body made from squares/rectangles: The front panels and back panel are assembled from blocks in different shades. This creates that modern, graphic look.
- Mixed texture blocks: Most blocks use a dense stitch for a smooth, tailored fabric. A few blocks include a simple eyelet texture (little holes) to add interest without being lacy.
- Drop-shoulder construction: Sleeves attach to a straight armhole opening—easier than fitted sleeve caps.
- Ribbed trim: The neckline, button band, cuffs, and bottom hem use crochet ribbing for structure and a professional finish.
- Minimal shaping: Instead of heavy decreases/increases, the fit comes from block sizing and edging.
This is a “smart simple” crochet pattern: the steps are straightforward, but the final look is high-end.
Skill Level Explanation#
Skill Level: Confident Beginner to Intermediate Beginner
You’ll do great if you already know:
- Chain (ch), single crochet (sc), half double crochet (hdc), double crochet (dc)
- Working in rows
- Counting stitches and rows
- Seaming (whip stitch or mattress stitch)
- Basic edging
Newer skills you’ll learn (or practice):
- Join-as-you-go or tidy seaming for patchwork
- Crochet ribbing that mimics knitted bands
- Clean color changes and weaving ends efficiently
- Optional: simple eyelet stitch pattern
Materials Needed#
Yarn
Choose a yarn that gives good stitch definition and drape. For a cardigan that feels soft but holds shape, worsted weight is a sweet spot.
Suggested yarn weight:
- Worsted (Category 4) for a cozy, structured cardigan
- DK (Category 3) for a lighter, drapier version (adjust yardage up)
Fiber suggestions:
- Acrylic or acrylic/wool blend: soft, easy care, great stitch definition
- Cotton blend: breathable with crisp texture (may feel heavier)
- Wool or wool blend: warm and elastic, beautiful ribbing
Color planning (example palette):
- 4–6 shades in one family (light to dark) for a gradient patchwork look
- Or 3 shades + 1 accent shade for strong contrast blocks
Yardage estimate (very adjustable due to patchwork):
- XS–S: 1100–1400 yards (1000–1280 m)
- M–L: 1400–1700 yards (1280–1550 m)
- XL–2XL: 1700–2100 yards (1550–1920 m)
- 3XL–5XL: 2100–2600 yards (1920–2380 m)
Tip for accuracy: weigh one finished block, then multiply by total blocks to estimate yarn.
Hook
- 5.0 mm (H/8) for worsted
- Adjust up/down to meet gauge
Notions
- Stitch markers
- Tapestry needle
- Scissors
- Measuring tape
- Buttons (4–6 buttons, 20–25 mm / about ¾–1 inch)
- Optional: blocking tools/mat
Stitches & Techniques Explained#
Common Abbreviations
- ch = chain
- sc = single crochet
- hdc = half double crochet
- dc = double crochet
- sl st = slip stitch
- blo = back loop only
- flo = front loop only
- ( ) = repeat
- = stitch count
The Main “Knit-Look” Texture (Recommended)
For a fabric that looks neat and slightly knit-like, use hdc in the back loop only (hdc blo).
- It creates subtle horizontal ridges
- It’s denser than dc, so the cardigan looks polished and warm
- It drapes better than all sc
Crochet Ribbing (For Bands, Hem, Cuffs)
Ribbing is made by working sc blo in rows:
- Ch a ribbing strip
- Work sc in the back loop only
- The fabric becomes stretchy and structured—perfect for cardigan edges
Simple Eyelet Block (Optional Texture)
To add those tiny “punched” holes in a few squares, use a beginner-friendly repeat like:
- Row A: (dc, ch 1, skip 1) repeat
- Row B: dc in dc, dc in ch spaces
This keeps the fabric stable while adding visual interest.
Step-by-Step Instructions#
Fit + Sizing Approach
This crochet pattern is written in a modular way so you can size it without complicated math.
Choose your fit:
- Classic fit: cardigan width ≈ bust measurement + 2–4 inches (5–10 cm) ease
- Oversized fit: bust + 6–10 inches (15–25 cm) ease
The cardigan is made from:
- Back panel: a patchwork rectangle
- Two front panels: patchwork rectangles with a V-neck opening created by leaving the center open
- Sleeves: patchwork tubes or simple rectangles sewn into tubes
- Ribbing + button band: added after assembly for a clean finish
Gauge
Make a swatch in the main stitch (hdc blo).
- Aim for approximately 14–16 hdc and 10–12 rows = 4 inches (10 cm) using 5.0 mm and worsted.
Gauge doesn’t need to be perfect, but it must be consistent so your blocks match.
Block Size (Core of the Pattern)
Pick one block size and stick to it. A great wearable size is:
- Square Block: 6″ x 6″ (15 x 15 cm) or 7″ x 7″ (18 x 18 cm)
Use whichever makes sizing easiest for you.
Below is a reliable 6″ block recipe you can tweak.
Solid Textured Patchwork Block (Make Many)
With chosen color:
Foundation: ch 21 (or chain length that matches 6″ width in your stitch)
Row 1: hdc in 2nd ch from hook and across, ch 1, turn
Row 2–? : hdc blo across, ch 1, turn
Repeat until the block is as tall as it is wide (6″ tall).
Fasten off, weave ends.
Tip: Write down your exact chain count and row count once you like the size. Every block should match.
Eyelet Accent Block (Make a Few)
Use the same starting chain as your solid block.
Row 1: hdc across, ch 2, turn
Row 2: dc, (ch 1, skip 1, dc) repeat to end, ch 2, turn
Row 3: dc across (place dc in dc and in each ch-1 space), ch 2, turn
Row 4: repeat Row 2
Row 5: repeat Row 3
Then finish remaining height in hdc blo rows until block matches your solid block height.
Fasten off.
This gives you an accent panel without making the fabric too open.
Patchwork Layout Planning
A balanced layout looks intentional. Try these guidelines:
- Put darker shades near hem and cuffs for a grounded look
- Mix solid blocks with a few eyelet blocks (2–6 total)
- Avoid clustering all light blocks on one side unless you want an asymmetrical design
Example Layout (Adjust to Size)
- Back panel: 3 blocks wide x 3 blocks tall (9 blocks)
- Each front panel: 2 blocks wide x 3 blocks tall (6 blocks each)
Total body blocks: 21 blocks
For larger sizes, add:
- Width: add one block to back width and/or front widths
- Length: add one row of blocks
Seaming the Patchwork
Join blocks into strips, then join strips together.
Seaming options:
- Whip stitch (needle): fast, sturdy, slightly visible ridge
- Mattress stitch (needle): flatter, more “invisible” seam
- Slip stitch seam (hook): decorative ridge, very strong
Most beginners love whip stitch because it’s straightforward and forgiving.
Assemble the Body
- Seam blocks into the back panel rectangle.
- Seam blocks into two front panels rectangles.
- Lay panels flat. Seam shoulders: attach front panels to back at the top edges, leaving a neck opening in the center.
- Seam side seams from hem upward, leaving armholes.
Armhole depth suggestion:
- S–M: 7–8″ (18–20 cm)
- L–XL: 8–9″ (20–23 cm)
- 2XL–5XL: 9–10″ (23–25 cm)
Sleeves (Two Options)
Pick the method that matches your vibe.
Option A: Patchwork Sleeves (Most On-Theme)
Make blocks and seam into a rectangle that fits around your upper arm with a little ease, then seam into a tube.
- Sleeve width: upper arm circumference + 2–3″ (5–8 cm) ease
- Sleeve length: desired length from shoulder seam to wrist
Add ribbed cuff after seaming.
Option B: Simple Sleeves Worked From Armhole (Easier)
Join yarn at armhole edge and work in rows around the opening using hdc blo, then seam underarm.
This is less patchwork-heavy but very beginner-friendly.
Ribbed Hem and Cuffs
Ribbing is what makes the cardigan look “finished.”
Bottom Hem Ribbing
Attach yarn at bottom edge.
Ribbing strip: ch 9–13 (depending on how deep you want the hem ribbing)
Row 1: sc in 2nd ch and across, sl st into next 1–2 stitches on cardigan hem, turn
Row 2: sc blo across ribbing, ch 1, turn
Row 3: sc blo across, sl st into next 1–2 stitches on cardigan hem, turn
Repeat around the entire hem. Seam ribbing ends together.
Cuff Ribbing
Same method as hem, just smaller (ch 7–11). Work around sleeve opening.
Button Band + V-Neck Trim
This cardigan uses a structured, ribbed band that frames the V-neck and holds buttons neatly.
- Work a clean edging round first: sc evenly around the front opening and neckline (place extra sc at corners so it doesn’t pucker).
- Button band ribbing (right side): attach yarn at bottom front edge, create ribbing rows up the front opening, around neckline, and down the other side—same ribbing technique as hem.
- Add buttonholes on the band you want as the “buttonhole side.”
Simple buttonhole method:
- Work ribbing until aligned with desired button placement
- Make a small gap: ch 2, skip 2 stitches (or ch 1 skip 1 for smaller buttons)
- Continue ribbing
Test with your button before committing to all holes.
Sew On Buttons
Sew buttons evenly on the opposite band. Try on the cardigan and pin placement before sewing so the front sits flat without pulling.
Common Mistakes and How to Avoid Them#
- Blocks aren’t the same size: Count rows and measure every block. Even a ¼” difference adds up fast.
- Wavy edges on eyelet blocks: Keep your turning chains consistent and don’t over-tighten after chain spaces.
- Seams feel bulky: Use mattress stitch or seam through the back loops only for a flatter join.
- Neckline gapes: Add one extra round of sc edging before the button band, or tighten your band ribbing tension.
- Cardigan feels stiff: Use a larger hook, switch from sc-heavy fabric to hdc blo, and block gently.
Expert Tips for Better Results#
- Make two “test blocks” first (one solid, one eyelet). Wash/dry them the way you’ll care for the cardigan. This prevents surprise shrinking or stretching.
- Weave ends as you go. Patchwork creates lots of ends—do not save them all for the end if you value your sanity.
- For a more “knit-like” look, use linked double crochet or hdc blo consistently in the solid blocks.
- Keep the darkest shade for cuffs/hem. It hides wear and gives a designer-style visual anchor.
- If you want extra structure, add a thin slip stitch edging along seams after assembly (optional, but very polished).
Variations and Customization Ideas#
- Cropped version: Remove one row of blocks in length and shorten hem ribbing.
- Longline version: Add one full row of blocks and deepen the hem ribbing.
- No-button version: Skip buttonholes and add a simple tie belt or wear open.
- More texture: Add a few blocks in lemon peel stitch (sc, dc repeat) for subtle contrast.
- Gradient perfection: Arrange blocks from light at shoulders to dark at hem for an ombré effect.
Benefits of This Crochet Project#
- Perfect “make it in pieces” crochet pattern—easy to pause and resume
- Great stash-buster for partial skeins
- Builds wearable skills: seaming, edging, fit adjustments
- Creates a modern, boutique look with beginner-friendly stitches
- Very customizable for size, length, and color style
Internal Linking Suggestions#
- How to Crochet Ribbing That Looks Knit
- Best Yarn for Wearable Crochet Garments
- Crochet Gauge Guide for Beginners
- How to Seam Crochet Squares Neatly
- Easy Crochet Sweater Pattern for Beginners
FAQ#
Is this patchwork crochet cardigan pattern beginner-friendly?
Yes. The shapes are simple (mostly squares/rectangles) and the “fit” comes from assembly rather than tricky shaping.
What’s the best stitch for a neat, sweater-like fabric?
Half double crochet in the back loop only (hdc blo) is a favorite because it looks tidy and holds its shape.
How do I keep my crochet squares the same size?
Use the same hook, the same stitch pattern, and the same row count. Measure every few blocks and adjust before you make too many.
Can I make it bigger without rewriting the whole pattern?
Absolutely. Add blocks for width and/or add a row of blocks for length. Patchwork is one of the easiest ways to size up.
Will the cardigan stretch over time?
Most crochet garments relax a bit. Blocking helps, and using ribbing at hems/cuffs keeps the shape looking crisp.
Conclusion#
A patchwork cardigan is one of the most satisfying wearable crochet projects because it looks complex, but it’s really just smart construction and consistent blocks. This crochet pattern gives you a modern color-block style, a flattering V-neck, and sturdy ribbed finishing—plus endless ways to personalize the palette and layout.
If you tell me your target size (bust measurement), preferred length (cropped/regular/long), and yarn weight, I can suggest an exact block count layout (back + fronts + sleeves) so you can start crocheting with zero guesswork.


