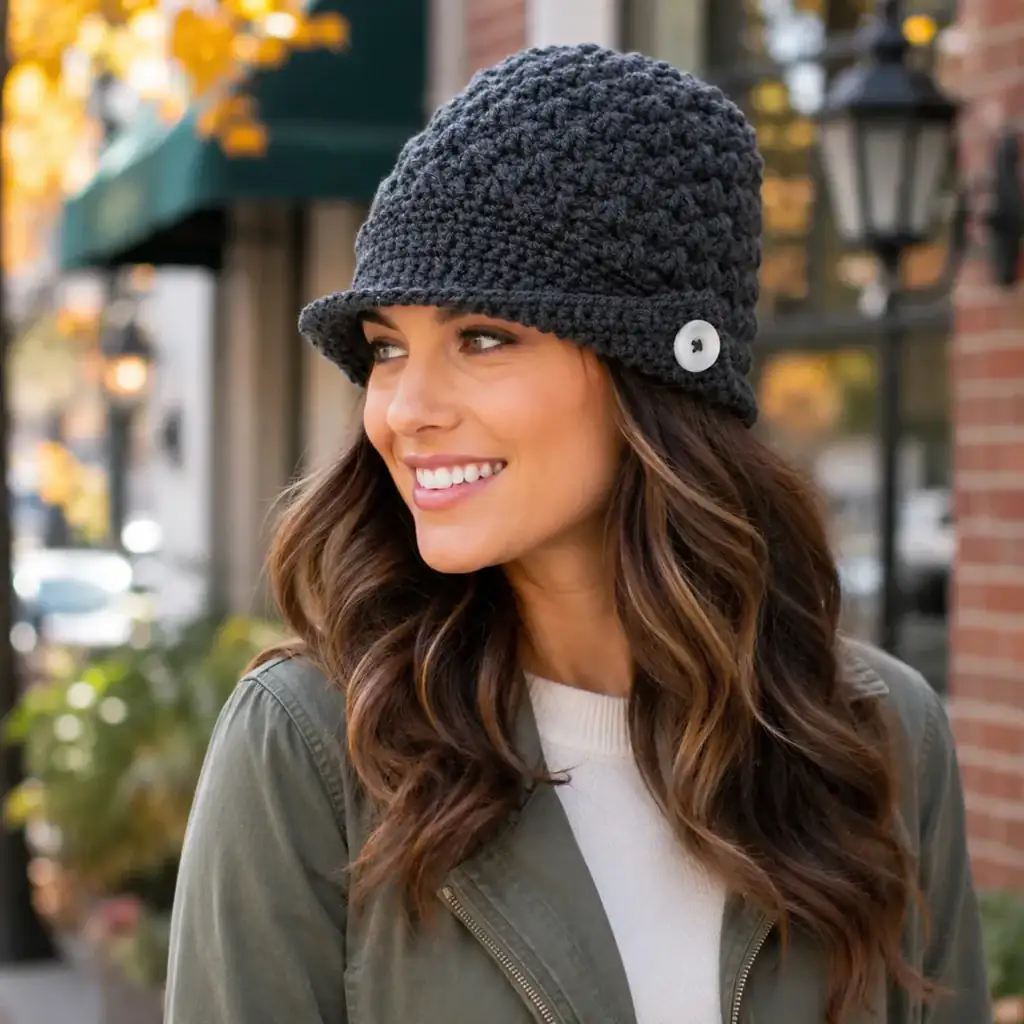
Introduction#
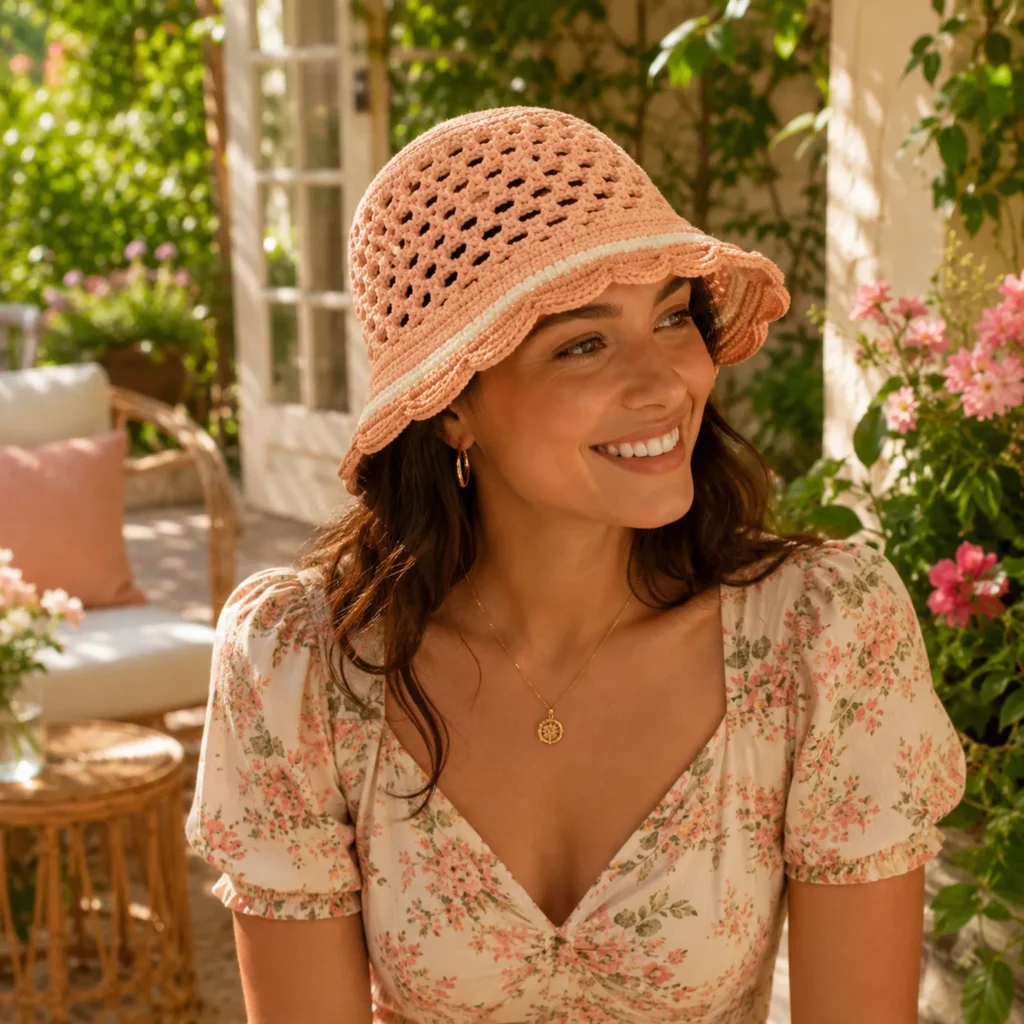
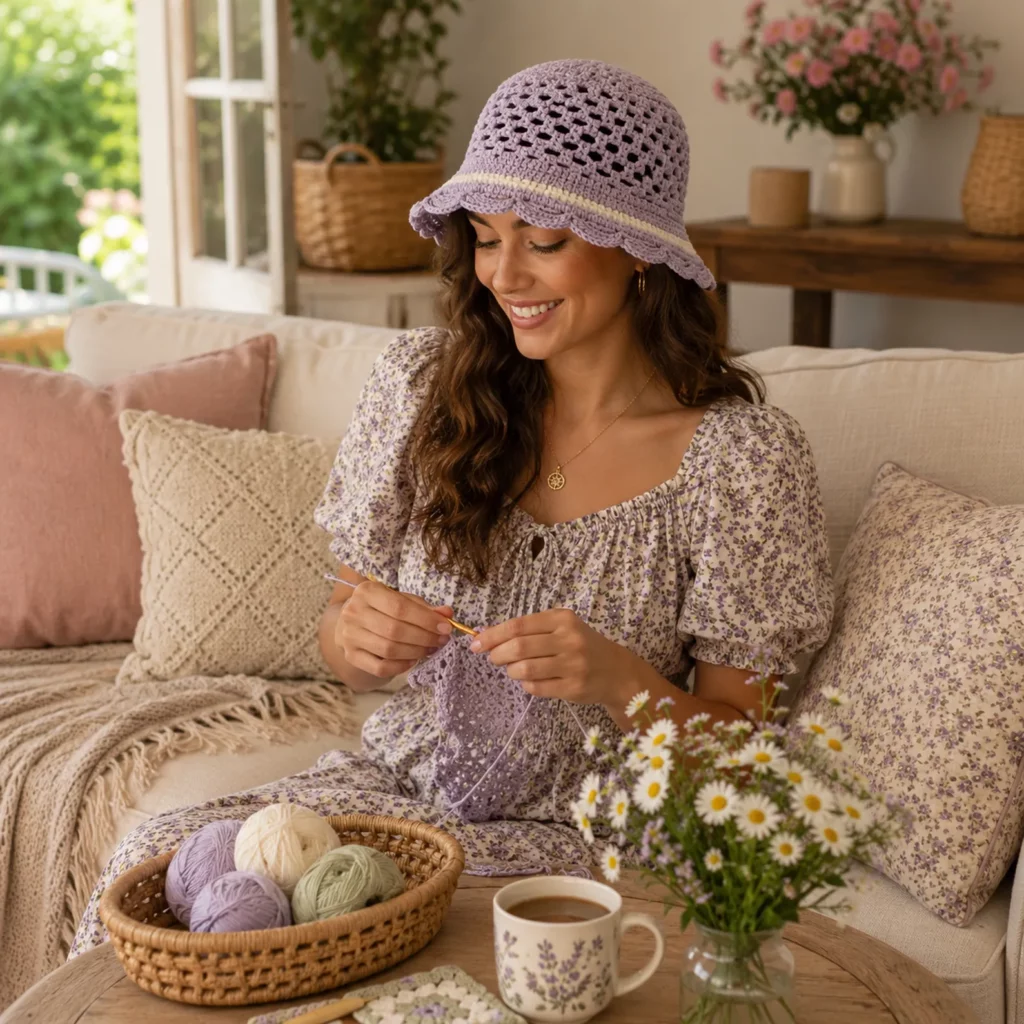
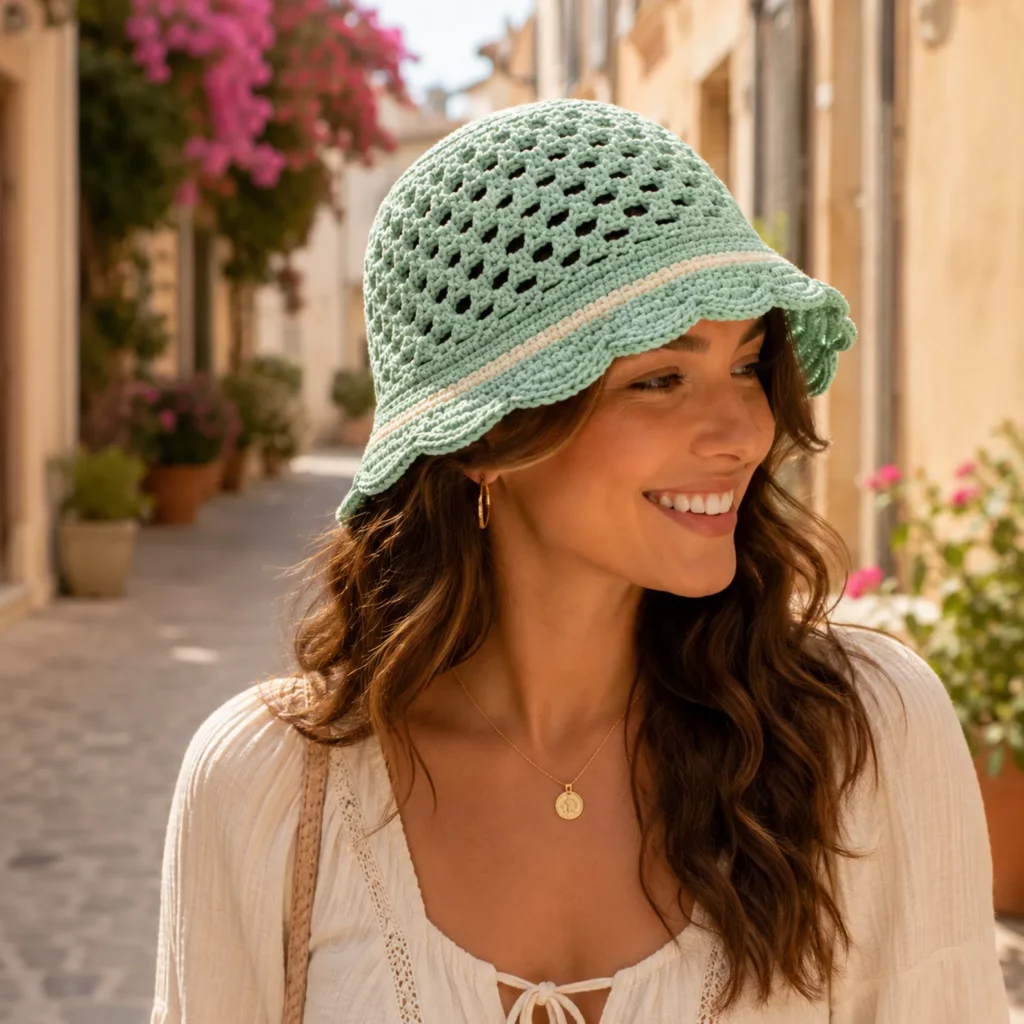
If you want a summer hat that feels light, breathable, and effortlessly cute, a lace crochet bucket hat is exactly the kind of crochet pattern you’ll actually wear. It has a classic bucket hat shape (so it’s flattering and practical), but the openwork mesh sides keep it cool in warm weather. Then the scalloped brim adds that “finished boutique” look that makes it feel extra special.
Explore more beginner hats crochet patterns in our pattern library.
This crochet tutorial walks you through the full hat from top to brim. You’ll start with a solid crown so it keeps its shape, transition into an easy mesh stitch for the sides, and finish with a sturdy brim and scalloped edge. It’s beginner-friendly, works up quickly, and it’s easy to customize for different head sizes or for more or less brim.
Detailed Description of the Crochet Pattern#
This bucket hat is made in the round from the top down. The design has three distinct sections that make it both cute and functional.
Solid crown
- A flat circle increases evenly to create the top
- Worked in a dense stitch so the hat looks neat and doesn’t collapse
Openwork lace sides
- A repeating mesh pattern creates airy holes
- The sides keep the hat breathable and comfortable
Structured brim with scallops
- The brim is worked with increase rounds to flare outward
- A scalloped edge adds a soft, feminine finish
- A contrast stripe near the brim adds a clean “band” effect
Because the stitch pattern is simple and repetitive, this is a great easy crochet pattern for summer accessories, beach days, and quick gifts.
Skill Level Explanation#
Skill Level: Beginner-Friendly
You’ll do great if you already know
- Chain (ch)
- Single crochet (sc)
- Double crochet (dc)
- Slip stitch (sl st)
- Working in the round
- Counting stitches and repeats
Newer skills you’ll practice
- Even increasing for a flat crown
- Mesh stitch rhythm (very relaxing once it clicks)
- Shaping a brim that lays flat
- Scalloped edging that looks tidy
Materials Needed#
Yarn
Cotton yarn is ideal for summer hats because it’s breathable and holds shape well.
Best yarn choices
- DK (Category 3) cotton for a lighter, lacey hat
- Worsted (Category 4) cotton for a sturdier bucket hat
Color options
- One main color for a clean minimalist look
- Two colors for a stripe band near the brim (like the sample style)
Yardage estimate
- DK: 150–250 yards (140–230 m)
- Worsted: 120–200 yards (110–180 m)
This depends on brim size and head size.
Hook
Choose a hook that gives a firm fabric without feeling stiff.
- DK cotton: 3.5–4.0 mm
- Worsted cotton: 4.0–5.0 mm
Notions
- Stitch marker
- Tapestry needle
- Scissors
- Measuring tape
- Optional: hat stiffener spray (for extra structure)
- Optional: thin elastic thread (for a snug inner band)
Stitches & Techniques Explained#
Common Abbreviations
- ch = chain
- sl st = slip stitch
- sc = single crochet
- hdc = half double crochet
- dc = double crochet
- inc = increase
- sp = space
- ( ) = repeat
- = stitch count
Mesh Stitch Used for the Sides
This is a very easy lace repeat that creates round “windows.”
Mesh round
- (dc, ch 1, skip 1) repeated around
The next round typically anchors by working dc into dc and into chain spaces.
How to Keep the Crown Flat
A hat crown is basically a circle. To keep it flat
- Increase evenly every round
- If it ruffles, you’re increasing too much
- If it cups, you’re not increasing enough
How to Make a Brim That Doesn’t Flop
- Use cotton yarn
- Use a slightly smaller hook for the brim
- Add one extra sc round before the scallops for firmness
- Block lightly so it holds its shape
Step-by-Step Instructions#
Finished Size
This pattern is written in a “made-to-measure” way so it fits any head. The most common adult head circumference is 21–23 inches (53–58 cm).
Hat sizing rule
- Crown diameter (inches) ≈ head circumference ÷ 3.14
Example: 22-inch head ÷ 3.14 ≈ 7 inches crown diameter
Notes Before You Start
- Work in joined rounds or continuous rounds, but stay consistent
- Use a stitch marker at the start of each round
- Measure crown diameter instead of relying only on stitch counts
- The mesh section stretches slightly, so keep it snug but comfortable
Crown (Solid Top)
Use dc for a quick, smooth crown.
Round 1
MR, ch 3, 11 dc into ring, join (12 dc)
Round 2
Ch 3, 2 dc in each stitch around, join (24 dc)
Round 3
Ch 3, (dc, 2 dc in next) around, join (36 dc)
Round 4
Ch 3, (2 dc in next, dc in next 2) around, join (48 dc)
Round 5
Ch 3, (dc in next 3, 2 dc in next) around, join (60 dc)
Round 6
Ch 3, (dc in next 4, 2 dc in next) around, join (72 dc)
Continue increasing in this pattern until the crown diameter matches your target.
Most adult hats land around 6.5–7.5 inches (16.5–19 cm) depending on fit.
Transition Round (Firm Band)
This helps the hat shape turn from flat crown into sides.
Round
Ch 1, sc in each stitch around, join
Optional snug band
If you want the hat to fit more snugly, work sc in the back loop only for this round.
Lace Side Section (Mesh)
Mesh Round A
Ch 3, (dc in next stitch, ch 1, skip 1) repeat around, join
Mesh Round B
Ch 3, dc in each dc and dc in each ch-1 space around, join
Repeat Mesh Rounds A and B until the hat height (from crown top down) fits you.
Typical adult bucket hat side height is 3.5–5 inches (9–13 cm) depending on how deep you like it.
Fit tip
Try it on after every few rounds. You want the hat to sit comfortably above your ears before starting the brim.
Pre-Brim Solid Round
This firms up the edge and prevents the brim from stretching.
Round
Ch 1, sc around, join
Brim Section
The brim flares by increasing evenly. Use dc or hdc for structure.
Brim Round 1
Ch 2, hdc in each stitch around, placing an increase every 6th stitch (2 hdc in same stitch), join
Brim Round 2
Ch 2, hdc around with an increase every 7th stitch, join
Brim Round 3
Ch 2, hdc around with an increase every 8th stitch, join
Continue brim rounds until you like the width.
A medium brim is usually 2–2.75 inches (5–7 cm).
A wider sunhat brim can be 3–4 inches (7.5–10 cm).
Optional Contrast Stripe
To create a clean stripe band near the brim
- Switch to contrast color for 1–2 rounds of hdc
- Switch back to main color
This gives that cute “ring” detail that looks polished.
Scalloped Edge Finish
Finish with a scallop round for the signature cute edge.
Round
Sl st to the next stitch
(Skip 1, 5 dc in next stitch, skip 1, sl st in next) repeat around
If your scallops feel too big
- Use 4 dc instead of 5
If you want softer scallops - Use 5 hdc instead of 5 dc
Fasten off and weave in ends neatly.
Common Mistakes and How to Avoid Them#
Hat crown becomes wavy
- Too many increases
- Skip an increase round or space increases farther apart
Hat crown cups upward
- Not enough increases
- Add an extra increase round evenly spaced
Mesh holes look uneven
- Keep your chain-1 spaces consistent
- Make sure you are skipping exactly one stitch each time
Brim ripples
- Too many increases in brim rounds
- Reduce increase frequency (increase every 9th stitch instead)
Brim flops too much
- Use cotton
- Use a smaller hook for brim
- Add an extra sc round before scallops
- Lightly block and shape
Expert Tips for Better Results#
- Measure crown diameter early and often. It’s the fastest way to get the right size.
- If you want a more structured bucket hat, work the crown and brim in hdc instead of dc.
- Add a hidden elastic thread along the inside band (woven through the sc band round) for a secure fit without tightening the whole hat.
- Block the brim by laying it flat and pinning the scallops evenly. Even light blocking makes the edge look much more professional.
- For a beach-ready hat, spray with fabric stiffener (lightly) so it keeps its shape.
Variations and Customization Ideas#
- Make it more sun-protective by adding extra brim rounds
- Turn it into a fisherman hat by making the brim shorter and more structured
- Add a ribbon or crocheted cord through the mesh holes as a decorative tie
- Make a striped hat by changing colors every two mesh rounds
- Add a small flower applique on the side for a cute detail
- Use raffia yarn for a straw-hat look (use a larger hook and keep tension even)
Benefits of This Crochet Project#
- Breathable lace design perfect for summer
- Beginner-friendly stitches with a polished result
- Easy to adjust for any head size
- Works up quickly compared to many hats
- Great stash-buster for cotton yarn
- A crochet pattern you can repeat in different colors for a full summer hat collection
Internal Linking Suggestions#
- Crochet Bucket Hat Sizing Guide for Beginners
- How to Crochet in the Round Without Gaps
- Easy Crochet Lace Mesh Stitch Tutorial
- How to Block Crochet Hats and Brims
- Best Cotton Yarn for Summer Crochet Projects
FAQ#
Is this crochet bucket hat pattern suitable for beginners?
Yes. It uses basic stitches and simple repeats. The mesh section is especially beginner-friendly once you learn the rhythm.
What yarn is best for a summer crochet hat?
Cotton is the best choice because it’s breathable and holds shape better than stretchy fibers.
How do I make sure the hat fits my head?
Measure your head circumference and crochet the crown until it reaches the correct diameter. Then try it on as you build the side height.
How do I make the brim stiffer?
Use cotton yarn, go down a hook size for the brim, add an extra sc round, and lightly block the brim flat.
Can I make this hat in child sizes?
Yes. Use the crown diameter formula (head circumference ÷ 3.14) and stop increasing earlier. The rest of the pattern stays the same.
How do I adjust the lace holes size?
Use a smaller hook for tighter mesh or replace ch-1 spaces with ch-2 spaces for larger holes.
Conclusion#
A lace crochet bucket hat is one of the most wearable warm-weather accessories you can make. This crochet pattern gives you the best of both worlds: a solid crown for structure, airy mesh sides for comfort, and a scalloped brim that makes the whole hat feel extra cute and finished. Once you make one, it’s so easy to tweak the brim width, change stripe colors, and create a full set for summer.
If you tell me your head circumference and the yarn weight you’re using, I can suggest the exact crown diameter target and how many rounds you’ll likely need for the perfect fit.