Introduction#
There’s something instantly comforting about a floppy plush. The long arms and legs drape over your wrist, the head feels squishy in your palm, and the whole toy has that “take-me-everywhere” vibe that kids (and honestly, adults) adore. A koala version is especially sweet because the big ears and round nose give you tons of personality with very simple shapes.
Explore more beginner baby crochet patterns in our pattern library.
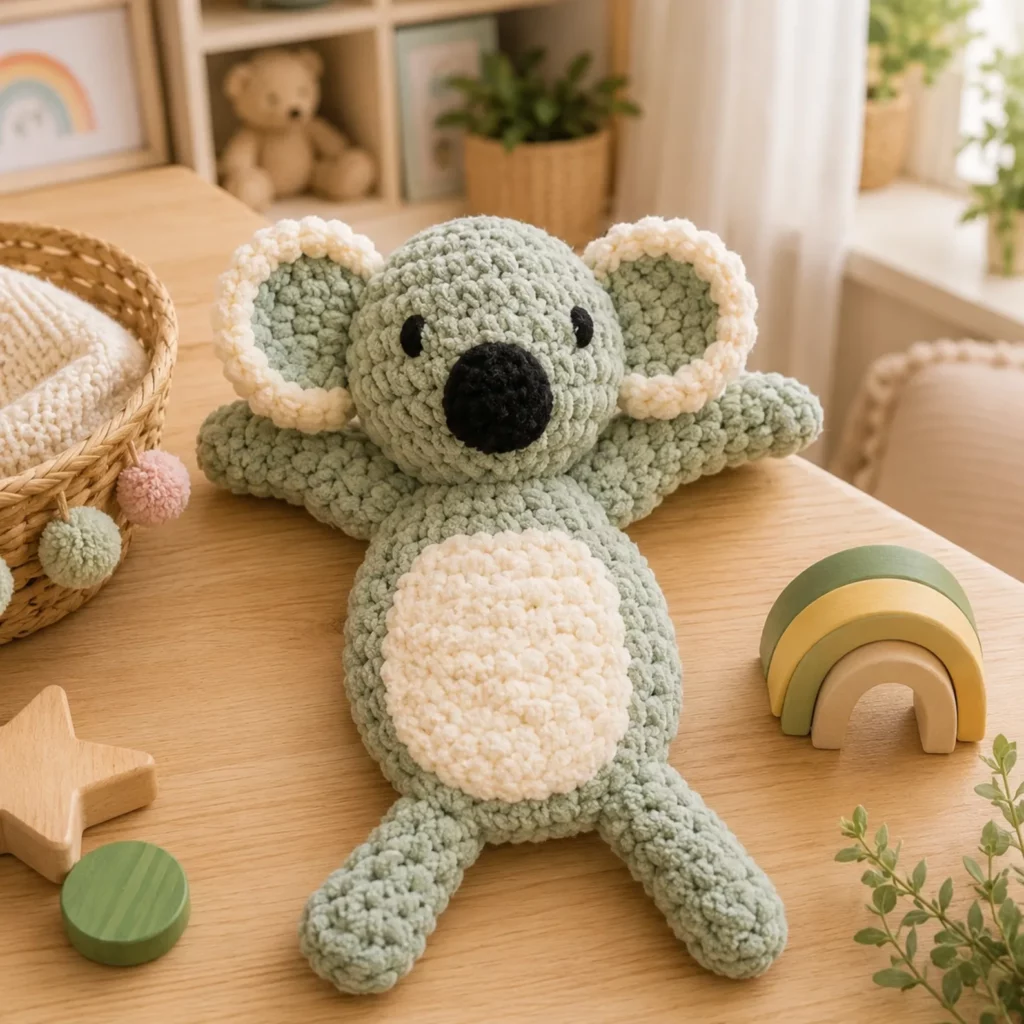
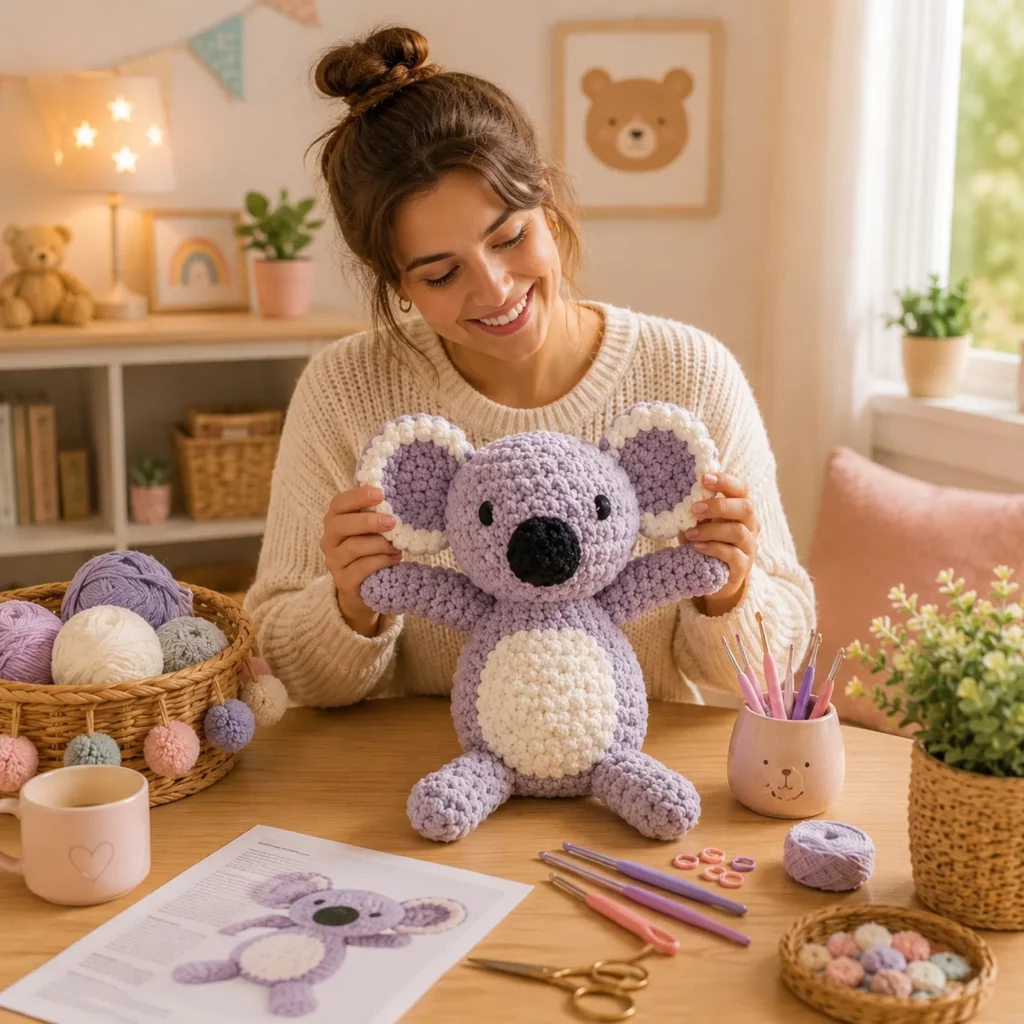
This crochet pattern is for a floppy koala lovey-style plush made with chunky, velvety yarn. It has a soft grey body, a creamy tummy panel, oversized ears with a contrasting rim, and extra-long limbs that make it perfect as a comfort toy, stroller buddy, or nursery shelf friend. You’ll crochet mostly single crochet in the round, then assemble the pieces with beginner-friendly sewing.
If you’re searching for a free crochet pattern that looks impressive but is still approachable, this easy crochet pattern is a great pick. It also scales beautifully: make it small with worsted yarn or super cuddly with plush/chenille yarn.
Detailed Description of the Crochet Pattern#
This koala is designed in a classic “floppy” style: a rounded head, a compact body, and long arms and legs that hang loosely. The ears are large and framed with a contrasting border to mimic that fluffy koala ear look. The tummy is a separate oval panel in a lighter color, sewn onto the body for a clean finish and extra dimension.
Key features you’ll be making
A round plush head with simple eye placement and a bold nose
Large, wide ears with a pale inner rim
A small body that’s easy to hold
Extra-long arms and legs for the floppy lovey effect
A soft belly patch that makes the toy look polished
Construction overview
You crochet the head, body, arms, legs, ears, belly patch, and nose as separate pieces. Then you attach everything in a specific order so placement stays symmetrical. Plush yarn hides seams nicely, which is a huge confidence booster for beginners.
Finished size (approximate)
With plush/chenille yarn: 10–14 inches tall depending on limb length
With worsted yarn: 7–10 inches tall
The long limbs are what create the “lovey” look, so you can easily adjust length without changing the whole pattern.
Skill Level Explanation#
This is an easy-to-intermediate crochet pattern. The stitches are simple, but plush yarn can be tricky because you often “feel” stitches more than you see them. The shaping itself is beginner-friendly: increases, decreases, and straight rounds.
You’ll be comfortable if you can
Work single crochet in the round
Increase and decrease cleanly
Count stitches and use a stitch marker
Sew pieces securely and neatly
Great for beginners because
The shapes are forgiving
Plush yarn hides tiny imperfections
You can customize size and features without stress
Materials Needed#
Yarn
Plush/chenille yarn is the best match for the squishy look. Choose a quality chenille that doesn’t shed too much. If you’re worried about yarn shedding, a bulky velvet-style yarn or blanket yarn can work too.
Suggested colors
Main color: medium grey (koala body)
Contrast: cream or off-white (tummy and ear trim)
Nose: black (or dark charcoal)
Yarn amounts (approximate)
Main color: 120–200 yards
Contrast: 40–80 yards
Nose: small scrap amount
Hook
Plush yarn usually pairs well with 4.5–6.0 mm, but you want tight stitches so stuffing doesn’t show. A common sweet spot is 5.0 mm. If your stitches look gappy, go down one size.
Notions
Stitch marker
Yarn needle
Scissors
Fiberfill stuffing
Safety eyes or embroidered eyes option
Optional felt circles behind safety eyes for extra security
Safety note
If making for babies or toddlers, avoid safety eyes and instead embroider eyes with black yarn or thread.
Stitches & Techniques Explained#
Abbreviations (US terms)
MR = magic ring
sc = single crochet
inc = increase (2 sc in one stitch)
dec = invisible decrease
sl st = slip stitch
ch = chain
st(s) = stitches
Invisible decrease
This keeps the shape smooth, especially important on plush heads and limbs. You’ll decrease through the front loops of the next two stitches, then finish the stitch as normal.
Working with plush/chenille yarn
Use a stitch marker in the first stitch of every round.
Count carefully and don’t rush.
If you lose where you are, gently stretch the fabric to find the “V” shapes.
Keep tension steady; pulling too tight can break chenille fibers.
Stuffing tips for floppy toys
Stuff the head firmly so it stays round.
Stuff the body moderately.
Stuff the limbs lightly so they stay soft and bendy.
A floppy toy looks best when the limbs are not rock-hard.
Step-by-Step Instructions#
Pattern notes
Work in continuous rounds unless stated. Use a stitch marker. Numbers in parentheses are stitch counts. This is written to be beginner-friendly and adjustable.
Part 1: Head (grey)
Rnd 1: MR, 6 sc (6)
Rnd 2: inc around (12)
Rnd 3: (sc, inc) around (18)
Rnd 4: (2 sc, inc) around (24)
Rnd 5: (3 sc, inc) around (30)
Rnd 6: (4 sc, inc) around (36)
Rnd 7: (5 sc, inc) around (42)
Rnd 8–12: sc around (42) for 5 rounds
Place eyes between Rnd 10–11, spaced about 8–10 stitches apart.
Begin stuffing firmly.
Rnd 13: (5 sc, dec) around (36)
Rnd 14: (4 sc, dec) around (30)
Rnd 15: (3 sc, dec) around (24)
Rnd 16: (2 sc, dec) around (18)
Rnd 17: (sc, dec) around (12)
Rnd 18: dec around (6)
Fasten off, close, weave in.
Part 2: Nose (black)
A bold nose gives the koala face its character.
Rnd 1: MR, 6 sc (6)
Rnd 2: inc around (12)
Rnd 3: sc around (12)
Rnd 4: (2 sc, dec) around (9)
Stuff lightly, flatten slightly. Fasten off leaving a tail for sewing.
Sew the nose centered below the eyes.
Optional: embroider a short vertical line under the nose for a simple mouth.
Part 3: Body (grey)
Rnd 1: MR, 6 sc (6)
Rnd 2: inc around (12)
Rnd 3: (sc, inc) around (18)
Rnd 4: (2 sc, inc) around (24)
Rnd 5: (3 sc, inc) around (30)
Rnd 6–10: sc around (30) for 5 rounds
Rnd 11: (3 sc, dec) around (24)
Rnd 12: sc around (24)
Stuff moderately.
Rnd 13: (2 sc, dec) around (18)
Rnd 14: (sc, dec) around (12)
Rnd 15: dec around (6)
Fasten off, close, leave tail if you prefer sewing head later.
Part 4: Arms (make 2, grey)
These arms are long and floppy.
Rnd 1: MR, 6 sc (6)
Rnd 2: inc around (12)
Rnd 3: sc around (12)
Rnd 4: (2 sc, dec) around (9)
Rnd 5–14: sc around (9) for 10 rounds
Lightly stuff just the hand and a little up the arm. Keep most of the arm soft.
Flatten the top and close with sc through both layers or sew closed.
Fasten off leaving a tail for attaching.
To make arms longer
Add 2–6 extra rounds to Rnd 5–14 section.
Part 5: Legs (make 2, grey)
Legs are longer than arms for a classic lovey silhouette.
Rnd 1: MR, 6 sc (6)
Rnd 2: inc around (12)
Rnd 3: sc around (12)
Rnd 4: (2 sc, dec) around (9)
Rnd 5–18: sc around (9) for 14 rounds
Lightly stuff the foot and lower leg. Keep upper leg floppier.
Flatten top, close, fasten off leaving tail.
To make legs longer
Add 2–8 extra rounds to the long section.
Part 6: Ears (make 2, grey + cream trim)
You’ll make a grey ear base, then add a cream border. This creates that cute framed look.
Ear base (grey)
Rnd 1: MR, 6 sc (6)
Rnd 2: inc around (12)
Rnd 3: (sc, inc) around (18)
Rnd 4: (2 sc, inc) around (24)
Rnd 5: sc around (24)
Fasten off leaving a tail.
Cream trim
Join cream yarn anywhere on the edge. Work sc evenly around the ear, placing 2 sc in a stitch every few stitches if the edge tightens. The goal is a soft rounded border, not a ruffle.
Fasten off and weave in ends.
Optional: For extra firmness, make two ear bases per ear and sew them together, or cut a small felt circle to insert inside.
Part 7: Belly patch (cream)
The belly patch is an oval sewn onto the front of the body.
Ch 10
Round 1: sc in 2nd ch from hook, sc in next 7 ch, 3 sc in last ch.
Work down the other side: sc in next 7 ch, 2 sc in last ch (20)
Round 2: inc, sc 7, inc x3, sc 7, inc x2 (26)
Round 3: sc around (26)
Fasten off leaving a long tail.
Sew belly patch centered on the body front. Don’t pull too tight or it will pucker.
Part 8: Assembly
Order matters for symmetry and stability.
Attach head to body
Pin head to body first. Sew around the neck opening with strong stitches. If this is for a child, sew twice around for durability.
Attach ears
Place ears high on the sides of the head, slightly forward. Sew firmly. Make sure both ears match height by counting rows from the top center of the head.
Attach arms
Sew arms to the sides of the body just below the head seam. Angle them slightly forward for a cuddly pose.
Attach legs
Sew legs to the lower body front, spaced evenly so the plush sits nicely. For an extra floppy look, place legs slightly outward.
Final shaping
Add a bit more stuffing if needed, then gently squish and shape the head and body with your hands so everything looks rounded and even.
Common Mistakes and How to Avoid Them#
Stuffing shows through the stitches
Use a smaller hook or tighten tension. Plush yarn hides gaps, but large holes will still show stuffing.
Head looks lumpy
Stuff in small pieces and distribute evenly. Massage the head gently to smooth lumps before closing.
Ears are uneven
Pin first and measure placement. It helps to sew one ear, then use it as a reference point for the other.
Limbs too stiff
Use less stuffing in arms and legs. The floppy effect comes from softer limbs.
Toy tips forward or sideways
Adjust leg placement so they’re balanced. You can also add a small bit more stuffing at the bottom of the body for stability.
Chenille yarn breaks while pulling
Avoid yanking tight. If a strand breaks, overlap yarn tails and sew them in securely rather than tying tight knots.
Expert Tips for Better Results#
Use embroidered eyes for baby-safe gifting. It also creates a softer look that matches the sleepy, cuddly style.
Sew the nose on before finalizing the head-to-body seam if you want easier access for face shaping.
Reinforce the neck seam. This is the stress point kids will grab.
If you want a flatter lovey style, keep the body slightly under-stuffed and focus stuffing in the head only.
Add a tiny blush effect with a light pink embroidery thread or very small amount of cosmetic blush for display-only items.
Variations and Customization Ideas#
Make it a bedtime koala by embroidering closed eyes and adding little eyelashes.
Swap colors for a pastel koala, cream koala, or even a fun rainbow belly patch.
Add a small scarf or bow for a gift-ready look.
Turn it into a rattle toy by inserting a rattle insert into the body (only if you sew everything extra securely and it’s baby-safe).
Make the ears extra fluffy by crocheting the trim with a fuzzy yarn instead of cream chenille.
Add a tiny tail nub on the back of the body for an extra cute detail.
Benefits of This Crochet Project#
It’s fast and satisfying, especially with plush yarn.
The floppy limbs make it instantly cuddly and comforting.
It’s a great stash-buster for plush yarn colors and small contrast accents.
It makes a high-value handmade gift for baby showers and birthdays.
The shapes are simple, so it’s approachable for crochet for beginners.
It’s easy to scale up or down just by changing yarn weight and hook size.
Internal Linking Suggestions#
You may also like these related posts
Free Crochet Pattern: Plush Turtle Amigurumi for Beginners
Crochet Tutorial: How to Crochet with Chenille Yarn Without Losing Stitches
DIY Crochet: Baby-Safe Embroidered Eyes and Facial Features
Easy Crochet Pattern: Teddy Bear Holding Heart Plush
Free Crochet Pattern: Mini Animal Lovey Collection Ideas
Crochet Tutorial: Invisible Decrease for Smooth Amigurumi
FAQ Section#
What yarn is best for a floppy koala crochet pattern?
Plush/chenille yarn is perfect for the cuddly look and soft feel. If you want clearer stitch definition, use worsted cotton or acrylic.
Is this an easy crochet pattern for beginners?
Yes. The shaping uses basic rounds with increases and decreases. Plush yarn can be a little tricky, but a stitch marker and careful counting make it very doable.
How do I make the limbs longer or shorter?
Add or remove rounds in the long straight section of the arms and legs. Keep the hand/foot shaping the same for a consistent look.
Can I make this toy baby-safe?
Yes. Use embroidered eyes instead of safety eyes, avoid loose decorations, and sew all parts extra securely with reinforced seams.
How do I stop stuffing from showing through plush yarn?
Use a slightly smaller hook than recommended and keep tension steady. Stuff firmly but don’t overstretch the fabric.
Can I turn this into a true “lovey blanket” style?
Yes. Replace the body with a small blanket square or circle and attach the koala head and arms at the top. The same head and ear pattern works beautifully for that style.
Conclusion#
A floppy koala lovey plush is the kind of crochet pattern that gets hugged hard, carried everywhere, and treasured for years. The big ears, bold nose, and extra-long limbs give it instant personality, while the simple construction keeps it beginner-friendly. This free crochet pattern is easy to customize, easy to scale, and especially satisfying in soft plush yarn.
From now on, I’ll keep your articles without divider lines. If you want, tell me whether you’re using plush yarn or worsted yarn and the approximate size you want, and I can adjust the stitch counts so your koala comes out perfectly proportional.