


Introduction#
If you want a crochet project that feels joyful the moment you pick up your hook, a daisy granny square cardigan is hard to beat. It’s colorful, nostalgic, and somehow both playful and wearable at the same time. This style of crochet pattern also has a huge bonus: it’s modular. You can make one square at a time, take it anywhere, and watch it grow into a full cardigan without the stress of complicated shaping.
Explore more beginner granny squares crochet patterns in our pattern library.
This crochet tutorial is designed to help you create a bold patchwork cardigan with dimensional daisies, a cozy V-neck, and clean ribbed finishing at the hem, cuffs, and button band. You’ll learn how to keep all your squares the same size, how to plan a layout that looks intentional, and how to assemble everything so the cardigan sits nicely on the body.
If you’re a “crochet for beginners” maker who’s ready for a first garment, this is one of the friendliest ways to do it. And if you’re more experienced, it’s a satisfying DIY crochet project that delivers maximum impact for relatively simple stitches.
Detailed Description of the Crochet Pattern#
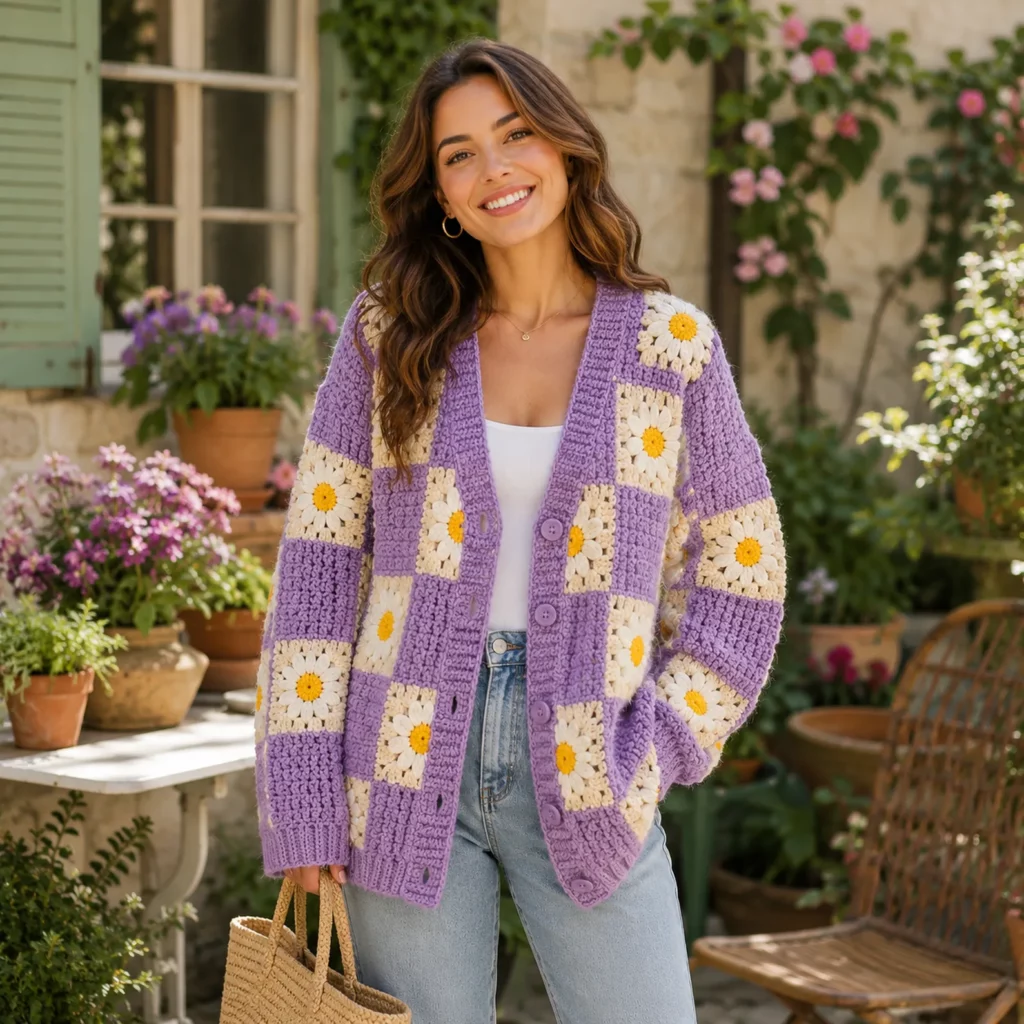
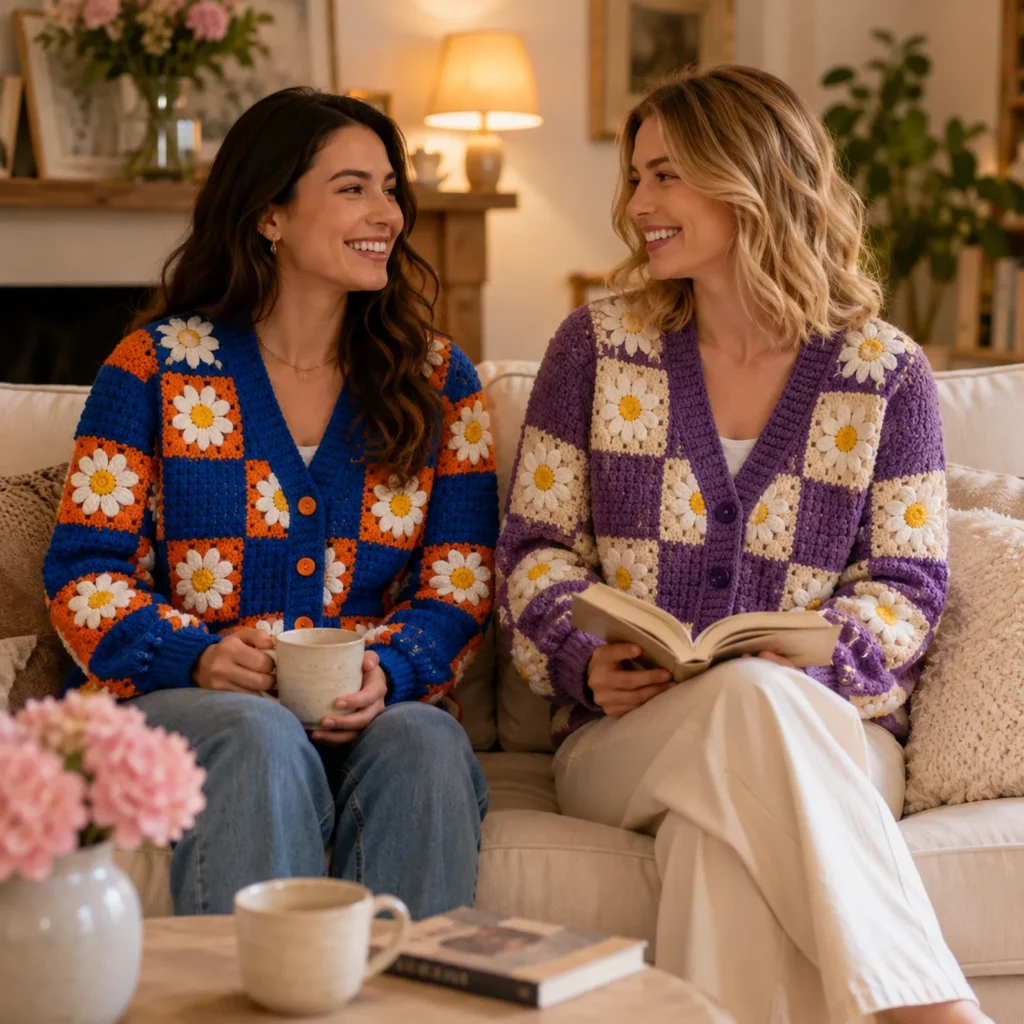
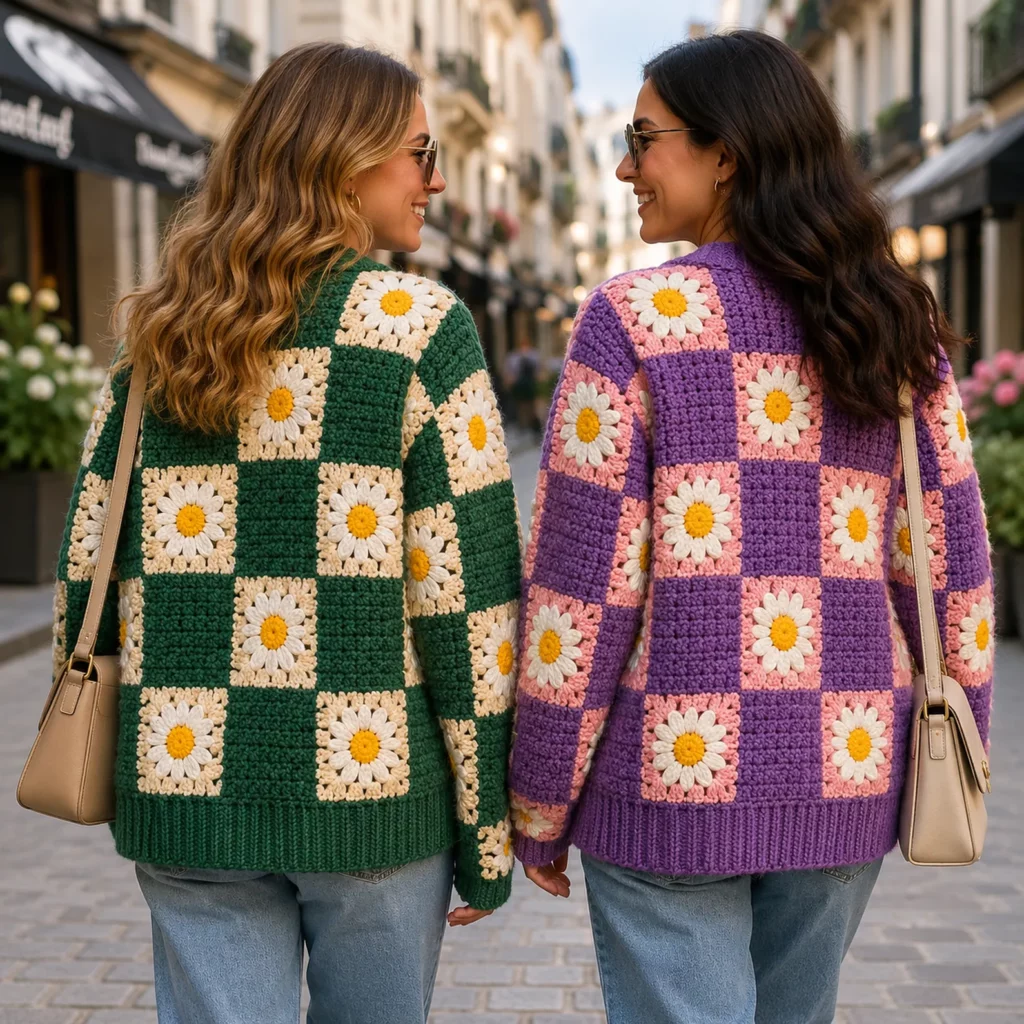
This cardigan is built from daisy granny squares arranged like a checkerboard. Some squares are solid, and others feature a raised flower motif. The contrast creates that graphic, retro look that makes this garment feel like wearable art.
Design features you’ll recreate
- Patchwork body made from squares joined into panels
- Bold daisy motifs with a round center and layered petals
- Alternating solid and floral blocks for a balanced layout
- V-neck opening created by two front panels and a center button band
- Ribbed hem and cuffs for a snug, sweater-like finish
- Ribbed front bands that stabilize the opening and support buttons
Construction summary
- Crochet daisy squares and solid squares to a consistent finished size
- Join squares into a back panel and two front panels
- Seam shoulders and sides, leaving armholes
- Make sleeves from squares or from a mix of squares plus plain rows
- Add ribbing to hem and cuffs
- Add button band, make buttonholes, sew on buttons
The fabric in this style is typically dense enough to feel like a real sweater, especially if you use a worsted weight yarn and keep your tension even.
Skill Level Explanation#
Skill Level: Confident Beginner to Intermediate Beginner
You’ll do great if you already know
- Chain, slip stitch, single crochet, double crochet
- Basic granny square construction
- Counting stitches and rows
- Seaming or joining squares
Newer skills you’ll learn or practice
- Making a dimensional daisy motif
- Keeping motif squares identical in size
- Joining squares neatly so seams don’t twist
- Crochet ribbing that looks polished
- Button band spacing and simple buttonholes
This is an easy crochet pattern conceptually because it’s repeating units, but it rewards patience in blocking and assembly.
Materials Needed#
Yarn
A worsted weight yarn is ideal for a structured cardigan with clear stitch definition.
Suggested yarn weight
- Worsted (Category 4) is the classic choice
- DK (Category 3) works for a lighter cardigan, but you’ll likely need more squares or larger squares
Fiber suggestions
- Acrylic for affordability and easy care
- Wool blend for warmth and natural elasticity
- Cotton blend if you want crisp stitch definition, but note it can feel heavier
Color palette idea for a high-contrast daisy look
- Main color A: deep blue for the base and trim
- Accent color B: bright orange for square backgrounds
- Daisy petals: white or cream
- Daisy center: yellow or golden mustard
Yardage estimate (varies by square size and length)
- XS–S: 1200–1600 yards (1100–1460 m)
- M–L: 1600–2100 yards (1460–1920 m)
- XL–2XL: 2100–2700 yards (1920–2470 m)
- 3XL–5XL: 2700–3600 yards (2470–3300 m)
Practical yardage tip
Make one daisy square and one solid square, weigh them, then multiply by how many you plan to make. This is the quickest way to predict yarn needs accurately.
Hook
- 5.0 mm (H/8) is a common starting point for worsted
- Adjust to get a fabric you like: go down for denser fabric, up for more drape
Notions
- Tapestry needle
- Scissors
- Stitch markers
- Measuring tape
- Buttons (4–6 depending on length, typically 20–25 mm)
- Optional blocking tools (pins, mat)
Stitches & Techniques Explained#
Common Abbreviations
- ch = chain
- sl st = slip stitch
- sc = single crochet
- dc = double crochet
- hdc = half double crochet
- tr = treble crochet
- blo = back loop only
- ( ) = repeat
- = stitch count
Granny Square Basics
Most patchwork squares rely on dc clusters and chain spaces. The key to clean squares is consistent corner construction, usually
- 3 dc, ch 2, 3 dc in each corner space
How the Daisy Motif Works
A dimensional daisy square usually has
- A round center (worked in the round)
- Petals worked as repeated loops or tall stitches
- A background round that squares it off
The petals can be made with chained loops and then filled, or with taller stitches directly into the round. Both methods work well. The important part is keeping the petal count consistent so every square matches.
Joining Squares Neatly
Three common joining options
- Whip stitch seam with a needle for a classic, sturdy join
- Mattress stitch for a flatter join
- Slip stitch join with a hook for a decorative ridge
For cardigans, a flatter seam often feels more comfortable, but a ridge seam can look intentionally “retro.” Choose the style you love.
Crochet Ribbing That Looks Like Knit
Ribbing is often made with sc blo in rows. It’s stretchy and gives professional structure to hems and cuffs.
Basic ribbing method
- Crochet a narrow strip in sc blo
- Join the strip to the garment edge as you go
- Seam the ribbing ends together
Step-by-Step Instructions#
Finished Size
This cardigan is written as a made-to-measure crochet pattern approach so you can size it to your body without needing a complicated grading chart.
Fit options
- Classic fit: bust measurement + 2–4 inches (5–10 cm) ease
- Oversized fit: bust + 6–10 inches (15–25 cm) ease
Choose your square size first, then build your panel layout to match your target measurements.
Notes Before You Start
- Make a test square and block it before committing to a layout
- Use the blocked square measurement as your real finished square size
- Keep your corners consistent across every square
- Weave in ends as you go to avoid a giant finishing pile later
Square Size Recommendation
A wearable cardigan square usually looks best at
- 5.5 to 7 inches (14 to 18 cm) per square after blocking
Smaller squares create a busier look and more seaming. Larger squares work up faster and look bolder.
Daisy Granny Square Pattern
This is a beginner-friendly daisy square formula that makes a clean motif and squares up nicely. Adjust stitch counts if needed to match your preferred size.
Daisy center (yellow)
Round 1: magic ring, ch 2, 12 dc into ring, join
Round 2: ch 1, 2 sc in each stitch around, join
Fasten off if you want a crisp color break
Petal round (white)
Join white in any stitch
Round 3: (sl st in same stitch, ch 4, sl st in next stitch) repeat around to create loops
You should have 12 loops if you began with 12 center stitches
Fill petals (white)
Round 4: sl st into first loop, work (sc, hdc, 3 dc, hdc, sc) into loop, sl st into next loop, repeat around
Fasten off
Background round to square (orange)
Join orange in any gap between petals
Round 5: ch 3, dc in same space, work dc clusters between petals and build corners with 3 dc, ch 2, 3 dc at four evenly spaced points
The exact spacing depends on your petal structure, so the goal is visual balance and a square shape rather than a rigid formula
Round 6: continue granny-style rounds until the square reaches your target size
Fasten off
Consistency tip
Count your corner groups. Every daisy square must have the same number of rounds and the same corner construction so they join cleanly.
Solid Granny Square Pattern (blue or orange)
Solid squares balance the visual layout and help the cardigan look less crowded.
Round 1: magic ring, ch 3, 2 dc, ch 2, (3 dc, ch 2) repeat 3 more times, join
Round 2: sl st to corner space, 3 dc, ch 2, 3 dc in corner, work 3 dc in each side space, corners as usual, join
Repeat rounds until the square matches your daisy square size
Fasten off
Gauge and Measuring
Because this is modular, gauge is mostly about consistent square size.
Best practice
- Make 1 daisy square and 1 solid square
- Block both
- Measure the finished width
- Use that number to plan how many squares you need across and down
Planning Your Patchwork Layout
A classic layout uses a balanced mix of floral and solid squares. The cardigan shown in this style often places daisies on alternate squares so they pop.
A beginner-friendly layout idea
- Back panel: 4 squares wide by 4 squares tall
- Each front panel: 2 squares wide by 4 squares tall
This creates a shorter cardigan shape with a V front opening
To size up
- Add a column of squares to the back and/or add height rows
- Add length by adding one full row of squares at the bottom
- Add width by adding one square to each front panel and possibly one to the back
Fit check method
- Lay your blocked squares on a table in the planned layout
- Measure the full panel width
- Compare to your target finished width
- Adjust before you start joining
Joining Squares Into Panels
Make three panels
- Back panel
- Left front panel
- Right front panel
Joining method (needle whip stitch)
- Place squares right sides together
- Stitch through the outer loops for a flatter seam
- Keep tension even so seams don’t pucker
Joining method (slip stitch join)
- Place squares wrong sides together
- Slip stitch through both loops along the edge
- Creates a visible ridge seam that looks bold and graphic
Assemble the Body
Shoulder seams
- Seam the top of each front panel to the back panel
- Leave a neck opening in the center
Side seams
- Seam from hem upward
- Stop to leave armholes
Armhole depth guideline
- S–M: about 7–8 inches (18–20 cm)
- L–XL: about 8–9 inches (20–23 cm)
- 2XL–5XL: about 9–10 inches (23–25 cm)
Because this style is drop-shoulder, deeper armholes feel comfortable and relaxed.
Sleeves
You have two sleeve options depending on how “patchwork” you want.
Option A: Patchwork sleeves
- Join squares into a rectangle
- Seam into a tube
- Attach to armhole
Simple starting sleeve layout
- Sleeve width: 2 squares around for smaller sizes, 3 squares around for larger sizes
- Sleeve length: 3 to 4 squares long depending on your arm length
Option B: Mixed sleeves
- Use one square near the upper sleeve for the motif look
- Then crochet the rest in rows in the main color for a cleaner sleeve
This reduces seaming and can feel less bulky under the arm.
Attach sleeves
- Align sleeve seam with side seam
- Pin and seam evenly around the armhole
Hem Ribbing
Ribbing gives the cardigan a sweater finish and helps it sit neatly.
Ribbing method
- With main color, attach yarn at hem edge
- Ch 9–13 depending on desired ribbing depth
- Row 1: sc in 2nd ch and across
- Join to hem with sl st into next stitch on cardigan edge
- Turn and work sc blo back across ribbing
- Repeat, joining as you go, around the entire hem
- Seam ribbing ends together
Cuff Ribbing
Repeat the same ribbing method around each sleeve cuff.
If the cuff is too loose, use a shorter ribbing chain and slightly tighter tension.
Button Band and Neckline
A sturdy band makes the cardigan look finished and supports buttons.
Clean-up edging
- Work one round of sc evenly around the front opening and neckline
This stabilizes the edge and makes ribbing easier.
Button band ribbing
- Work ribbing along the front edge in sc blo rows joined to the cardigan as you go, similar to the hem ribbing method
- Do one band on each side, or one continuous band around both fronts and neckline if you prefer
Buttonholes
Simple buttonhole in ribbing
- When you reach a button placement row, chain 2 and skip 2 stitches on the band edge
- Continue ribbing
Test with your actual button and adjust chain/skip count as needed.
Sew on buttons
- Align button placement with buttonholes
- Pin first, then sew securely
Common Mistakes and How to Avoid Them#
Squares are different sizes
- Block your first few squares and measure
- Keep the same hook and stitch tension
- Count rounds and corner groups every time
Motifs look wavy or curled
- Add one extra background round to stabilize
- Use consistent corner spacing
- Block motifs before joining
Cardigan edges ripple
- Add a single crochet edging round before ribbing
- Make sure you are placing a consistent number of stitches along edges
Sleeves feel stiff or bulky
- Use fewer squares around for sleeve circumference
- Consider the mixed sleeve option with plain rows
- Use a flatter seam method
Button band pulls or gapes
- Add the sc edging round before the band
- Make the band slightly tighter than you think you need
- Space buttonholes evenly and test the closure as you go
Too many ends to weave
- Weave as you finish each square
- Use a yarn needle and split plies for a cleaner, less bulky finish
Expert Tips for Better Results#
- Block your squares before joining. This is the secret to a cardigan that looks polished instead of homemade.
- For a crisp daisy, use a smooth yarn for petals and center. Fuzzy yarn can blur the flower shape.
- If you want extra dimension, stitch the petals with slightly looser tension so they puff forward naturally.
- Join squares in rows first, then join rows. This keeps your layout organized and prevents accidental rotation of motifs.
- Use a contrasting button color that matches your accent squares for a cohesive “designed” look.
Variations and Customization Ideas#
- Make it cropped by using fewer rows of squares
- Make it oversized by adding a column to the back and fronts
- Swap daisies for sunflowers, puff flowers, or simple solid squares
- Add pockets made from one square each, sewn onto the front panels
- Change the neckline finish into a shawl collar by making a wider band
- Make a matching beanie or bag using leftover daisy squares
Benefits of This Crochet Project#
- Portable and motivating because you work in small squares
- Perfect stash-buster for color leftovers
- Beginner-friendly garment construction with easy fit adjustments
- Bold, eye-catching style that looks like boutique knitwear
- Highly customizable for any color palette and size
- Great skill builder for motifs, joining, ribbing, and button bands
Internal Linking Suggestions#
- How to Crochet a Granny Square for Beginners
- Best Yarn for Crochet Wearables
- How to Join Granny Squares Neatly
- Crochet Ribbing Tutorial That Looks Knit
- Easy Crochet Cardigan Sizing Guide
FAQ#
Is this suitable for crochet beginners?
Yes, especially if you’ve made at least one granny square before. The cardigan is built from repeats, and the fit is forgiving.
How many squares do I need to make a cardigan?
It depends on square size and your target width and length. Most cardigans use 20 to 40 squares. Block one square, measure it, then plan your grid.
What yarn is best for a daisy granny square cardigan?
Worsted weight acrylic or wool blends work well because they’re warm, durable, and show stitches clearly.
How do I keep my squares from becoming different sizes?
Count rounds, use the same hook, and block your squares. Blocking makes the biggest difference.
Can I make it without buttons?
Absolutely. Skip the button band and add a simple edging. You can wear it open or add a belt tie.
How do I stop the button band from stretching?
Add a single crochet edging round first, keep band tension snug, and use enough buttons so the front doesn’t pull.
Conclusion#
A daisy granny square cardigan is the kind of crochet pattern that’s fun to make and even more fun to wear. The motifs give it personality, the checkerboard layout makes it look intentional and bold, and the ribbed edges pull everything together into a real sweater finish. Take your time with consistent square sizing, block before joining, and focus on neat bands and seams, and you’ll end up with a cardigan that looks polished and feels like a statement piece you’ll reach for again and again.
If you tell me your bust measurement, your preferred length (cropped, waist, or hip), and your square size after blocking, I can map out an exact square layout for your back, fronts, and sleeves so you can start immediately with zero guesswork.


