


Introduction#
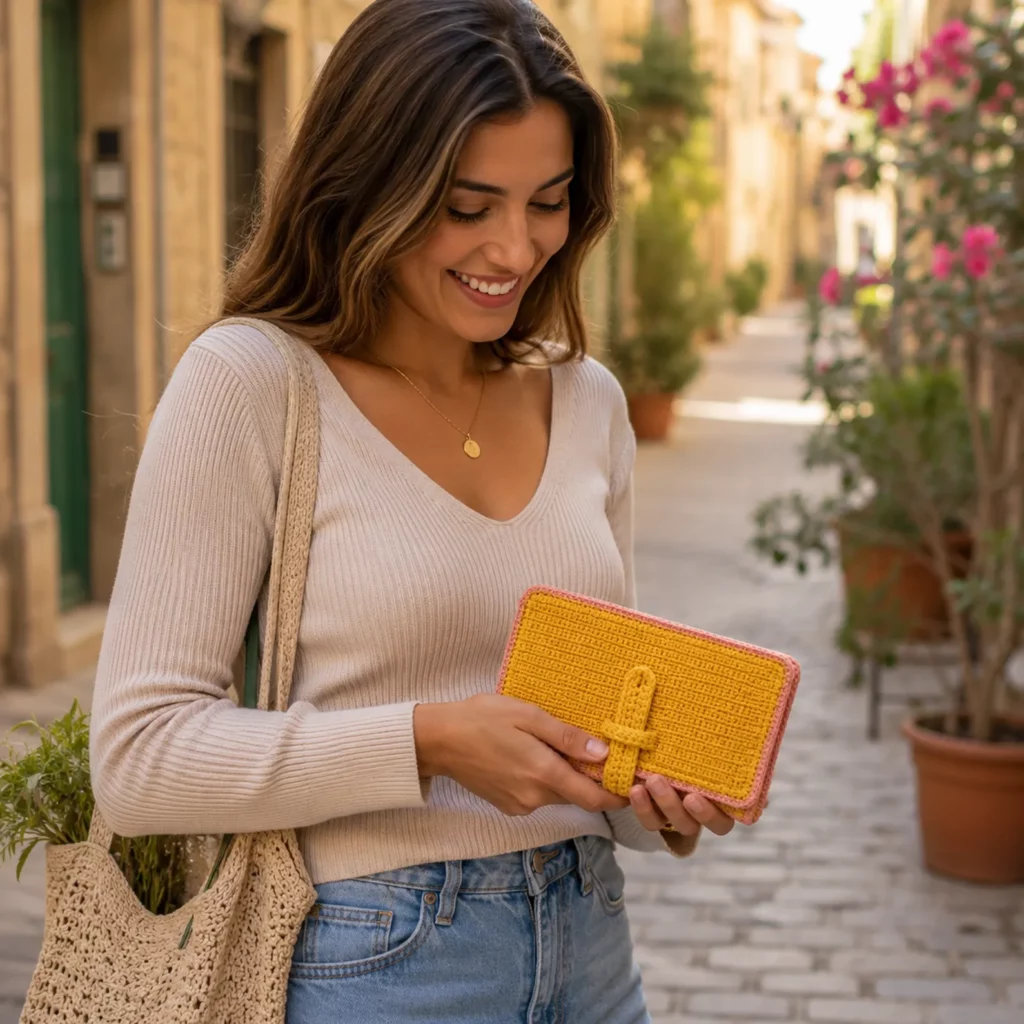
If you’ve ever tossed cards, cash, receipts, and tiny essentials into a regular pouch and ended up digging around like you’re on a treasure hunt—this project is for you. A crochet organizer wallet is one of those “why didn’t I make this sooner?” makes: it keeps everything visible, it travels well, and it’s surprisingly relaxing to crochet because the shapes are simple and repeatable.
Explore more beginner home decor crochet patterns in our pattern library.
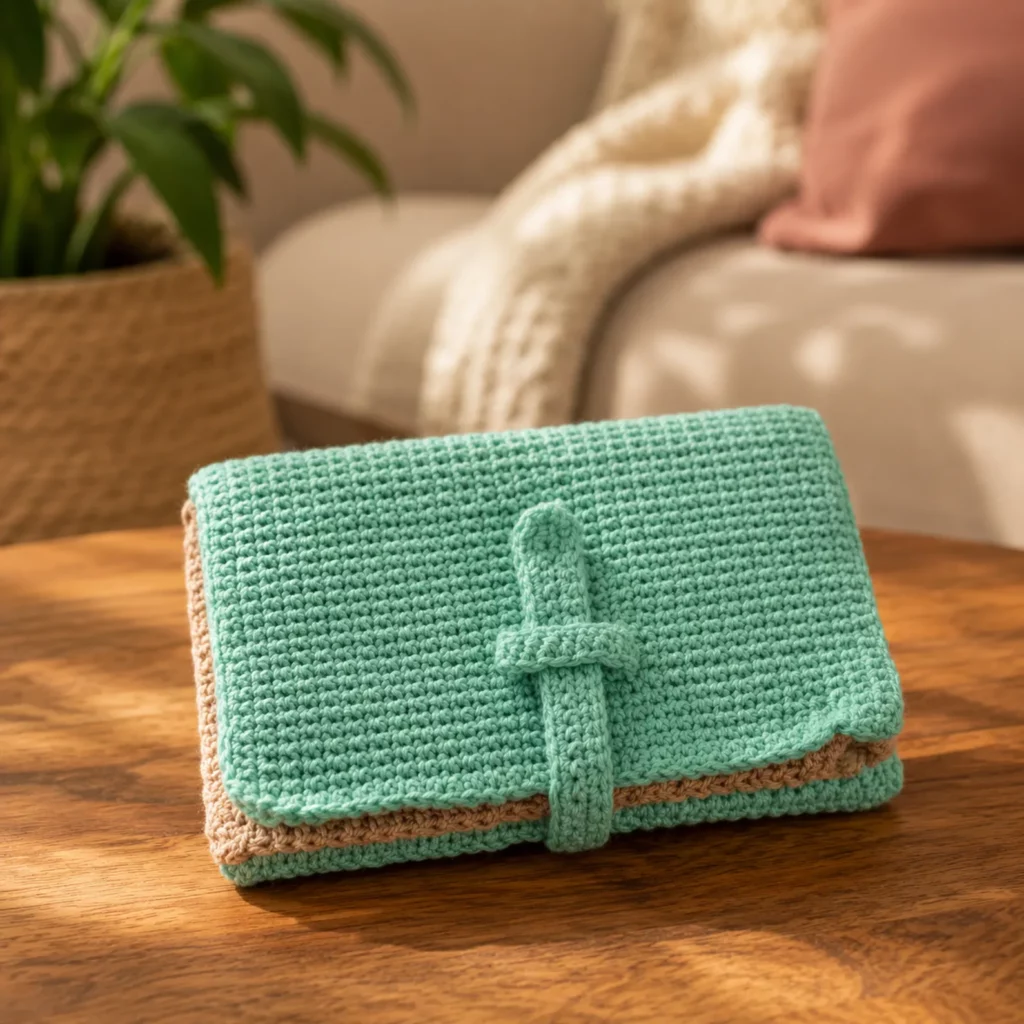
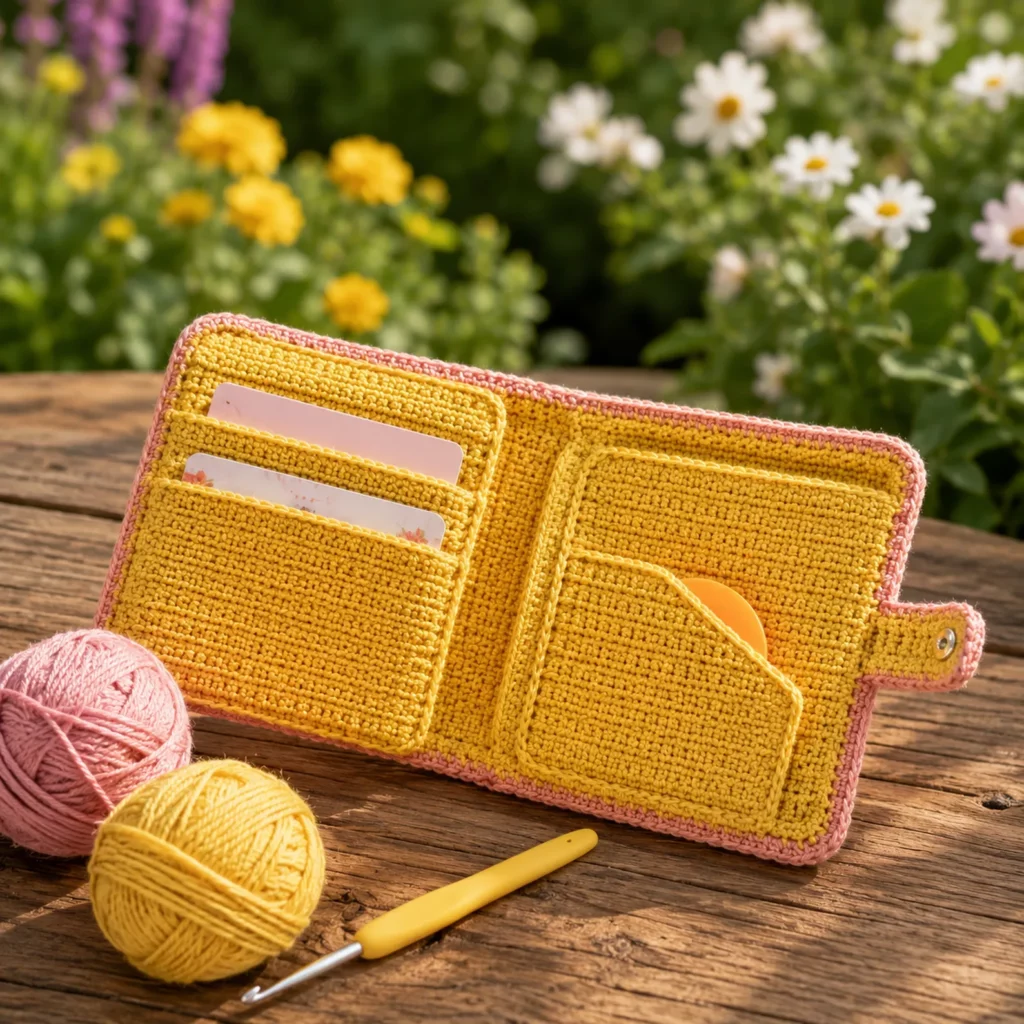
This crochet pattern creates a structured fold-over organizer with multiple pockets and a secure strap closure. It’s perfect as a minimalist wallet, a passport/doc holder, a craft notions case, or even a baby bag essential organizer (think pacifier, small wipes pack, ointment, and little extras). The best part is that you can customize pocket sizes without rewriting the whole project—just adjust a few measurements and stitch counts.
If you want a free crochet pattern that’s genuinely useful and looks polished enough to gift, this is a smart, beginner-friendly DIY crochet project.
Detailed Description of the Crochet Pattern#
This design is a folding crochet organizer wallet made from a sturdy base panel with attached pockets. It folds closed like a clutch and secures with a crocheted strap and snap/button. You can keep it sleek and minimal or add multiple snap pockets for extra organization.
Key features
- Structured outer cover (dense stitch fabric that holds its shape)
- Interior pockets (one large pocket plus optional smaller compartments)
- Secure closure strap (keeps everything contained in a bag)
- Optional snap pockets (perfect for coins, earbuds, SD cards, stitch markers)
- Customizable layout (wallet, travel, craft, or baby organizer)
Construction overview
You’ll crochet:
- Main base panel (outer cover + interior base in one piece)
- Pocket panels (stitched onto the base)
- Side seams for pockets (or boxed pockets if you prefer more depth)
- Closure strap + button/snap
- Optional: lining for a boutique finish
Skill Level Explanation#
This is an easy-to-intermediate crochet project.
Great for confident beginners who can:
- crochet evenly in rows
- count stitches and maintain straight edges
- sew with a yarn needle (simple seams)
- attach a snap or sew on a button (optional but recommended)
Intermediate upgrades (optional):
- adding a fabric lining
- installing a magnetic snap cleanly with reinforcement
- creating multiple compartments with vertical pocket seams
It’s a fantastic crochet for beginners project because it’s mostly rectangles, and you’ll learn practical finishing skills that transfer to bags and pouches.
Materials Needed#
Yarn
For organizers, structure matters. Choose yarn that won’t stretch too much.
Best yarn options:
- Worsted cotton (#4) (my top pick for structure)
- Cotton blend (durable but slightly softer)
- Acrylic worsted (works, but lining is strongly recommended)
Yardage estimate:
- Single wallet organizer: 200–350 yards total
(Depends on size + number of pockets)
Hook
Use a hook that gives a dense fabric:
- Worsted cotton: 3.5–4.5 mm
Tip: If your stitches look gappy, go down one hook size.
Notions
- Stitch markers (helpful for pocket placement)
- Yarn needle
- Scissors
- Measuring tape
Closures + hardware (optional but elevates the look)
Choose one:
- Sew-on snap
- Magnetic snap
- Button + buttonhole loop
Optional:
- Small grommets (for a cleaner strap closure look)
- Fabric lining + needle/thread
Stitches & Techniques Explained#
Abbreviations (US terms)
- ch = chain
- sl st = slip stitch
- sc = single crochet
- hdc = half double crochet
- BLO = back loop only
- st(s) = stitch(es)
- rep = repeat
Best stitch for a sturdy organizer
A wallet needs a fabric that doesn’t flop.
- Single crochet (sc) = dense, structured, durable
- Linked double crochet (optional) = smoother with fewer holes
- Thermal stitch (advanced option) = super thick and structured
This pattern uses single crochet for a clean, firm finish.
Clean edges (important for wallets)
Two habits make a huge difference:
- Always use the same turning chain (ch 1, does not count as a stitch)
- Mark the first/last stitch for the first few rows
Creating pockets neatly
Pockets are just rectangles sewn onto a base. To make multiple compartments, you stitch vertical seams down the pocket panel at measured intervals.
Step-by-Step Instructions#
Pattern notes
- Written in US terms
- Size is customizable
- Keep tension firm for a structured organizer
- Sample finished size: about 8.5″ wide x 5.5″ tall when closed
Decide your organizer size
Pick what you want it to hold:
- Wallet size: 8–9″ wide x 5–6″ tall
- Passport/travel: 9–10″ wide x 6–7″ tall
- Craft notions roll: 10–11″ wide x 7–8″ tall
For this tutorial, we’ll use a practical wallet/travel size.
Part 1: Main Base Panel (Outer + Interior)
Foundation: Ch 41
(Adjust width by chaining more/less. This example gives a medium organizer.)
Row 1: Sc in 2nd ch from hook and across. Turn. (40)
Row 2: Ch 1, sc across. Turn. (40)
Repeat Row 2 until the panel measures 18–20 inches long.
Why so long? Because this one panel forms:
- back cover
- interior pocket base
- front flap
Fold guide:
When your panel is done, fold it like a tri-fold:
- Bottom section = pocket base (interior)
- Middle = back cover
- Top = flap
You can also do a simple bi-fold by crocheting a shorter panel and folding in half.
Fasten off and weave in ends.
Part 2: Pocket Panel (Main Interior Pocket)
This is the large pocket that holds bills, a phone, or a small notebook.
Ch 41 (same width as base)
Row 1: Sc in 2nd ch from hook and across (40). Turn.
Row 2: Ch 1, sc across (40). Turn.
Repeat until pocket height is 4–5 inches (or desired depth).
Fasten off leaving a long tail.
Attach pocket:
Place the pocket on the lower interior section of the base panel (the part that will be inside when folded). Sew:
- along the left side
- along the bottom
- along the right side
Leave the top open.
Part 3: Add Compartments (Optional but highly recommended)
To make card slots or tool slots:
- Use stitch markers to divide the pocket width into sections (ex: 4 pockets)
- Sew vertical seams from the bottom up to about 3.5–4 inches
Suggested pocket widths:
- Card slots: 2–2.5″ each
- Tool slots (hooks/pens): 1–1.5″ each
- Mixed layout: 2 narrow + 1 medium + 1 wide
Reinforce the top of each seam with a few extra stitches (stress point).
Part 4: Optional Snap Pockets (Great for coins, earbuds, small items)
Make 1–2 smaller pouch-style pockets.
Small snap pocket panel (make 1–2):
- Ch 21
- Row 1: sc across (20)
- Row 2: ch 1, sc across (20)
Repeat until about 4 inches tall.
Fold bottom up to create a pocket and sew sides. Add a snap or button at the top flap.
Sew the pocket onto the interior base where you want it.
Part 5: Top Flap Shaping (Rounded optional)
You can keep it rectangular or round the corners for a softer look.
Simple rounding method:
On the last 2–3 rows of the flap section:
- dec 1 stitch at each end (sc2tog at start and end)
Repeat for 2–3 rows to taper slightly.
Or just round corners with edging later.
Part 6: Edging Around the Entire Organizer
Join yarn at any corner.
Round 1: Ch 1, sc evenly around the entire perimeter.
- Work 3 sc in each corner to keep edges flat.
Join with sl st.
Round 2 (optional for extra firmness): Ch 1, sc around again. Join.
Fasten off and weave in ends.
Part 7: Closure Strap
Strap (simple and sturdy):
Ch 9
Row 1: sc in 2nd ch and across (8). Turn
Row 2: ch 1, sc BLO across (8). Turn
Repeat Row 2 until strap length fits comfortably around the folded organizer (usually 6–8 inches).
Sew strap base to the back cover section (centered).
Buttonhole end:
At strap tip, create a small loop:
- ch 8–12 and sl st to form a loop sized for your button
Or sew a snap directly.
Part 8: Add Closure (Button or Snap)
Button option:
Sew button on the front flap where the loop lands.
Snap option:
Sew snap parts so the strap closes neatly over the flap.
Tip: Reinforce the area behind the snap/button with a small felt square if your yarn is soft.
Optional Part 9: Add a Lining (Most professional finish)
A lining:
- reduces stretch
- makes pockets sturdier
- hides seams
- protects items from snagging
Basic lining method:
- Measure interior size and cut fabric.
- Sew a simple lining sleeve.
- Insert and whip stitch lining to the inside edges.
Common Mistakes and How to Avoid Them#
- Organizer feels floppy:
Use cotton yarn, smaller hook, add a lining, or add a second edging round. - Edges curl:
Your tension may be too tight—block lightly and ensure corners have 3 sc. - Pockets stretch out:
Reinforce pocket top edge with one extra sc row, and add lining if needed. - Card slots are too tight:
Increase pocket widths slightly or use hdc for the pocket panel. - Strap placement looks off-center:
Mark center points with stitch markers before sewing. - Snap pulls yarn:
Reinforce with felt/interfacing behind the snap.
Expert Tips for Better Results#
- Cotton is your best friend for organizers—less stretch and cleaner structure.
- Block the base panel before sewing pockets so everything aligns nicely.
- Reinforce pocket seams with an extra pass of stitching at the top.
- Add one “catch-all” pocket: keep at least one wide pocket for random items.
- Weave ends like a bag maker: multiple direction changes; organizers get handled a lot.
- Make it gift-worthy: add lining + a neat label + matching button.
Variations and Customization Ideas#
- Passport + travel wallet: add a tall pocket for passport and a pen loop.
- Crochet hook organizer: make narrow slots and add a flap with elastic.
- Diaper clutch organizer: larger version with pockets sized for wipes and small diapers.
- Make it reversible: use contrasting interior pocket color.
- Add a zipper pocket: sew zipper into lining and stitch lining inside.
- Change closure style: magnetic snap, toggle, or tie strings.
Benefits of This Crochet Project#
- Keeps essentials organized and easy to find
- Beginner-friendly construction (rectangles + simple sewing)
- Customizable for travel, crafting, or daily use
- Great stash buster for cotton yarn
- Looks polished with minimal hardware
- Makes a thoughtful handmade gift (teachers, students, travelers)
Internal Linking Suggestions#
You may also like…
- Free Crochet Pattern: Simple Crochet Zipper Pouch
- Crochet Tutorial: How to Sew a Lining into Crochet Projects
- Best Yarn for Crochet Bags and Wallets (Cotton vs Acrylic)
- Crochet Tutorial: Neat Whip Stitch and Mattress Stitch Seams
- Free Crochet Pattern: Mini Coin Purse with Snap Closure
- DIY Crochet: How to Install Snaps and Reinforce Stress Points
FAQ Section#
What yarn is best for a crochet organizer wallet pattern?
Worsted cotton is the best choice because it holds shape and resists stretching. If you use acrylic, add a lining for extra structure.
Is this an easy crochet pattern for beginners?
Yes. It’s mostly single crochet rectangles and simple sewing. The pockets and strap are straightforward and very beginner-friendly.
How do I resize this organizer?
Change the foundation chain to adjust width and add or remove rows to adjust length. Build pockets to match the new width, and adjust strap length to wrap neatly.
Can I add more pockets?
Absolutely. Add extra pocket panels and sew vertical seams to create compartments. This pattern is designed to be modular.
What closure works best?
A button-and-loop is the easiest. Snaps look sleek and stay secure. Magnetic snaps feel “boutique” but should be reinforced with felt or lining.
Do I need to line it?
Not required, but highly recommended if you want a professional finish, less stretch, and stronger pockets—especially for travel use.
Conclusion#
A crochet organizer wallet is one of the most practical things you can make: it keeps your essentials tidy, travels beautifully, and teaches finishing skills that instantly level up your crochet. This free crochet pattern gives you a clean base, customizable pockets, and a secure strap closure—so you can tailor it to exactly what you carry.
If you tell me what you want to store (cards + cash, passport, crochet hooks, baby essentials), I can suggest the best pocket layout measurements so your crochet pattern fits your needs perfectly.


