


Introduction#
If your crochet hooks, scissors, stitch markers, and tape measure are always “somewhere,” you’re going to love this project. A dedicated tool organizer isn’t just cute—it saves time, keeps your workspace calm, and makes it easier to grab what you need without digging through bags and bins.
Explore more beginner home decor crochet patterns in our pattern library.
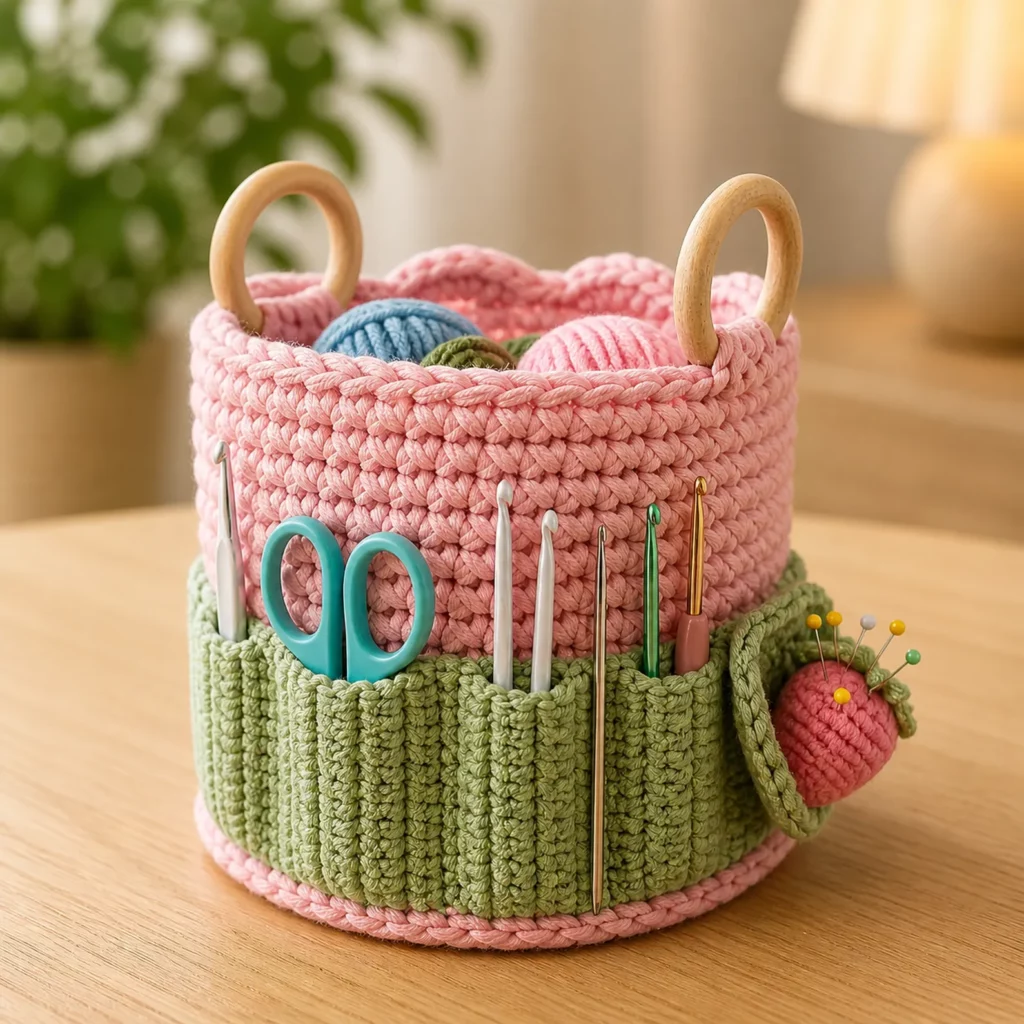
This crochet pattern is designed to create a structured, roomy organizer basket with two standout features: a firm body that holds shape and a wide pocket band that neatly stores tools around the outside. Add sturdy handles and you’ve got a portable craft station you can carry from room to room.
It’s practical DIY crochet, it’s beginner-friendly, and it’s one of those makes you’ll wonder how you lived without.
Detailed Description of the Crochet Pattern#
This project is a crochet tool organizer basket with:
- A sturdy cylindrical body (thick, structured walls)
- A contrasting lower pocket band with multiple “slots”
- Two side handles (wood rings or crocheted handles)
- Optional interior dividers (if you want even more organization)
Construction overview
You’ll crochet the basket in two main sections:
- The base + body (worked in the round for structure)
- The pocket band (worked separately in rows or rounds, then stitched on and segmented into pockets)
The basket shape is perfect for yarn cakes, small skeins, works-in-progress, and all your tools—while the pocket band keeps sharp items (like scissors) safely upright and easy to find.
Why it holds its shape
This isn’t a floppy storage bin. The structure comes from three smart choices:
- Dense stitch pattern (single crochet is your best friend here)
- A fold round (BLO round at the base creates crisp sides)
- Thicker yarn (t-shirt yarn or cotton cord gives instant firmness)
Skill Level Explanation#
This is an easy-to-intermediate crochet project.
Great for confident beginners who can:
- crochet in the round
- increase evenly for a flat circle base
- keep consistent stitch counts
- work simple edging and basic seaming
Intermediate (optional) upgrades:
- attaching handles securely
- adding a lining or base insert
- customizing pocket sizes and adding dividers
If you can make a basic basket or beanie, you can absolutely make this easy crochet pattern organizer.
Materials Needed#
Yarn
For a basket that stands up on its own, use yarn with body.
Best yarn choices:
- T-shirt yarn (fast, thick, very structured)
- Braided cotton cord (3–6 mm) (clean stitch definition, strong)
- Worsted cotton held double (budget-friendly option)
Yardage estimate (medium organizer):
- T-shirt yarn: 350–550 yards total
- Cotton cord: 250–450 yards total
- Worsted cotton held double: 500–800 yards total
You’ll typically use:
- Main color for body (example: red)
- Contrast color for pocket band (example: green)
Hook
Choose a hook that makes a dense fabric:
- T-shirt yarn: 8.0–10.0 mm
- Cotton cord: 5.0–7.0 mm
- Worsted held double: 6.0–8.0 mm
Tip: If your basket feels floppy, go down one hook size.
Notions
- Stitch markers (for rounds and handle placement)
- Yarn needle
- Scissors
- Measuring tape
Handles (choose one)
- 2 wooden rings (largest visual impact, sturdy)
- 2 D-rings (for a more modern hardware look)
- Or crochet your own built-in handles (no hardware)
Optional structure add-ons
- Plastic canvas circle (base insert)
- Felt circle (soft insert)
- Cardboard base covered with fabric (quick DIY)
- Fabric lining (for extra polish)
Stitches & Techniques Explained#
Abbreviations (US terms)
- ch = chain
- sl st = slip stitch
- sc = single crochet
- inc = increase (2 sc in one stitch)
- BLO = back loop only
- st(s) = stitch(es)
- rep = repeat
Single crochet in the round (best basket stitch)
Single crochet creates a dense, sturdy fabric with minimal gaps—exactly what you want for a functional organizer.
The “fold round” (BLO round for crisp corners)
Working one round in BLO sc creates a sharp bend where the base turns into the sides. This makes baskets look more professional and helps them stand tall.
Pocket band strategy (how the slots are made)
The pocket band is essentially a wide strip attached to the outside of the basket. Then you sew vertical lines at intervals to create individual pockets:
- wide pockets for scissors and tape measure
- narrow pockets for hooks, needles, pens
- medium pockets for stitch marker tins or small notions
This method is flexible—you can customize the pocket layout to your own tools.
Step-by-Step Instructions#
Pattern notes
- Written in US terms
- Basket is worked in continuous rounds (do not join unless stated)
- Use a stitch marker to mark the first stitch of each round
- Size is adjustable; pocket band can be customized
Finished size (example)
Approx. 8–10″ diameter x 7–8″ tall (medium organizer)
Part 1: Base (Flat Circle)
Using main color.
Rnd 1: MR, 6 sc (6)
Rnd 2: inc around (12)
Rnd 3: (sc, inc) around (18)
Rnd 4: (2 sc, inc) around (24)
Rnd 5: (3 sc, inc) around (30)
Rnd 6: (4 sc, inc) around (36)
Rnd 7: (5 sc, inc) around (42)
Rnd 8: (6 sc, inc) around (48)
Keep increasing in this pattern until your base is your preferred size:
- Small: 6–7″ diameter
- Medium: 8–10″ diameter
- Large: 11–12″ diameter
Rule of thumb: If the circle starts to ruffle, you’re increasing too much. If it cups, you need more increases.
Part 2: Fold Round (Creates the Corner)
Next Rnd: BLO sc around (same stitch count)
This is the round that turns your flat base into a basket.
Part 3: Basket Body (Sides)
Continue in sc around.
Rnd 1–? (sides): sc around until basket height is about 7–8″ (or your preferred height).
Optional structure boost:
- Work a few rounds of sl st at the top for a firmer rim
- Or crochet one extra round tighter (smaller hook) at the rim
Fasten off and weave in ends.
Part 4: Top Rim (Optional Clean Finish)
Join yarn at any point on the top edge.
Rnd A: ch 1, sc around, join
Rnd B: ch 1, sl st around (or crab stitch for a decorative edge), join
Fasten off.
Part 5: Pocket Band (Contrast Color)
Now make the outer pocket wrap.
Measure:
- Basket circumference (wrap measuring tape around the outside)
- Basket pocket band height (suggested 3.5–4.5″)
Pocket band strip (worked in rows):
Ch to match the pocket band height + 1 (for turning)
Example: For a 4″ band, you might ch 13–17 depending on yarn thickness.
Row 1: sc in 2nd ch from hook and across. Turn.
Row 2: ch 1, sc across. Turn.
Repeat Row 2 until strip length matches your basket circumference.
Fasten off leaving long tails for sewing.
Part 6: Attach Pocket Band
Wrap the band around the basket bottom section.
- Align the bottom edge of band near the basket base
- Pin in place with stitch markers
Sew the top and bottom edges of the band to the basket using whip stitch.
Part 7: Create the Pockets (Vertical Seams)
Now decide pocket widths.
Suggested pocket layout:
- 2 narrow pockets (hooks)
- 1 medium pocket (tape measure)
- 1 wide pocket (scissors)
- 1 medium pocket (pens/needles)
Mark pocket divisions with stitch markers.
Sew vertical lines from top of pocket band to bottom of pocket band at each marker to form pockets.
Pro tip: Reinforce the top of each pocket seam with a few extra stitches (stress point).
Part 8: Handles
Option A: Wooden ring handles (most like the photo)
You’ll attach two rings at the top edge on opposite sides.
- Decide placement (usually centered left and right)
- Stitch the ring to the basket with strong yarn loops:
- Insert needle from inside to outside near rim
- Wrap yarn over ring and back into the basket
- Repeat many times to create a thick, secure attachment
Repeat for second ring.
Option B: Crocheted handles (no hardware)
Mark two sections opposite each other.
At handle placement round:
- sc to handle start
- ch 10–18 (depends on desired handle size)
- skip same number of stitches
- sc around
Next round: sc around, placing multiple sc into chain space to reinforce.
Part 9: Optional Base Insert (Extra Structure)
Cut a circle of:
- plastic canvas, felt, or sturdy cardboard
to fit inside the base.
Insert it before adding a lining (if lining) or just place it inside for support.
Common Mistakes and How to Avoid Them#
- Basket won’t stand up:
Use thicker yarn, smaller hook, and more sc rounds. Add a base insert if needed. - Base is wavy (ruffling):
Too many increases. Reduce increases or add an “even” round. - Base is cupping:
Not enough increases. Add increases more frequently. - Pocket band doesn’t fit:
Measure circumference carefully and block the strip before attaching. - Pockets stretch out:
Reinforce vertical seams and avoid making pockets too wide. - Handles feel loose:
Add more attachment stitches and reinforce inside with extra passes of yarn.
Expert Tips for Better Results#
- Use stitch markers for symmetry: handle placement and pocket divisions look best when evenly spaced.
- Make the rim firm: add a slip stitch round or crab stitch for stability.
- Customize pocket sizes to your tools: test-fit your scissors and hooks before sewing pocket seams.
- Reinforce stress points: tops of pocket seams and handle attachments need extra stitching.
- Block the pocket band before attaching: it makes the band sit flatter and look cleaner.
- Add lining if you store sharp tools: lining protects yarn from snagging and keeps everything neat.
Variations and Customization Ideas#
- Yarn-only version: Skip pockets and make it a simple yarn basket.
- Add interior dividers: Crochet a rectangle panel and sew inside to create sections.
- Label pockets: Add small stitched tags (hooks, scissors, markers).
- Make it a rolling caddy: Crochet around a sturdy plastic container for instant structure.
- Change handle style: leather straps, D-rings + webbing, or crochet handles.
- Color themes: neutral body + bright pockets, or matching monochrome for a modern look.
Benefits of This Crochet Project#
- Keeps crochet tools organized and easy to grab
- Portable craft station you can move room-to-room
- Uses sturdy stitches that build basket skills fast
- Custom pockets prevent tools from getting lost
- Great stash buster for bulky yarn or cord
- Makes a thoughtful gift for crocheters and knitters
Internal Linking Suggestions#
You may also like…
- Crochet Tutorial: How to Crochet a Flat Circle (Perfect Basket Bases)
- Best Yarn for Crochet Baskets (Cord vs T-shirt Yarn)
- Crochet Tutorial: Crab Stitch Edging for a Professional Rim
- DIY Crochet: How to Add a Lining to Crochet Storage Baskets
- Free Crochet Pattern: Simple Crochet Basket for Beginners
- Free Crochet Pattern Roundup: Organization & Storage Crochet Ideas
FAQ Section#
What yarn is best for a crochet basket organizer pattern?
T-shirt yarn and braided cotton cord are the best options because they hold shape and resist stretching. Worsted cotton held double also works well.
Is this an easy crochet pattern for beginners?
Yes. The stitches are simple (mostly single crochet), and the shaping is straightforward. The pockets are made with basic sewing lines, which is very beginner-friendly.
How do I make the basket bigger or smaller?
Increase the base circle to your desired diameter, then crochet more or fewer rounds for height. Adjust the pocket band length to match the new circumference.
How do I keep the pockets from stretching out?
Make pockets narrower rather than very wide, reinforce the tops of pocket seams, and use firm yarn (cotton cord or t-shirt yarn). A lining also helps.
Do I need wooden handles?
No. Wooden rings look stylish, but crocheted handles or D-rings work just as well. Choose what matches your supplies and style.
Can I add a lining to this basket?
Absolutely. A lining adds polish and helps protect yarn from snagging on sharp tools. It’s especially useful if you store scissors, needles, or pins in the pockets.
Conclusion#
A crochet tool organizer basket is one of the most practical projects you can make—because it instantly improves how you craft. This free crochet pattern gives you a sturdy base, structured sides, customizable pockets, and handle options so it fits your tools and your space perfectly.
If you tell me your yarn type (t-shirt yarn, cotton cord thickness, or worsted held double) and the diameter you want (small/medium/large), I can adjust the stitch counts and pocket layout so your crochet pattern comes out exactly the size you need.


