


Introduction#
When you want a crochet pattern that’s cute, useful, and genuinely interactive, a sensory busy board blanket is hard to beat. It’s like a soft, portable activity board made with yarn and fabric textures—perfect for little hands that love to explore. Instead of plastic toys that get dropped and lost, you create one cozy mat packed with safe “fidgets”: a zipper section, big buttons, braided loops, a soft pocket flap, and different crochet textures that invite squeezing, rubbing, pulling, and practicing fine-motor skills.
Explore more beginner blankets crochet patterns in our pattern library.
This project is also a smart DIY crochet idea because it can be as simple or as detailed as you want. You can make just a few activity sections for a quick finish, or go all-out with multiple panels and attachments. Either way, the construction stays manageable: you crochet a sturdy base mat, crochet (or sew) small activity panels, attach them securely, and finish with a clean border plus ribbon tabs for extra tactile play.
This crochet tutorial is written to give real value, not just a quick list of steps. You’ll learn how to plan the layout, choose safe materials, create textured squares, attach interactive pieces properly, and keep everything secure and washable.
Detailed Description of the Crochet Pattern#
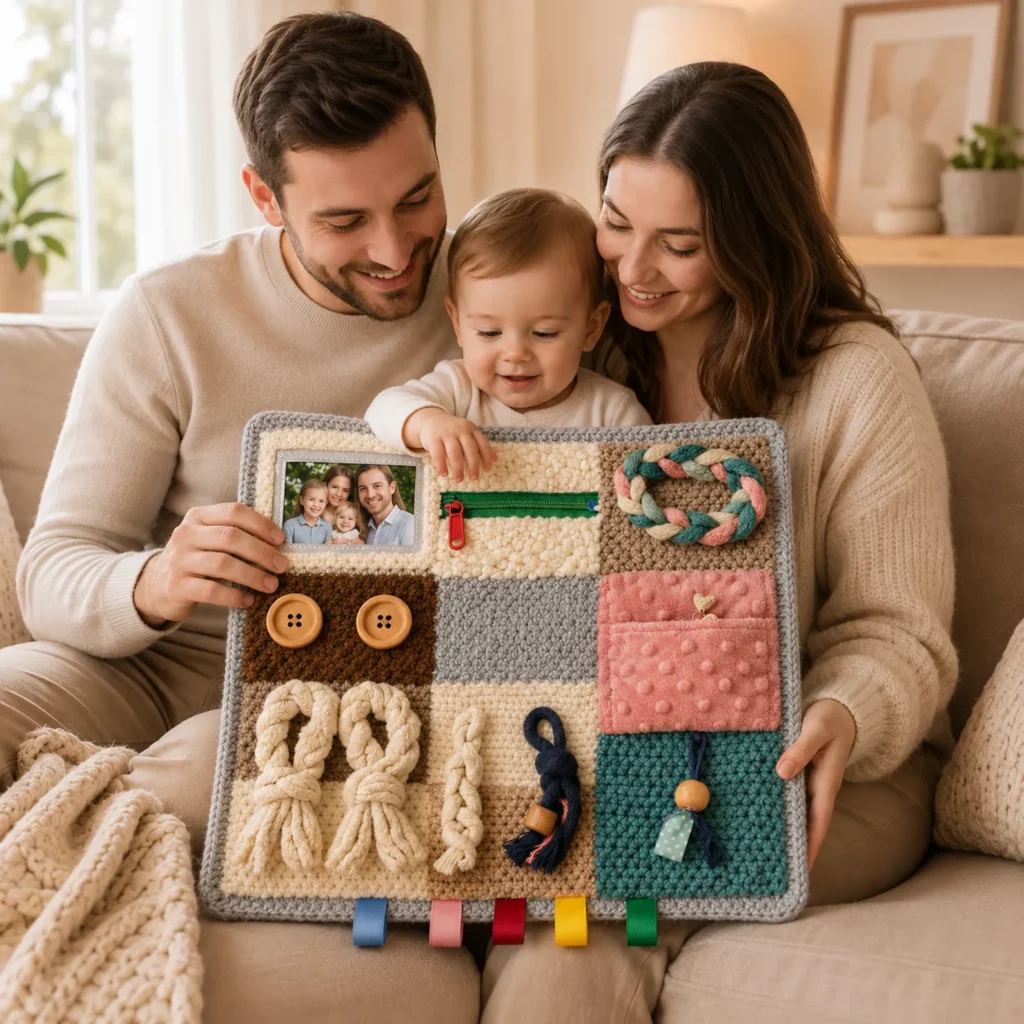
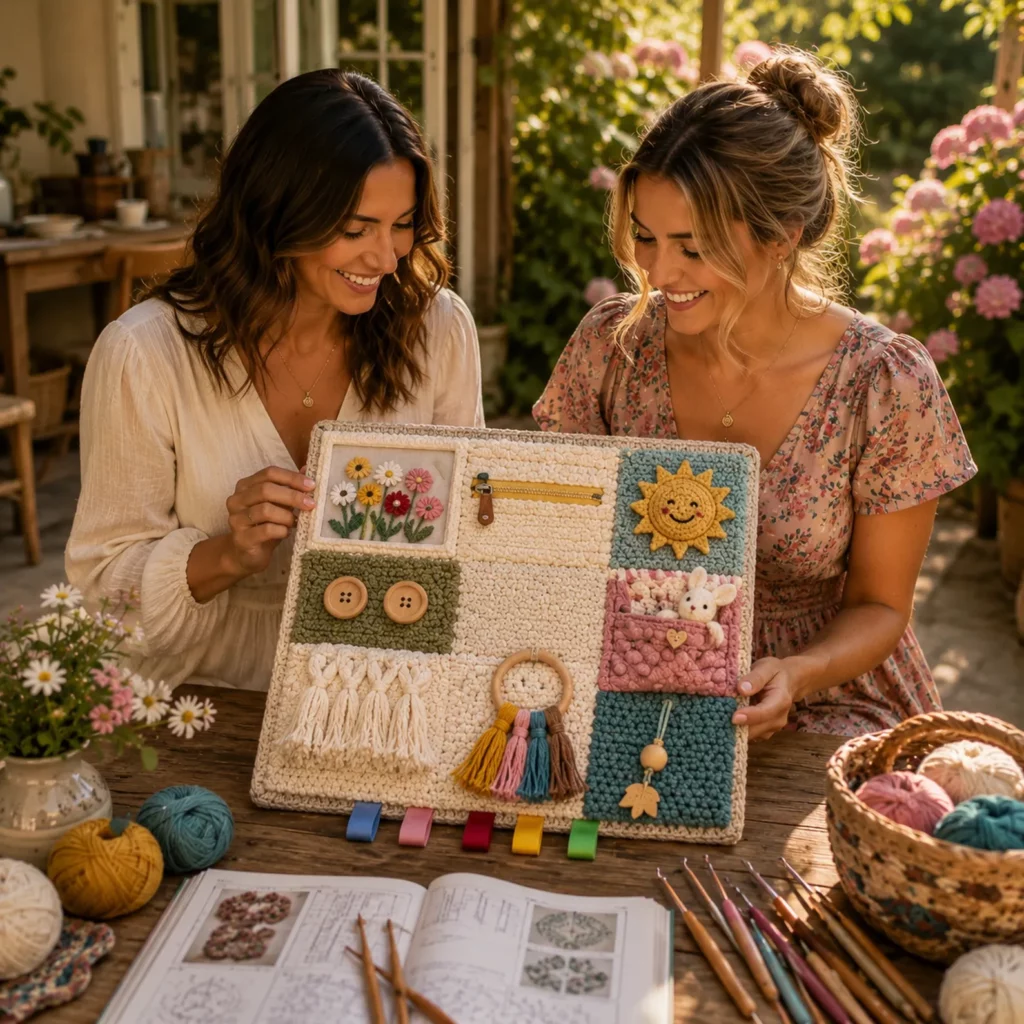
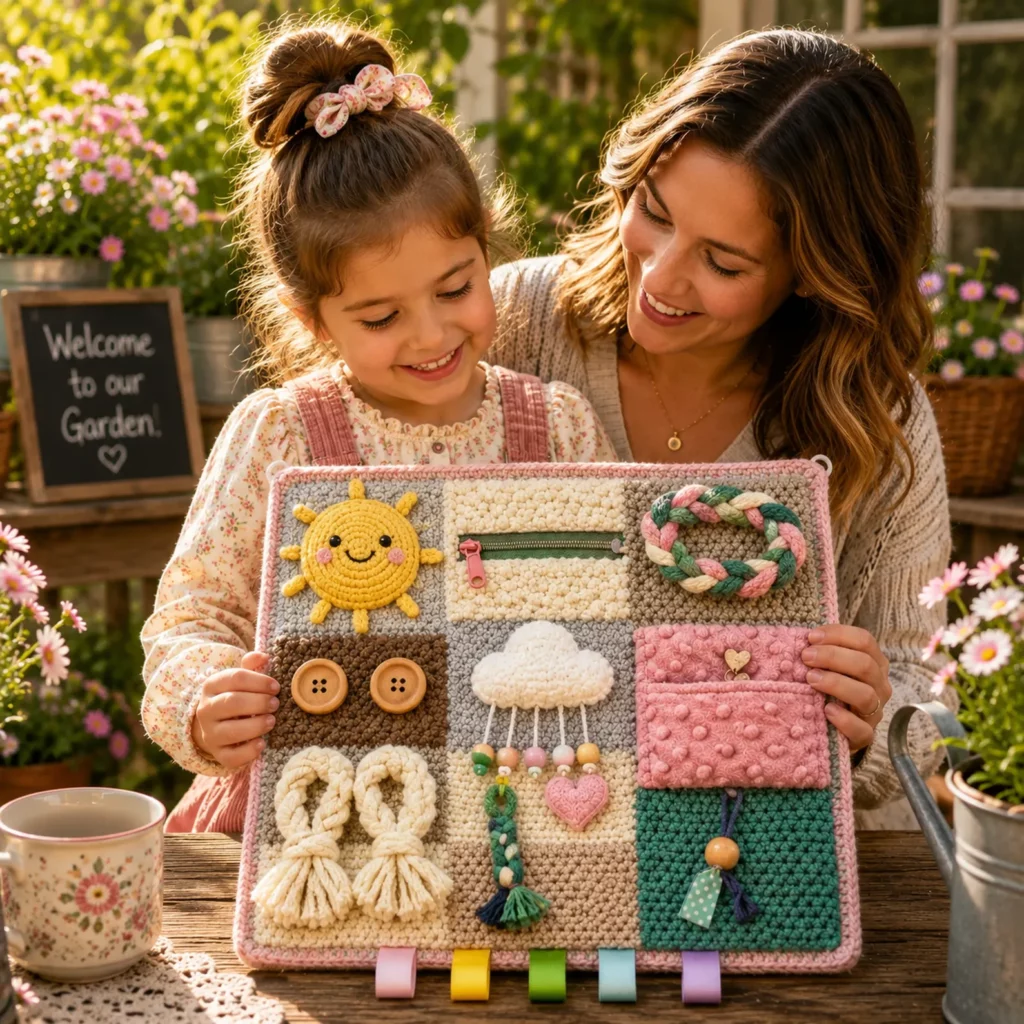
This crochet pattern creates a rectangular sensory lap mat made from several stitched panels joined together like a patchwork quilt. Each panel has a different texture or interactive element. The base is framed with a border, and the bottom edge includes ribbon tags in different colors for a classic sensory “tag blanket” effect.
Key features you can include
A zipper pocket panel for practicing open and close motion
A big button panel for pushing, touching, and unfastening (best for older toddlers with supervision)
Braided loops or knot cords for gripping and pulling
A plush “minky-style” pocket with a small object tucked inside (optional and supervised)
A chunky braided ring loop (great for tactile play)
Multiple crochet textures: bobbles, nubs, tight single crochet, and looser stitch patterns
Ribbon tags along one edge for sensory exploration
How it’s made
Crochet a base mat (either one solid rectangle or joined squares)
Create each activity panel separately
Sew panels onto the base with strong stitching
Add interactive parts (zipper, buttons, braids, loops) with reinforced attachment
Finish with a border to protect edges and stabilize the mat
Skill Level Explanation#
Skill level: Confident beginner to intermediate
This is crochet for beginners friendly if you already know the basics and you’re willing to take your time with assembly.
Skills you’ll use
Chain, single crochet, half double crochet, double crochet
Working in rows and joining pieces
Basic sewing with a tapestry needle
Simple surface stitching for reinforcement
Optional: attaching a zipper (no sewing machine required, but you can use one)
The crochet stitches are easy. The most important part is secure finishing and safety-focused construction.
Materials Needed#
Yarn
Use durable, washable yarn that won’t shed easily.
Worsted weight (Category 4) is ideal for structure
Acrylic or cotton blends are great for washability
Plush/velvet yarn can be used for one panel, but avoid shedding fibers
Suggested colors
Mix light and dark tones for visual contrast
Include one or two bright colors for “focus panels” (zipper, tags, braids)
Hook
4.0 mm to 5.0 mm for worsted yarn
Use a slightly smaller hook for tight stitches that hold shape well
Notions and add-ons
Tapestry needle
Scissors
Stitch markers
Fabric panel (optional plush/minky-style square)
Zipper (6–8 inches is a practical size)
Large wooden or plastic buttons (only if age-appropriate and supervised)
Ribbon strips for sensory tags (cut ends sealed carefully)
Strong sewing thread (matching or clear) for reinforcing attachments
Optional: plastic teething ring (only if baby-safe, smooth, and secured properly)
Safety note
If this is for babies or children who mouth items, avoid small parts like loose beads, detachable charms, and unsecured buttons. For baby-safe versions, replace buttons with embroidered shapes or firmly stitched fabric tabs.
Stitches & Techniques Explained#
Abbreviations
ch chain
sc single crochet
hdc half double crochet
dc double crochet
sl st slip stitch
BLO back loop only
FLO front loop only
inc increase
dec decrease
st stitch
Important technique: reinforced attachment
For interactive pieces, sew them on using strong thread and multiple passes. A good rule is to stitch around the attachment area at least twice, then stitch across it once more like a “bar tack” to prevent tearing.
Texture options (why they matter)
Bobbles create raised bumps for tactile play
Tight sc makes a firm, grippy surface
Looser hdc or dc patterns feel softer and drapier
Plush fabric adds a completely different touch sensation
Step-by-Step Instructions#
Finished size
A common lap mat size is about 12 x 16 inches (30 x 40 cm)
You can scale up to 16 x 20 inches (40 x 50 cm) for a larger activity blanket
Layout plan (simple and effective)
Make a 3 x 3 grid of squares, each about 5 inches (12–13 cm), then add a border.
This keeps everything tidy and makes it easy to swap panels.
Crochet the Base Squares (make 9)
You can use different stitch textures for each square.
Square A: tight single crochet square (sturdy base)
Ch 21
Row 1 sc in 2nd ch from hook and across (20)
Row 2 ch 1, turn, sc across (20)
Repeat Row 2 until square measures about 5 inches
Fasten off
Square B: bobble texture square (sensory bumps)
Ch 21
Row 1 sc across (20)
Row 2 ch 1, turn, (sc 2, bobble) repeat across, ending with sc
Row 3 ch 1, turn, sc across
Repeat rows 2–3 until 5 inches
Fasten off
Bobble tip: keep bobbles on the same side for a consistent raised texture.
Square C: pebble texture square (seed stitch feel)
Ch 21
Row 1 sc across (20)
Row 2 ch 1, turn, (sc, hdc) repeat across
Row 3 ch 1, turn, (hdc, sc) repeat across
Repeat Rows 2–3 until 5 inches
Fasten off
Make a mix
Make at least 4 sturdy squares (Square A style) for panels that will hold hardware (zipper, buttons).
Join Squares Into a Grid
Arrange your 9 squares in a 3 x 3 layout. Alternate textures so the mat feels varied.
Joining method (strong and clean)
Whip stitch through outer loops with matching yarn
Or sl st join with your hook for a raised seam texture
Join squares into rows first (3 squares per row), then join the rows together.
Add a Border Around the Entire Mat
Border stabilizes edges and makes the mat look finished.
Round 1
Attach yarn at any corner
Ch 1, sc evenly around the mat
Work 3 sc into each corner space to keep corners flat
Join with sl st
Round 2
Ch 1, sc around again
Corners: 3 sc in the center corner stitch
Join and fasten off
Optional third round
Add one more round in a contrasting color for a framed look.
Create the Activity Panels
Now add interactive features to specific squares.
Panel 1: Zipper pocket panel
You need
A zipper (6–8 inches)
A fabric strip or crocheted strip behind it (to cover the opening)
Easy no-machine zipper panel method
Choose a sturdy square
Place zipper horizontally near the top of the square
Hand sew zipper tape to the square using strong thread
Sew a backing fabric rectangle behind the zipper so it forms a pocket
Crochet backing pocket (optional)
Ch enough to match square width
Work sc rows until it matches the zipper width area
Sew backing behind zipper to create a “stash pocket”
Safety tip
Keep pocket contents large and safe if used by kids. Many makers leave it empty for pure zipper practice.
Panel 2: Button texture panel (older toddlers, supervised)
Choose a textured square
Sew on two large buttons with strong thread
Make a crochet flap strip with buttonholes
Crochet flap strip
Ch 16
Row 1 sc across (15)
Row 2 ch 1, turn, sc 6, ch 2, skip 2, sc to end (buttonhole)
Row 3 ch 1, turn, sc across, working sc into ch spaces
Make two strips if you want two buttons
Sew one end of each strip firmly to the panel so it can wrap over the button
If you want baby-safe
Replace buttons with stitched circles and use Velcro-style fabric strips stitched securely instead (still supervised).
Panel 3: Braided ring panel
This is a thick, tactile braid attached in a loop.
Make braid strands
Cut 6 long yarn strands (or use thick cord yarn)
Fold in half, attach to panel securely, braid tightly, then form an oval loop and stitch the end down
Stitch the loop attachment multiple times in a box shape for strength
Panel 4: Plush pocket flap panel
Use a soft fabric square or plush yarn square for contrast texture
Add a pocket
Fold a rectangle in half, sew sides, stitch bottom edge to panel so it opens
Optional: add a decorative heart or flower applique sewn flat
Panel 5: Knot cords and loops
Create thick cords by chaining or making i-cord style crochet cords
Attach cords at one end and add a knot at the free end
Add a few ribbon loops or yarn loops near the bottom for pulling
Cord method
Ch 35–45
Sl st back down the chain to thicken
Tie a knot at the end
Sew the base down with multiple passes
Add Ribbon Tags Along One Edge
Cut 5–7 ribbon pieces, about 3 inches (7–8 cm) long each
Seal ends carefully so they don’t fray
Fold each ribbon in half
Insert folded ribbon between border rounds or sew securely under the border stitches
Space evenly along the bottom edge
Baby-safe reminder
Ribbon ends must be sealed and stitched very securely.
Final Reinforcement Check
Before you call it done, test each interactive piece gently
Pull lightly on braids, cords, and strap ends
If anything lifts or stretches at the stitching point, reinforce immediately
Weave in all yarn ends thoroughly
Trim any loose fibers
Common Mistakes and How to Avoid Them#
The mat curls or warps
Use tight, even tension on base squares
Block squares lightly before joining
Don’t add too many border stitches on the sides
Zipper area puckers
Pin zipper in place before sewing
Sew slowly and evenly
Use a backing fabric so the zipper tape lies flat
Buttons feel unsafe or loose
Use strong thread and multiple passes
Tie off securely and bury knots
Consider avoiding buttons for babies
Cords and braids pull out
Attach with a wide base seam, not just one point
Stitch in a box shape and then stitch an X across the box
Reinforce with strong thread if needed
Too many bulky elements in one spot
Balance textures across the mat
Avoid stacking several thick items in one square
Keep the center area flatter if it’s a lap mat
Expert Tips for Better Results#
Use a consistent square size so joining is stress-free
Mix high-contrast textures: smooth, bumpy, plush, braided
Keep hard pieces away from the center if the mat will rest on a lap
Add a removable fabric lining behind the entire mat for extra stability (optional)
For a cleaner look, use a neutral border color to “frame” all the panels
Variations and Customization Ideas#
Travel-friendly version
Add a handle loop at the top and a snap strap to roll it up.
Theme version
Ocean colors with shell appliques
Pastel nursery palette with soft textures
Bright rainbow tags and high-contrast squares
Name personalization
Surface stitch initials on one square
Sew on a fabric label (flat and secure)
Extra learning features
Add numbers or shapes as flat appliques
Add a simple lace-up section using crocheted eyelets and a thick cord
Benefits of This Crochet Project#
A high-value crochet pattern that supports tactile exploration
Portable activity mat that’s easy to carry
Customizable for different ages and interests
Great scrap yarn project because each square can be a different color
Washable and reusable with proper materials
A meaningful handmade gift that feels thoughtful and unique
Internal Linking Suggestions#
Free Crochet Pattern Collection for Baby Blankets
Crochet Texture Stitches for Beginners
How to Attach Zippers to Crochet Projects
DIY Crochet Toys and Sensory Projects
Beginner Guide to Joining Crochet Squares Neatly
FAQ Section#
Is this a free crochet pattern suitable for beginners?
Yes, if you know basic stitches. The main focus is careful assembly and secure attachment of interactive parts.
What yarn is best for a sensory busy blanket?
Worsted cotton blends or durable acrylic are best because they hold up to pulling and washing.
Can I make it baby-safe?
You can, but you should avoid buttons, beads, and detachable pieces. Use embroidered or flat appliques and reinforce every attachment.
How do I wash it?
Use washable yarn and pre-wash any fabric panels. Gentle cycle and air dry is safest, especially with attachments like zippers.
How do I size it up or down?
Change the number of squares or increase the square size. A 4 x 4 grid makes a bigger blanket-style mat.
Do I need a sewing machine for the zipper?
No. You can hand sew the zipper with strong thread. A machine is optional, not required.
What are the best textures to include?
A mix works best: bobbles, tight sc, plush fabric, braids, ribbons, and cords—each gives a different sensory feel.
Conclusion#
A crochet sensory busy board blanket is a creative, practical crochet pattern that combines texture, color, and interactive elements into one portable project. By building a sturdy base, adding a zipper pocket, button practice panel, braided loops, plush textures, and ribbon tags, you get a finished mat that feels high quality and genuinely engaging.
If you tell me the finished size you want (in inches or cm) and the child’s age range, I can suggest a safer activity layout and the best set of panels to include.


