


Introduction#
If you want a crochet pattern that feels practical and “wear it every day” cute, crochet loafer slippers are a perfect project. They have that classic slip-on shoe look—clean lines, a structured toe, a comfy low profile—and they’re surprisingly simple to crochet once you understand the construction. You’ll start with a sturdy sole, build up the sides, shape the toe, and finish with a neat contrasting trim plus a decorative button strap that gives the shoes a polished, boutique feel.
Explore more beginner tops crochet patterns in our pattern library.
These slippers are especially great because you can customize them endlessly. Make them nautical with navy and cream, go neutral with beige and ivory, or choose bold colors for a fun statement. You can also adjust the fit easily: snug for indoor-only slippers, or slightly roomier if you plan to wear them with socks. Add a non-slip sole, and you’ve got a handmade shoe that feels both cozy and secure.
This crochet tutorial is written to be beginner-friendly, but still detailed enough to help you get a professional result. You’ll learn how to size the sole, keep the edges clean, shape the toe without lumps, and attach the strap so it doesn’t flop around or stretch out.
Detailed Description of the Crochet Pattern#
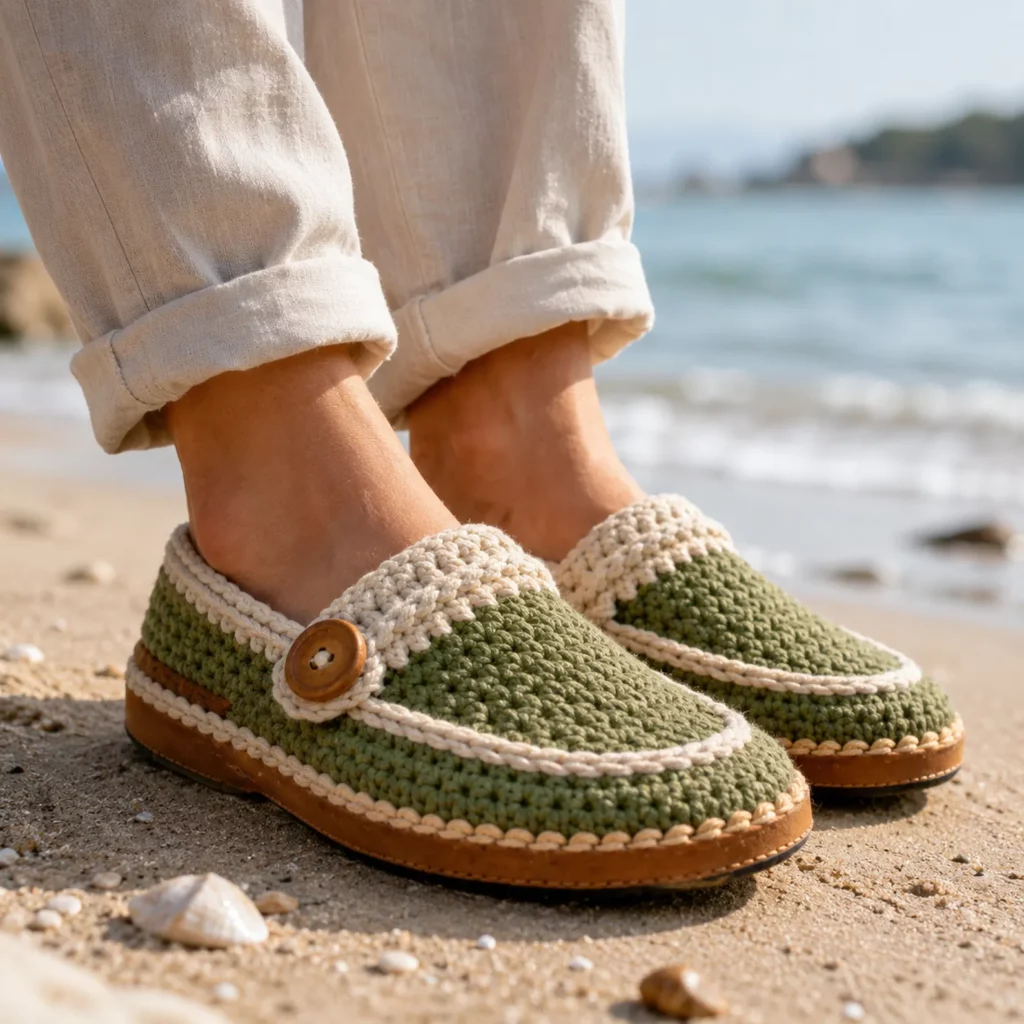
This crochet pattern makes slip-on loafer-style slippers with a rounded toe, low sides, and a neat upper edge. The most eye-catching details are the contrasting trim around the opening and toe line, plus the side strap with a button accent.
Design features
Rounded toe and structured upper so the slipper looks like a shoe, not a sock
Low-cut opening for easy slip-on fit
Two-tone trim that outlines the shape cleanly
Side strap with a button detail for a classic loafer vibe
Sturdy sole that can be reinforced or paired with a purchased slipper sole
How it’s made
You crochet the sole first in continuous rounds, increasing at the toe and heel. Then you “turn the corner” by working one round in back loops only, which creates the vertical sides. After that, you crochet the sides upward and shape the toe by working short rows or decreases across the front section. Finally, you add trim and the button strap.
Skill Level Explanation#
Skill level: Confident beginner
Perfect if you already know
Chain (ch)
Single crochet (sc)
Half double crochet (hdc)
Slip stitch (sl st)
Working in rounds
Basic increasing and decreasing
You’ll learn or practice
Turning the work upward using back loop only (BLO)
Shaping a toe with short rows or decreases
Neat edging and trim placement
Sizing a crochet sole for different feet
This is an easy crochet pattern in stitches, and the “skill” is mostly in fit and finishing—both of which you’ll get clear guidance for.
Materials Needed#
Yarn
Worsted weight (Category 4) cotton or acrylic works well
Cotton gives great structure and breathability
Acrylic is softer and often warmer indoors
For extra durability, consider a cotton-acrylic blend
Colors
A main color (navy or any base shade)
B contrast color (cream/white for trim)
Optional accent color for a stripe or heel detail
Hook
3.5 mm to 4.5 mm for worsted yarn
Use a smaller hook if you want a tighter, sturdier slipper
Notions
Stitch markers
Tapestry needle
Scissors
Measuring tape
Buttons (1 per shoe, 1–1.25 inches or 2.5–3 cm looks great)
Optional: non-slip sole pads or sock stop paint
Optional: foam or felt insole for extra comfort
Yarn choice tip for slippers
If you want long-lasting slippers, choose a yarn that can handle friction. Smooth cotton or sturdy acrylic tends to wear better than fuzzy yarn.
Stitches & Techniques Explained#
Abbreviations
ch chain
sc single crochet
hdc half double crochet
dc double crochet
sl st slip stitch
inc increase (2 stitches in one stitch)
dec decrease (single crochet two together or hdc2tog)
BLO back loop only
FLO front loop only
st stitch
rep repeat
rnd round
Turning the corner (BLO round)
After you finish the flat sole, crocheting one round in BLO makes a crisp edge and pushes the next rounds upward, creating the slipper sides.
Toe shaping (two beginner-friendly options)
Option A decrease shaping across the toe in rounds (simple and sturdy)
Option B short rows for the upper (gives a smooth loafer top line)
This tutorial uses the decrease shaping option because it’s easier to size and repeat.
Neat color change for trim
Finish the last yarn over of the final stitch with the new color, then continue. This prevents little dots of the old color from showing in the trim.

Step-by-Step Instructions#
Sizing guide
Because feet vary, the most reliable method is to measure the wearer’s foot and adjust the starting chain and sole rounds.
Foot length measurement
Measure from heel to longest toe
Your crochet sole should be about 0.25–0.5 inches (0.5–1.25 cm) shorter than the foot length for a snug slipper fit (the yarn stretches)
Starter sizing (approximate)
Small (US Women 5–6): foot length about 9 inches, start chain 13
Medium (US Women 7–8): foot length about 9.5–10 inches, start chain 15
Large (US Women 9–10): foot length about 10.5–11 inches, start chain 17
Men’s sizes: typically start chain 17–21 depending on foot length
If you are unsure, start smaller. It’s easier to add rounds than to remove length later.
Color key
A main color
B contrast trim
Sole (A)
Ch the size you need (example given: ch 15 for a medium)
Round 1
Sc in 2nd ch from hook
Sc in next stitches across until last ch
In last ch work 3 sc (this forms the toe curve)
Now work along the underside of the chain
Sc in each ch across
In the last ch (the starting end) work 2 sc (this forms the heel curve)
Join or continue in rounds (marker recommended)
Round 2
Sc around
At the toe curve (the 3-stitch curve), work inc in each of those 3 stitches
At the heel curve (the 2-stitch curve), work inc in each of those 2 stitches
Round 3
Sc around
At toe curve: (sc, inc) repeated across the curve stitches
At heel curve: (sc, inc) across the curve stitches
Round 4
Sc around
At toe curve: (2 sc, inc) across the curve area
At heel curve: (2 sc, inc) across the curve area
Keep repeating one more round if you need a longer or wider sole
For a wider foot, add an extra increase round
For a longer foot, add one more round with increases mainly at toe and heel
Sole width check
Stand on a paper outline of your foot and compare to your crocheted sole. The sole should match the widest part of your foot comfortably.
Turn the Corner (A)
Next round
Sc in BLO only around the entire sole
This creates the vertical wall and gives the slipper that structured “shoe” shape
Build the Sides (A)
Rounds 1–3 of sides
Sc around in both loops
If you want a taller slipper wall, add another round here
Shape the Toe (A)
We will now decrease across the front section of the slipper to create the loafer toe cap.
Mark the toe section
Put the slipper on your foot (or a foot form) and mark the front third of stitches as the toe area. If you don’t have a foot form, eyeballing works: the toe area is the section that sits over your toes, not the sides.
Toe shaping rounds
Round 1 toe shaping
Sc around until you reach the toe section
Work dec evenly across the toe section (about 6–10 decreases depending on slipper size)
Sc around the rest of the round
Round 2 toe shaping
Repeat the same idea
Dec across the toe section again, slightly fewer decreases than round 1 if it’s getting tight
Sc around the rest of the round
Round 3 toe shaping
Try the slipper on
If the toe still feels loose, do one more toe shaping round with a few decreases
If it feels snug and the opening looks like a loafer, stop decreasing
Fit tip
The toe should hug gently without pressing down hard. Crochet slippers loosen slightly with wear, so a snug fit at first is good.
Create the Loafer Opening Edge (A)
Once the toe shape is correct, crochet one round of sc evenly around the top opening to smooth the edge.
Optional strap anchor points
Decide where the strap will sit (usually near the side top edge). Place a stitch marker there on each side so both shoes match.
Contrast Trim (B)
Toe trim line
Attach B at one side near the toe line
Sl st or sc along the line that outlines the toe cap
If your toe cap line isn’t naturally defined, follow a consistent row and keep it symmetrical
Top opening trim
Attach B at the back heel seam
Work a round of sc or sl st around the opening edge
Sl st gives a flatter, more “piped” look
Sc gives a slightly thicker edge
Button Strap (B)
This strap gives the loafer look and also helps snug the fit.
Strap (make 2)
Ch 10–14 depending on button size and desired look
Row 1 sc in 2nd ch and across
Row 2 ch 1, turn, sc across
Row 3 repeat row 2 for a thicker strap (optional)
Buttonhole
On the last row, make a buttonhole by
Sc 2–3, ch 2, skip 2, sc to end
Adjust the ch amount to fit your button
Attach strap
Sew one end of the strap to the outer side of the slipper near the opening
Wrap strap toward the front or side (your preferred placement)
Sew the button to the opposite side so the strap closes neatly
Optional decorative stripe near the heel
A small line of contrast yarn near the heel area can mimic a sporty loafer detail. You can surface stitch a stripe with yarn and a needle.
Finishing the Bottom
If you are wearing these indoors, add anti-slip grips.
Options
Sock stop paint in small dots
Non-slip suede or leather patches stitched on
Silicone grip fabric glued and stitched (best durability)
Extra comfort option
Cut a felt insole and place inside the slipper. You can tack it in with a few stitches so it doesn’t slide.
Common Mistakes and How to Avoid Them#
Slippers are too big
Crochet soles stretch. Make the sole slightly shorter than the foot length. Use a smaller hook for tighter stitches.
Toe cap looks pointy or uneven
Your decreases may be too concentrated. Spread decreases evenly across the toe section. Use stitch markers to keep the toe centered.
Top opening is too tight
Stop decreasing earlier. Add one extra side round before toe shaping. Consider switching from sc to hdc for one round to add flexibility.
Sides flare outward
Your sole may be too wide or you may need a tightening round. Try one round of sc with a decrease every 10–12 stitches.
Trim looks wavy
Edge stitches may be too many. If using sc, keep tension steady and avoid adding extra stitches. Sl st trim is often smoother on curves.
Strap stretches or looks floppy
Crochet strap tightly and reinforce with a second layer (two rows). Sew strap ends with multiple passes. Add a small hidden cord inside the strap if needed.

Expert Tips for Better Results#
Use cotton or a structured blend for a loafer look that holds shape
For a cleaner toe outline, work the toe trim using slip stitches
If you want a more “shoe-like” finish, add one extra round at the top opening and crochet it tightly
Take time on symmetry: match strap placement and toe trim on both shoes
Block lightly by shaping the slippers with socks or paper forms inside them and letting them rest overnight
Variations and Customization Ideas#
Two-tone preppy style
Navy body with cream trim and a brown button for a nautical vibe.
Cozy cabin slipper version
Use bulky yarn and a larger hook. Add an extra round of sides for a deeper slipper.
Outdoor-friendly version
Stitch the crocheted upper to a purchased rubber slipper sole. This makes them much more durable.
Mary Jane style
Make the strap longer and place it across the top instead of the side.
No-button minimalist loafer
Skip the strap and do a clean trim only. Add a small embroidered “stitch line” across the toe for detail.
Personalized gift version
Add initials with surface crochet on the side or heel.
Benefits of This Crochet Project#
Practical crochet pattern you can actually wear
Great beginner-friendly introduction to crochet footwear
Customizable sizing and colors
Stylish design that looks polished and modern
Fast to make once you understand the sole and toe shaping
Perfect handmade gift for birthdays, holidays, and housewarming
Internal Linking Suggestions#
How to Crochet a Perfect Oval Sole for Slippers
Best Yarn for Crochet Shoes and Slippers
How to Add Non-Slip Soles to Crochet Footwear
Beginner Guide to Invisible Decreases
Easy Crochet Accessories You Can Make in a Weekend
FAQ Section#
Is this crochet slipper pattern beginner-friendly?
Yes. The stitches are simple. The key is following the sole and toe shaping steps carefully and checking fit as you go.
How do I choose the right size?
Measure foot length and crochet the sole slightly shorter for a snug fit. Add or remove sole rounds to adjust.
What yarn is best for crochet loafers?
Cotton or a sturdy acrylic blend works best. Very soft yarn can stretch and lose shape faster.
Can I wear crochet slippers outside?
With a reinforced sole or a purchased outsole, yes. For indoor-only use, add non-slip grips for safety.
How do I stop the slippers from stretching?
Use tight stitches, choose structured yarn, reinforce the top edge, and consider lining or adding an insole.
Do I have to add the button strap?
No. It’s decorative and helps snug the fit, but the slippers still look great with just the trim.
Conclusion#
Crochet loafer slippers are the perfect blend of cozy and stylish. This crochet pattern gives you a structured slip-on shoe shape, a clean two-tone trim, and a classic button strap detail that makes the finished pair look boutique and gift-worthy. Once you make one pair, you’ll want another in a different color—because they’re practical, satisfying, and surprisingly fast.
If you tell me the foot length you want to make (in inches or cm) and your yarn weight, I can give you an exact starting chain and recommended number of sole rounds for a perfect fit.


