


Introduction#
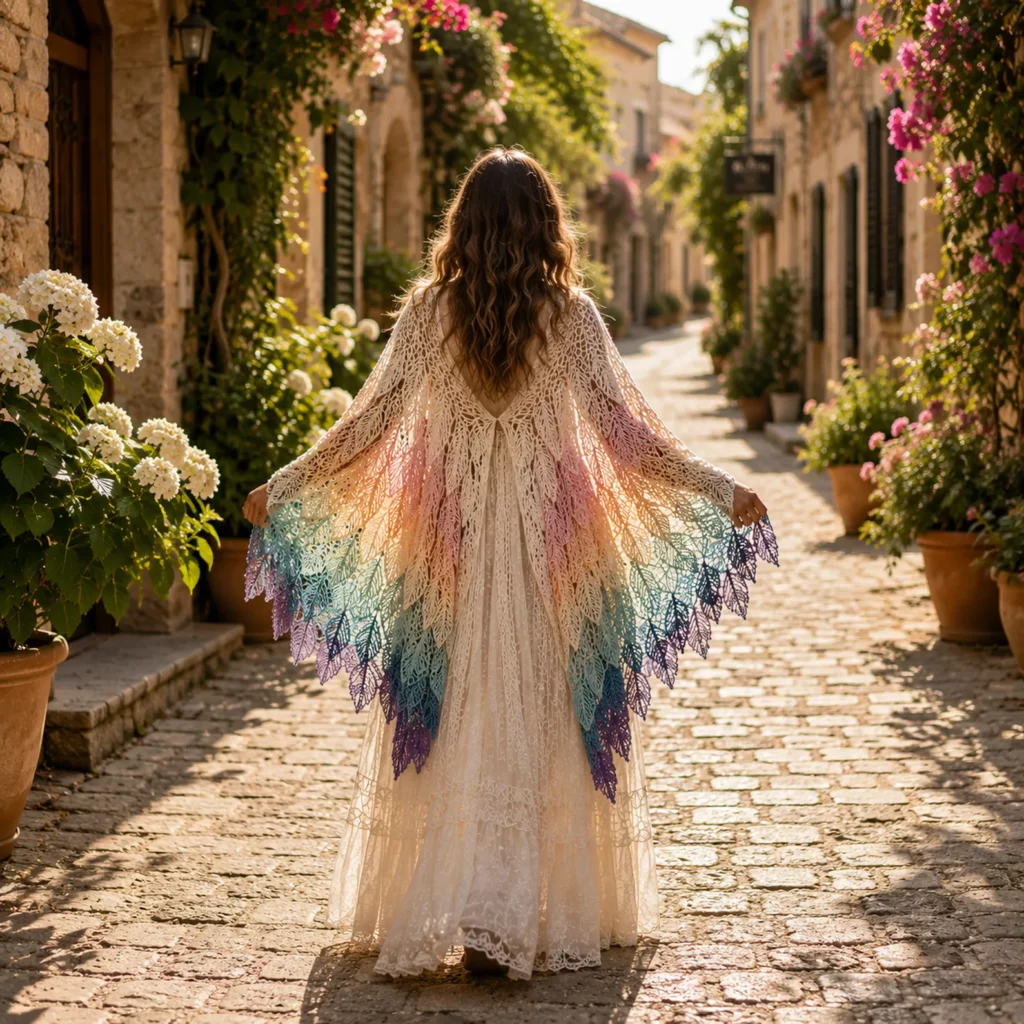
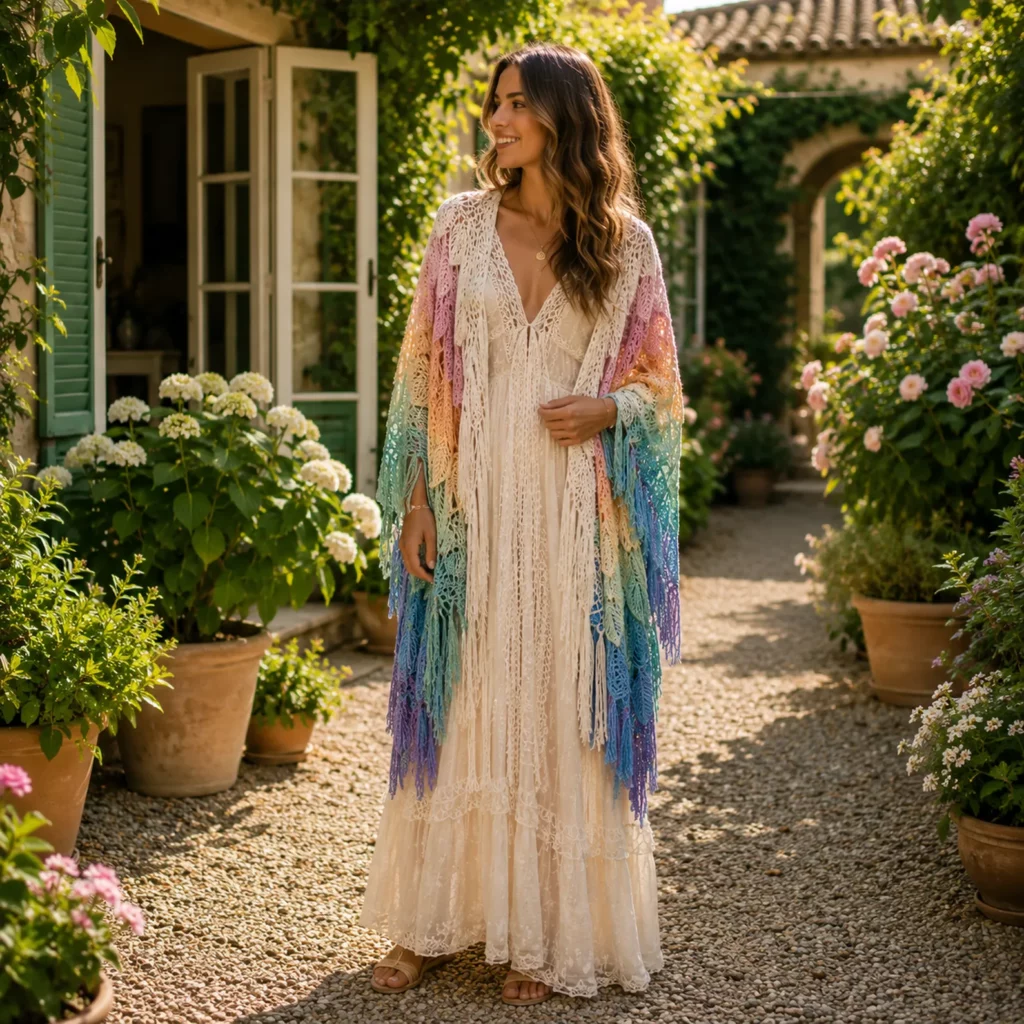
If you’ve ever wanted a crochet pattern that makes people stop and ask “Where did you get that?”, a layered leaf cape shawl is it. This wrap isn’t just warm and wearable, it’s pure statement. The overlapping leaf layers create a beautiful “feather-like” texture that moves as you walk, while the airy lace stitches keep it light enough to drape over dresses, tops, and event outfits.
Explore more beginner tops crochet patterns in our pattern library.
The best part of this crochet tutorial is that the wow factor comes from repeating one motif well. You’re not memorizing a hundred complicated rows. Instead, you’ll crochet a leaf-shaped lace motif, then layer and join those leaves to build a dramatic cape silhouette. The color flow (from light at the top to deeper shades toward the bottom) turns it into wearable art. Whether you choose soft pastels, ocean tones, autumn fades, or a full rainbow, the construction stays the same.
This guide walks you through materials, the leaf motif stitches, how to scale the cape to your body, how to join without bulky seams, and how to keep the wrap balanced so it sits comfortably across your shoulders.

Detailed Description of the Crochet Pattern#
This project is a large layered cape shawl built from many leaf-shaped motifs arranged in overlapping rows. Each leaf has a central spine with angled “veins” created by simple stitch height changes and lace spaces. The motifs overlap like layered petals: smaller leaves near the neckline, larger leaves as you move downward, and the longest leaves along the outer edges.
Key design features
Wide wrap that drapes from shoulder to shoulder
V-shaped back neckline for an elegant fit
Layered leaf rows that create depth and movement
Lacy leaf texture for a lightweight, dramatic fabric
Gradient color layout (top light, bottom deeper) for dimension
Construction overview
Make many leaf motifs (in several sizes or repeated size with spacing)
Join motifs into horizontal rows (like layered bands)
Stack rows from top to bottom, overlapping slightly
Add a neckline and shoulder band for stability and comfort
Optional: add ties, a clasp, or a small button closure
This is a crochet pattern that looks complex, but the technique is repeatable and relaxing once you understand the motif.
Skill Level Explanation#
Skill level: Intermediate Beginner to Intermediate
You’ll be comfortable if you know
Chain (ch)
Single crochet (sc)
Half double crochet (hdc)
Double crochet (dc)
Treble crochet (tr)
Slip stitch (sl st)
Working in rows and joining motifs
You’ll also practice
Keeping motif tension consistent for symmetry
Joining motifs neatly (sl st join or whip stitch)
Planning a color gradient across a large wearable
Blocking lace for crisp, professional definition
Materials Needed#
Yarn
This shawl looks best in yarn that shows stitch definition and has good drape.
Recommended yarn weights
DK (Category 3) for delicate lace and elegant drape
Sport (light Category 2) for extra airy fabric
Worsted (Category 4) works, but will be heavier and less lace-like unless you use a larger hook
Fiber suggestions
Cotton blend: crisp stitches and clean leaf texture
Merino or wool blend: soft drape and gorgeous gradients
Acrylic: budget-friendly and easy care, great for bright colors
How much yarn
This is a large piece. As a guide
DK/Sport: 1200–1800 yards total depending on size and layering
If you do a full rainbow gradient with multiple colors, plan 6–10 colors in varying amounts
Hook
Use a hook that creates an open lace fabric without being floppy
Sport: 3.0–3.5 mm
DK: 3.5–4.0 mm
Worsted: 4.5–5.5 mm (test swatch recommended)
Notions
Tapestry needle
Scissors
Stitch markers (helpful for leaf tips)
Blocking mats and pins (strongly recommended)
Measuring tape
Optional shawl pin, clasp, or ribbon ties
Stitches & Techniques Explained#
Abbreviations
ch chain
sl st slip stitch
sc single crochet
hdc half double crochet
dc double crochet
tr treble crochet
inc increase (work 2 stitches into the same space/stitch)
picot (ch 3, sl st into first ch) for decorative points (optional)
sp space
Leaf motif structure (how it works)
A leaf motif usually has
A base (rounded bottom)
A center spine (a line of stitches up the middle)
Side “veins” (lace spaces and taller stitches that angle outward)
A pointed tip (often a picot or chain point)
To keep leaves symmetrical
Count stitches on both sides of the spine
Use stitch markers at the leaf tip and the center spine
Block motifs after finishing so every leaf lays flat
Joining methods
Slip stitch join: quick and tidy, slightly firmer seam
Whip stitch join: flexible and nearly invisible, great for lace
Join-as-you-go: saves time but needs careful placement
For layered edges, whip stitch or join-as-you-go keeps the fabric softer and more drapey.
Step-by-Step Instructions#
This crochet tutorial uses a repeatable leaf motif and shows how to assemble it into a layered cape shawl. You can scale by making more motifs, bigger motifs, or adding more rows.
Finished size (adjustable)
Small shoulder cape: width 45–55 in (115–140 cm)
Medium wrap cape: width 55–70 in (140–178 cm)
Large dramatic cape: width 70–85 in (178–216 cm)
A comfortable width is your fingertip-to-fingertip measurement or slightly shorter.
Crochet the Leaf Motif (medium leaf)
This is a beginner-friendly lace leaf. Make 40–80 motifs depending on your size.
Leaf Motif (worked in rows)
Foundation
Ch 12
Row 1
Sc in 2nd ch from hook
Hdc in next ch
Dc in next 2 ch
Tr in next 2 ch
Dc in next 2 ch
Hdc in next ch
Sc in last ch
Ch 1, turn
Row 2
Sc in first st
Hdc in next st
Dc in next 2 sts
Tr in next 2 sts
Ch 2 (spine gap)
Tr in next 2 sts
Dc in next 2 sts
Hdc in next st
Sc in last st
Ch 1, turn
Row 3 (start shaping outward)
Sc in first st
Hdc in next
Dc in next 2
Tr in next 2
In ch-2 space: (tr, ch 2, tr)
Tr in next 2
Dc in next 2
Hdc in next
Sc in last
Ch 1, turn
Row 4
Repeat Row 3
In the center ch-2 space: (tr, ch 2, tr)
Ch 1, turn
Row 5 (vein texture)
Sc in first st
Hdc in next
Dc in next 2
Tr in next 2
In center ch-2 space: (tr, ch 3, tr)
Tr in next 2
Dc in next 2
Hdc in next
Sc in last
Ch 1, turn
Row 6 (leaf tip)
Sc to the center space
In center space: (dc, tr, ch 3, sl st into first ch for picot, tr, dc)
Sc to end
Fasten off, weave ends
If you prefer no picot, replace it with ch 3 only.
Make several sizes (recommended for a more natural layered look)
Small leaf: start with ch 10 and do fewer rows
Large leaf: start with ch 14 and add 1–2 extra shaping rows before the tip
Plan Your Color Gradient
A layered cape looks most dimensional when the top leaves are lighter and the lower leaves are darker.
Simple gradient plan (example)
Top row: cream/white
Next row: blush/pink
Next row: peach/gold
Next row: mint/teal
Bottom row: deep teal/purple
How to distribute color
Smallest leaves in the lightest color
Medium leaves in mid tones
Longest leaves in the deepest tones
If you’re using a self-striping cake yarn
Group leaves by the natural color changes
Try to keep both sides mirrored (same order left and right) for a balanced look
Join Leaves Into Rows
Each row is a band of leaves placed side by side.
Row building method
Lay leaves flat with tips pointing downward
Overlap bases slightly so there are no gaps
Join leaf bases together using whip stitch through outer loops
Do not join the full sides, only the top/base area
This keeps the leaf tips free and layered
Row length goal
For a medium cape, each row may need 10–16 leaves depending on size. The top row uses smaller leaves and more pieces. The bottom row uses larger leaves and fewer pieces.
Stack Rows to Create the Cape Shape
The layered effect comes from stacking rows with overlap.
Assembly method
Lay the top row flat
Place the second row below it, overlapping the bases behind the first row’s leaf tips
Whip stitch the second row’s base area to the first row’s lower edge (light attachment)
Continue adding rows downward
Shaping for a flattering silhouette
To create a soft “cape curve,” make the center back slightly shorter and extend the sides
Add 1–2 extra leaves to the left and right ends of lower rows
Keep the center consistent but let the outer edges grow longer
This creates that elegant longer drape at the sides, which looks beautiful over dresses and skirts.
Create the Neckline and Shoulder Band
To keep the cape on comfortably, add a stable top band.
Neckline band (simple)
Attach yarn to the top center of your uppermost row
Ch 1 and sc across the entire top edge, working evenly into leaf bases
At the center back, shape a gentle V by skipping 1–2 stitches or working one small decrease
Work 2–4 rows of sc or hdc to form a soft collar band
Fasten off
Optional ribbed band (extra secure)
Work the band in hdc BLO for a subtle ribbed edge that grips the shoulders better
Optional closure
Add ties at the front corners of the band
Ch 50–80, sl st back down the chain for a firm tie
Or attach a shawl pin/clasp for an easy finish
Block for a Professional Finish
Blocking is what makes the lace “veins” pop and the layers lie beautifully.
How to block
Soak in lukewarm water, gently squeeze out excess
Lay flat on blocking mats
Pin each leaf tip so it opens evenly
Pin outer edges so both sides match
Let dry completely
Acrylic tip
Steam blocking works, but keep heat gentle and do not press directly on the yarn.
Common Mistakes and How to Avoid Them#
Cape looks uneven
Lay everything out before sewing
Count leaves per row on each side
Mirror your color order left and right
Leaves curl or twist
Tension may be too tight
Use a slightly larger hook for lace
Block motifs before final assembly
Gaps between leaves
Overlap base edges slightly
Add a tiny filler leaf where needed
Join only the tops so tips stay layered and naturally cover gaps
Neckline slips off shoulders
Make the top band firmer with sc or ribbed hdc BLO
Add ties or a clasp
Keep the V back shallow and comfortable
Wrap feels too heavy
Use DK or sport weight instead of worsted
Choose lighter fiber blends
Reduce the number of rows or increase lace spacing
Expert Tips for Better Results#
Make a simple paper layout: sketch a cape outline and place leaves on it before joining
Use stitch markers at every leaf tip while blocking for uniform points
Mix 10–20% different leaf sizes for a more natural layered effect
For a more wearable everyday wrap, use fewer rows and keep the outer tips shorter
For a dramatic event piece, extend the outer rows with extra large leaves on each side
Variations and Customization Ideas#
Bridal-style lace cape
Use ivory or white and add pearl beads at leaf tips.
Sunset gradient cape
Cream to blush to coral to gold to deep plum.
Ocean gradient cape
White to pale aqua to teal to deep blue to navy.
Autumn cape
Cream to tan to rust to olive to deep brown.
Mini shoulder cape
Use only 3 rows of leaves and shorten the width.
Festival statement wrap
Use bold rainbow tones and extend the side edges for extra movement.
Benefits of This Crochet Project#
High-impact crochet pattern that looks like wearable art
Repetitive, relaxing motif work once you learn the leaf rhythm
Perfect for photos, events, festivals, and gifting
Uses gradient yarn sets beautifully
Teaches motif joining and lace shaping skills you can reuse in shawls and garments
Creates a lightweight wrap with dramatic movement and feminine drape
Internal Linking Suggestions#
How to Crochet Leaf Motifs for Shawls and Lace Projects
Beginner Guide to Blocking Crochet Lace
How to Plan a Color Gradient for Crochet Wearables
Best Yarn for Crochet Shawls That Drape Well
Easy Crochet Wrap Patterns for Beginners
FAQ Section#
Is this crochet cape shawl pattern beginner-friendly?
It’s best for confident beginners. The stitches are simple, but repeating motifs and assembling rows neatly takes patience.
What yarn is best for a layered leaf wrap?
DK or sport weight yarn gives the best drape and lace definition. Cotton blends make crisp leaves, wool blends create softer flow.
How many leaf motifs do I need?
It depends on size. A medium wrap often uses 40–80 leaves across all rows. Make 6–10 leaves first and lay them out to estimate accurately.
Do I have to use multiple colors?
No. A single-color cape looks elegant and dramatic. The layered texture still creates depth even without a gradient.
How do I keep both sides symmetrical?
Count motifs per row, mirror your color order, and assemble on a flat surface. Pin everything before sewing.
Can I make it smaller or larger?
Yes. Make fewer rows for a smaller cape. Add rows and use larger leaves toward the bottom for a more dramatic wrap.
What’s the best way to join the leaves?
Whip stitch through the outer loops is flexible and nearly invisible. Slip stitch joins are faster but slightly firmer.
Conclusion#
A layered leaf cape shawl is one of the most striking crochet pattern projects you can make because it combines lace, texture, and color in a way that feels fashion-forward and feminine. The repeated leaf motifs build into overlapping rows, and once you add the neckline band and block everything, the wrap transforms into a dramatic cape that looks beautiful over dresses and everyday outfits alike.
If you tell me your preferred finished width (in inches or cm) and whether you’re using DK or sport yarn, I can suggest a practical leaf count per row and a simple gradient plan so your cape comes out perfectly balanced.


