


Introduction#
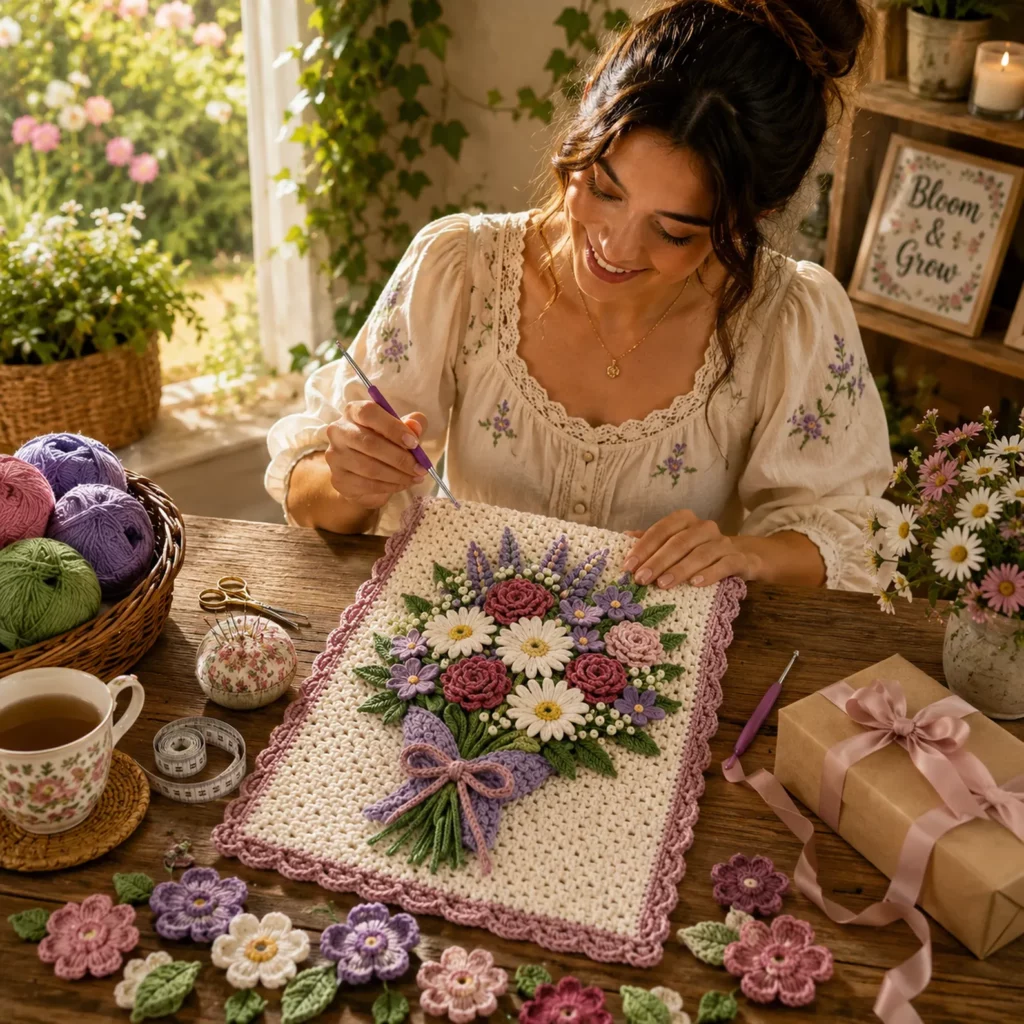
Sometimes you want a crochet project that feels like a present the moment it’s finished—something soft, romantic, and detailed enough to look “extra,” even if you’re using familiar stitches. A bouquet-themed crochet pattern is exactly that kind of project. It combines a simple, relaxing background panel with beautiful raised florals that look like a real arrangement tied up with a bow.
Explore more beginner home decor crochet patterns in our pattern library.
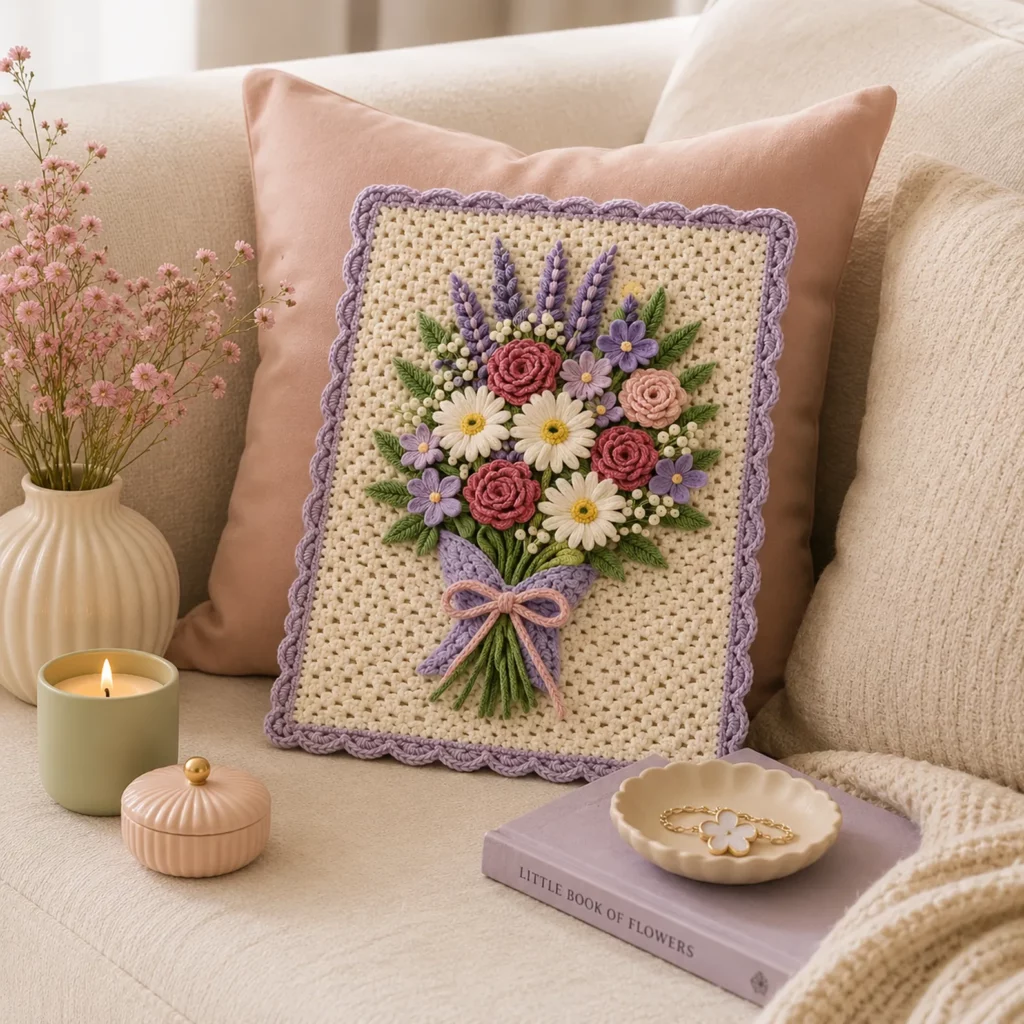
This crochet tutorial is designed to help you recreate a rectangular panel with a textured background, a scalloped border, and an eye-catching 3D bouquet appliqué in the center. It works wonderfully as a baby blanket panel, a wall hanging, a decorative table runner, a pillow front, or the center of a larger throw. You can keep it small and sweet or scale it up into a full-size statement piece.
You’ll learn how to build the base fabric, how to crochet and place each flower and leaf, and how to assemble the bouquet so it looks balanced and professional. If you love DIY crochet that has real “wow” factor, this is one of the most rewarding styles to make.
Detailed Description of the Crochet Pattern#
This design has three main parts that come together beautifully:
A textured rectangular base
The background uses a repeating stitch pattern that creates a subtle, lacy grid—pretty enough to stand alone, but not so busy that it competes with the bouquet. It’s the kind of stitch pattern that works up quickly once your hands memorize the rhythm.
A decorative border
The outer edge is finished with a structured border that includes scalloped shells. This adds a polished frame and helps the panel lay flat. A second contrast border (in a dusty rose tone, for example) makes the whole piece look gift-ready.
A 3D bouquet appliqué
The bouquet is made from layered flowers and leaves: rolled roses, daisy blooms, small five-petal flowers, lavender-style spikes, and tiny “bud” clusters. A wrapped ribbon/bow detail at the base ties everything together and creates the look of a hand-tied floral arrangement.
The magic of this crochet pattern is the combination of a calm base fabric and bold dimensional appliqué. It’s approachable, but it doesn’t look basic—perfect for a keepsake project.
Skill Level Explanation#
This crochet pattern is best described as adventurous beginner to intermediate.
You’ll feel comfortable if you can
- Chain and work basic stitches (single crochet, half double crochet, double crochet)
- Work in rows and maintain straight edges
- Make simple increases and decorative shells
- Sew appliqués neatly with a tapestry needle
You’ll practice and improve
- Working layered motifs (petals and rolled flowers)
- Building a balanced composition (bouquet placement)
- Weaving in ends cleanly (appliqués create more ends)
- Blocking and finishing for a flat, professional result
Beginners can absolutely make it if you take it one step at a time: finish the base first, then treat the bouquet like a fun set of mini projects.
Materials Needed#
Yarn
Choose smooth yarn for crisp stitch definition, especially for the flowers and leaves.
Recommended yarn weight
- DK or worsted weight yarn for a sturdy panel
- Cotton or cotton-blend is ideal for structure and clear stitches
- Acrylic is also fine and often softer for baby gifts
Suggested colors
- Main background: cream/ivory
- Border: dusty rose or soft mauve
- Leaves: medium and dark green (a couple shades looks more natural)
- Flowers: lavender/purple, blush pink, rose pink, deep rose, and white
- Flower centers: pale yellow or gold
- Filler buds: cream or soft white
Hook
- Use the hook size that gives you a nice fabric without holes
- DK often pairs well with 3.5 mm to 4.0 mm
- Worsted often pairs well with 4.0 mm to 5.0 mm
For appliqué details, going down 0.5 mm can make petals cleaner and more defined.
Notions
- Stitch markers
- Tapestry needle (sharp-ish helps for sewing through dense appliqués)
- Scissors
- Measuring tape
- Blocking board/mat and pins (highly recommended)
- Optional: fabric backing or felt for extra stability (especially if used as wall art)
Stitches & Techniques Explained#
Common abbreviations (US terms)
- ch chain
- sl st slip stitch
- sc single crochet
- hdc half double crochet
- dc double crochet
- tr treble crochet
- inc increase
- sk skip
- sp space
Textured grid stitch (beginner-friendly option)
A classic way to create a lacy grid is a simple mesh:
- dc, ch-1, sk 1 repeated across
This keeps the panel light, flat, and elegant.
Shell border
Shells are groups of stitches worked into one stitch or space (often 5 dc). They create that scalloped “frame” look.
Raised flower building blocks
- Petal stitches: combinations of sc, hdc, dc, and tr in the same space
- Rolled rose method: crochet a long strip of petals, then roll and stitch into a spiral
- Leaves: a chain spine with stitches worked around it (sc/hdc/dc) to form a leaf shape
Step-by-Step Instructions#
This is written like a free crochet pattern-style tutorial. Adjust stitch counts to your desired size; the techniques stay the same.
Size planning
This panel works well in many sizes. Choose your goal first.
- Pillow front: about 16 in x 16 in (or 18 in x 18 in)
- Baby blanket centerpiece: about 14 in x 20 in, then add a wider border to enlarge
- Table runner panel: longer rectangle, repeat the base stitch to extend length
Base panel crochet pattern
Foundation chain
- Chain a number that suits your width.
For a mesh base: chain a multiple of 2 plus 3 turning chains.
Row setup (mesh option)
- Row 1: dc in 4th ch from hook, ch 1, sk 1, dc in next; repeat across
- Row 2: ch 3 (counts as dc), dc in first ch-1 space, ch 1; repeat across, end with dc in top of turning chain
Repeat Row 2 until your rectangle reaches the desired length.
Alternative textured option (if you want a denser fabric)
- Use moss stitch (sc, ch 1, sk 1) in rows. It’s sturdy and lovely behind appliqués.
Finish the base
- Work one round of sc evenly around the entire rectangle (3 sc in each corner).
This “frame round” makes the border easier and prevents curling.
Border crochet pattern
Border Round 1
- With border color, work sc around (placing 3 sc in corners).
If your edges ripple, reduce stitches along the long sides (skip every 10th stitch). If it pulls, add occasional increases.
Border Round 2 (optional texture)
- Work hdc around for a slightly thicker frame.
Scalloped shell round
- sl st, sk 1, 5 dc in next st, sk 1, sl st in next st repeat around
In corners, you can either place one shell centered in the corner stitch, or treat the corner as two shells with an extra sl st between. Aim for symmetry.
Clean finishing round (optional)
- A final round of sl st or crab stitch (reverse sc) gives a crisp edge.
Bouquet appliqué layout
Before crocheting every flower, it helps to plan placement. The bouquet typically looks best when it has
- Three focal blooms (large daisies)
- Three to four roses (medium)
- Several lavender spikes for height
- Small filler flowers and buds to soften gaps
- Leaves angled outward to frame the arrangement
- A bow wrapping the stems at the base
Tip: Place your flowers on the panel without sewing and take a photo. It’s easier to adjust composition before anything is attached.
Daisy flowers
Daisy center (yellow)
- MR, 10–12 sc, join with sl st
Petal round (white) - In each stitch: sl st, ch 6, sl st into same stitch (for simple loop petals)
Or for fuller petals: - sl st, ch 3, (dc, tr, dc) in same stitch, ch 3, sl st in same stitch
Make 2–4 daisies depending on the bouquet size.
Rolled roses
Rose strip (petal strip method)
- Ch a long strip (30–50 depending on desired rose size)
- Work along the chain: create petal clusters every few stitches such as (sc, hdc, 3 dc, hdc, sc) in one space, then sl st to next space
When the strip is complete, roll it tightly from one end and stitch the base as you go to form a spiral rose.
Make roses in a few shades
- Deep rose for contrast
- Blush pink for softness
- Dusty mauve to match the border if you like a coordinated look
Lavender spikes
Lavender looks best as tall, narrow spikes.
Spike base
- Ch 18–26 depending on height
- Work back with sc to create a firm stem line
Buds - Along one side of the stem, work small puff/bobble clusters:
- sl st into next st, ch 2, 3-dc puff, ch 2, sl st into same st
Repeat up the stem for a textured spike look. Make 4–7 spikes in mixed purples.
- sl st into next st, ch 2, 3-dc puff, ch 2, sl st into same st
Small five-petal flowers
Quick small flower
- MR, ch 2, sl st repeated 5 times
Or - MR, ch 3, (hdc, dc) in ring, ch 3, sl st repeated 5 times
Add a tiny contrasting center stitch in yellow if desired.
Leaves
Classic leaf worked around a chain
- Ch 10
- Work into the chain: sc, hdc, dc, dc, tr, dc, dc, hdc, sc
- In last chain, work 3 sc, then mirror stitches down the other side of the chain
Make leaves in at least two sizes, and in two greens if possible.
Filler buds
You can create the tiny white buds as mini bobbles or French-knot-style embroidery. Crochet option:
- MR with 5 sc, close and leave as a tiny nub
Sew several in clusters around the bouquet to create that “filler flower” look.
Stems and bow
Stems
- Chain long cords in green, then sl st back down for a firm i-cord style strand
Bundle several strands together at the bottom.
Bow
- Crochet a long chain cord for a tie
- Make two bow loops as small oval pieces (or tie a crocheted cord into a bow)
- Stitch the bow at the stem wrap point so it stays in shape
Sewing the bouquet to the panel
Sew in layers for the best look
- Start with stems and the wrap/bow base
- Add the largest leaves next, angling outward
- Sew the lavender spikes behind the main blooms
- Attach daisies and roses
- Fill gaps with small flowers and buds
Sewing tips
- Use matching thread/yarn color for each piece so stitches disappear
- Tack petals down only at the center so they stay dimensional
- Avoid sewing every edge flat unless you want a flatter finish
Common Mistakes and How to Avoid Them#
Wavy panel edges
This usually means too many border stitches. Skip stitches evenly along the long edges or use fewer stitches in border rounds.
Appliqués look bulky or stiff
Use a slightly smaller hook for flowers and leave petals less tightly stitched down. Light blocking helps.
Bouquet looks unbalanced
Before sewing, arrange everything and check symmetry. Add one or two leaves or a small flower to fix “empty” corners.
Ends popping out
Weave ends into the back of each appliqué before sewing it onto the panel. It’s harder once it’s attached.
Border scallops don’t land evenly
Try adjusting the base round stitch count or changing the shell repeat (use 4 dc instead of 5, or skip 2 stitches between shells).
Expert Tips for Better Results#
- Block the base panel before adding appliqués. A flat base makes everything look cleaner.
- Make flowers in batches (all roses, then all daisies). It speeds up your workflow and improves consistency.
- Use two greens for leaves. Even a small color difference adds realism.
- Slightly overstuff the bouquet visually by adding extra filler buds—this makes it look lush.
- If you plan to use it as a pillow, stitch the appliqués very securely and consider lining the back of the panel with fabric before assembling.
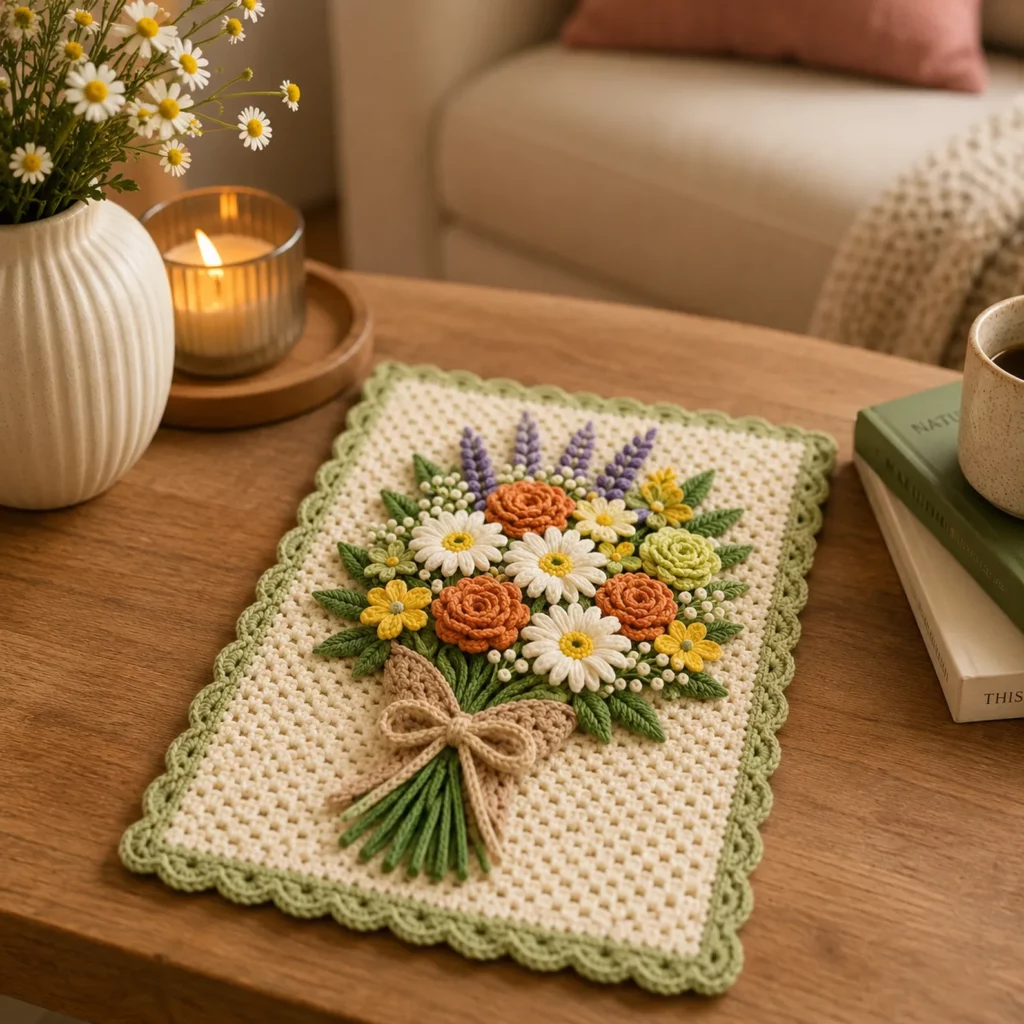
Variations and Customization Ideas#
- Turn it into a baby blanket by making a larger base and repeating the border rounds.
- Make it a wall hanging by adding a dowel pocket at the top.
- Create seasonal bouquets: sunflowers for autumn, tulips for spring, poinsettias for winter.
- Swap scallops for a picot edge for a lighter look.
- Use variegated yarn in the bouquet for a painterly floral style.
- Make multiple bouquet panels and join them into a larger throw.
Benefits of This Crochet Project#
- A crochet pattern that looks like a keepsake gift
- Great way to use scrap yarn for flowers and leaves
- Builds confidence in appliqué and composition
- Beautiful for home décor and nursery design
- Highly customizable in size and color palette
- Makes an impressive finished piece without complicated base stitches
Internal Linking Suggestions#
- How to Crochet a Simple Mesh Stitch Background
- How to Crochet a Scalloped Shell Border
- Easy Crochet Rose Appliqué Pattern
- Crochet Leaf Appliqué Tutorial
- Crochet Flowers for Beginners
- How to Block Crochet for a Professional Finish
- How to Sew Crochet Appliqués Neatly
FAQ#
What can I use this crochet pattern panel for
It works as a baby blanket centerpiece, pillow front, wall hanging, table runner, or decorative lap blanket panel.
Do I need to do colorwork in the base
No. A solid background helps the bouquet stand out. The color comes from the appliqués.
How do I keep the flowers from flattening
Sew only at the center of petals, not around the whole edge. Also avoid heavy blocking on the bouquet itself.
Can beginners make this
Yes. The base is simple and repetitive. The bouquet is a series of small pieces you can crochet one at a time.
How do I make the panel bigger
Increase the foundation chain for width and repeat rows for length. You can also add extra border rounds.
How do I wash it
For best results, hand wash or use a gentle cycle in a laundry bag, then reshape and air dry. Cotton holds shape well; acrylic is often easier care.
Conclusion#
A bouquet panel crochet pattern is the kind of project that feels meaningful—soft, romantic, and full of detail. The textured base keeps the crochet relaxing, while the 3D flowers give you that “I can’t believe I made this” feeling when you’re done. With careful placement and neat finishing, you’ll end up with a piece that looks like a handcrafted gift straight from a boutique.
If you want, tell me whether you’re making this as a pillow, baby blanket, or wall hanging, and I’ll suggest the best finished dimensions plus an easy flower count so your bouquet looks perfectly full without overcrowding the panel.


