


Introduction#
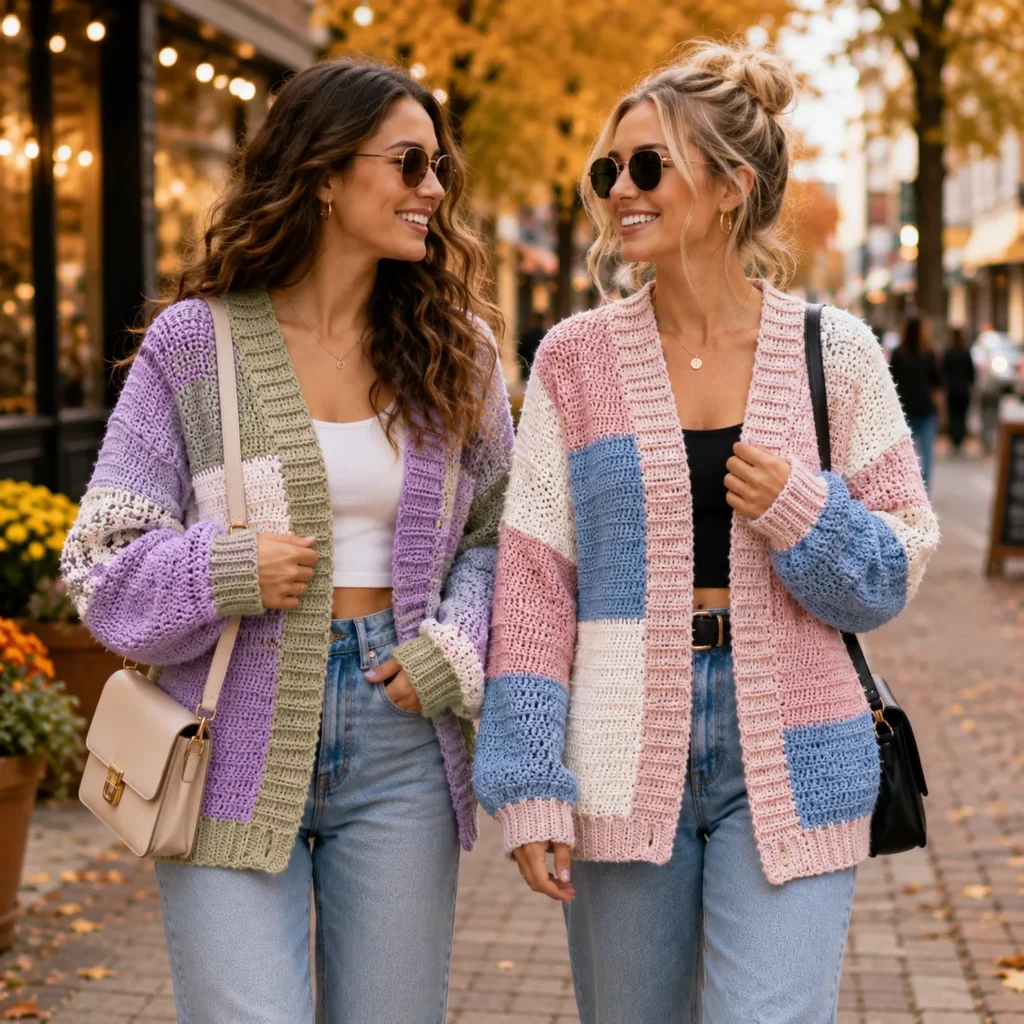
Some crochet projects are “nice,” and some are the ones you reach for every single day. A patchwork cardigan falls into that second category—especially when it’s oversized, warm, and styled with that timeless checkerboard vibe that looks boutique without being fussy.
Explore more beginner cardigans crochet patterns in our pattern library.
This crochet pattern is built around two things beginners love: simple shapes and repeatable rows. You’ll create big, clean checkerboard blocks in neutral tones, assemble them into a relaxed, drop-shoulder cardigan, then finish with cozy ribbing at the cuffs and hem. The result is a statement piece that still feels wearable—perfect over a tee, a turtleneck, or even loungewear.
If you’ve been searching for a free crochet pattern that looks high-end but doesn’t require complicated shaping, this is your sign to make the cardigan.
Detailed Description of the Crochet Pattern#
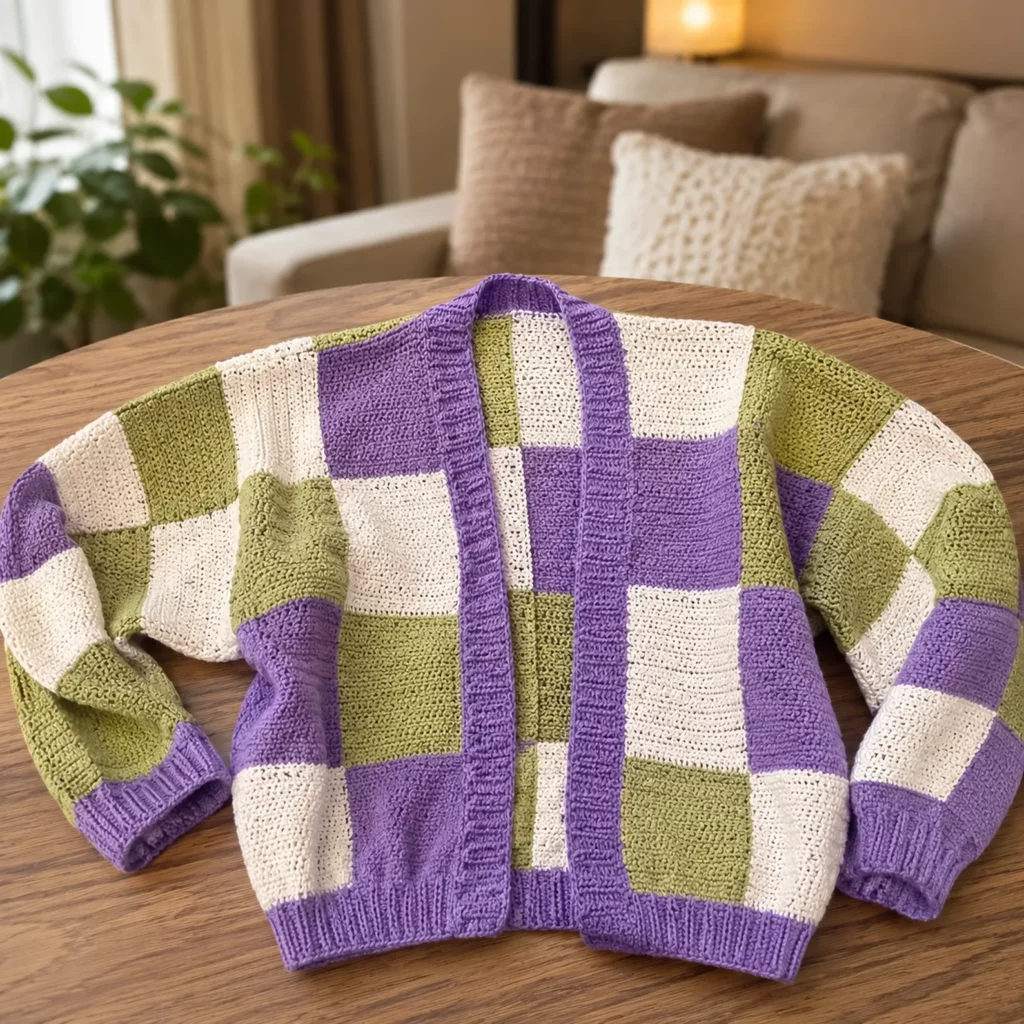
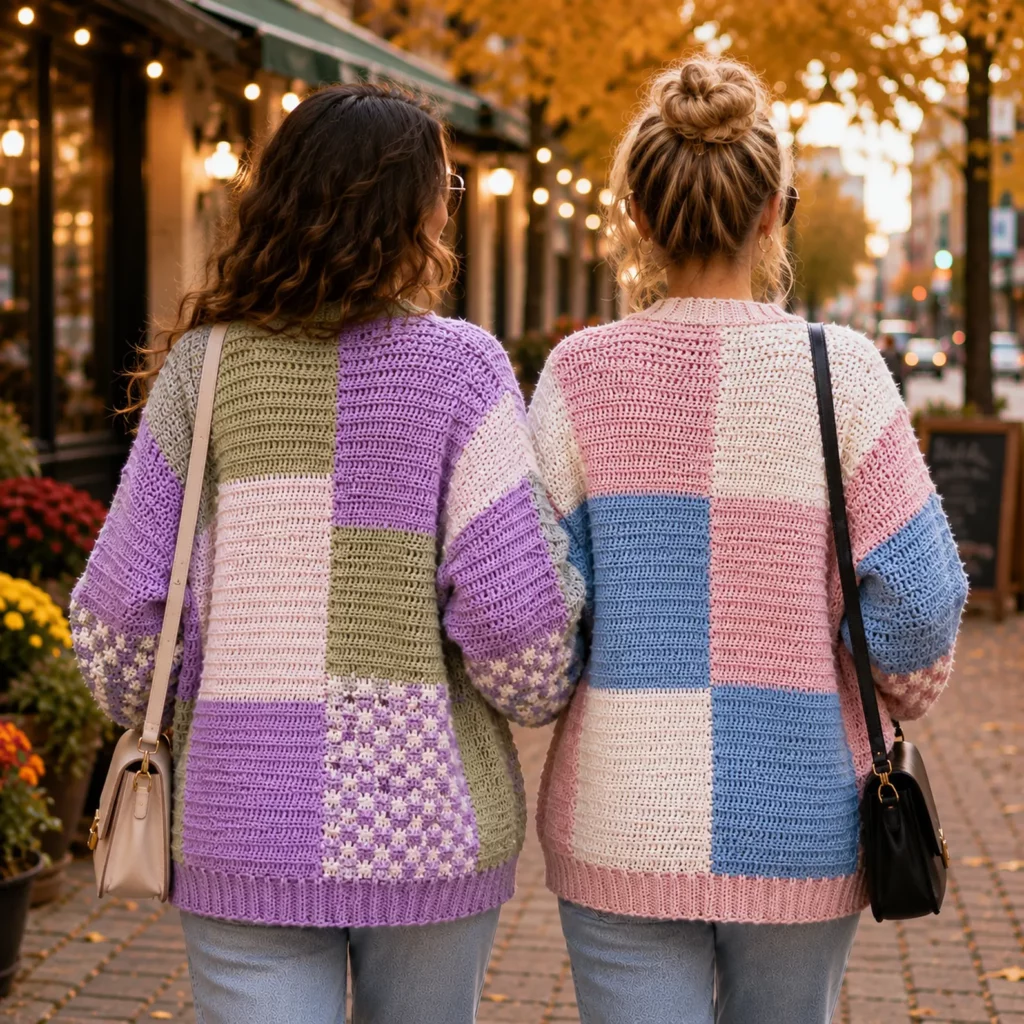
This cardigan is a checkerboard patchwork sweater with an open front, a wide silhouette, and long sleeves. The body is made from large squares/rectangles arranged in a block layout—alternating dark and light neutrals (think chocolate brown, camel, and cream). The sleeves continue the checkerboard theme, with a bold panel near the lower arm and solid sections above/below for balance.
Key design details
- Patchwork construction: panels/squares are stitched together, making the fit easy to customize.
- Drop shoulders: no shaped armholes—just seam and go.
- Wide sleeves: cozy and slightly balloon-like, finished with ribbed cuffs.
- Ribbed hem and front edge: helps the cardigan hang neatly and feel structured.
- Modern color palette: neutrals make the checkerboard pop while staying wearable.
You can make this as an everyday oversized cardigan or adjust it to a cropped, fitted version by changing panel measurements—no complicated grading required.
Skill Level Explanation#
This is an easy-to-intermediate project.
Beginner-friendly elements:
- Mostly half double crochet or double crochet rows (your choice).
- Construction uses rectangles and squares—no complex shaping.
- Checkerboard blocks are simple color changes, not advanced tapestry crochet.
Intermediate elements (still totally manageable):
- Keeping tension consistent during color changes.
- Seaming panels neatly (mattress stitch recommended).
- Adding ribbing evenly around cuffs and hem.
If you can crochet straight edges and count stitches, you can make this easy crochet pattern cardigan.
Materials Needed#
Yarn
A cardigan like this looks best in yarn that has good stitch definition and a cozy feel.
Recommended yarn options:
- Worsted weight (#4) acrylic (easy care + budget friendly)
- Worsted wool blend (extra warmth + beautiful drape)
- Cotton-acrylic blend (great definition, less pilling)
Color palette (3-color neutral set):
- Color A: dark brown (main contrast)
- Color B: tan/camel (warm neutral)
- Color C: cream/ivory (light contrast)
Yardage estimate (approx.)
- S/M: 1,200–1,500 yards total
- L/XL: 1,500–1,900 yards total
- 2XL/3XL: 1,900–2,300 yards total
Tip: If you want a more “chunky” look, go up to bulky (#5) yarn and scale panel sizes down slightly.
Hook
- Worsted weight: 5.0–6.0 mm
- Bulky: 6.5–8.0 mm
Choose a hook that creates fabric with a little drape but not too many gaps. Cardigans look best when the fabric is smooth and consistent.
Notions
- Stitch markers (helpful for sleeve placement)
- Yarn needle (for seaming)
- Scissors
- Measuring tape
Optional upgrades
- Buttons (if you want a closure)
- Blocking tools (mat + pins)
- A simple sewn-in label for a boutique finish
Stitches & Techniques Explained#
Abbreviations (US terms)
- ch = chain
- sl st = slip stitch
- sc = single crochet
- hdc = half double crochet
- dc = double crochet
- BLO = back loop only
- rep = repeat
- st(s) = stitch(es)
Main fabric stitch options
You can build your panels with either stitch:
- HDC (half double crochet): slightly thicker, cozy, structured
- DC (double crochet): drapier, faster, more relaxed fabric
For a cardigan that holds shape and looks polished, HDC is a great default.
Checkerboard crochet (simple block method)
Instead of changing color every stitch, you create a checkerboard using blocks:
- Each square = a set number of stitches wide and rows tall
- You switch colors only at the edge of each block
A great starter size is:
- 6 stitches wide x 6 rows tall per square (easy to count, visually bold)
You’ll change color on the last yarn-over of the final stitch in the previous color—this keeps edges crisp.
Ribbing with BLO
Ribbing is made using sc BLO (single crochet in back loop only). It creates a knit-like rib texture that makes cuffs and hems look finished.
Step-by-Step Instructions#
Pattern notes
- Written in US terms
- Construction: back panel + 2 front panels + 2 sleeves + ribbing
- Fit: oversized, drop shoulder
- Sizing: made-to-measure with simple targets (beginner-friendly)
Decide your finished measurements
For a relaxed oversized fit, aim for:
- Finished bust circumference: your bust + 6–12″ ease
- Cardigan length: 22–28″ (cropped to longline)
- Sleeve length: 16–20″ from shoulder seam to cuff
Make a small swatch (worth it)
Crochet a 4″ x 4″ swatch in your main stitch (hdc or dc).
Measure:
- stitches per 4″
- rows per 4″
This makes your panel sizing accurate and prevents surprises after hours of work.
Part 1: Crochet the checkerboard panels
You have two easy ways to build the patchwork look:
Option A: Crochet separate squares and seam them (cleanest)
- Choose your square size (example: 8″ x 8″ or 10″ x 10″)
- Make squares in alternating colors:
- Solid squares (brown, tan, cream)
- Checkerboard squares (brown + cream or brown + tan)
Simple square base (hdc)
- Ch to desired width + 1
- Row 1: hdc in 2nd ch, hdc across
- Row 2: ch 1, hdc across
- Repeat until square is same height as width
Checkerboard square method
- Use blocks (example: 6 sts x 6 rows)
- Across the row, alternate blocks: 6 hdc in Color A, 6 hdc in Color C, repeat
- Continue for 6 rows, then swap the block order for the next 6 rows
Make enough squares to form:
- Back (typically 6–9 squares depending on size)
- Front panels (typically 3–5 squares each)
- Sleeve accents (2–4 squares per sleeve)
Option B: Crochet large rectangles with checkerboard sections (fastest)
This method avoids lots of seams:
- Crochet the back panel as one rectangle
- Crochet each front panel as a rectangle
- Add checkerboard as a section near shoulder or lower sleeve
This is ideal if you want fewer ends to weave.
Part 2: Build the back panel
If using squares:
- Arrange squares into a rectangle that matches your desired back width and length.
- Seam squares together in rows, then seam rows together.
If using a rectangle:
- Ch to desired back width
- Work hdc rows until desired length
- Add checkerboard blocks where you want visual interest (upper back or side sections)
Part 3: Build the two front panels
Each front panel is a rectangle:
- Same length as back
- About half the back width (minus a little for the opening)
If using squares:
- Arrange and seam squares into two matching rectangles.
- You can mirror the checkerboard placement or mix it up for a true patchwork vibe.
Part 4: Seam shoulders
Lay panels flat:
- Back panel in the center
- Front panels on either side (right sides facing down if you care about “right side”)
Seam the shoulders, leaving a neck opening:
- For a standard opening, leave 7–9″ unseamed at center
- For a wider neckline, leave more
Part 5: Make sleeves
The easiest sleeve is a rectangle seamed into a tube.
- Decide sleeve width (oversized looks best): 16–22″
- Crochet sleeve rectangle to desired length (usually 16–20″)
- Seam the long edge to form a tube
Checkerboard placement idea
- Solid upper sleeve
- Checkerboard band around forearm
- Solid lower cuff section
Part 6: Attach sleeves
With cardigan body laid flat:
- Match the sleeve seam to the shoulder seam.
- Sew sleeve to the arm opening (like a “T” shape).
Then fold cardigan and seam:
- Side seams from underarm to hem
- Sleeve seam from underarm to cuff (if not already seamed)
Part 7: Add ribbed cuffs
Pick up stitches around each cuff opening.
Cuff ribbing (sc BLO method)
- Ch 9–13 (depending on how wide you want the cuff)
- Row 1: sc in 2nd ch and across, sl st to cuff edge, turn
- Row 2: sc BLO across, turn
- Row 3: sc BLO across, sl st to next cuff edge stitch, turn
- Repeat around, seam ends together
This creates a neat, stretchy cuff that keeps sleeves from feeling too wide.
Part 8: Add hem ribbing
Repeat the same ribbing method along the bottom edge of the cardigan for a polished finish. Hem ribbing helps the cardigan sit nicely and prevents the bottom from flaring.
Part 9: Add the front band
You can do a simple edging or a wide ribbed band.
Wide ribbed band (recommended)
Attach ribbing along:
- front opening edge
- around the neckline
- down the other front edge
Same sc BLO ribbing method as cuffs/hem.
Optional: Add buttonholes on one side if you want a closure.
Common Mistakes and How to Avoid Them#
- Checkerboard looks uneven:
Use stitch markers every 6 stitches (or your block width) and keep row counts consistent. - Fabric puckers where colors change:
Don’t pull the carried yarn tight. Let it float loosely or cut and rejoin. - Panels don’t match:
Measure each panel as you go. Blocking squares before assembly helps a lot. - Sleeves feel too bulky at the underarm:
Keep sleeve rectangles wide but not too thick; use mattress stitch to reduce seam bulk. - Front band waves:
Don’t stretch the cardigan edge while attaching ribbing. Attach evenly with consistent sl st joins. - Cardigan is stiff:
Switch to dc or go up a hook size for more drape.
Expert Tips for Better Results#
- Choose 2 checkerboard colors and stick to them: it keeps the look cohesive.
- Block squares before seaming: even light steam blocking makes everything align.
- Use mattress stitch for seams: cleaner and more “store-bought.”
- Weave ends as you go: checkerboard creates more ends—don’t leave them all for the end.
- Reinforce shoulder seams: cardigans hang from shoulders; a second seam pass adds durability.
- Keep ribbing consistent: matching cuff/hem/band ribbing instantly elevates the finish.
Variations and Customization Ideas#
- Cropped version: shorten panels and make a wider hem rib for a trendy fit.
- Longline duster: extend panels to mid-thigh for a cozy dramatic layer.
- Pocket add-on: crochet two solid rectangles and sew to front panels.
- Bolder checks: use 8×8 blocks for oversized checkerboard.
- Soft pastel palette: cream + sage + blush looks amazing with the same layout.
- Button front: add 4–6 buttons and matching buttonholes on the front band.
Benefits of This Crochet Project#
- A wearable statement cardigan that still feels neutral and versatile
- Great stash-buster for coordinated yarn colors
- Easy construction (rectangles + seams) with high-end visual impact
- Customizable fit for any size and length
- Teaches valuable skills: seaming, ribbing, colorwork blocks
- Perfect for gifting or creating a signature wardrobe piece
Internal Linking Suggestions#
You may also like…
- Crochet Tutorial: How to Change Colors Neatly in Crochet
- Crochet Tutorial: Mattress Stitch for Invisible Seams
- Best Yarn for Crochet Wearables (Drape vs Structure)
- Free Crochet Pattern: Beginner Oversized Crochet Cardigan
- Crochet Tutorial: Single Crochet BLO Ribbing
- Free Crochet Pattern Roundup: Cozy Crochet Wearables
FAQ Section#
Is this an easy crochet pattern for beginners?
Yes. The cardigan is made from simple shapes, and the checkerboard is done in blocks with straightforward color changes.
What stitch is best for a patchwork cardigan?
Half double crochet creates a cozy, structured fabric. Double crochet is faster and drapier. Choose based on the look you want.
How do I resize the cardigan?
Make the back panel width equal to your bust measurement plus 6–12″ ease. Match the front panels to the back length, then adjust sleeve width and length to your preference.
How do I keep the checkerboard edges clean?
Use consistent block sizes (like 6 stitches x 6 rows), change colors on the last yarn-over of the previous stitch, and avoid pulling floats too tight.
Do I need to block the squares?
Blocking isn’t required, but it makes assembly much easier and the finished cardigan looks more polished and professional.
Can I make this cardigan without checkerboard?
Absolutely. You can keep it fully color-blocked or single color and still use the same construction method.
Conclusion#
A checkerboard patchwork cardigan is the kind of project that turns crochet into a full outfit moment—cozy, modern, and totally customizable. This free crochet pattern keeps construction simple while giving you that boutique patchwork look through easy blocks, clean seams, and ribbed finishing.
If you tell me your preferred fit (regular vs oversized) and your size range (S/M, L/XL, 2XL/3XL), I can translate this into a clear stitch-count plan for your exact measurements so your crochet pattern fits the way you want.


