


Introduction#
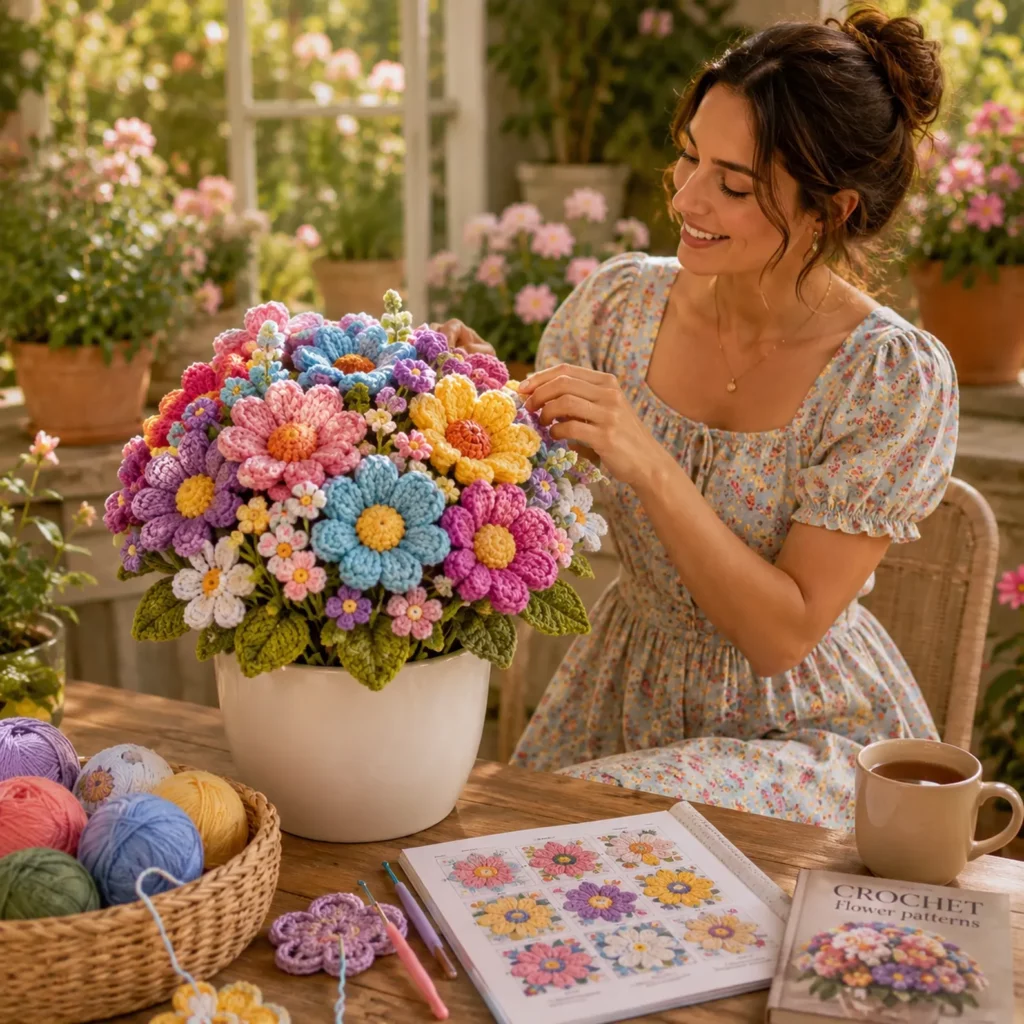
If you love the look of fresh flowers but want something that lasts forever (and won’t drop petals all over the table), a crochet bouquet is the perfect solution. This project gives you that full, lush “just arranged” look using small, satisfying pieces you can crochet in short sessions—one flower at a time.
Explore more beginner home decor crochet patterns in our pattern library.
This crochet pattern is designed to be flexible: you can use your favorite colors, make as many blooms as you like, and arrange everything in a pot so it becomes a finished decor piece. It’s also a fantastic stash-buster. Even small yarn leftovers can become mini flowers that add depth and realism to the bouquet.
In this tutorial-style guide, you’ll learn how to crochet layered 3D flowers, create neat centers, add textured leaves, build stems (with or without wire), and assemble everything into a stable arrangement that looks polished and gift-worthy.

Detailed Description of the Crochet Pattern#
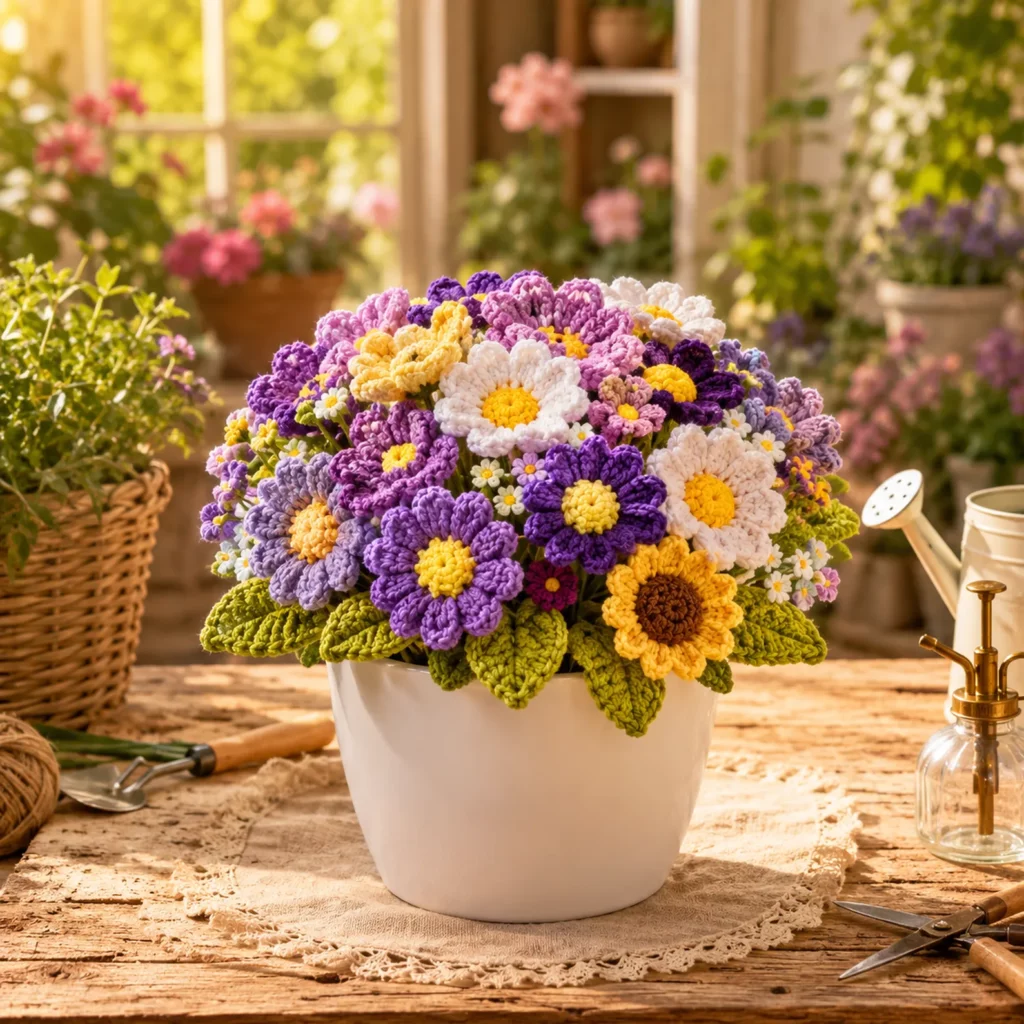
This project is a mixed crochet flower bouquet arranged in a small pot or container. The look comes from combining several flower sizes and shapes, then filling gaps with leaves and mini blooms.
The bouquet typically includes:
- Large statement flowers with thick, rounded petals
- Medium flowers for volume and color balance
- Mini flowers to fill empty spaces and make the arrangement feel abundant
- Textured leaves that create a realistic base around the stems
- Optional stems (wire or crochet tubes) so flowers can be positioned
- A pot insert (foam or crocheted stuffing base) that holds everything upright
Each flower is built from a simple center circle plus a petal round. The petals are formed using basic stitches, but the layering creates a dimensional, “puffy petal” effect that looks far more complex than it is.
Skill Level Explanation#
Skill Level: Beginner to Confident Beginner
You’ll be comfortable with this easy crochet pattern if you already know:
- Chain (ch)
- Slip stitch (sl st)
- Single crochet (sc)
- Half double crochet (hdc)
- Double crochet (dc)
You’ll also practice:
- Working small rounds for flower centers
- Repeating petal sequences evenly around a circle
- Simple assembly (sewing pieces, weaving ends)
- Optional stem support (wire/pipe cleaners)
This is ideal crochet for beginners who want a beautiful finished object without complicated shaping.
Materials Needed#
Yarn
Use one consistent yarn weight for a cohesive bouquet. DK or worsted works best.
Recommended yarn weights:
- DK (Category 3): crisp petals, great detail
- Worsted (Category 4): fuller blooms, fast progress
Color suggestions:
- Petals: pink, purple, blue, coral, orange, yellow, white
- Centers: yellow, orange, brown (sunflower style), or contrasting brights
- Leaves: 1–2 greens (mixing light and dark looks extra realistic)
Yarn choice tips:
- Cotton gives the sharpest stitch definition (great for petals and leaves).
- Acrylic is soft and slightly puffier (great for a plush bouquet).
- If mixing brands, keep the yarn weight similar so your flower sizes match.
Hook
Pick a hook that creates firm stitches so petals hold shape.
General hook ranges:
- DK yarn: 3.0–3.5 mm
- Worsted yarn: 3.5–4.5 mm
If your petals feel floppy, go down 0.5 mm.
Notions
- Stitch marker (helpful for small rounds)
- Yarn needle
- Scissors
- Fiberfill stuffing (optional for puffy centers)
- Floral wire, pipe cleaners, or wooden skewers (optional stems)
- Hot glue or craft glue (optional for securing stems)
- Small pot, mug, or container for display
Pot Base Options
Choose one:
- Floral foam block
- Dense crocheted stuffed insert (instructions included below)
- Air-dry clay base (heavier, very stable)
Stitches & Techniques Explained#
Common Abbreviations
- MR = magic ring
- ch = chain
- sl st = slip stitch
- sc = single crochet
- hdc = half double crochet
- dc = double crochet
- inc = increase (2 stitches in the same stitch)
- FLO = front loop only
- BLO = back loop only
- ( ) = repeat
- = stitch count
Magic Ring (MR)
A magic ring lets you close the center tightly, which is perfect for flower middles. If you prefer, you can chain 2 and work into the first chain, but the center may not close as neatly.
Petal Building (The “5-Stitch Petal”)
A simple way to form a rounded petal is to work this sequence into one stitch or space:
(sc, hdc, dc, hdc, sc)
That creates height in the middle and neat edges on both sides.
Clean Joins for Petal Rounds
When joining a new color for petals, join with a slip stitch, then start the petal in the next stitch. This keeps the join less noticeable and avoids a bulky first petal.
Step-by-Step Instructions#
Finished Size
Size varies by yarn and hook, but as a guide:
- Large flower: 6–10 cm (2.5–4 in) across
- Medium flower: 4–7 cm (1.5–3 in) across
- Mini flower: 2.5–4 cm (1–1.5 in) across
- Bouquet height: 15–25 cm (6–10 in) with stems
Notes Before You Start
- Work flower centers first, then petals, then leaves, then stems.
- Weave ends as you go to keep assembly easy.
- For a full arrangement, a good “recipe” is:
- 2–3 large flowers
- 4–6 medium flowers
- 4–8 mini flowers
- 8–14 leaves
Adjust based on your pot size and how dense you want it.
Color Key
- Color C = center color (yellow/orange/brown)
- Color P = petal color (any bright)
- Color G = leaf green
Flower Pattern A: Puffy Daisy Bloom (Large or Medium)
Center (Color C)
Round 1: 6 sc in MR [6]
Round 2: inc around [12]
Round 3: (sc, inc) around [18]
For a bigger center (large bloom), add:
Round 4: (2 sc, inc) around [24]
Fasten off for a flat center, or keep a tail for sewing if needed.
Optional puffy center (adds amazing dimension):
- Make 2 identical center circles.
- Place them wrong sides together.
- Lightly stuff with fiberfill.
- sc around the edge to join, placing 1 sc per stitch.
This creates a rounded “button” center.
Petals (Color P)
Join Color P to any stitch on the center.
If your center has 18 stitches:
Round (petals): sl st in next st, (sc, hdc, dc, hdc, sc) in next st repeat around
You’ll get 9 petals.
If your center has 24 stitches:
Round (petals): repeat the same sequence around
You’ll get 12 petals.
Fasten off and weave in ends.
Petal shaping tip: gently pinch each petal and curve it forward with your fingers.
Flower Pattern B: Sunflower-Style Bloom (Large Accent)
This adds variety with a darker center and longer petals.
Center (Brown)
Round 1: 6 sc in MR [6]
Round 2: inc around [12]
Round 3: (sc, inc) around [18]
Round 4: sc around [18]
Fasten off.
Petals (Yellow)
Join yellow in any stitch.
Round (petals): (sl st in next st, ch 3, 2 dc in next st, ch 3, sl st in next st) repeat around
This makes 9 longer petals.
Want a fuller sunflower? Add a second petal layer:
- Join yarn between petals and repeat the petal round, offsetting so new petals sit between the first layer.
Flower Pattern C: Mini Flower (Fast Filler)
These mini blooms make the bouquet look abundant and balanced.
Center (Color C)
Round 1: 5 sc in MR [5]
Fasten off.
Petals (Color P)
Join petal color into any stitch.
Round (petals): (ch 2, 2 dc in same st, ch 2, sl st in next st) repeat around
You’ll get 5 small petals.
Make several in different colors. Mini flowers are perfect for leftover yarn scraps.
Leaves: Textured Leaf (Medium and Large)
Medium Leaf (Color G)
Ch 10.
Work into 2nd ch from hook:
sc, hdc, hdc, dc, dc, hdc, hdc, sc
In last chain: 3 sc (turning point)
Now work down the other side of the chain:
sc, hdc, hdc, dc, dc, hdc, hdc, sc
Sl st to the tip to finish. Fasten off with a tail.
Optional leaf vein:
- Surface sl st down the center, or
- Work BLO on one side for a subtle ridge.
Large Leaf
Ch 14 and repeat the same structure. Add extra dc stitches in the middle section to elongate the leaf.
Stems (Two Options)
Option 1: Wrapped Stem (Fast and Sturdy)
This is the best option if you want poseable flowers.
- Insert floral wire or a pipe cleaner through the underside of the flower center.
- Use green yarn to wrap tightly around the wire from top to bottom.
- Secure the top with a few tight stitches or a tiny dot of glue (optional).
- Attach leaves by wrapping over the leaf tail or sewing the leaf to the stem.
Option 2: Crochet Tube Stem (Polished Look)
This creates a clean crocheted stem.
With Color G:
Round 1: 6 sc in MR [6]
Rounds 2–25: sc around [6] (adjust length)
Insert wire/pipe cleaner as you go if you want it poseable.
Fasten off leaving a long tail. Sew the stem to the flower base.
Pot Insert (So Everything Stands Up)
Easy Crocheted Stuffed Insert
Make a dense “puck” that fits your pot opening.
Round 1: 6 sc in MR [6]
Round 2: inc around [12]
Round 3: (sc, inc) around [18]
Round 4: (2 sc, inc) around [24]
Continue increasing until the circle matches the pot opening diameter.
Then crochet 3–6 rounds even to create a shallow bowl.
Stuff very firmly so it’s dense and supportive. Place it inside the pot.
Extra stability tip: add a small sealed bag of rice or pebbles at the bottom of the pot before inserting the crochet base.
Assembly: Arranging the Bouquet
- Plan your height
Put 2–3 tall flowers at the back, medium flowers in the middle, minis near the front and edges. - Secure stems
Push stems into foam or into the crocheted insert. If using an insert, stitch stems down through the base with a yarn needle so they stay put. - Add leaves last
Tuck leaves around the base to hide where stems enter. Angle them outward for a full silhouette. - Final shaping
Bend stems slightly so flowers face outward. Rotate the pot and check for gaps, then add mini flowers where needed.
Common Mistakes and How to Avoid Them#
Petals look floppy
- Use a smaller hook
- Choose cotton or a firmer yarn
- Add a second petal layer for large blooms
Center hole won’t close
- Tighten the magic ring firmly
- Weave the tail through the first round stitches before fastening off
Flowers look flat
- Use the puffy center method
- Add a second petal round offset between petals
- Curl petals forward gently with your fingers
Bouquet won’t stand upright
- Add weight to the pot bottom
- Use wire or pipe cleaners in stems
- Make sure the insert is dense and grips stems firmly
Colors feel “too busy”
- Repeat 2–3 main petal colors throughout the bouquet
- Keep leaf green consistent
- Use cohesive center colors (yellow/orange/brown) to tie everything together
Expert Tips for Better Results#
- Batch your work: crochet all centers first, then all petals, then all leaves. Your flowers will look more consistent.
- Pin before final placement: push stems into the base and rearrange until you love the balance.
- Make scale work for you: every large flower looks better with one mini bloom nearby to soften transitions.
- Hide ends strategically: weave petal tails into the center circle and stem tails down into the base.
- Make it look “arranged”: slightly tilt some blooms left and right instead of facing all flowers straight forward.
Variations and Customization Ideas#
- Pastel bouquet: blush, cream, lavender, mint with pale yellow centers
- Autumn bouquet: mustard, rust, burgundy, olive with brown centers
- Minimalist bouquet: all white flowers with textured centers and leaves
- Gift topper: make 3–5 flowers and tie them onto wrapped gifts
- Accessories: turn a single bloom into a brooch, hair clip, or bag charm
- Mini bouquet: use fingering yarn and a small hook for a tiny desk pot
Benefits of This Crochet Project#
- A high-value crochet tutorial project that teaches reusable skills
- A true stash-buster for leftover yarn
- Fast gratification: each flower is a small, finished win
- Long-lasting decor that doesn’t wilt
- A thoughtful handmade gift for birthdays, housewarmings, nurseries, and spring holidays
- Great practice for tension, neat joins, and consistent shaping
Internal Linking Suggestions#
- How to Crochet a Magic Ring (Step-by-Step)
- Best Yarn for Amigurumi and Small Crochet Projects
- How to Change Colors Neatly in Crochet
- Beginner Guide to Crochet Hook Sizes and Tension
- Easy Crochet Leaf Patterns (Free Collection)
- Simple Scrap Yarn Crochet Ideas for Beginners
FAQ#
Is this crochet pattern beginner-friendly?
Yes. This free crochet pattern uses basic stitches and simple repeats. The assembly is the main step, and arranging flowers is forgiving because you can reposition until it looks right.
What yarn is best for crochet flowers?
Cotton gives the cleanest petals and crisp edges. Acrylic works well too and can make flowers look softer and puffier.
How do I make the bouquet stand up firmly?
Use a weighted pot base and a dense insert (foam or a tightly stuffed crochet insert). Wire or pipe cleaners inside stems also help the flowers hold their shape.
Can I make this without stems?
Yes. You can sew flowers directly onto a stuffed dome insert in the pot. This creates a “flower topper” look that’s very stable and still full.
How many flowers do I need for a full pot?
For a small pot, 10–18 flowers usually looks full when you mix sizes. If you add lots of leaves and mini flowers, you can use fewer large blooms.
How do I keep petals from curling the wrong way?
Tension matters. If petals twist, go down a hook size and keep your slip stitches snug. You can also shape petals gently with your fingers when finishing.
Conclusion#
A bright crochet bouquet is one of the happiest ways to turn yarn into decor. With layered petals, neat centers, and a mix of bloom sizes, your arrangement looks full and intentional—while still being an easy crochet pattern you can build piece by piece.
If you tell me your yarn weight (DK or worsted) and the size of your pot opening, I can give you an exact bouquet plan (how many large, medium, mini flowers and leaves) so you get a perfectly full arrangement on the first try.


