


Introduction#
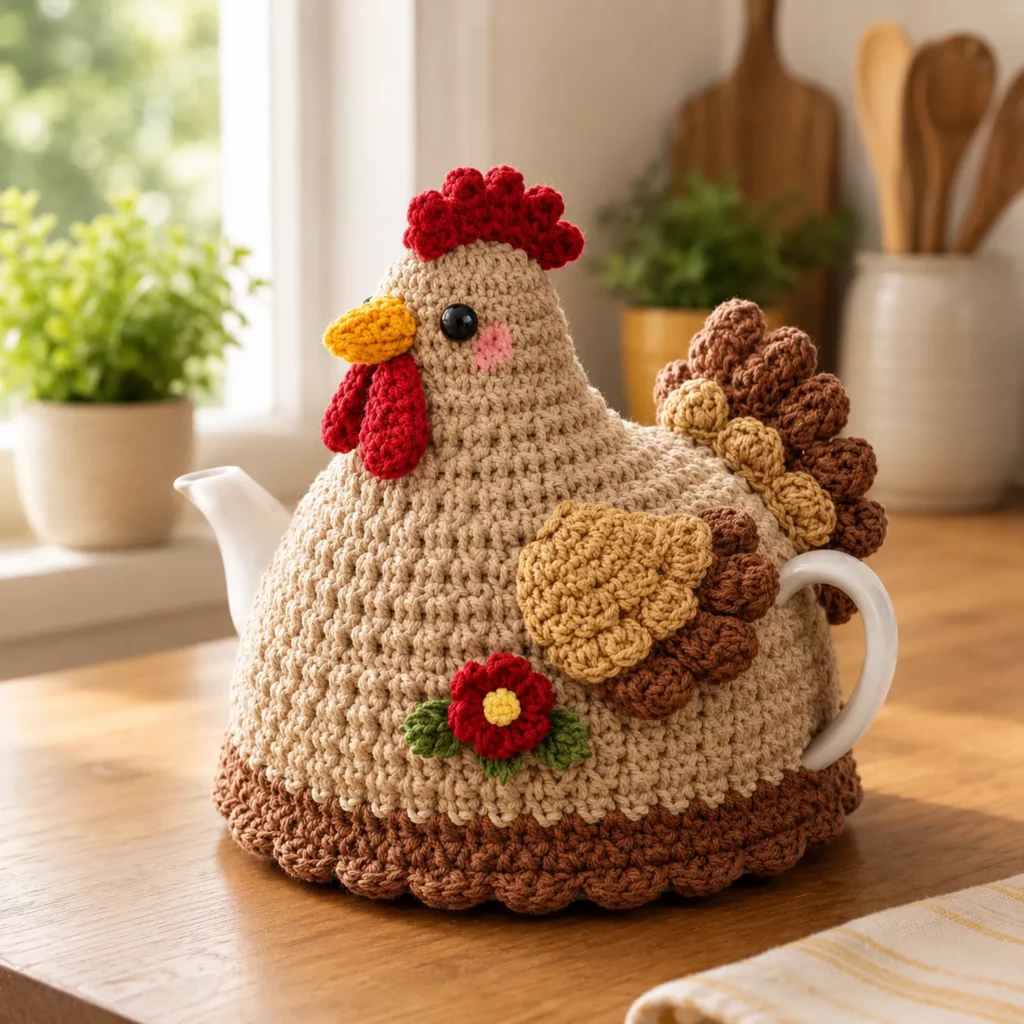
A teapot cozy is already one of those “old-school cozy” things that makes tea time feel special, but a chicken teapot cozy takes it to another level. It’s warm, playful, and instantly turns a plain teapot into a centerpiece. The best part is that it’s not just decoration—this crochet pattern is designed to keep your tea hotter for longer while still looking like a sweet little hen perched on your table.
Explore more beginner home decor crochet patterns in our pattern library.
If you’ve been looking for a crochet project that feels useful and giftable (and gets people smiling), this is it. The design combines a snug teapot cover with character details: a bright red comb and wattle, a yellow beak, textured wings, and a cute little flower accent. The base edge has a bold bobble/cluster trim that feels classic and sturdy, and the cozy fits around the teapot while leaving space for the spout and handle.
This crochet tutorial walks you through the full construction with beginner-friendly steps, plus easy ways to adjust the fit for different teapot shapes.
Detailed Description of the Crochet Pattern#
This crochet pattern creates a hen-shaped teapot cozy that sits over your teapot like a warm “jacket.” The cozy is built as a domed body with an opening at the bottom, then finished with decorative pieces (comb, wattle, beak, wings, tail) that make it look like a chicken.
Main features you’ll crochet
Hen body cover in a smooth, dense stitch for warmth
Textured base trim that looks like a scallop/bobble border
Chicken head and face area with an eye, cheek blush, and beak
Comb (top red crest) and wattle (dangly red pieces)
Wings (layered or puffed texture)
Tail feathers (clustered, rounded “feather” bumps)
Optional flower applique with leaves
How it’s made (simple overview)
Crochet the main body as a dome from the top down
Create openings or shaping points where the handle and spout will sit
Add a firm bottom border so it grips the teapot
Crochet and sew on the chicken details
Optional: add a lining or a second inner layer for extra heat retention
This is an easy crochet pattern in stitches, but it looks detailed because the add-ons are layered and textured.
Skill Level Explanation#
Skill Level: Confident Beginner
Great if you already know
Single crochet (sc)
Half double crochet (hdc) and double crochet (dc)
Increasing and decreasing
Working in the round or in rows
Basic sewing/assembly
You’ll also practice
Shaping a cozy to fit a real object
Placing openings for spout and handle
Adding 3D parts like comb and wings
Neat edging and finishing for a “shop-quality” look
Materials Needed#
Yarn
For a teapot cozy, cotton is the best choice because it handles heat well and holds shape.
Recommended yarn weight
Worsted (Category 4) cotton for a sturdy cozy
DK (Category 3) cotton for a lighter cozy with finer detail
Colors to match the hen style
Main hen body: cream or off-white
Base trim + wing/tail accents: medium brown and dark brown
Comb and wattle: red
Beak: yellow or orange
Flower: red + yellow center + green leaves (optional)
Yarn tips
Choose a yarn that is washable and heat-resistant (cotton or cotton blend)
Avoid highly fuzzy yarns for kitchen items because they can pick up lint and odors
Use the same yarn weight across colors to keep proportions consistent
Hook
Worsted cotton: 4.0–5.0 mm
DK cotton: 3.5–4.0 mm
For a tighter, warmer fabric, go down one hook size.
Notions
Tapestry needle
Scissors
Stitch markers
Measuring tape
Optional: small button or snap if you want a closure under the handle
Optional: felt circle for a heat-protective lining patch (stitch it in, do not glue)
Stitches & Techniques Explained#
Abbreviations
ch = chain
sl st = slip stitch
sc = single crochet
hdc = half double crochet
dc = double crochet
inc = increase
dec = decrease
BLO = back loop only
sp = space
( ) repeat
[ ] stitch count
Dense fabric tip (important for teapot cozies)
The warmer the cozy, the denser the stitch fabric should be. Single crochet and half double crochet are ideal. If your stitches look holey, go down a hook size.
Bobble or puff trim
The base trim in this style looks like rounded bumps. You can create that look with one of these
Puff stitch clusters
Bobble stitches
Shells (5 dc in one stitch) for a flatter scallop look
Spout and handle openings
Instead of cutting holes (never do that in crochet), you create openings by chaining across a gap and skipping stitches, then continuing the round/row. This keeps edges clean.
Step-by-Step Instructions#
Fit note
Teapots vary a lot. This pattern is written with a made-to-measure approach so you can fit most standard teapots. You’ll measure as you go and stop increasing when the dome is wide enough.
Measure your teapot
You need two measurements
Circumference around the widest belly (around the pot, not including spout/handle)
Height from base to lid knob (or to where you want the cozy to stop)
Helpful fit rule
The cozy should be snug around the belly and tall enough to cover most of the pot body, leaving the spout and handle accessible.
Crochet the top dome (hen body)
Use main color (cream/off-white).
Round 1: 6 sc in magic ring [6]
Round 2: inc around [12]
Round 3: (sc, inc) around [18]
Round 4: (2 sc, inc) around [24]
Round 5: (3 sc, inc) around [30]
Round 6: (4 sc, inc) around [36]
Round 7: (5 sc, inc) around [42]
Round 8: (6 sc, inc) around [48]
Keep increasing until the circle matches the top width you need to sit over the teapot lid area and begin draping down the sides.
Work straight to create the sides
Once the circle is wide enough, stop increasing.
Rounds 1–? : sc around (no increases)
Try the dome on your teapot often. You want the sides to start covering the pot belly.
Create the handle and spout openings
When the cozy reaches the height where the spout and handle sit, you’ll create two gaps.
How to do it in one round
Work sc until you reach the spout area
Ch a small number (typically 6–12 depending on spout width)
Skip the same number of stitches
Continue sc around until you reach the handle area
Ch 10–18 (handles are usually wider)
Skip the same number of stitches
Continue sc to end of round
Next round
Work sc into stitches and sc into each chain across both gaps. This locks the openings and makes a neat edge.
Fit tip
If you’re unsure, make the openings slightly smaller. Crochet stretches and you can widen an opening by skipping 1–2 extra stitches in the next round if needed.
Continue straight rounds to the bottom edge
Keep working sc rounds until the cozy reaches the teapot base line.
Bottom edge shaping option
If your cozy flares out, add a decrease round
(dec every 10–12 stitches)
If it feels too tight, add an increase round
(inc every 10–12 stitches)
Add the brown base trim
Switch to brown.
Round 1 (stabilizing): sc around
Round 2 (texture band): work bobbles or puff clusters spaced evenly
Simple bobble repeat
(sc 2, bobble) repeat around
Round 3: sc around to lock the bobbles
If you prefer scallops instead
Work (sl st, skip 1, 5 dc in next stitch, skip 1, sl st in next) repeat around
Chicken head shaping area
The hen look comes from creating a slightly higher front “neck/head” section.
Easy method (add a head cap on top)
Crochet a small dome (like a mini head) and sew it to the top front of the cozy.
Head cap
Round 1: 6 sc in MR [6]
Round 2: inc around [12]
Round 3: (sc, inc) around [18]
Round 4: (2 sc, inc) around [24]
Rounds 5–6: sc around [24]
Fasten off, lightly stuff or leave flat depending on the look you want.
Sew this head cap near the front top area of the cozy.
Eye placement
Use one black safety eye or embroider a small dot. Add blush with pink yarn or pastel chalk.
Beak (yellow/orange)
Ch 6
Row 1: sc in 2nd ch and across (5), ch 1, turn
Row 2: sc2tog, sc 1, sc2tog (3), ch 1, turn
Row 3: sc3tog
Fasten off and sew to face.
Comb (red)
A comb looks best as a row of small rounded bumps.
Ch 10
In 2nd ch from hook: (sl st, 3 dc in next, sl st in next) repeat across to create 3–5 bumps
Fasten off and sew along the top of the head area.
Wattle (red)
Make 2 teardrops.
Round 1: 6 sc in MR [6]
Round 2: (sc, inc) around [9]
Round 3: sc around [9]
Round 4: (2 sc, inc) around [12]
Round 5: sc around [12]
Round 6: (2 sc, dec) around [9]
Stuff lightly, fasten off and sew under the beak.
Wings (brown tones)
These wings look textured and layered.
Wing base
Ch 12
Row 1: sc in 2nd ch and across (11), ch 1, turn
Row 2: sc across (11), ch 1, turn
Row 3: sc2tog, sc 7, sc2tog (9), ch 1, turn
Row 4: sc across (9)
Fasten off.
Wing texture
Add a puff or bobble line down the wing center, or add a scallop edge along the bottom.
Sew wings on the sides of the cozy, slightly forward so they show.
Tail feathers (brown and tan bumps)
The tail in this style looks like clustered puffs at the back.
Make 6–10 puff “feathers”
Small puff ball
Round 1: 6 sc in MR [6]
Round 2: inc around [12]
Round 3: sc around [12]
Fasten off, lightly stuff, close.
Sew these in a fan shape near the handle side/back area so it looks like a fluffy tail.
Flower applique (optional)
Center (yellow)
MR, 6 sc, join
Petals (red)
Attach red and work (ch 3, sl st) around for 5 petals
Leaves (green)
Ch 6, sc back down, sl st to attach
Sew flower and leaves to the body.
Common Mistakes and How to Avoid Them#
Cozy doesn’t fit over the teapot lid
Increase the dome one more round
Use a slightly larger hook just for the top dome if needed
Spout/handle openings are too tight
Add 2–4 more chains across the gap
Skip 2–4 more stitches in the gap round
Reinforce edges with sc to keep it neat
Cozy feels floppy
Use cotton yarn
Use a smaller hook
Add an extra sc round at the top and bottom edges
Bottom edge ruffles
Too many stitches
Add one decrease round before trim
Decorations look crooked
Pin everything first
Sew in this order: beak, wattle, comb, wings, tail
Step back and check symmetry before final stitches
Expert Tips for Better Results#
Make the body fabric dense. That’s what makes it a real teapot cozy, not just a decoration.
Add a second inner layer if you want extra warmth: crochet a simple plain cozy and sew it inside the chicken cozy.
For the cleanest kitchen finish, weave ends inside and keep knots away from areas that touch the hot teapot.
If you want a secure fit, add a small button-and-loop under the handle side so the cozy can close snugly.
Use surface slip stitch lines on the brown trim to create extra definition and a “professional” look.
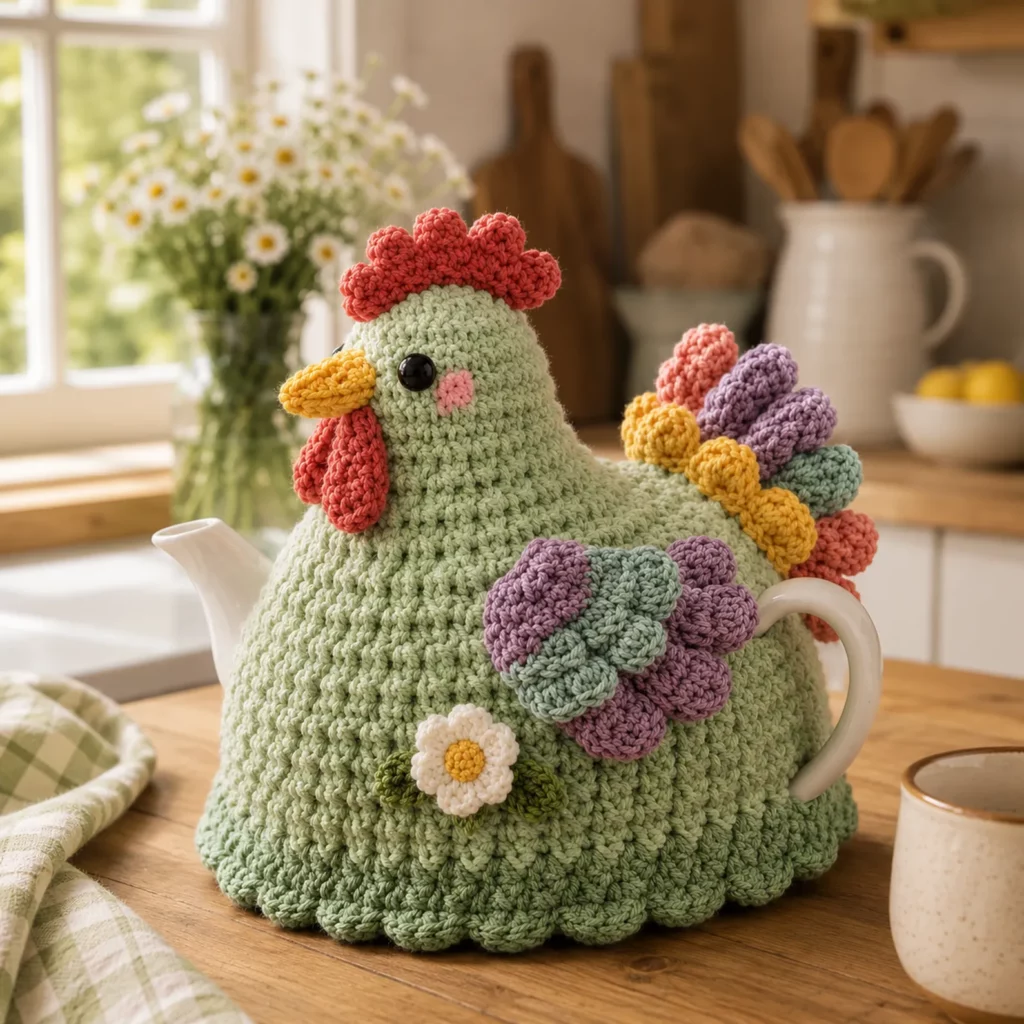
Variations and Customization Ideas#
Holiday hen cozy
Use red and green accents, add a tiny scarf or holly applique.
Farmhouse hen
Use beige and tan with a muted comb color for a rustic look.
Easter hen
Pastel body, bright comb, and a small flower crown.
Rooster version
Make the comb larger, add longer tail feathers, and use brighter color accents.
Drawstring bottom option
Add a round of chain spaces near the bottom and thread a cord through to cinch.
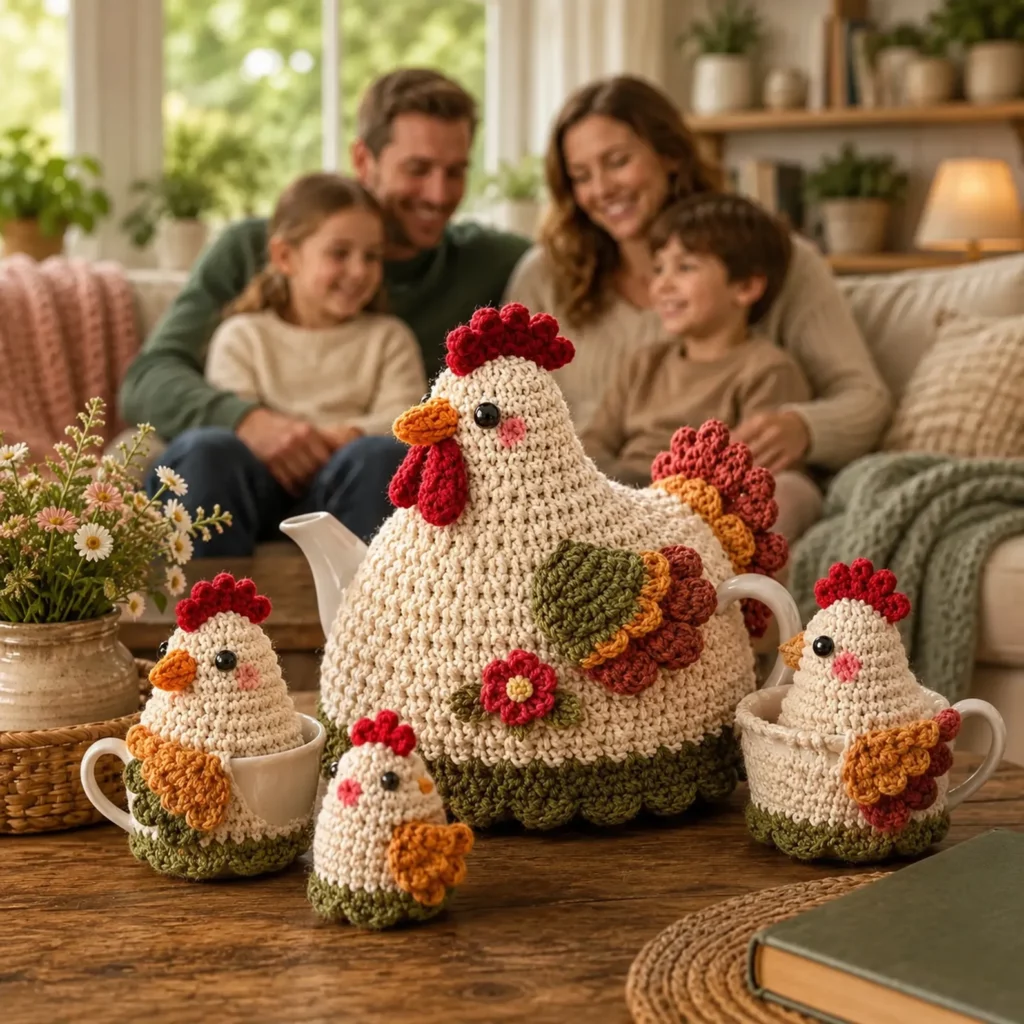
Benefits of This Crochet Project#
A functional crochet pattern that keeps tea warm
Perfect handmade gift for tea lovers and home cooks
Great stash buster for small accent colors
Beginner-friendly construction with impressive results
Makes a beautiful kitchen display piece even when not in use
Reusable and washable (with the right yarn)
Internal Linking Suggestions#
How to Crochet Bobble Stitch for Beginners
Easy Crochet Appliqué Flowers and Leaves
Beginner Guide to Measuring for Crochet Covers
Crochet Kitchen Patterns Collection
Best Cotton Yarn for Crochet Home Projects
FAQ Section#
Is this crochet pattern beginner-friendly?
Yes. The main cozy uses simple single crochet shaping. The chicken details are small add-ons that are easy to sew on.
What yarn is best for a teapot cozy?
Cotton is the best choice because it handles heat well and holds shape. Avoid fuzzy yarns for kitchen use.
How do I size the cozy for my teapot?
Measure the teapot belly circumference and height, then keep increasing the dome until it fits the top and work straight until it covers the body. Adjust the spout and handle openings with chain gaps.
Can I make this without openings?
You can, but it’s less practical. Openings make pouring easier and prevent stretching when removing the cozy.
How do I make it warmer?
Use a smaller hook for denser stitches, add an inner lining cozy, or use thicker cotton yarn.
Is it washable?
Yes. Use washable cotton yarn and hand wash or gentle cycle, then reshape and air dry.
Conclusion#
A chicken teapot cozy is the kind of crochet project that feels both charming and genuinely useful. With a warm, snug body cover, a sturdy textured base, and fun details like the comb, beak, wings, and tail, this crochet pattern turns everyday tea time into something special. It’s a fantastic gift and a joyful make that looks impressive without complicated stitches.
If you tell me your teapot height and belly circumference, I can give you an exact target stitch count for the dome and the best chain lengths for the spout and handle openings so your cozy fits perfectly.


