Introduction#
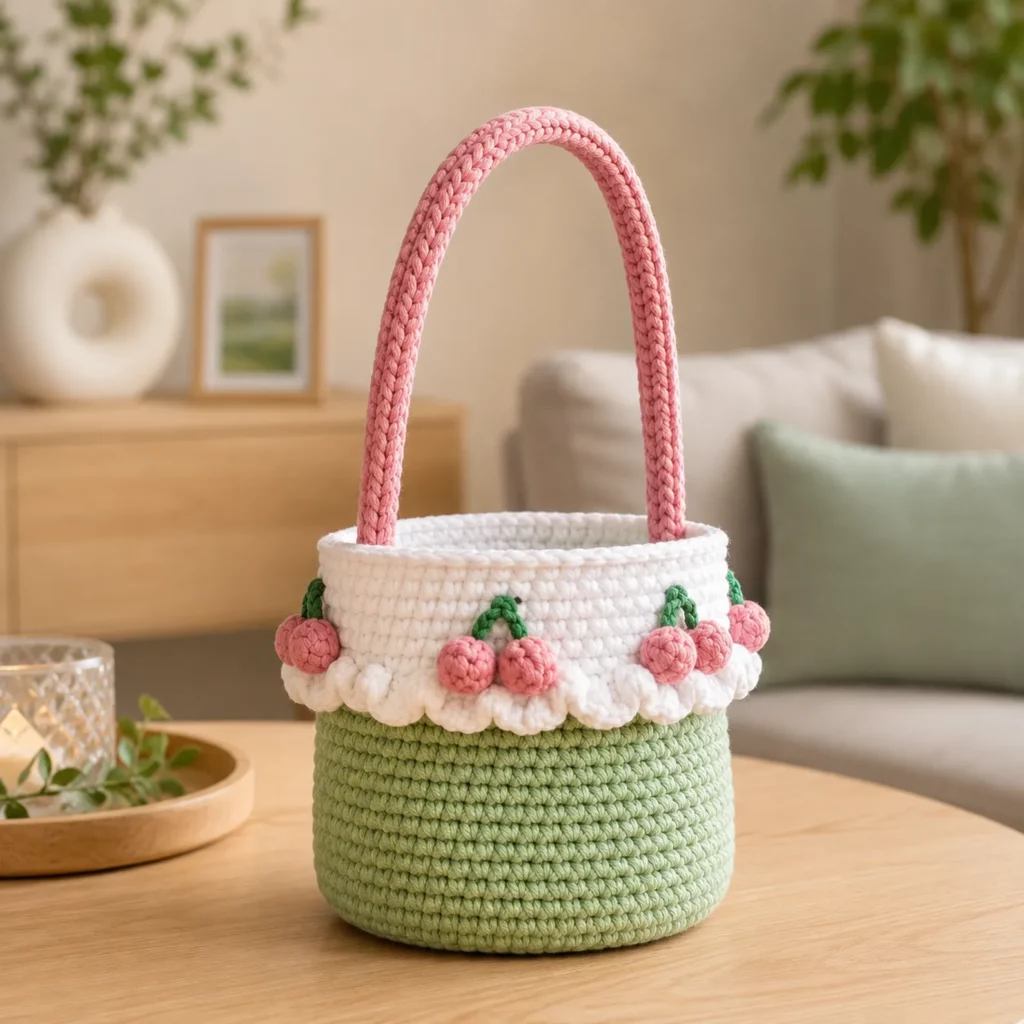
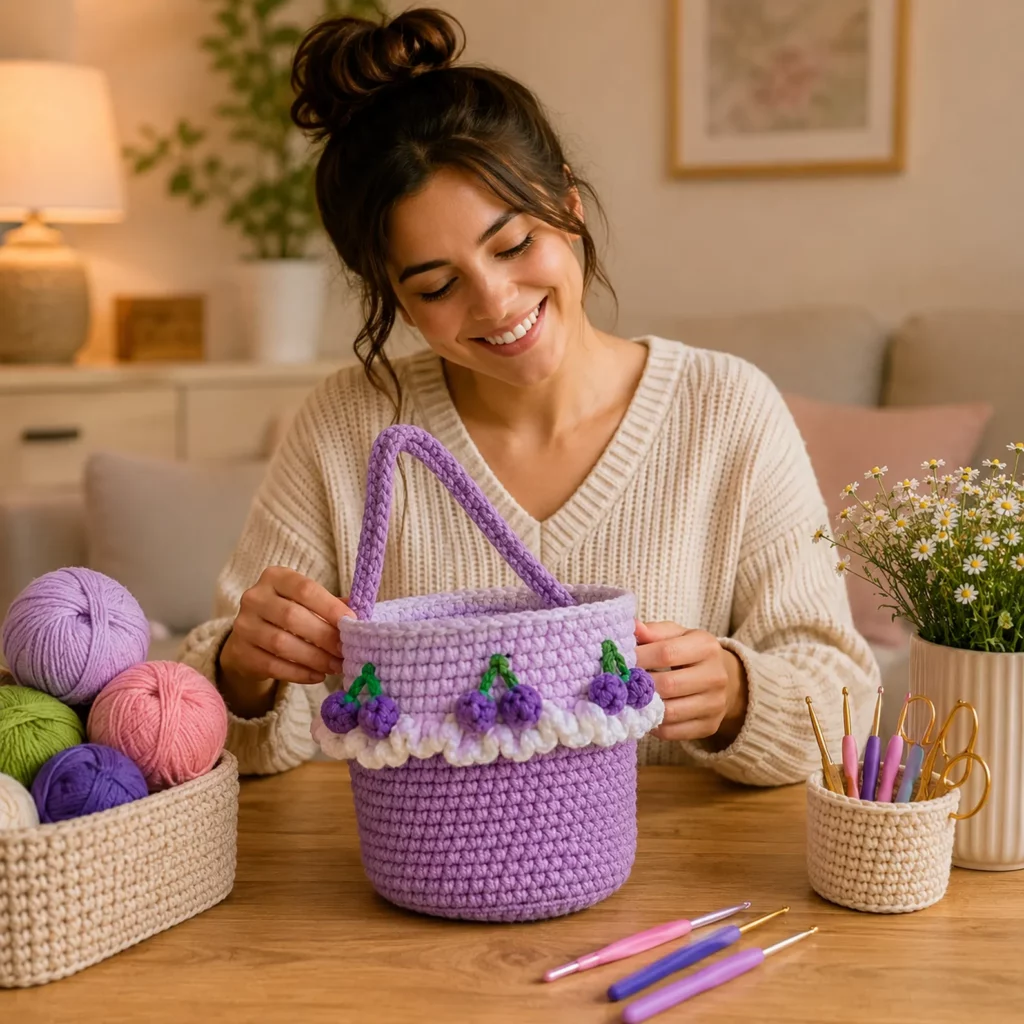
Some crochet projects are “nice to have,” and some become your go-to accessory all season. A cherry bucket bag falls into the second category. It’s playful without being childish, bold without being loud, and surprisingly practical for everyday life. The clean bucket shape holds more than you expect, the strap makes it easy to wear hands-free, and the little cherry details add that handmade charm that gets compliments everywhere.
Explore more beginner bags crochet patterns in our pattern library.
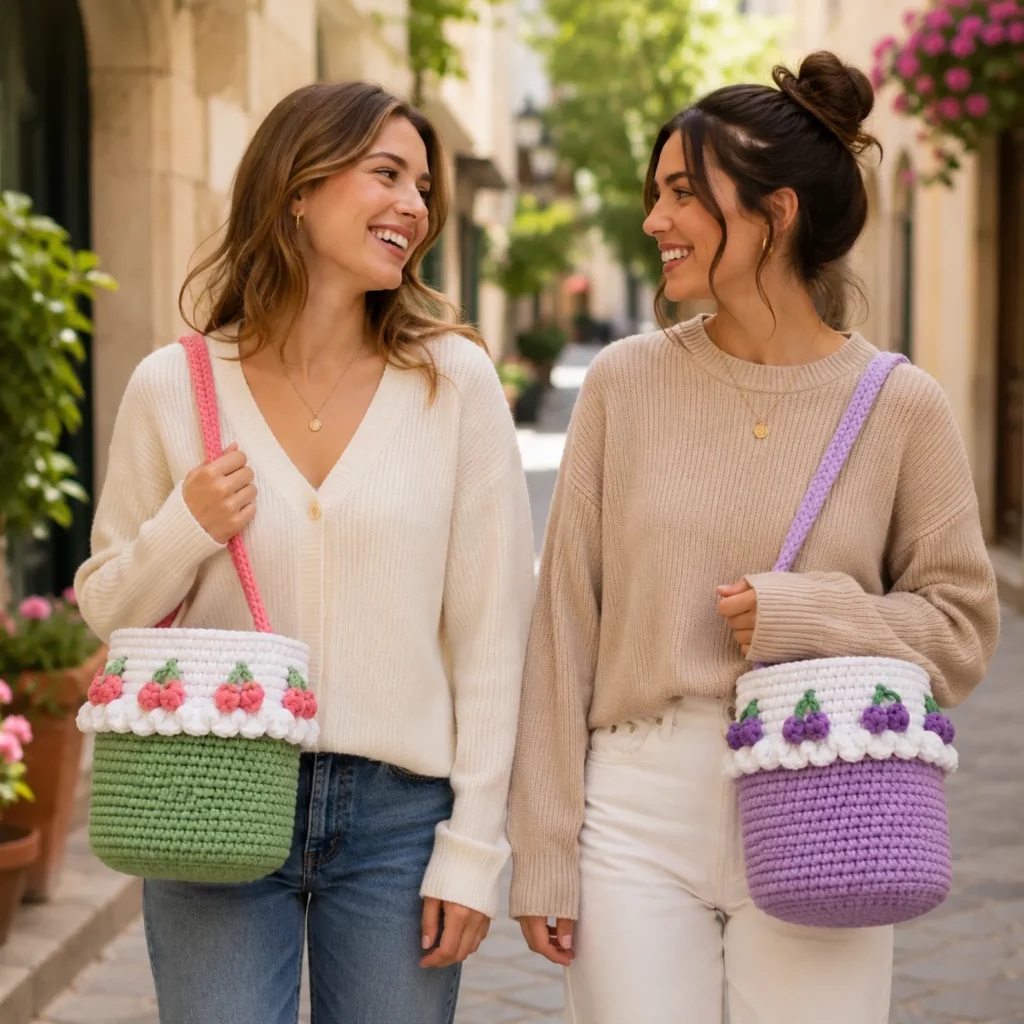
This crochet pattern is designed to look polished and boutique-style while staying approachable for newer crocheters. The bag body is built with simple, dense stitches for structure. The top band is a contrasting color that makes the design pop. Then you finish with a fluffy ruffle edge and small cherry appliqués that you can add as many (or as few) as you like.
If you’ve been looking for a free crochet pattern you can actually use—something sturdy enough for daily errands but cute enough for brunch—this is the project. And if you’re building a crochet bag collection, this one is a standout because it teaches several skills you’ll reuse again and again.
Detailed Description of the Crochet Pattern#
This is a structured bucket bag with a rounded base and straight sides. The main body is worked in continuous rounds using single crochet so the fabric is dense and durable. The bottom is an oval or circle base (depending on your preferred style), then the sides are built upward with minimal shaping. The bag has a contrasting top band (worked in a second color) that functions like a decorative cuff and helps the opening keep its shape.
The signature detail is the ruffled edge around the top. It’s created by increasing stitches in a dedicated ruffle round so it flares outward into soft waves. The cherries are small crocheted appliqués: each cherry is a tiny sphere (or puff-style circle), paired in twos with a green stem and optional leaf. These are sewn evenly around the top band for that classic cherry look.
The strap is a long, reinforced crochet strap. You can crochet it as a flat strap (less stretch) or as a cord-style strap (clean and rounded). For best everyday wear, this pattern recommends a reinforced strap and optional lining so the bag doesn’t stretch over time.
Skill Level Explanation#
This is an easy-to-intermediate crochet pattern.
Beginner-friendly parts
Single crochet in the round
Basic increases for the base and ruffle
Simple counting and stitch marker use
Straightforward strap construction
Intermediate-feeling parts
Keeping tension consistent for a structured bag
Attaching appliqués evenly
Optional lining and closure additions
Making the ruffle full without twisting the opening
If you can single crochet confidently and count stitches, you can make this. The details (ruffle and cherries) are what make it special, but they’re built from small, repeatable shapes.
Materials Needed#
Yarn choices
For bags, yarn matters. Cotton is the best for structure and reduced stretching. If you want a soft “plush” look, choose a sturdy cotton blend or a braided cotton cord.
Recommended yarn
Worsted weight cotton (#4) for a neat, sturdy fabric
Cotton cord (3–5 mm) for a more structured, modern bucket bag
Acrylic can work, but lining is strongly recommended to prevent stretching
Color suggestions (classic cherry look)
Main body: cherry red or orange-red
Top band + ruffle: white or cream
Cherries: red
Stems/leaves: green
Hook
4.0–5.0 mm for worsted cotton (choose smaller for denser fabric)
5.0–6.5 mm for cotton cord (follow yarn thickness and desired firmness)
Notions
Stitch marker
Yarn needle
Scissors
Measuring tape
Optional: fabric for lining
Optional: magnetic snap, button, or drawstring cord
Optional: plastic canvas or sturdy felt for a base insert
Yardage estimate (approximate)
Main color: 250–400 yards
Contrast color: 100–200 yards
Green + cherry accents: small scraps
Exact yardage depends on bag height, strap length, and ruffle fullness.
Stitches & Techniques Explained#
Abbreviations (US terms)
ch = chain
sl st = slip stitch
sc = single crochet
inc = increase (2 sc in one stitch)
dec = decrease (sc2tog or invisible decrease)
BLO = back loop only
hdc = half double crochet
dc = double crochet
st(s) = stitches
Working a flat base
A bucket bag needs a flat base that doesn’t ripple. That comes from spacing increases evenly. If your base starts to wave, you have too many increases. If it starts to curl like a bowl too early, you need more increases.
Turning the corner cleanly
To make the sides stand up, you’ll crochet one round in BLO. This creates a crisp fold line and helps the bag hold shape.
Ruffle round
A ruffle is simply controlled “extra fabric.” You create it by increasing aggressively in one round (for example, 2 stitches in each stitch, or repeating increase patterns like inc, inc, sc).
Carrying weight and preventing stretch
Dense stitches help. Cotton yarn helps more. For maximum durability, add a lining and reinforce the strap (either with extra rows or by sewing ribbon/twill tape inside the strap).
Step-by-Step Instructions#
Pattern notes
Work in continuous rounds unless stated. Use a stitch marker in the first stitch of each round. This tutorial is written to be adjustable: you can make the bag taller, shorter, wider, or smaller by adding or removing rounds.
Step 1: Crochet the base (main color)
Option A: Round base (simple and common for bucket bags)
Rnd 1: MR, 6 sc (6)
Rnd 2: inc around (12)
Rnd 3: (sc, inc) around (18)
Rnd 4: (2 sc, inc) around (24)
Rnd 5: (3 sc, inc) around (30)
Rnd 6: (4 sc, inc) around (36)
Rnd 7: (5 sc, inc) around (42)
Rnd 8: (6 sc, inc) around (48)
Continue increasing until the base diameter matches what you want.
Small bag base: 5–6 inches across (about 48–60 stitches)
Medium bag base: 6.5–7.5 inches across (about 60–72 stitches)
Base check
Lay it on a table. It should lie flat. If it ruffles, remove an increase round or space increases farther apart. If it bowls, add an increase round.
Option B: Oval base (roomier shape)
If you prefer a slightly longer bottom (more room for items), start with a chain oval base and increase around the ends. This is great if you want your bucket bag to hold a phone, wallet, and small pouch comfortably.
Step 2: Build the sides (main color)
Turning round
Work 1 round sc in BLO around. Do not increase. This creates the fold line.
Side rounds
Continue with sc around in both loops, no increases, until the bag reaches your desired height.
Typical height ranges
Mini bucket: 6–7 inches tall
Everyday bucket: 8–10 inches tall
Tip for a smoother look
If you want perfectly stacked rows, you can “join rounds” (sl st, ch 1, sc around). Continuous rounds are faster but create a slight spiral. Both are fine.
Step 3: Add the contrasting top band (contrast color)
Join contrast yarn at the back seam area.
Work 4–8 rounds of sc around (no increases).
This creates that clean “cuff” look at the top and makes the ruffle stand out.
Optional: firm top edge
Work one round of sc in BLO for a subtle ridge before the ruffle. This helps the ruffle sit neatly and keeps the opening from stretching.
Step 4: Crochet the ruffle (contrast color)
There are two good beginner-friendly ruffle options.
Ruffle option 1: Full ruffle (very fluffy)
Work 2 sc in each stitch around (inc in every stitch).
This creates a dramatic ruffle.
Ruffle option 2: Soft ruffle (more subtle, still cute)
(inc, inc, sc) repeat around.
This gives a gentler wave that’s less bulky.
Finish the ruffle with a sl st to the first stitch if you’re joining rounds, then fasten off and weave in ends.
Step 5: Make the cherries (accent color)
Each cherry is a tiny ball. Make 6–12 cherries depending on how decorated you want the bag.
Cherry (make 2 per pair)
Rnd 1: MR, 6 sc (6)
Rnd 2: inc around (12)
Rnd 3: sc around (12)
Rnd 4: (sc, dec) around (8)
Stuff lightly
Rnd 5: dec around (4)
Fasten off, close, weave in neatly or leave a tail for sewing.
If you prefer no stuffing
Stop after Rnd 3, flatten slightly, and sew as a puffy circle instead. This is faster and still looks great.
Step 6: Stems and leaves (green)
Simple stem for a cherry pair
Ch 10–14 (adjust length)
Sl st back down the chain to make a firm cord
Fasten off, leave tails for sewing.
Optional leaf
Ch 6
In 2nd ch: sl st, sc, hdc, sc, sl st
Fasten off.
Assemble a cherry pair
Sew two cherries close together. Attach one stem at the top center, and add a leaf if desired.
Step 7: Attach cherries to the bag
Decide placement before sewing. The cleanest look is evenly spaced cherry pairs around the top band, just above the ruffle. Use stitch markers to mark spacing points (for example, every 10–14 stitches depending on your stitch count).
Sew each cherry pair securely
Stitch through the cherry base into the bag fabric with multiple small stitches.
Secure the stem ends firmly so they don’t lift.
Step 8: Crochet the strap (main color)
You want a strap that’s strong and doesn’t stretch.
Strap option 1: Flat reinforced strap (recommended)
Ch to desired length (typical crossbody: 90–120 ch, shoulder: 65–85 ch)
Row 1: sc in 2nd ch from hook and across, turn
Rows 2–4: ch 1, sc across
Fasten off leaving long tails for sewing.
Attach strap ends to the inside top band, slightly toward the sides so the bag hangs centered.
Strap option 2: Cord strap (rounded look)
Ch to desired length
Work sl st into each chain across for a firm cord
This looks neat but can be thinner on the shoulder.
Strap reinforcement tip
Sew the strap on with a box stitch (rectangle) and an “X” through the middle. This is the strongest way to attach a strap.
Step 9: Optional lining (highly recommended)
A lining makes the bag feel professional and prevents stretching.
Simple lining method
Measure the bag’s width and height. Cut fabric slightly smaller than the bag circumference and height.
Sew a fabric tube and bottom panel.
Insert lining and hand-stitch it to the inside top band.
Optional: add a magnetic snap before attaching the lining.
Optional: base insert
Cut plastic canvas or sturdy felt to fit the base. Slide it between lining and crochet fabric for a crisp shape.
Common Mistakes and How to Avoid Them#
The base ripples
Too many increases. Frog back one round and space increases farther apart.
The bag leans or twists
This usually happens when you lose stitch count in continuous rounds. Use a marker and count occasionally. Joining rounds can also reduce drift.
The ruffle looks messy or curls inward
Your increase rate may be too high for your yarn thickness, or your top band is too tight. Use the softer ruffle option or go up a hook size for the ruffle round only.
Cherries look uneven
Make sure both cherries in a pair have the same stitch count and stuffing amount. Light stuffing keeps them neat.
Strap stretches over time
Use cotton, reinforce the strap with multiple rows, and consider sewing ribbon/twill tape inside the strap or adding a lining.
Appliqués feel loose
Sew through multiple stitches and secure with several passes. Bags get handled a lot, so durability matters.
Expert Tips for Better Results#
Use cotton yarn for the body and strap. It’s the simplest way to get a bag that stays the same shape.
Keep stitches tight. A smaller hook gives a more structured fabric and a cleaner look.
Block the bag lightly. Stuff the bag with towels to shape it, mist lightly with water (for cotton), and let it dry so it holds its form.
Add a simple closure. A magnetic snap or drawstring makes the bag more functional for everyday use.
Even spacing makes it look “store-bought.” Mark cherry placement points before sewing so the decoration is perfectly balanced.
Variations and Customization Ideas#
Make it a mini cherry bag by using a smaller base and a shorter strap (perfect for kids or festivals).
Swap the cherries for strawberries, lemons, or flowers using the same appliqué placement method.
Change the top to a drawstring ruffle by adding eyelets (ch 1, skip 1) and threading a cord through.
Use a different color palette: pink body + cream top, black body + red cherries, sage body + white top for a softer look.
Add an inner pocket to the lining for keys or lip balm.
Turn it into a handbag by making two shorter handles instead of a long strap.
Benefits of This Crochet Project#
It creates a functional, wearable accessory you’ll actually use
The dense stitch fabric teaches you how to build structured crochet bags
The cherry appliqués add high visual value with simple techniques
It’s easy to customize size, strap length, and decoration count
It’s a great stash-buster for accent colors
It makes a memorable handmade gift for birthdays, holidays, and summer outings
Internal Linking Suggestions#
You may also like these related posts
Best Yarn for Crochet Bags That Don’t Stretch
How to Add a Fabric Lining to Any Crochet Bag
Easy Crochet Strap Tutorial That Won’t Stretch
Free Crochet Pattern: Simple Bucket Bag Base in the Round
Crochet Tutorial: Clean Color Changes for Neat Bands and Borders
DIY Crochet: Adding Magnetic Snaps and Closures to Crochet Bags
FAQ Section#
What stitch is best for a crochet bucket bag?
Single crochet is best because it creates a dense fabric that holds shape and supports the weight of items better than open stitches.
Is this a good free crochet pattern for beginners?
Yes. The bag body is simple rounds of single crochet. The cherries and ruffle are beginner-friendly add-ons that you can do slowly and repeat.
How do I make the bag bigger or smaller?
Adjust the base size by adding or removing increase rounds, then change the height by adding or removing side rounds. The top band and ruffle can stay the same style.
Do I need a lining for a crochet bag?
You don’t have to, but lining makes the bag more durable, prevents stretching, and keeps small items from poking through stitches. It’s the best upgrade.
How do I stop the strap from stretching?
Use cotton yarn, crochet the strap in multiple rows of single crochet, and sew it on with reinforced stitching. For extra strength, sew ribbon inside the strap.
Can I wash this bag?
If you use cotton yarn and a simple fabric lining, gentle hand-washing is best. Lay flat to dry and reshape the bag while damp.
Conclusion#
A cherry bucket bag is the perfect mix of cute and practical. The structured body makes it usable, the ruffle gives it personality, and the cherries turn a simple crochet bag into something unforgettable. This crochet pattern is especially satisfying because it teaches you how to build a strong bag foundation and then elevate it with details—exactly the kind of skill-building project that makes you feel more confident as a maker.
If you want, tell me whether you’re using worsted cotton or cotton cord and whether you want it as a shoulder bag or crossbody, and I’ll suggest the best base diameter and strap length so your finished bag fits exactly how you want.