


Introduction#
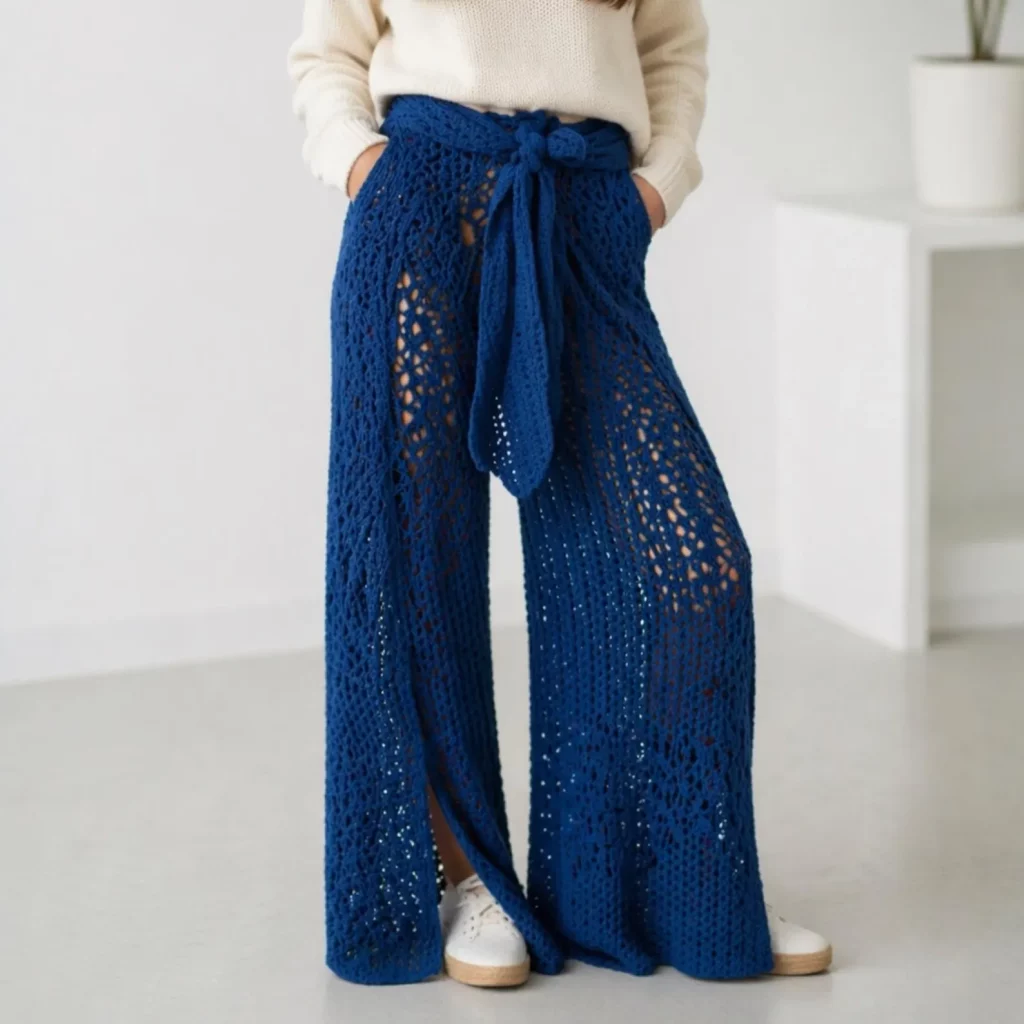
When you want a summer outfit that feels light, looks elevated, and still gives you that “I made this” glow, crochet pants are a power move. And not the stiff, heavy kind—these are breezy, lacey, wide-leg wrap pants with a flattering high waist and a dramatic drape that moves beautifully when you walk.
Explore more beginner tops crochet patterns in our pattern library.
This crochet pattern is designed for makers who want something wearable and modern without complicated shaping. The secret is in the construction: two simple leg panels with an airy lace repeat, a comfortable waistband, and a long tie belt that wraps and knots at the front. You’ll get a polished look with straightforward stitches, plus plenty of tips for fit, length, and opacity (because lace pants can be a little intimidating the first time).
If you’ve been searching for a free crochet pattern that feels fashion-forward and still doable, this is a fun project to level up your wardrobe.
Detailed Description of the Crochet Pattern#
These pants have a few signature design features that make them look boutique-style while staying approachable to crochet:
- High-waisted wrap waistband with a long tie that creates an adjustable fit
- Wide-leg silhouette that flatters many body types and gives that flowy, “resort wear” vibe
- All-over lace texture made with a repeating openwork stitch pattern (lightweight and breathable)
- Built-in overlap at the front (wrap style) that adds coverage compared to standard lace trousers
- Optional pockets (easy add-on if you like hands-free comfort)
- Customizable length from cropped to full length with minimal math
Instead of crocheting in the round with complicated increases, you’ll mostly work flat panels. This makes it easier to try on and adjust as you go—especially helpful if you’re still getting comfortable with garment crochet.
Skill Level Explanation#
This is an easy-to-intermediate crochet pattern depending on your experience with wearables.
You’ll do great if you can:
- Crochet a consistent gauge (or at least measure as you go)
- Work basic stitches like double crochet and chain spaces
- Read a simple repeat (the lace pattern repeats across the row)
- Seam panels neatly and evenly
- Make a waistband and tie that won’t twist
If you’re a true beginner, you can still make these—just choose a simple lace repeat (I’ll include options) and take your time with measuring. The shaping is forgiving because of the wrap fit and wide legs.
Materials Needed#
Yarn
Pick a yarn that drapes well and feels comfortable against the skin. Great choices:
- Cotton or cotton-bamboo blends (breathable, crisp stitch definition)
- Viscose/rayon blends (amazing drape, more fluid movement)
- Lightweight acrylic blends (budget-friendly, easier care)
Recommended yarn weight:
- DK (#3) for lighter, airier pants
- Worsted (#4) for slightly more coverage and structure
Approximate yardage (depends heavily on size + length):
- Cropped: 900–1400 yards
- Full length: 1200–2000 yards
Hook
- DK yarn: 4.0–5.0 mm
- Worsted yarn: 5.0–6.0 mm
Choose the hook that gives you a fabric with good drape (not stiff). Lace looks best when it can “flow.”
Notions
- Stitch markers
- Measuring tape (essential for wearables)
- Yarn needle for seaming
- Scissors
- Optional: elastic (½ inch / 12 mm) for extra waistband security
- Optional: lightweight lining fabric or shorts for more coverage
Fit Tip (Important)
Because lace fabric stretches differently depending on yarn, measure your body and your fabric frequently instead of relying only on stitch counts.
Stitches & Techniques Explained#
Below are the most common stitches you’ll use in this crochet tutorial.
Abbreviations (US terms)
- ch = chain
- sl st = slip stitch
- sc = single crochet
- dc = double crochet
- tr = treble crochet (optional, for a more open lace)
- sk = skip
- sp = space
- rep = repeat
- RS/WS = right side/wrong side
Core techniques
- Working lace repeats: You’ll repeat the same sequence across a row (easy once you get the rhythm).
- Seaming flat panels: Mattress stitch or whip stitch both work.
- Adjusting rise: You can add rows to increase the waist-to-crotch depth.
- Creating a tie belt: A long strap made with tight stitches (sc or hdc) so it won’t stretch out too much.
Beginner-friendly lace options
If you want the look without complicated counting, these repeats are great:
Option: Classic V-stitch lace
- (dc, ch 1, dc) in same stitch/space; creates neat vertical eyelets.
Option: Mesh stitch
- dc, ch 1, sk 1 (or sc + ch spaces). Super simple, very airy.
Option: Shell-and-mesh hybrid
- Adds a little “texture motif” while staying repetitive.
Below I’ll write the pattern using a V-stitch lace base because it gives a beautiful drape and looks polished.
Step-by-Step Instructions#
This is a made-to-measure approach so it fits more bodies without complicated grading. You’ll crochet two leg panels, seam, then add the waistband and tie.
Measurements to take
- Waist (where you want the pants to sit—high waist recommended)
- High hip (around the fullest upper hip)
- Rise (waist down to where you want the crotch seam to sit)
- Inseam (crotch to ankle)
- Outseam (waist to ankle)
- Thigh circumference (fullest part)
Gauge check (quick but worth it)
Make a 6 x 6 inch swatch in your lace pattern. Measure:
- stitches per 4 inches
- rows per 4 inches
If you don’t want to swatch, at least crochet a small sample and confirm you like the drape.
Lace Pattern Repeat (V-stitch lace)
Foundation row setup (worked flat):
- Start with a chain that is a multiple of 3, then add 2 more chains.
Row 1: dc in 4th ch from hook, ch 1, sk 1 ch, dc in next ch; rep across, turn.
Row 2: ch 3 (counts as dc), (dc, ch 1, dc) in next ch-1 sp; rep across, dc in top of turning ch, turn.
Row 3+: Repeat Row 2 until your panel reaches the needed length.
This creates a tidy lace that’s consistent and easy to adjust.
Make the Leg Panels (make 2)
Each leg is essentially a wide rectangle that becomes wide-leg pants once seamed.
Step: Decide your panel width
A simple starting point:
- Panel width ≈ (high hip ÷ 2) + 2–5 inches for ease and wrap overlap
If you want more dramatic flow, add more ease. If you want less volume, reduce ease.
Step: Crochet the panel
- Chain to the width you need using the lace multiple.
- Work the lace rows until the panel length matches your outseam minus waistband height (about 2–3 inches).
Quick fit check:
Hold the panel against your body from waist to ankle. Lace stretches under its own weight, so it’s okay if it looks slightly short before washing/blocking.
Shape the Inner Leg Angle (simple method)
To avoid a bulky crotch and help the pants sit better, you’ll create a small step-in seam.
On each panel, mark:
- The top edge center point
- From the center, measure out 3–5 inches on each side (more for larger sizes)
Create a gentle inner curve (easy approach):
For the last 6–10 rows near the top, do this on the inner edge only:
- At the start of the row, sl st across 1–2 stitches/spaces, then continue the lace pattern.
This subtly narrows the top inner edge so the crotch seam is smoother.
If you prefer no shaping, you can skip this and seam a straight line—the wide leg style hides a lot.
Seam the Legs
Fold each panel lengthwise (right sides together). Seam from ankle up toward the top, stopping where the crotch should begin.
You’ll end up with two “tubes.”
Tip: Mattress stitch gives a nearly invisible seam. Whip stitch is faster and also fine.
Join the Legs at the Crotch
Turn one leg right-side out and place it inside the other leg (right sides facing). Align center seams and pin.
Seam the crotch curve from the front to the back. Reinforce this seam well—this area takes the most strain.
Create the Wrap Front Overlap
The wrap look comes from a slightly extended front panel + tie placement.
Simple overlap method:
- Lay the pants flat.
- Identify the front center.
- Add a front overlap extension by crocheting an extra flap on each front side of the waistband area (about 4–7 inches wide, 6–10 inches tall), then these flaps cross at the front.
If you want a cleaner method: crochet a waistband casing that extends longer on one side, then wrap it across.
Add the Waistband
You can do a waistband two ways:
Option: Crochet-on waistband (most common)
- With RS facing, join yarn at the back center.
- Work sc evenly around the waist opening (place 1 sc per stitch/space, adjusting as needed so it lays flat).
- Work 4–8 rounds of sc or hdc for a firm band.
- If adding elastic, crochet a casing: fold the waistband inward and stitch it down, leaving an opening to insert elastic.
Option: Ribbed waistband (more fitted)
- Crochet a long ribbed strip (BLO slip stitch or BLO sc rows), then sew it to the waist.
This hugs the waist nicely and looks very professional.
Make the Tie Belt
A tie belt should be firm so it doesn’t stretch out.
- Ch until the belt is long enough to wrap around your waist and tie a bow (usually 70–90 inches total length depending on waist + bow size).
- Work sc in each chain across.
- Add another row of sc to make it sturdier.
- Fasten off and weave in ends.
Attach the belt at the waistband sides or thread it through belt loops.
Add Belt Loops (recommended)
Belt loops stop the tie from slipping and keep the wrap centered.
- Join yarn at waistband side seam.
- Ch 8–12, sl st back into waistband (loop).
Make 4–6 loops: two front, two sides, two back.
Optional Pockets
Simple patch pockets work best with lace pants.
- Crochet two rectangles in sc or a tighter mesh stitch (so items don’t fall through).
- Sew onto the outer hip area, aligning the top with the waistband.
Finishing
- Weave in ends carefully (lace shows everything).
- Lightly block to open the lace pattern and improve drape.
- Try on and adjust: hem length, waistband height, tie placement.
Common Mistakes and How to Avoid Them#
- Waistband too loose: Add elastic or use a ribbed waistband. Also make sure your sc round count isn’t too many.
- Lace pattern looks uneven: Tension matters—slow down and check each repeat. Stitch markers every 10–15 repeats help.
- Pants are too see-through: Use a thicker yarn, reduce hook size slightly, choose a denser lace (V-stitch vs big mesh), or plan to wear lining shorts.
- Crotch seam feels bulky: Use fewer layers at the join, seam with a flatter stitch, and consider that small inner-leg narrowing method.
- Legs twist: Check that both panels have the same row count and that you didn’t accidentally rotate a seam during joining.
Expert Tips for Better Results#
- Choose drapey yarn first, pattern second. Lace pants live or die by drape. Cotton-bamboo and rayon blends are gold here.
- Use a larger hook for flow. Stiff lace won’t hang nicely—aim for fluid fabric.
- Reinforce stress points. Add a second pass of stitching at the crotch seam and at belt attachments.
- Block before final hemming. Lace length changes after blocking; don’t lock in the hem too early.
- Add a modesty panel if you want. A simple inner front panel in tighter stitch can increase coverage while keeping the lace vibe.
Variations and Customization Ideas#
- Beach cover-up version: Make the lace more open and shorten to mid-calf for a swim cover-up.
- Cropped wide-leg: Stop at ankle-bone height and add a cute scalloped hem.
- High-slit legs: Leave the outer seam open from knee down for dramatic movement.
- Two-tone stripe: Swap colors every 6–10 rows for subtle bands.
- Dressy version: Use a silky yarn and add a longer tie belt with tassels.
- Drawstring waist: Instead of a wrap belt, add a cord through the waistband with eyelets.
Benefits of This Crochet Project#
- Creates a wearable, modern garment that stands out
- Adjustable wrap waist means the fit is forgiving
- Lace stitches keep it cool and breathable
- Easy to customize length, width, and coverage
- Great stash-buster for DK/worsted summer yarns
- Builds confidence in garment construction without complex shaping
Internal Linking Suggestions#
If you’re building a crochet blog, link this post to:
- A “How to Crochet a Gauge Swatch” tutorial
- A “Beginner Crochet Lace Stitches” guide
- A “How to Block Crochet Garments” post
- A “How to Seam Crochet Panels Neatly” tutorial
- A “Best Yarn for Summer Crochet Wearables” roundup
- A “Crochet Belt and Drawstring Tutorial” post
FAQ Section#
Are lace crochet pants hard to make?
Not necessarily. The lace repeat is usually simple—most of the success comes from measuring, consistent tension, and careful seaming.
What is the best yarn for crochet pants?
Cotton, cotton-bamboo, and rayon blends are popular because they’re breathable and drape well. Avoid very stiff yarns unless you want a structured look.
How do I stop crochet pants from stretching out?
Use a waistband with elastic or ribbing, reinforce seams, and avoid overly heavy yarn. Blocking helps stabilize the fabric too.
Will lace crochet pants be see-through?
They can be, depending on stitch pattern and yarn. Choose a denser lace, use a slightly smaller hook, or plan to wear lining shorts or a slip.
How do I size this crochet pattern for my body?
Use a made-to-measure approach: crochet panels to your measurements, then adjust length and waistband as you try on. This is more accurate than stitch counts alone.
Can I add pockets to crochet lace pants?
Yes—use a denser stitch for pockets (sc fabric) so items don’t peek through or fall out.
Conclusion#
These lace wrap pants are the kind of crochet pattern that turns heads because they look polished, intentional, and effortlessly stylish. Once you understand the “two panels + seam + waistband” formula, you can remake them in different yarns and lengths for totally different vibes—beachy, dressy, casual, or cozy.
If you tell me your waist, high hip, and desired inseam, I can help you translate that into a clean starting chain count for your lace repeat and a waistband plan that fits securely.


