Introduction#
Tiny handmade shoes have a special kind of magic. They’re practical (warm little toes!), they’re fast to finish, and they look like something you’d find in a boutique baby shop—especially when you add thoughtful details like tie straps, soft pom-poms, and a clean, structured sole.
Explore more beginner baby crochet patterns in our pattern library.
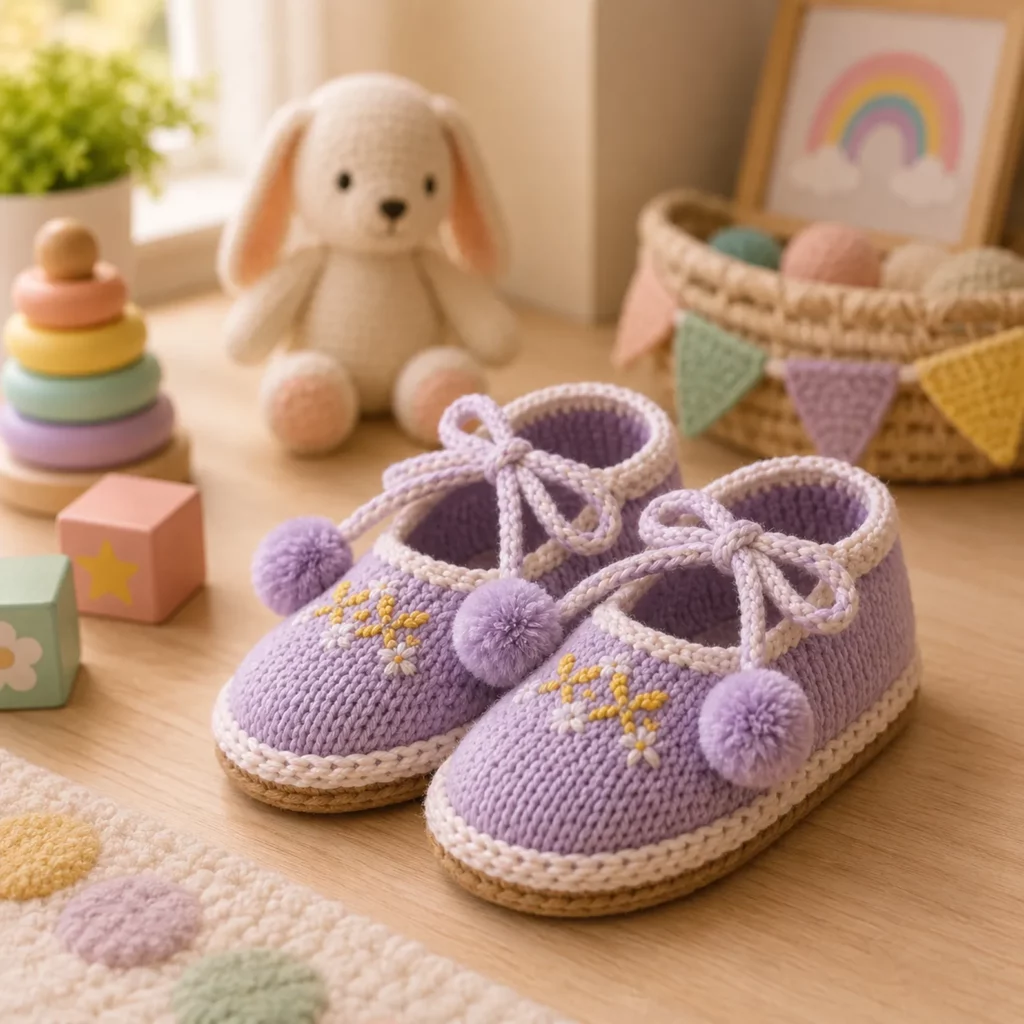
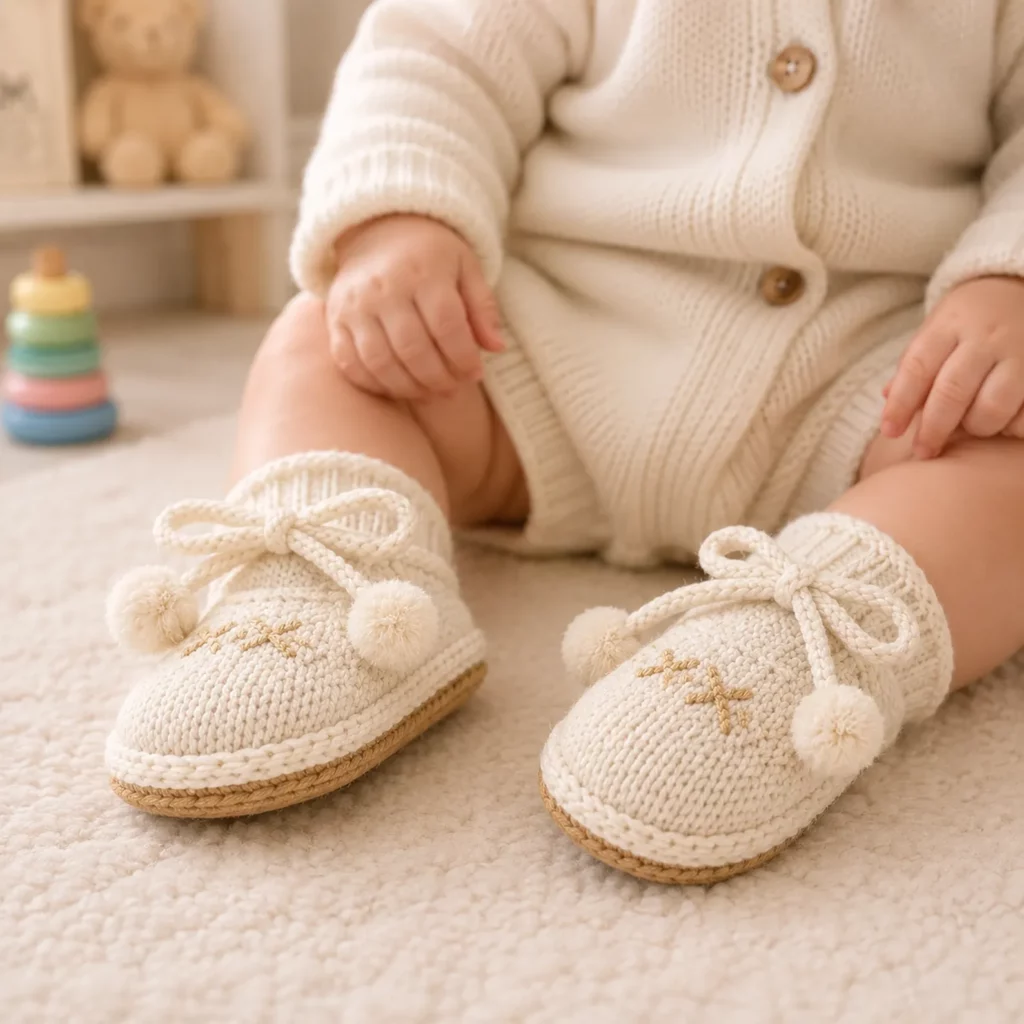
This crochet pattern is for a sweet pair of baby Mary Jane–style booties with a secure tie that helps them stay on wiggly feet. The shape is classic: a rounded toe, a smooth upper, and a gentle ankle cuff that sits comfortably without squeezing. The finishing touch is the bow tie and pom-poms, which make the shoes feel polished and gift-ready.
Because baby shoes need to be comfortable and secure, this crochet tutorial focuses on the parts that matter most: getting the right sole length, building an upper that doesn’t gap, making a strap that actually holds, and finishing neatly so the inside feels smooth. If you’ve ever crocheted a simple baby bootie and found it slides off, this design is a nice upgrade without being complicated.
Detailed Description of the Crochet Pattern#
These baby shoes are built in three main stages:
A shaped sole that forms the footprint and sets the size
An upper worked upward from the sole that creates the toe and sides
A strap-and-cuff finish that closes around the ankle like a Mary Jane, finished with a bow and pom-poms
Visually, the shoe has a “two-tone sole” effect. You can crochet the base in a natural/tan shade to mimic an espadrille-style sole and work the upper in cream for a timeless look. The top has a centered strap that ties into a bow, with pom-poms hanging at the ends.
The stitch texture is dense and baby-friendly, meaning it’s warm, soft, and not overly holey. You can also add a simple embroidered cross stitch or initials on the toe for a personalized gift look.
Skill Level Explanation#
Skill Level: Beginner to Confident Beginner
This is an easy crochet pattern if you’re comfortable with:
Chain (ch)
Single crochet (sc)
Half double crochet (hdc)
Slip stitch (sl st)
Working in the round
Working in rows (for the strap)
Skills you’ll practice while staying in a beginner-friendly zone:
Shaping an oval sole
Working into back loops only (BLO) to create a clean “edge” between sole and upper
Simple decreases to shape the toe
Attaching straps and finishing neatly
If you’ve made a hat, a simple amigurumi piece, or a basic bootie before, you can absolutely make these.
Materials Needed#
Yarn
For baby shoes, choose yarn that is soft, washable, and not scratchy.
Best yarn weights:
DK (Category 3) for delicate, lightweight booties
Worsted (Category 4) for a slightly sturdier, warmer shoe
Good fiber options:
Soft acrylic baby yarn (easy wash, budget-friendly)
Cotton or cotton blend (crisp stitch definition, breathable)
Bamboo blend (very soft drape)
Colors (suggestion):
Color A: Cream/ivory for the upper
Color B: Tan/natural for the sole edge (optional)
Optional accent: light gold or beige embroidery thread for toe detail
Yardage:
Most baby shoes use a small amount of yarn. One 100g skein is usually plenty, even with pom-poms.
Hook
Use a hook that creates a tight fabric so toes don’t poke through and the shoe holds shape.
DK yarn: 3.0–3.5 mm
Worsted yarn: 3.5–4.5 mm
If your stitches look gappy, go down 0.5 mm.
Notions
Stitch marker
Yarn needle
Scissors
Measuring tape or ruler
Optional: non-slip fabric paint or suede patches for the soles
Optional: pom-pom maker or fork for quick pom-poms
Optional: embroidery needle and thread for toe embellishment
Stitches & Techniques Explained#
Common Abbreviations
ch = chain
sl st = slip stitch
sc = single crochet
hdc = half double crochet
inc = increase (2 sts in same st)
dec = decrease (sc2tog or hdc2tog)
BLO = back loop only
FLO = front loop only
( ) = repeat
[ ] = stitch count
Oval Sole Basics
A baby shoe sole is usually an oval. You crochet along one side of a foundation chain, increase at the end, crochet back along the other side, then increase at the other end. Repeating this builds a flat oval.
BLO Round for a Crisp Edge
Working one round in BLO creates a ridge that visually separates the sole from the upper. It also makes the shoe look more structured.
Toe Shaping With Decreases
To create the rounded toe, you’ll decrease across the front section of the shoe. The goal is a smooth curve, not a sharp point. Even spacing is the secret.
Secure Straps
A Mary Jane strap is most secure when it’s anchored on both sides and ties across the top. A tie strap also allows small fit adjustments, which is perfect for babies.
Step-by-Step Instructions#
Sizing and Finished Sole Length
Baby shoes fit best when the sole is close to the baby’s foot length, with a little wiggle room.
Common sole lengths (approximate):
Newborn: 3.25 in (8.3 cm)
0–3 months: 3.75 in (9.5 cm)
3–6 months: 4.25 in (10.8 cm)
6–9 months: 4.75 in (12 cm)
9–12 months: 5.25 in (13.3 cm)
Fit tip: If you can measure the baby’s foot, do that and build the sole to match. If not, choose a size chart length and crochet to that measurement.
Notes Before You Start
Make two shoes exactly the same by counting rounds and writing down any changes.
Try the sole against a ruler as you go. Sizing is easier to adjust early than later.
Use a stitch marker at the start of each round.
Color Key (Optional)
A = cream/ivory upper
B = tan/natural sole accent
Sole (Color B or A)
Choose your starting chain based on size. These are flexible because yarn and tension vary. The goal is the sole length.
Newborn: ch 10
0–3 months: ch 11
3–6 months: ch 12
6–9 months: ch 13
9–12 months: ch 14
Round 1: sc in 2nd ch from hook, sc in next chs to last ch, 3 sc in last ch
Work down the other side of the chain: sc in each ch, 2 sc in the last ch (the first chain space)
Join with sl st if you prefer joined rounds, or continue in a spiral. Place marker.
Round 2: inc in first st, sc in next sts until you reach the 3-sc curve, inc in each of the next 3 sts (around the toe end)
sc down the long side, inc in each of the next 2 sts (heel curve)
sc to end
Round 3: sc, inc repeat on the curve areas only to keep the oval smooth
On the toe curve, work (sc, inc) across the 3 curve stitches
On the heel curve, work (sc, inc) across the 2 curve stitches
Sc evenly along the long sides
Continue adding sole rounds until your sole measures the target length for your size. Most baby soles land around 3–5 total rounds depending on yarn weight.
Upper Setup (BLO Round)
Round next: sc BLO around the entire sole
This creates the crisp ridge and prepares the upper.
Upper Sides (Color A if changing)
Rounds 1–2: sc around
This builds height before toe shaping.
Toe Shaping
Now you’ll shape the toe by decreasing across the front third of the shoe.
Round toe-shape 1: sc around until you reach the front center
Work a set of decreases across the toe area: for example, (sc 2, dec) repeat 4–6 times depending on size
Then sc the rest of the round to the end
Round toe-shape 2: sc around, repeating the same decrease rhythm but with fewer repeats
Example: (sc 1, dec) repeat 3–5 times across the toe, then sc to end
Round toe-shape 3 (optional for snug toe): sc around with a small set of decreases at the very front
Example: (dec, sc 2) repeat 2–3 times, then sc to end
Your shoe opening should now look like a rounded “U” at the top, like a Mary Jane front.
Ankle Cuff
Rounds next: sc around for 2–3 rounds to form the cuff height
If you want a taller ankle, add one more round. For a lower profile Mary Jane, keep it shorter.
Strap Anchors (Creating the Tie Points)
There are two common ways to do the tie. Choose the one you prefer.
Option 1: Built-in strap holes (simple and tidy)
Round: sc around until you reach the side of the shoe
ch 2, sk 2 sts (creates a small hole), sc in next sts across the front opening
Repeat on the other side: ch 2, sk 2 sts, sc to end
Next round: sc around, working sc into each ch space
Option 2: Sew-on straps (easiest to adjust)
Skip the strap-hole round and instead crochet two straps and sew them to the sides.
Straps (Make 2, Color A)
Ch 45–60 depending on desired bow length and pom-pom placement. For newborn, 45 is often enough. For 6–12 months, 55–60 looks balanced.
Row 1: sl st back down the chain to make a thicker cord, or sc back down for a flatter strap
Fasten off leaving a sewing tail.
Attach one strap to each side of the shoe opening where you want the tie to cross. Make sure both straps are placed evenly.
Pom-Poms (Make 4)
You’ll attach one pom-pom to each strap end.
Quick pom-pom method:
Wrap yarn around a fork 40–70 times depending on yarn thickness
Tie tightly in the center
Slide off, cut both sides, trim into a neat ball
Leave long tails for sewing
Sew one pom-pom to each strap end securely. Double knot and weave tails back into the strap.
Optional Toe Embroidery
To mimic a delicate stitched motif on the toe:
Use embroidery thread in a subtle gold/beige
Stitch a small “X” or cross stitch pattern centered on the toe
Keep stitches small and avoid pulling too tight so the fabric doesn’t pucker
Second Shoe
Repeat the full pattern, counting rows carefully so both shoes match.
Common Mistakes and How to Avoid Them#
Shoes fall off easily
Make the ankle cuff slightly taller
Use the strap-hole method so the tie sits snug across the foot
Reduce the opening by adding one extra toe shaping round with decreases
Sole curls or ripples
If it curls upward, you likely need more increases at the toe/heel curves
If it ripples, you likely added too many increases
Keep increases mostly at the curve ends, not along the long sides
Toe looks pointy instead of rounded
Use fewer decreases per round and spread them evenly
Avoid stacking all decreases right at the center stitch
Left and right shoes don’t match
Write down your exact round counts
Use stitch markers at toe center and heel center for consistency
Count your decrease repeats carefully
Pom-poms feel loose
Sew through the pom-pom center multiple times
Tie the pom-pom center string to the strap end before sewing
Use a strong strand for attaching (yarn doubled or embroidery floss)
Expert Tips for Better Results#
Use a slightly smaller hook for the sole and a slightly larger hook for the upper if you want the sole firmer and the upper softer.
For a more structured “shoe” look, add one extra BLO round in tan as a visible edge, then continue in cream.
To make the inside more comfortable, weave ends along the sides, not across the toe where little toes press.
If you want extra grip, dot the bottom with non-slip fabric paint once finished and fully dry.
For gift sets, crochet a matching baby headband with a small bow in the same cream yarn.
Variations and Customization Ideas#
Classic ballet flat version: skip the ankle cuff rounds and make a shorter opening, then add a small bow without ties.
Winter cozy version: add 3–5 extra cuff rounds to make a mini boot.
Two-tone chic: cream upper with blush straps and blush pom-poms.
Boy-friendly neutral: oatmeal upper with navy straps and no pom-poms (use knot ends instead).
No pom-poms: replace pom-poms with small tassels or simple knotted ends.
Leather-look sole: sew a thin suede oval to the bottom for durability (great for photo props).
Personalized gift: embroider initials on the toe with matching thread.
Benefits of This Crochet Project#
It’s a fast, satisfying crochet pattern with a high “aww” factor.
The tie straps help the shoes stay on better than many basic bootie styles.
Great stash-buster because it uses small amounts of yarn.
Perfect for baby shower gifts, newborn photos, and keepsake boxes.
Easy to customize colors, ties, and embellishments.
Beginner-friendly construction that teaches useful shaping skills.
Internal Linking Suggestions#
How to Crochet an Oval Sole for Baby Booties
Beginner Guide to Crochet Gauge and Sizing (Simple Version)
How to Make Pom-Poms That Don’t Fall Apart
Best Yarn for Baby Crochet Projects (Soft and Washable Picks)
Easy Crochet Baby Hat Pattern to Match
How to Weave in Ends Neatly for Baby Items
Non-Slip Soles for Crochet Slippers: Safe Options
FAQ#
Are these baby shoes suitable for beginners?
Yes. This is an easy crochet pattern using basic stitches and simple shaping. The strap and pom-poms are optional, but they make the shoes more secure and decorative.
What yarn is best for baby crochet shoes?
Soft, washable yarn is best. Acrylic baby yarn is practical, and cotton blends give crisp stitches and a neat finish.
How do I choose the right size?
Measure the baby’s foot if possible. If not, crochet the sole to a standard sole length (like 3.75 inches for 0–3 months) and adjust the number of sole rounds until you hit that measurement.
How can I make the shoes stay on better?
Add a slightly taller cuff and use the tie straps snugly across the top of the foot. You can also add one extra toe shaping round to reduce the opening.
Can I make these baby-safe?
Yes. Avoid small detachable decorations and secure pom-poms very firmly, or skip them altogether. For very young babies, simpler tie ends may be safer than pom-poms depending on your comfort level and supervision.
Why is my sole curling?
Curling usually means not enough increases at the toe and heel curves. Add increases only at the ends, not along the sides, and check that your oval stays flat after each round.
Can I add a sturdier sole?
Yes. You can sew a thin suede or felt sole to the bottom (stitched, not glued), or use non-slip fabric paint dots for gentle traction.
Conclusion#
These baby Mary Jane crochet shoes are the kind of project that looks beautifully finished but is still totally doable at home. The rounded toe and soft cuff keep them comfortable, while the tie straps and pom-poms add that boutique, gift-ready charm. Once you make one pair, it’s easy to picture a whole set in different colors for every season.
If you tell me the baby’s age (or foot length in inches/cm) and your yarn weight (DK or worsted), I can recommend the exact starting chain and a simple “sole round plan” so you land on the right size confidently.