


Introduction#
If you love the breezy look of espadrille wedges but wish they had more personality, crochet wedge sandals are the perfect DIY crochet project. They’re lightweight, summery, and surprisingly practical when you build them the smart way: start with a comfortable ready-made wedge sole, then crochet a decorative upper that’s reinforced in all the right places so it actually holds up to walking.
Explore more beginner tops crochet patterns in our pattern library.
This crochet pattern tutorial focuses on a classic boho wedge style with a wide toe/forefoot panel, airy lace texture, pops of color, and a secure ankle strap system. The design looks detailed, but it’s built from repeatable sections you can measure to your own foot, so you don’t need complicated shoe math. You’ll crochet the upper pieces, fit them directly on your foot, assemble the straps, then attach everything to the soles with sturdy stitching (and optional glue reinforcement).
If you’ve been wanting a “wow” project that’s still approachable, this is a great step into wearable crochet beyond hats and bags.
Detailed Description of the Crochet Pattern#
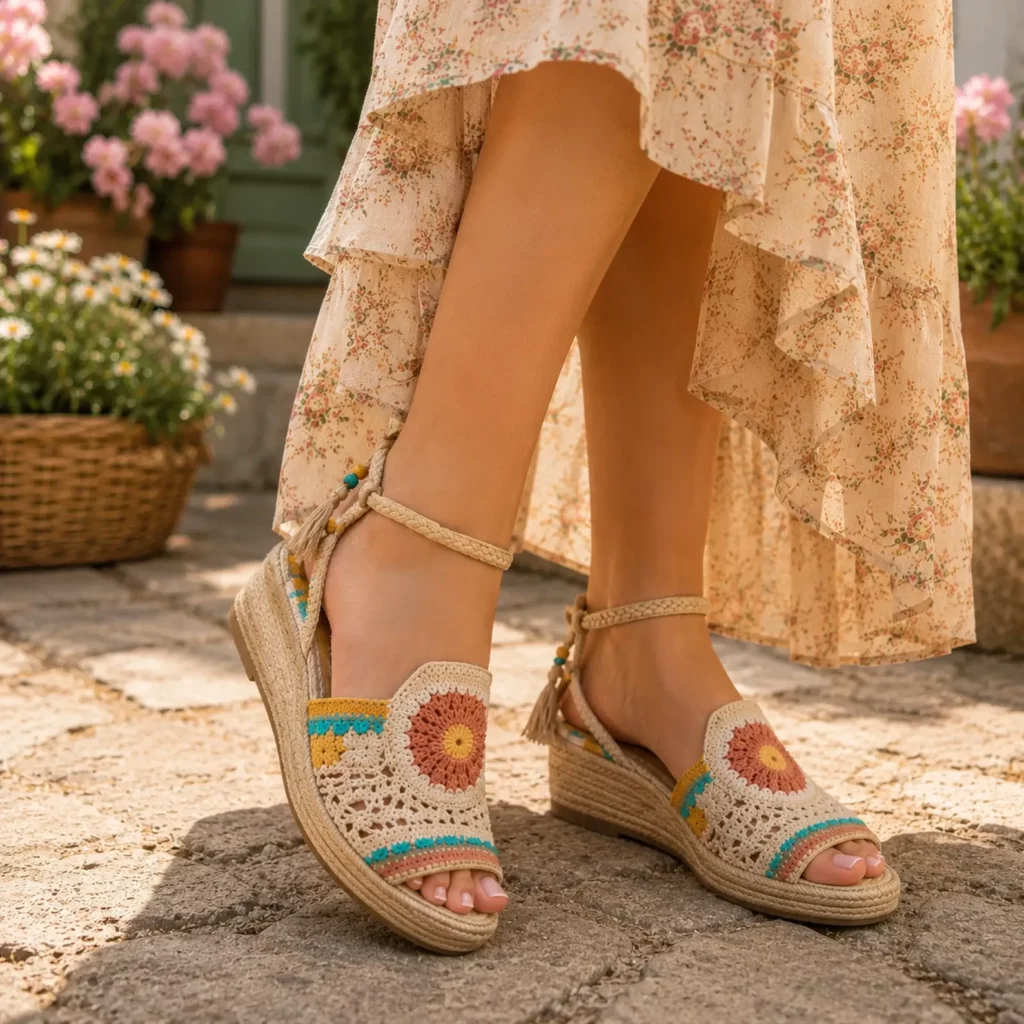
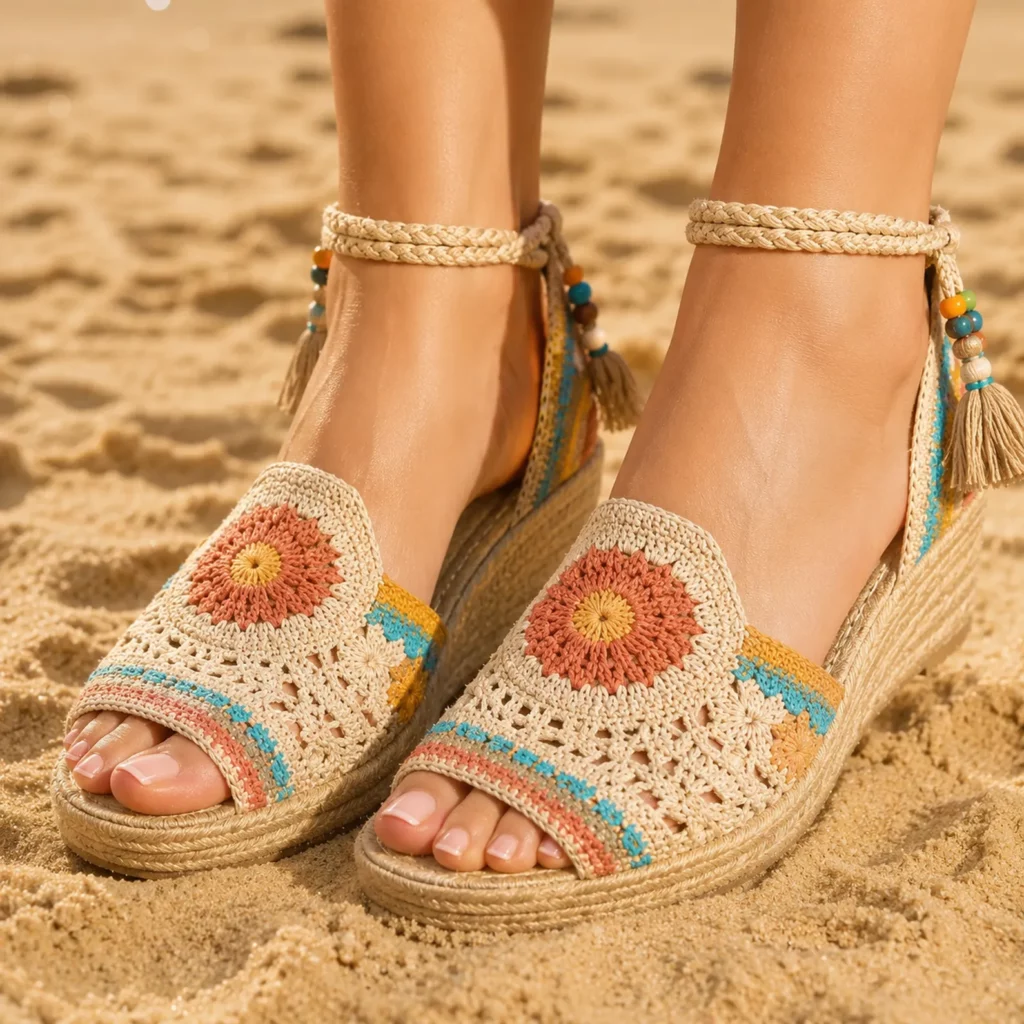
This crochet pattern creates a wedge sandal upper made from a structured front panel plus supportive straps. The look is boho-lace with floral accents and colorful bands, finished with an ankle wrap that keeps the shoe secure.
Parts you’ll make
- Forefoot upper panel: a wide lace panel that covers the top of the foot near the toes (open-toe)
- Accent motif area: a floral/mandala-style section near the top edge of the forefoot panel for a statement look
- Side columns: stronger vertical bands at the sides that help the upper keep its shape and connect to the back straps
- Back heel straps: two angled straps that cross or frame the heel and connect up toward the ankle band
- Ankle band: a wraparound strap with a closure (buckle, button, or ties)
- Optional tassel charm: decorative but can also hide strap joins
How it’s worn and why it works
- The forefoot panel anchors the sandal at the front
- Side columns prevent the upper from stretching outward
- Heel/back straps prevent sliding and keep your foot seated on the wedge
- The ankle band locks the whole structure in place so you can actually walk comfortably
The “secret” to crochet sandals that last is reinforcement: cotton yarn, snug tension, firm edging, and strong attachment to the sole.
Skill Level Explanation#
Skill Level: Confident Beginner
You’ll do great if you already know
- Chain (ch), slip stitch (sl st), single crochet (sc)
- Half double crochet (hdc) and double crochet (dc)
- Working in rows
- Counting repeats in a lace pattern
- Basic hand sewing with a tapestry needle
Newer skills you’ll learn or practice
- Measuring and adjusting straps to your foot
- Stabilizing lace with edging so it doesn’t stretch
- Attaching crochet fabric to a shoe sole cleanly
- Building a comfortable ankle closure with either hardware or crochet ties
This is an “easy crochet pattern” in stitches, but it’s a “patient” project in construction. The fit test step is what makes the final result feel professional.
Materials Needed#
Yarn
For sandals, choose strength over softness. Cotton is your best friend.
Best yarn types
- 100% cotton or cotton-linen blend (strong, breathable, low-stretch)
- Mercerized cotton (very crisp stitch definition, great for lace)
- Cotton with a tiny bit of nylon (extra durable, still stable)
Recommended yarn weight
- DK (Category 3) for delicate lace and more refined look
- Worsted (Category 4) for sturdier straps and faster progress
Color suggestions
- Main neutral: cream, beige, or sand for the lace upper
- Accent colors: coral/peach, teal, mustard/yellow (small amounts go a long way)
- Optional: matching neutral for reinforcement rows so the structure looks seamless
Yardage estimate (upper only, not including soles)
- DK: 150–250 yards (140–230 m) depending on strap width and size
- Worsted: 120–200 yards (110–180 m)
Hook
Use a smaller hook than you might normally use for the yarn so the fabric is firm.
Typical hook sizes
- DK cotton: 3.0–3.5 mm
- Worsted cotton: 3.5–4.5 mm
If your lace looks too floppy, go down a hook size.
Soles and hardware
Sole options (choose one)
- Wedge espadrille soles with side holes (easiest for stitching)
- Rope-wrapped wedge soles (you stitch through the rope edge)
- Upcycled wedge sandals (remove old straps and reuse the base)
Closure options
- Small buckle + ring set
- Button closure
- Tie straps (no hardware)
Notions
- Stitch markers
- Tapestry needle
- Scissors
- Measuring tape
- Strong sewing thread or waxed thread (recommended for attachment)
- Optional shoe glue for reinforcement
- Optional awl or leather punch (if soles have no holes)
Stitches & Techniques Explained#
Common Abbreviations
- ch = chain
- sl st = slip stitch
- sc = single crochet
- hdc = half double crochet
- dc = double crochet
- tr = treble crochet
- sp = space
- ( ) = repeat
- = stitch count
Lace structure that stays wearable
A common sandal mistake is using lace that’s too open and stretchy. This pattern balances “airy” with “secure” by using
- dc + chain spaces for the decorative look
- solid rows (sc or hdc) at the top and bottom edges to stabilize
- side columns in denser stitch to prevent spreading
Reinforcement edging
This is the difference between “pretty for photos” and “actually wearable.”
Best reinforcement methods
- One round of sc around every strap edge
- Optional slip stitch along top edges for extra firmness
- Optional surface slip stitch lines to visually reinforce and reduce stretch
Measuring for perfect fit
Instead of guessing shoe size charts, measure your foot directly.
Key measurements
- Forefoot width across the top where the toe panel will sit
- Toe panel depth (how far back you want the upper to go)
- Instep height (some feet need taller panels)
- Ankle circumference where the strap will sit comfortably
- Heel strap distance from side of foot around the back of heel

Step-by-Step Instructions#
Finished fit notes
Cotton relaxes slightly with wear. Your straps should feel snug but not tight when first finished. If it feels loose from the start, it will likely get looser.
Notes before you start
- Make one forefoot panel and test it on your foot before making the second
- Use stitch markers to mirror placement on both sandals
- Keep a small notebook of your row counts and strap lengths so the pair matches
- Reinforce edges as you go rather than waiting until the end
Forefoot Upper Panel (Make 2)
This is the wide lace panel across the toes and forefoot.
Sizing goal
- The panel should cover the toes comfortably while leaving the toe tips free
- It should sit on the flatter forefoot area, not far back on the arch
Foundation chain
- Start with ch 28 for an average adult width in DK cotton
- For wider feet, increase in multiples of 2
- For narrower feet, decrease in multiples of 2
Your chain should measure approximately the width across your forefoot.
Row 1
- Dc in 4th ch from hook
- Dc across
- Ch 2, turn
Row 2 (lace windows)
- Dc in first stitch
- Ch 1, skip 1, dc in next
- Repeat across
- Ch 2, turn
Row 3 (stabilizing)
- Dc in each dc and dc in each ch-1 space across
- Ch 2, turn
Rows 4–7
- Repeat Row 2 and Row 3 until the panel depth feels right
A good starting depth is 2.5–3.5 inches (6.5–9 cm), depending on instep height.
Bottom edging (important)
- Work 1 row of sc along the bottom edge of the panel
This is the edge you’ll attach to the sole, so you want it firm.
Top edging (important)
- Work 1 row of sc along the top edge
- Optional: add 1 row of sl st for extra structure
Side edging
- Work sc evenly along each side edge so you have a clean surface to sew side columns and straps
Fasten off, weave in ends.
Decorative Motif Panel (Optional but gives the “wow” look)
If you want a statement “sunburst” or floral medallion look near the top of the forefoot panel, crochet a half-circle motif and stitch it onto the panel.
Half sunburst motif
Round 1: MR, ch 2, 12 dc in ring, join
Round 2: ch 2, 2 dc in each stitch around, join
Round 3: ch 3, (dc, ch 1, dc) in same stitch, skip 1, repeat around, join
Turn it into a half motif by folding and stitching to the top-center of the forefoot panel, or crochet only half by working rows back and forth in a fan pattern.
Motif placement tip
Place the motif near the top edge of the forefoot panel so it looks centered on the foot and doesn’t interfere with toe movement.
Side Columns (Make 4)
These strengthen the sides and create a clean place to attach heel straps.
Sizing goal
- Each column should match the depth of your forefoot panel
- Width is typically 1–1.5 inches (2.5–4 cm)
Ch 8 (adjust for width)
Row 1: sc in 2nd ch from hook, sc across, ch 1, turn
Row 2: sc blo across, ch 1, turn
Repeat Row 2 until the column matches the side depth of the forefoot panel.
Edge with sc around if desired for extra firmness.
Sew one column to each side of each forefoot panel. These sit like “side frames.”
Heel and Back Straps (Make 4)
These run from the side columns around the heel and up toward the ankle band.
Sizing goal
- Strap should reach from side of forefoot panel to the back of heel and up slightly
- It should cradle the heel without rubbing
Strap base
Ch 40 to start (adjust after measuring on your foot)
Row 1: sc in 2nd ch from hook, sc across, ch 1, turn
Row 2: sc blo across, ch 1, turn
Repeat Row 2 for 3–6 rows depending on how wide you want the strap.
Reinforcement
- Work sc around the strap edges
- Optional sl st along the top edge
Fasten off with long tail for sewing.
Fit tip
Pin straps in place on your foot before sewing permanently. The most comfortable angle usually slopes slightly upward as it approaches the ankle.
Ankle Band (Make 2)
This wraps around the ankle and is the main security feature.
Sizing goal
- Ankle circumference measurement plus closure allowance
- Snug enough to hold, comfortable enough to wear
Foundation
Ch until it measures your ankle circumference plus 1–2 inches (2.5–5 cm) depending on closure type.
Row 1: dc in 4th ch from hook, dc across, ch 2, turn
Row 2: dc in first stitch, ch 1, skip 1, dc in next, repeat across, ch 2, turn
Row 3: dc in each dc and dc in each ch-1 space across, ch 2, turn
Repeat Rows 2–3 until band is about 1–1.25 inches (2.5–3 cm) wide.
Edging
- Work sc around the entire band
- Add an extra round of sl st on the edge that will hold the closure to reduce stretch
Closure options
Buckle closure
- Make a small loop at one end: ch 10–14 depending on buckle, sl st to band edge
- Reinforce with sc around the loop
- On the other end, sew buckle hardware securely
Button closure
- Create a button loop with ch 8–12 and reinforce with sc
- Sew button to opposite end
Tie closure
- Add ties by chaining 50–80 at each end and working sc back down the chain
This is beginner-friendly and adjustable.
Assembly of the Crochet Upper
Do this step before attaching to soles.
Attach heel straps to side columns
- Sew the lower end of each strap to the side column near the bottom edge
- Bring straps around the heel and attach upper ends to the ankle band area
Attach ankle band
- Position it above the ankle bone for comfort
- Sew strap ends securely to the ankle band sides
Fit test
- Put the assembled upper on your foot
- Check toe panel comfort, heel support, and ankle closure snugness
- Adjust strap length now if needed
Reinforce stress points
Add extra stitches at
- Side column to forefoot panel joins
- Strap to ankle band joins
- Strap to side column joins
These are the areas that take the most pulling when you walk.
Attaching the Upper to Wedge Soles#
This is the step that turns crochet into real sandals.
Best attachment methods
Soles with holes
- Stitch the bottom edge of the forefoot panel to the sole using waxed thread or strong yarn
- Use whip stitch through each hole or every other hole for a clean line
- Keep tension snug but not tight enough to distort the panel
Rope-wrapped espadrille wedges
- Stitch through the rope edge (not the hard sole)
- Take small stitches and keep them evenly spaced
- If needed, use an awl to help the needle pass through
Glue plus stitch reinforcement
- Apply a thin layer of shoe glue under the crochet edges
- Press firmly, let set
- Then stitch for long-term strength
Glue alone usually won’t hold up to real wear, but glue plus stitching is excellent.
Where to attach
- Forefoot panel bottom edge: attach along the front portion of the sole
- Side columns: tack down at the lower edges to prevent shifting
- Heel straps: anchor where they meet the sole near the heel area if your design needs extra stability
Comfort tip
If any crochet edge rubs, sew a thin strip of soft ribbon or bias tape to the inside edge that touches skin. It makes a huge difference.
Common Mistakes and How to Avoid Them#
Straps stretch out after a few wears
- Use cotton yarn and a smaller hook
- Add sc and sl st reinforcement edges
- Make the fit slightly snug at first
Toe panel feels too tight
- Add 2–4 chains to the foundation
- Use one fewer reinforcement row on the top edge
- Consider switching from sc edging to hdc edging for a bit more give
Toe panel slides forward
- Add stronger side columns
- Shorten the heel strap length slightly
- Make sure the heel strap angle pulls the foot backward, not upward only
Heel straps rub
- Move ankle band slightly higher
- Widen heel straps by adding a few rows
- Add a soft lining strip on the inside
Lace looks messy or uneven
- Count repeats carefully
- Block panels lightly before assembly
- Use stitch markers on row ends to keep edges straight
Upper looks floppy
- Add one more sc edging round
- Use a smaller hook
- Add a hidden row of slip stitches along the top edge to stiffen it
Expert Tips for Better Results#
- Use mercerized cotton for crisp lace that stays pretty longer.
- Keep all reinforcement stitches in the same color as your main neutral so the structure looks intentional, not bulky.
- Before attaching to soles, lightly steam-block the panels so lace lies flat.
- Stitch attachment points twice. Sandals experience repeated pulling, so double-stitching prevents failures.
- If you want the upper to feel “store-bought,” add a thin insole liner or cushioned insert under the footbed.
Variations and Customization Ideas#
- Add more floral motifs along the forefoot panel for a more dramatic boho look
- Replace buckle with ties for a more relaxed, adjustable style
- Make a barefoot sandal version by skipping the sole attachment and adding a toe loop
- Change the color bands to match your wardrobe, or use a single neutral for minimalist elegance
- Add beads to the ankle strap lace holes for a dressy vacation vibe (choose smooth beads so they don’t scratch)
- Turn it into a closed-heel look by adding an extra strap across the back of the heel
Benefits of This Crochet Project#
- Looks high-end and unique while using beginner-friendly stitches
- Custom fit for your foot and ankle
- Great way to use small amounts of accent colors
- Breathable lace upper perfect for warm weather
- Strong skill builder for measuring, reinforcement, and wearable construction
- A crochet pattern you can repeat in different colors for multiple pairs
Internal Linking Suggestions#
- How to Choose the Best Yarn for Crochet Footwear
- Easy Crochet Lace Stitch Tutorial
- How to Reinforce Crochet Straps So They Don’t Stretch
- How to Attach Crochet to Soles and Espadrilles
- Beginner Guide to Measuring for Crochet Wearables
FAQ#
Are crochet wedge sandals comfortable for walking?
Yes, when you start with a comfortable wedge sole and build a snug, reinforced upper. The ankle band and heel straps are what make them feel secure.
What yarn is best for crochet sandals?
Cotton or cotton-blend yarn is best because it’s strong, breathable, and holds shape better than stretchy fibers.
How do I keep crochet straps from stretching?
Use a smaller hook, add sc edging, reinforce with slip stitch along top edges, and double-stitch stress points during assembly.
Can I make these without buckles?
Yes. Tie straps and button loops are both great alternatives and are often easier for beginners.
How do I attach crochet to soles if there are no holes?
You can punch holes with an awl, stitch through a rope-wrapped edge, or use shoe glue plus stitching. For best durability, include stitching.
Can I wash crochet sandals?
Spot cleaning is best. Many soles shouldn’t be soaked. If your soles are washable, hand wash gently and air dry away from heat.
Conclusion#
Crochet wedge sandals are the perfect blend of pretty and practical: airy lace for summer style, strong straps for security, and a comfortable wedge base that makes them wearable for real life. This crochet pattern keeps the stitches simple and focuses on smart construction, reinforcement, and fit testing so your finished pair looks polished and stays on your feet.
If you tell me your foot length, forefoot width, and ankle circumference, I can suggest exact starting chain counts for the forefoot panel and ankle band so your sandals fit perfectly from the very first try.


